

Unit Schedule Page
A unit supervisor is identified as such on the unit record in Sparkrock 2016. A unit may have multiple supervisors, any of whom can perform supervisor actions for the unit.
The Unit Schedule page is the main access point for supervisory functions. This page is accessed from the main menu bar. The Unit Schedule page is available to all employees but has more controls and capabilities when the logged-in employee is designated as a unit supervisor for the selected unit.
To view the schedule for a unit:
- Select a specific unit from the location drop-down list. Any unit to which you are assigned (regardless of your supervisory status) will appear in the unit selector drop-down.
- The selected unit will be used to obtain the list of Pay Cycles for that unit, which will populate the pay cycle selection drop-down.

Note: Different units may have different pay cycles, so the drop-down selector is repopulated whenever you change units.
- The unit schedule page will display all published shifts for the unit, to a maximum of one year from the current day. It will also allow up to two previous pay cycles to be examined.
Note: Shifts which are created from templates in Sparkrock 2016 will have the status “Open.” Such shifts are not displayed in Employee Center. They must be published from Sparkrock 2016 by the Schedule Administrator. If there appear to be no shifts associated with a pay cycle, it is likely that the Schedule Administrator has not yet created or published the set of shifts for this pay cycle.
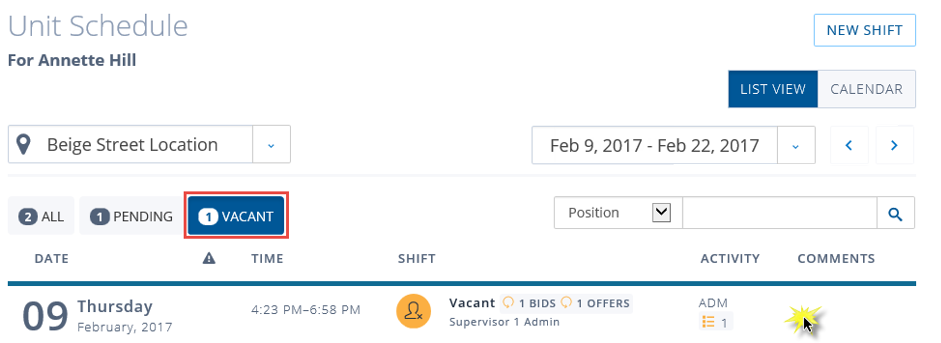
- There are three filter tabs on the Unit Schedule page: All, Pending, and Vacant. All shows the complete set of published shifts for the pay cycle. Pending shows the set of shifts which require supervisor action. This includes shifts with open employee change requests, and vacant shifts which need to be filled.
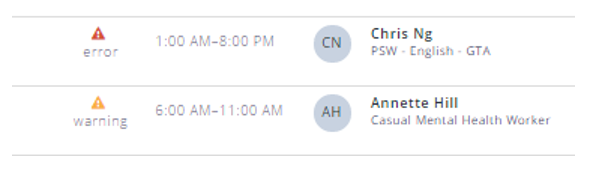
- If there are warnings or errors related to a shift, those are indicated so that you can review them and correct them if required.
Updating the Unit Schedule
Creating New Shifts
A unit supervisor can create new shifts, when required.
To create new shifts:
- Click New Shift on the Unit Schedule list view.
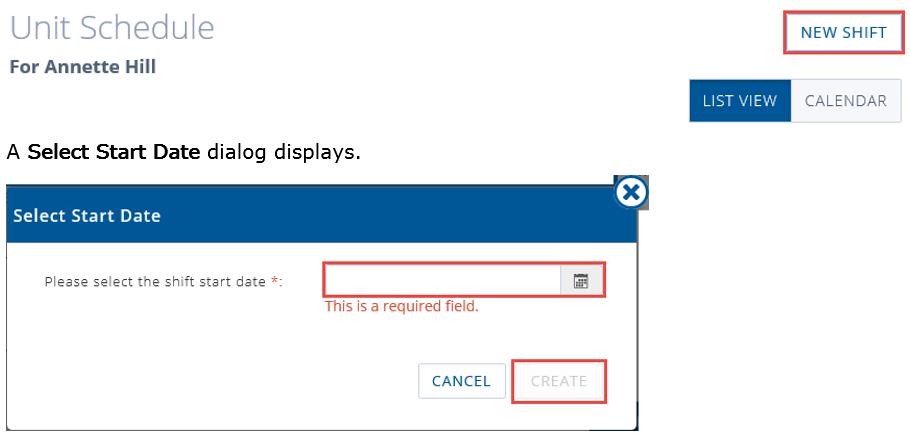
- Set the Shift Date, which must be somewhere within the currently selected Pay Cycle, using the standard date format for your locale, e.g. MM/DD/YYYY. You can also use the calendar picker to select the shift start date.
- The Shift Detail page opens so that you can enter the details for the new shift.
Note: Once set, the shift date cannot be changed until all required fields are populated.
The start and end times will be set to the nearest hour when you create the shift. Other shift details will be assigned default values, based on the unit settings.
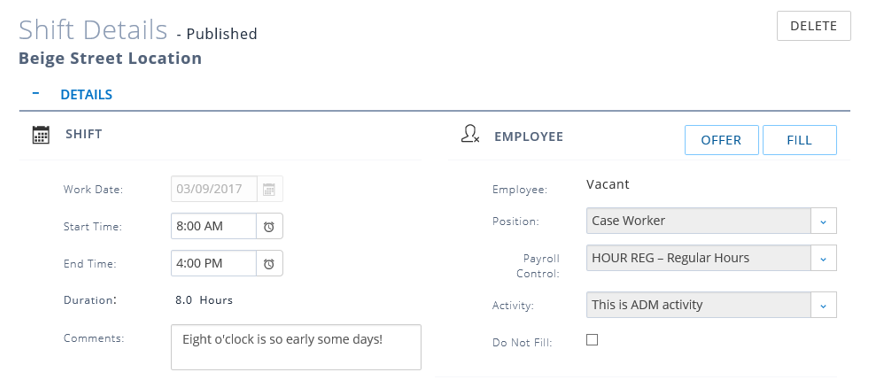
- Click in the Start Time field and the End Time field to select the start and end times. Once a non-zero shift duration is established, a single default activity will be created to match the shift duration.
- Select the Position from the adjacent field. The Payroll Control auto fills, but may be editable from the drop down.
Note: The Payroll Control field may or may not be editable, depending on the permissions configured in Sparkrock 2016.
New shifts are created as vacant shifts. You have the option to offer or directly fill the shift when you are creating it, or you can leave it vacant if required.
New shifts created in Employee Center are automatically granted the Published status, so they will be visible when you return to the Unit Schedule list view. If your unit allows shift bidding, employees will be able to bid on the new shift immediately.
Deleting Shifts
You can delete a shift from the Shift Detail page, if required.
To delete a shift:
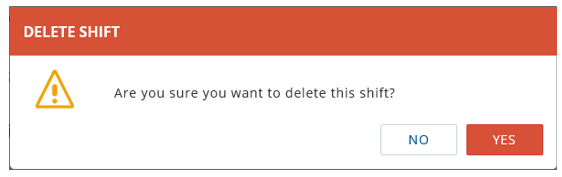
- Click Delete at the top of Shift Details.

- You will be prompted to confirm this action. Click Yes or No accordingly.
Once confirmed you will be returned to the Unit Schedule page. The deleted shift no longer appears in the list.
Changing Shift Details
Unit supervisors can update most details of any published (or confirmed) shift. The only exception is the Payroll Control field, which may not be editable, depending on the permissions configured in Sparkrock 2016.
To change the details of a shift:
- Navigate to the Shift Details page of the shift you wish to change.
- Make necessary changes, the shift details auto save as you work.
Changing Activities
Activities are used to subdivide a shift into smaller segments when different billing and/or payroll codes are needed. For example, a shift may include work with different clients which needs to be captured for billing purposes, or a shift may include some sleep hours which are paid at a different rate.
The following are basic guidelines for shift activities:
- By default, each shift has a single activity and payroll control code, which is set by the Schedule Administrator. Activities can be changed or added by assigned employees or by unit supervisors.
Note: Activity changes made by employees are made directly on the shift record. They do not follow the change request approval process that is used to change the shift start and end times.
- Shifts must have at least one activity, and the total duration of all activities on an assigned shift must match the overall shift duration. Activity times cannot overlap, and there cannot be any gaps in the shift (the entire shift duration must consist of scheduled activities.)
Note: Activities on a vacant shift are not validated by the application, but if they are incorrect, errors will be indicated when the shift is filled.
Adding an Activity
It is possible to add an activity to a shift. This may be necessary when the time of a shift has different billing controls.
To add an activity:
- Use the Add Activity button at the top of the Activity collapsible section to add a new activity row to the bottom of the activity list.

- The new activity row will be added in Edit mode.
- The start and end times will default to the shift start and end times.
- The activity and the payroll control will default from the values selected on the shift detail header.
- Change the activity and/or payroll control by choosing from the drop-down lists.
Note: If you need to use an activity which is not provided, contact your Sparkrock 2016 administrator or Schedule Administrator.
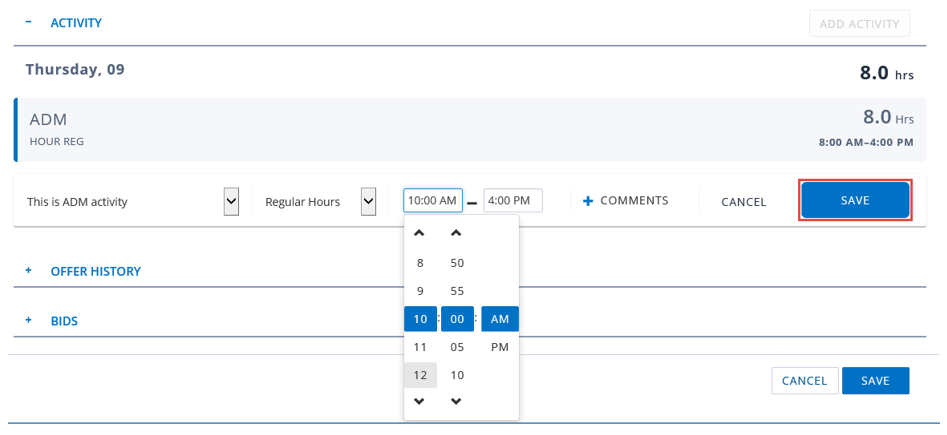
- Clicking the start or end times will provide a time range selection tool, select the time.
- Clicking the Comments button will provide a free-form text entry field.
- Click to save the new activity, or cancel to abandon it. Either action will exit edit mode. Save causes the activity to be added to the shift record, and results in an immediate save of the entire shift detail record, as well as a subsequent validation of the shift. As a result, errors and warnings may appear or disappear in the shift detail header.
Tip: If you try to add a new activity to a filled shift when the total shift duration is already full, the save action will be rejected with the message “Total activity duration could not be greater than shift duration” and the new row will be lost. Before adding a new activity, make sure to reduce the duration of a different activity accordingly. If you forget to do this, you can temporarily save your new activity by setting the start and end times to be equal, so that the duration will be zero. This activity can be saved, and you can then adjust the other activity times, or make a change request to have the shift times altered. If you do the latter, be sure to add a comment explaining that the new activity’s times will need to be updated.
Editing an Activity
- Hover over an activity to expose the Edit control.
- Click Edit to enter edit mode.

- You can only edit one activity at a time, so the controls will not appear when another row is in edit mode. Save or Cancel that row to enable editing of another row.
- Click Cancel or Save, as appropriate, to exit edit mode. Save causes the activity to be added to the shift, and results in an immediate save of the entire shift detail record, as well as a subsequent validation of the shift. Errors and warnings may appear or disappear as a result.
Deleting an Activity
- Hover over an activity to expose the Delete control.
- Click Delete to remove the chosen activity.
Note: The Delete control will not appear when there is only one activity.

Note: You will not be prompted for confirmation when you click Delete. The activity row will be immediately deleted. This action cannot be undone.
Filling Available Shifts
The Unit Schedule page has three filter tabs: All, Pending, and Vacant. All three tabs include the vacant shifts, but the Vacant shows only the set of shifts which need to be filled.
To fill available shifts
- Click the Vacant tab and the list of vacant shifts displays.
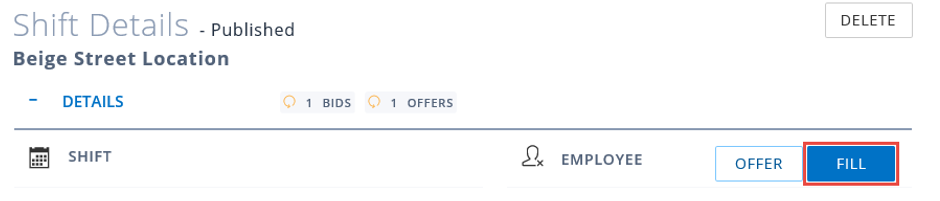
- Click a shift row to open the Shift Detail page.
- Click the Fill button on the right side in the Details collapsible section.
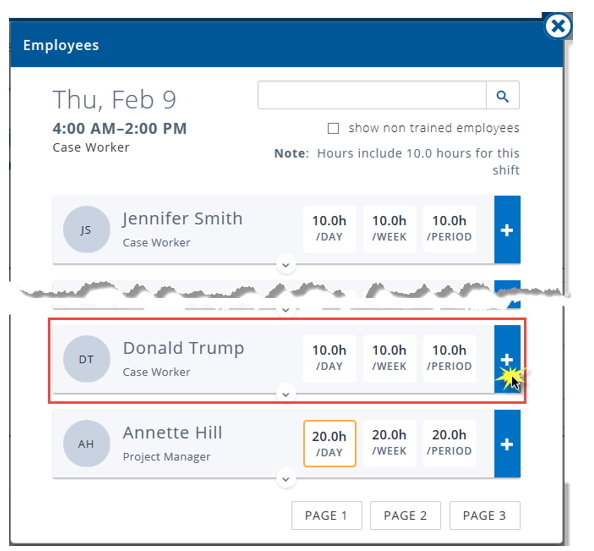
- An Employee selection dialog box will open on top of the Shift Detail page. Here you will be presented with a list of employees who are eligible to fill the shift, up to a maximum of 30 employees (five pages of six each). The list is filtered by position, and has an ALL option to display all employees who have schedulable positions which match the unit's position list. Employees are presented in priority order, based on the seniority policies of your organization. If necessary you can use the search filed to narrow the list to a specific set of employees whose names match the search key.
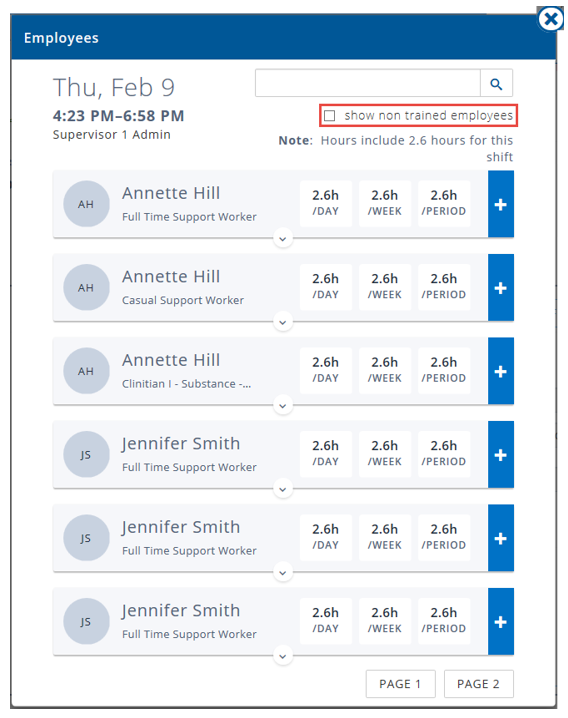
- By default, only employees with unit training are presented. Should you need to select a non-trained employee select the show non trained employees box. Non-trained employee records are highlighted to indicate this status.
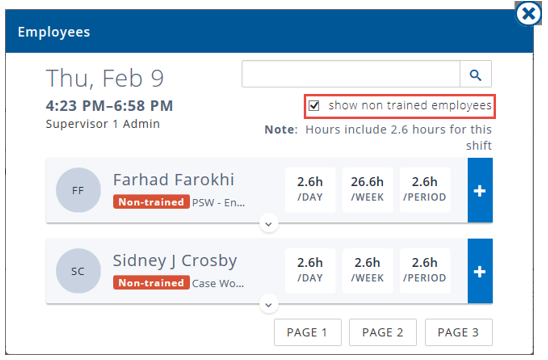
- To help you select the best match, the dialog indicates the total hours for the day, week, and pay period that the employee would have if this shift were added to their schedule. If the added hours would put the employee over the configured maximum, this condition is indicated with a warning color.
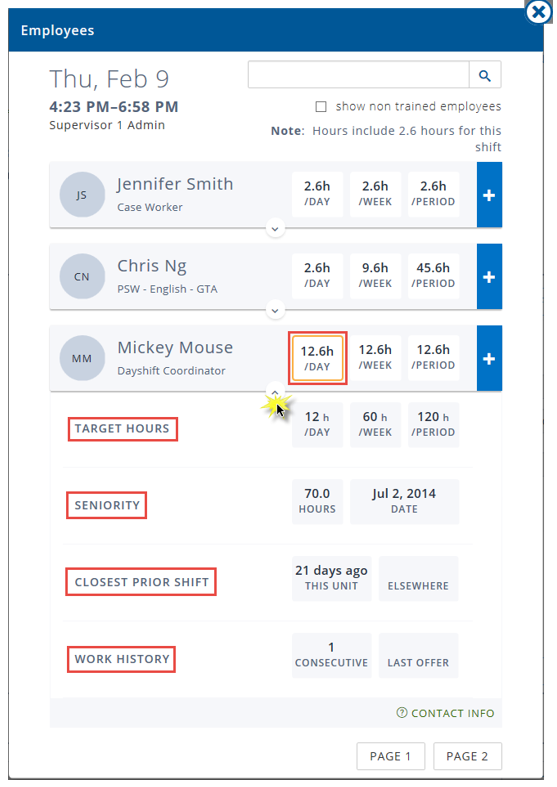
- You can click on any employee row to expand the record to display addition details, including target hours, seniority, closest prior shift, and work history.
- When you have decided who you wish to select, click the + control at the right side of any employee row to select that employee and assign them to the shift.
- The assigned employee is NOT notified about this action by email.
- When an employee is assigned to a shift, detailed validation will be performed by Sparkrock 2016. If this action detects any errors or warnings, those will be reported at the top of the Shift Detail page.
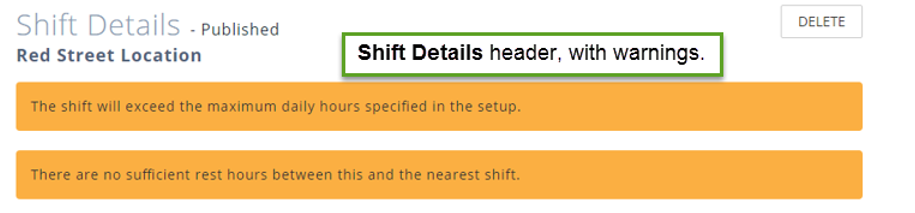
- Best practices are to correct all errors then save the shift. However, it is possible to leave a shift in an error or warning state.
Offering a Shift
You can offer a vacant shift to one or more eligible employees.
To offer a vacant shift:
- From the Vacant tab of the Unit Schedule page, click on the shift you wish to offer.
- The Shift Details page displays. Click the Offer button on the right hand side of the Details collapsible section.
- An employee selection dialog will open on top of the Shift Details page.
- A list of employees who are eligible to fill the shift appears in the Employee dialog.
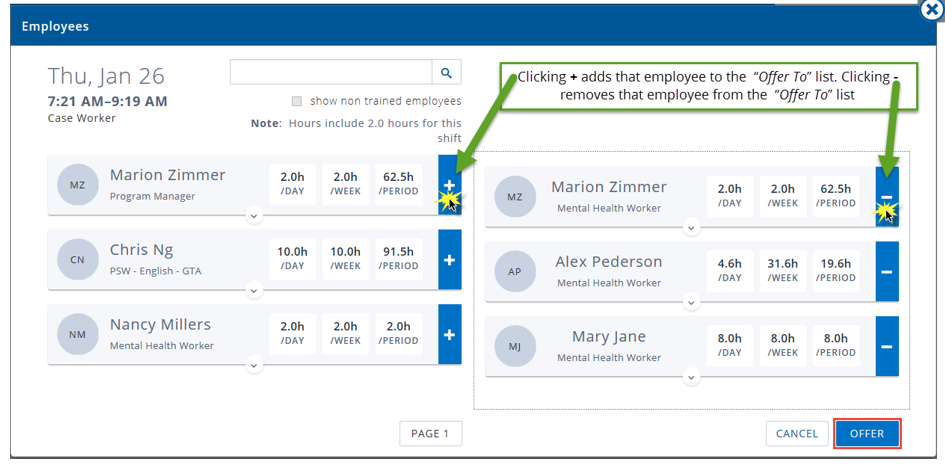
- Click + at the right side of any employee row to assign them to the list on the right (the “Offer To” list).
- You can remove an employee from the list of employees who will be offered the shift by clicking the -. This will remove their record from the “Offer To” list.
- Click Offer at the bottom right of the employee dialog, to send an email to each selected employee. The email messages include a link that allows the employee to connect to Employee Center to review the shift details and to accept or decline the offer.
Note: the email address where the notification will go to is the one configured on the HR Employee Card in the E-Mail field. - If you click Cancel, no offers will be sent.
Reviewing and Accepting Offers and Bids
If the unit settings allow it, employees can bid on available shifts from the My Schedule page or from a Shift Details page. The Unit Schedule page will indicate how many bids (if any) have been placed against each vacant shift.
Depending on the Unit settings, one of two things may happen with offers:
- The first employee to accept the offer may be given the shift, in which case, no one else can accept the offer;
- Employees who accept the offer are effectively bidding on the shift. The unit supervisor will see their acceptance as a bid and can choose from the set of bids against this shift.
Unit supervisors can review the list of bids for a shift from the Shift Detail page and can accept one bid to assign that employee to the shift.
Reviewing Open Offers
To review open offers:
- You can review the list of open offers from the Offer History collapsible section.
- As a unit supervisor, when you open the Shift Detail page, you will see an Offer History accordion below the Activity accordion.
- You may need to scroll down to see it. The Offer History accordion is closed by default; click the title to open it.
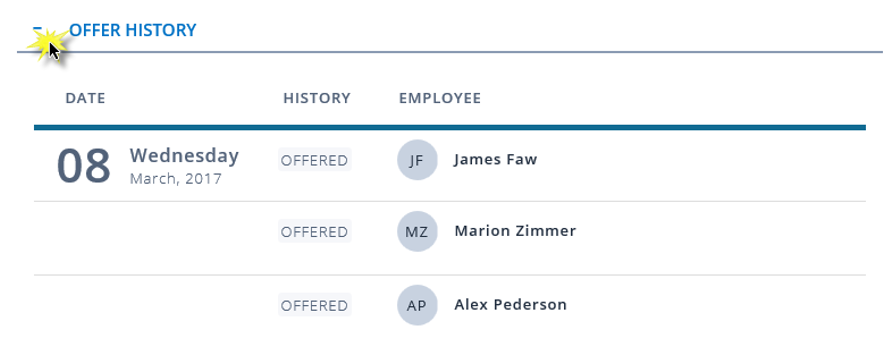
- Alternatively, you can click the offers badge at the top of the Details collapsible section to automatically scroll to the Offers collapsible section and open it.

- The Offers collapsible section has no associated actions; it is simply a chronological list of open offers that you can review.
Reviewing and Accepting Bids
To review and accept a bid:
- You can choose to click the Bids badge at the top of the Details collapsible section to automatically scroll to the Bids collapsible section and open it.
- Alternatively, as a unit supervisor, when you open the Shift Detail page, you will see a Bids collapsible section below the Offers collapsible section. You may need to scroll down to see it.

- Click to expand the Bids collapsible section.
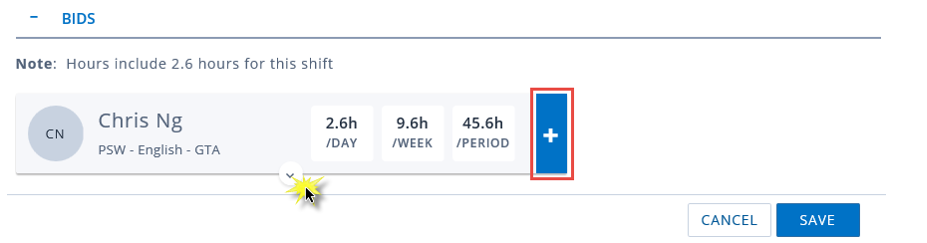
- Like the Employee modal, you can expand an employee bid to display addition details, including current hours, target hours, seniority, and work history.
- To accept one bid to assign that employee to the shift, click the + sign on the right side of any bid record.
- When you accept a bid, the selected employee will receive an email confirming that they have been assigned to the shift, and any other employees who bid will be notified that someone else has been assigned.
Note: the email address where the notification will go to is the one configured on the HR Employee Card in the E-Mail field.
Replacing an Employee
There are multiple reasons a unit supervisor may need to replace and employee who is scheduled for a shift. There are a couple of ways this can be done.
Using the Replace Button
Unit Supervisors can directly replace an assigned employee with another employee.
To replace an employee:
- From the Shift Detail page click Replace on the right hand side of the Details collapsible section.

- An employee selection modal dialog will open on top of the Shift Detail page.
- Click + adjacent the employee with whom you wish to replace the original employee.
Note: The affected employees are NOT notified by email of this action.
The Shift Details page refreshes with the replacement employee updated.
Making a Filled Shift Vacant
Unit supervisors can remove an assigned employee from a shift and make it vacant so it can be offered and/or bid upon. Making a filled shift vacant may be necessary when an employee cannot work the shift, for example due to illness.
To make a shift vacant:
- Navigate to the Shift Detail page of the shift you wish to make vacant.
- Click Make Vacant (on the right hand side of the Details collapsible section).

- The Vacant dialog appears.
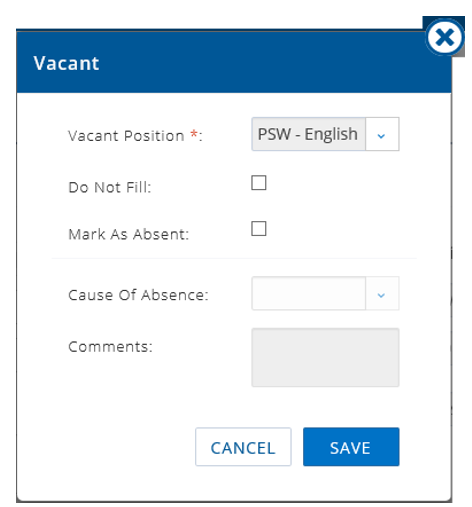
- You can choose a new position for the shift, if applicable.
- You can mark a shift as Do Not Fill if it will be left unassigned.
- If the shift is vacant due to an employee absence, you can place a check mark in the Mark As Absent field.
- The Cause of Absence and Comments fields will become editable. These fields will be used to post an Absence Request to the HR/P module.
- When you press Save, the shift will return to a vacant status (unless it is marked Do Not Fill) and the Shift Detail page will reload so that you can immediately offer or fill the shift.
Reviewing Employee-Requested Changes
The Unit Schedule page has three filter tabs: All, Pending, and Vacant. Pending shows the set of shifts which require supervisor action. This includes shifts with open employee change requests, and vacant shifts which need to be filled. All three tabs show you the number of corresponding shifts. If the count on the Pending tab is higher than the count on the Vacant tab, then you will know that some changes are awaiting your review.
To Review employee requested changes:
- Select the Pending tab to focus on the employee requested changes.
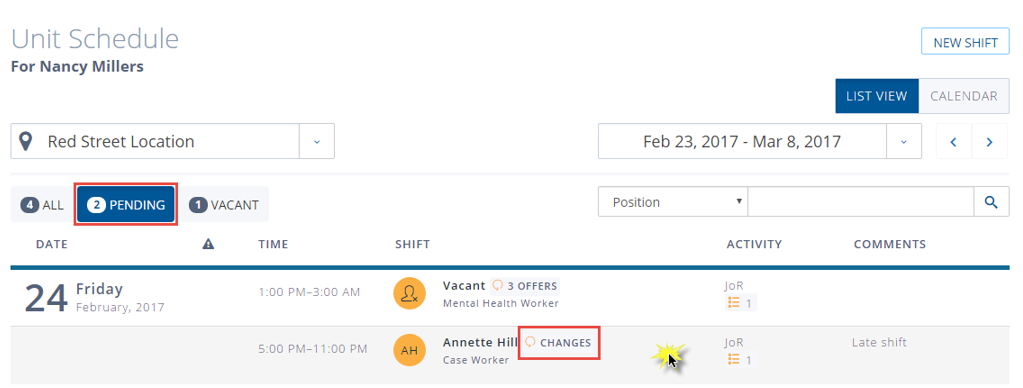
Note: There is no way to eliminate the vacant shifts and see only the pending changes.
- Clicking a shift row that displays the changes badge opens the Shift Detail page in a special mode that allows you to review and approve or deny the employee changes.
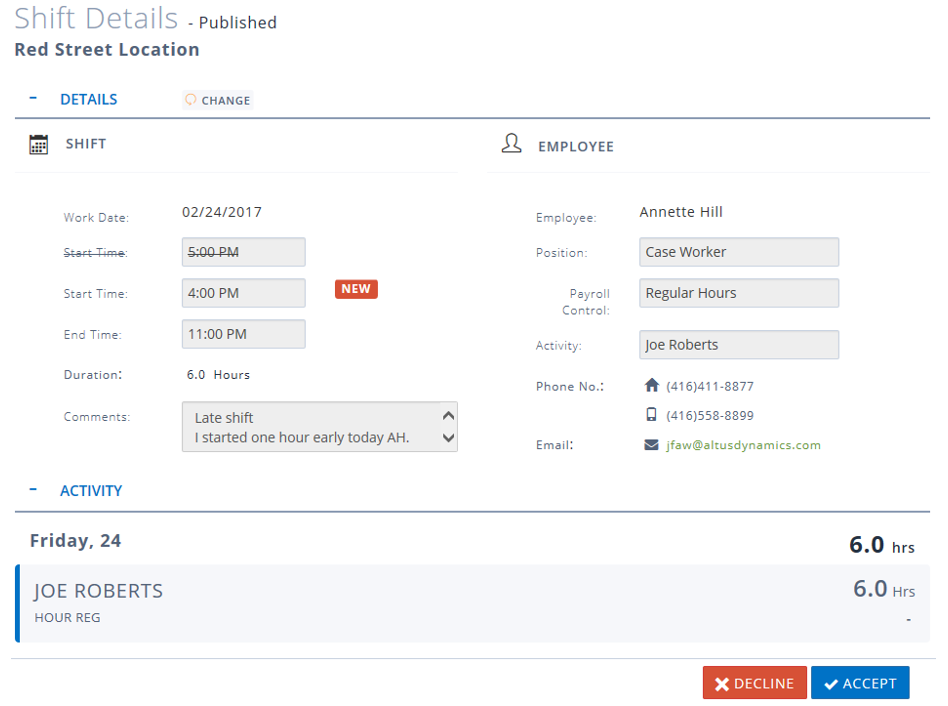
- The only fields that the employee can change are the start and end times. If either or both of those fields have suggested changes, the change will be shown on the page. The associated employee comment, if any, will also show. You can use the workflow buttons at the bottom of the page to Approve or Deny the change.
- When you click Approve, this will update the shift detail record.
- When you click Deny, this will discard the change request.
Note: There is not notification to the employee of either action.
Approving Shifts Worked
Shifts must be approved at the end of each pay cycle to send them to payroll. Not all unit supervisors can approve shifts, as this is controlled separately on the employee record for the unit in NAV.
To approve shifts:
- Select Approve Shifts Worked from the main menu.
- You will need to review the details of each shift for unit(s) where you are a designated shift approver by selecting a unit.
A list of the shifts you need to review for that unit displays.
- Review the list to be sure that the hours and activities are correct. If they are not, you can click a shift to open the Shift Detail page and correct them as needed. If a change is pending, you can click the shift to open the Shift Detail page and accept or deny the change request.
- If you prefer it is possible to review by employee or all at once. Select your preference from the drop down.
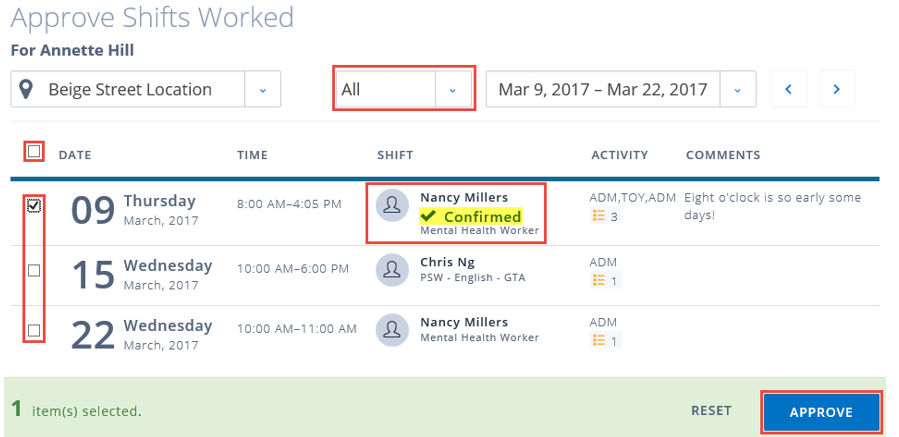
- Ideally, employees will confirm their shifts before you approve them. Confirmed shifts are indicated on the Approve Shifts Worked page with an icon that appears next to the employee name.
- You can select shifts using the check boxes on the left hand side of the list, or clicking the box at the top of the list to approve all, then click Approve.
Note: There is no way to undo this operation.
- Once approved, shifts will be marked as Approved and they will no longer be displayed in Employee Center.