

Overview
Time Clock is a web-based time clocking system that enables employees to track their time and clock in and out of their shifts. Time Clock is part of (and requires) the Employee Scheduling granule.
Employees clock in directly from the Employee Center Welcome page. If an employee is not already clocked in, Employee Center uses the current date and time to look for a match on the employee’s schedule. If a shift exists, a summary of the shift details is presented. The employee verifies these details and then presses a button to clock in. If a shift does not exist, employee can create a new shift and clock in, when their permission settings allow this.
Time Clocking gives Unit Supervisors the ability to monitor employee attendance and compliance in real-time from their Unit Schedule page. If an employee forgets to clock in to their shift, a “Not Clocked In” badge appears on the shift in the Unit Schedule.

By default, the Time Clock rounds the current time to the nearest 15 minute interval, but this can be configured from Schedule Setup.
The following rules apply to clocking in and out of shifts:
- Employees cannot clock in or out of an absent shift.
- Employees can clock in and out of shifts with a pending change request.
- Employees can only clock in and out of Published shifts.
- Shift trades cannot be active. All trades involving a shift must be cancelled before a clock in or out can occur. If the trade has been accepted, but is not yet approved, a Unit Supervisor must approve or deny the trade before any clocking actions can occur.
If an employee needs to leave part way through a shift and return later, they can do so by first splitting the shifts into workable and unworkable parts, and then request an absence for the unworkable part. If the employee clocked out early and needs to return, they will be permitted to split an active shift at the time of their return, so that they can clock into the new shift. For more information, see Splitting Shifts and Requesting Absences.
Clocking In and Out Using Employee Center
Employees clock in and out of their shifts from the Employee Center Welcome page by clicking the Clock button (located in the top right corner of the Welcome page). To clock in and out of your shifts:
If a Shift Exists:
- If Employee Center is able to find a current shift for you, it displays the shift details along with the option to clock in:
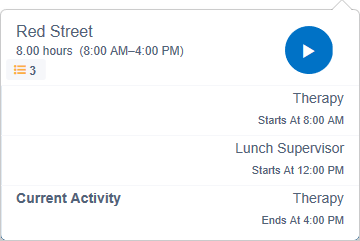
- To clock in to this shift, click the Start button.
- To clock out when your shift is completed, click the Stop button.
If No Shift Exists:
- If no shift exists, you are presented with the option to create a new shift to clock in to:
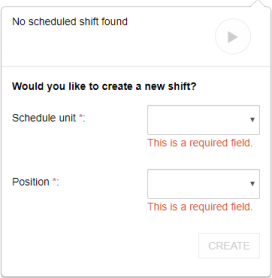
- Employees enter their schedule unit and position and then click Create.

- To clock out when your shift is completed, click the Stop button.
Managing Time Clocking as Unit Supervisor
If an employee forgets to clock in or out of a shift, a Unit Supervisor can manually override this from the Unit Schedule page.
To fix a missed clock in/clock out:
Fixing a Missed Clock-In
- Log in to Employee Center as a Unit Supervisor, and from the Schedule menu click Unit Schedule.
- Locate a shift with the “Not Clocked In” warning message and click the Clock icon
 .
.
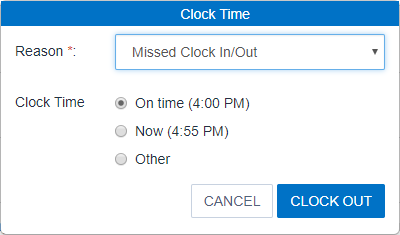
The Clock Time dialog displays. The available options depend on when the shift occurred. - For shifts older than one day, the Unit Supervisor can only provide a reason for the clock in (for example, “Missed Clock In/Out”), and then approve the scheduled shift start time as the approved clock-in time:

- To complete the clock-in process, choose a reason from the Reason drop-down list and then click Clock In.
- For current (today’s) shifts, Unit Supervisors also have the ability to set the clock-in time as well as provide a reason for the employee’s missed clock-in:
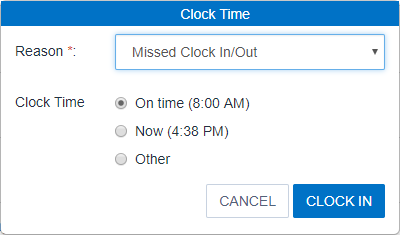
- To complete the clock-in process, choose a reason from the Reason drop-down list and then select the appropriate clock-in time.
Note: Scheduling Reason Codes are unique to your organization. They are created and maintained by the Schedule Administrator in the database.
Fixing a Missed Clock Out
- Log in to Employee Center as a Unit Supervisor, and from the Schedule menu click Unit Schedule.
- Locate a shift with the “Not Clocked Out” warning message and click the Clock icon .
- For shifts older than one day, the Unit Supervisor can only provide a reason for the clock out (for example, “Missed Clock In/Out”), and then approve the scheduled shift end time as the approved clock-out time:
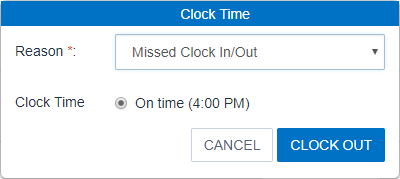
- To complete the clock-out process, choose a reason from the Reason drop-down list and then click Clock Out.
- For current (today’s) shifts, Unit Supervisors also have the ability to set the clock-out time as well as provide a reason for the employee’s missed clock-out:
- To complete the clock-out process, choose a reason from the Reason drop-down list and then select the appropriate clock-in time.
Approving Shifts Worked as Unit Supervisor
Unit Supervisors must approve shifts that employees have worked from the Approve Shifts Worked page.
Shifts display by either Person or Position. To change this:
- Use the toggle button in the header.
- To view an overview of all employees, click Overview.
- To view an individual list of all shifts requiring approval, click All Shifts.
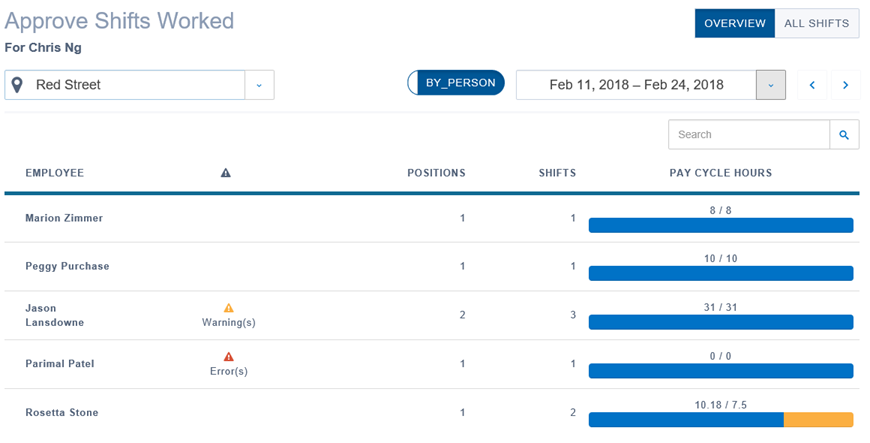
Note: The Pay Cycle Hours field displays the number of hours worked compared to the number of hours scheduled. An orange bar indicates that the employee has worked over their scheduled shift hours, and may require intervention.
To approve shifts worked:
- Log in to Employee Center as a Unit Supervisor.
- From the Scheduling menu, select Approve Shifts Worked.
The Approve Shifts Worked page displays. - The list of shifts requiring approval can be filtered based on schedule unit and date:
- To filter the list by schedule unit, select the appropriate schedule from the Schedule Unit drop-down list.
- To filter by date, choose the correct date from the Date drop-down list.

- Shifts can be approved in one of two ways:
- From the Overview view, click an Employee name to see all their shifts. Add a checkmark to the check box at the left of the screen, and then click Approve.
- From the All Shifts view, add a checkmark to each shift that you want to approve and then click Approve.
Note: You can also add a checkmark to the check box at the top of the shift view to select all shifts.