

Information
- Products: Sparkrock 2016
- Summary: Step by step guide to complete the Year-End Closing procedure
Details
The steps listed will guide you on how close a fiscal year and move the GL balances to the Retained Earnings GL Account.
Cause
Not Applicable
Impact / Risks
It is important that the GL accounts are set up with the right Account Type that is either Balance Sheet or Income Statement. The wrong value in this field will lead to miscalculation of the Retained Earnings balance.
Resolution
Carefully follow the steps below to close the fiscal year and generate the Retained Earnings balance:
Step 1 Creating a New Fiscal year
It is required that you have the fiscal year created before you can close it. If the fiscal year is not already created, follow the below steps to create the fiscal year.
- Type Accounting Periods in the search box and click on the related link, or navigate to Departments>Administration>Application Setup>Financial Management>Finance>Accounting Periods
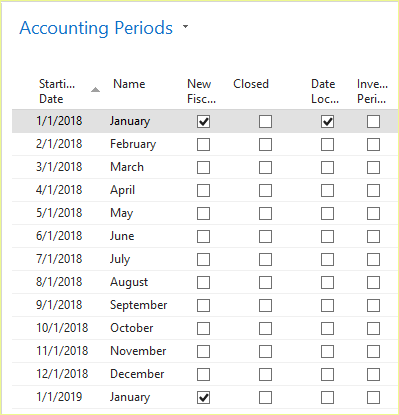
- In the Accounting Periods window, click Create Year

- Enter the current fiscal year you are planning to close, with the No. of Periods (typically 12), and Period Length as 1M (which is one month for each period).

- Click OK.
The accounting periods are added to the page with the Starting Date and Name fields filled in. The default names are based on the name of the month from the starting date, but you can change the name. After the last period in the fiscal year, an additional accounting period is inserted with the New Fiscal Year checkbox selected.
Step 2 Closing a Fiscal Year
- In the same function Accounting Periods, Click on the Close Year button to close a fiscal year.
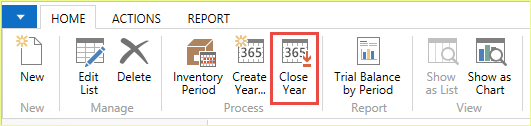
The function will automatically find the oldest fiscal year and close it. The program will place a checkmark in the Closed and Date Locked fields for each period of the fiscal year that is closed, and in the Date Locked field for the first period of the following fiscal year. - You will receive this message upon clicking the Close Year button, click Yes to close the stated year.


Additional Important Information:
- After you close a fiscal year, it cannot be opened again, and the starting dates of the individual periods cannot be changed.
- Even though a fiscal year has been closed, you can still post G/L entries to it. When you do this, the entries will be marked as posted to a closed fiscal (designated with a ‘C’ in front of the posting date).
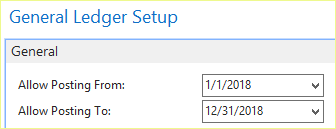
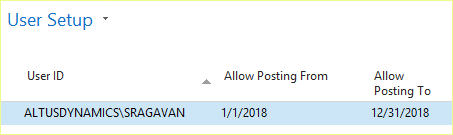
- Closing accounting periods do not restrict users from posting transactions into these closed periods. Instead, use the General Ledger Setup and/or User Setup’s posting date restrictions to control users from posting into the fiscal year.
- To access the General Ledger Setup go to Departments>Financial Management>Setup>Administration
- To access the User Setup go to Departments>Administration>Application Setup>Users
Step 3 Running the Batch Job - Close Income Statement
To close Income Statement
- Go to Departments>Financial Management>Periodic Activities>Fiscal Year>Close Income Statement
Use this batch job to automatically create a journal entry that transfers the balances from the Income Statement accounts to the Retained Earnings account. The batch job processes all G/L Accounts of the Income Statement Account Type, for the total balance of each account that occurred in the fiscal year.
- In the window, enter the following
- Fiscal Year Ending Date: (automatically populated with the ending date of the latest fiscal year closed as in step 2)
- Gen. Journal Template: enter GENERAL
- Gen. Journal Batch: Create a new General Journal Batch for this activity, for example, YECLOSE2018
- Document No.: Enter a relevant document number for this journal entry, for example, GLCLOSE2019
- Retained Earning Acc.: Enter the right Retained Earnings Account from the Chart of Accounts
- Posting Description: Enter a relevant description, for example, "Close Income Statement 2018"
- Close by select Dimensions, then select all dimensions from the checklist, in order to create a GL entry line by each dimension combination of the G/L account
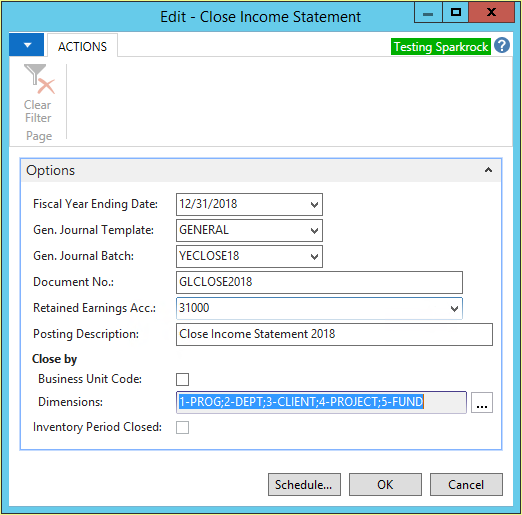
- Click OK and the system will start to create the journal entry in the background
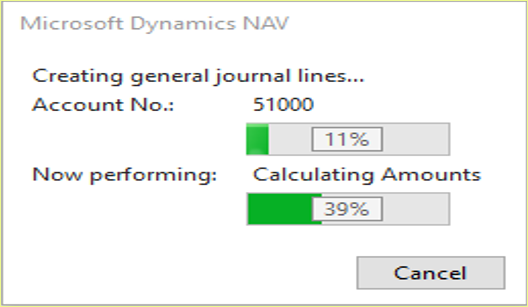
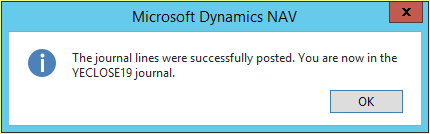
- You will receive a confirmation message after the batch job is run

4. Check the Closing Entries created
Open the General Journals
- Go to Departments>Financial Management>General Ledger> General Journals.
- Open the right batch specified in the previous step. You will see the entries are created with the closing date in the Posting Date field in this format "Cmm/dd/yyyy"
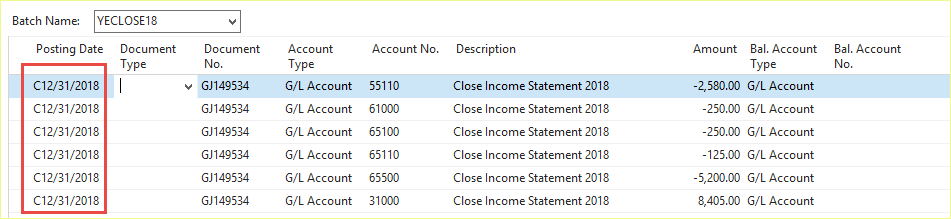
Note: The Closing date is a fictitious date between the last day of the old fiscal year and the first day of the new fiscal year. The C in the date is an indicator of a closing entry from the General Ledger Entries, which cannot be manually created on a journal entry other than using the batch job.
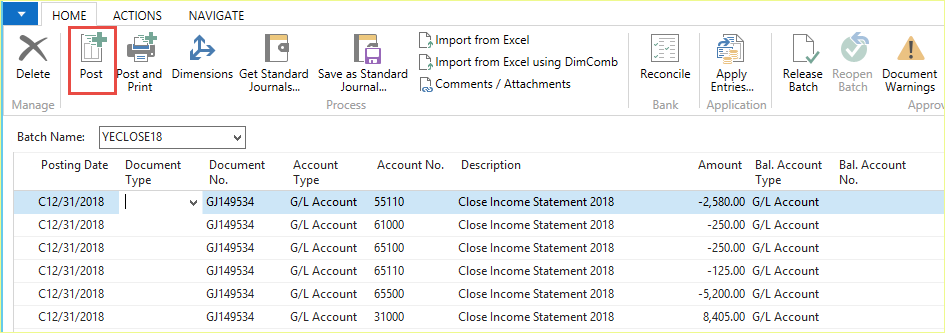
5. Posting the Closing Entries
The batch job does not post the entries automatically, you must post the journal manually.
- Click Post in the home ribbon.
Note: When you post the journal, an entry is posted to each income statement account so that its balance becomes zero and those values are transferred to the specified Retained Earning G/L account.
This marks the end of the Fiscal Year closing procedure.
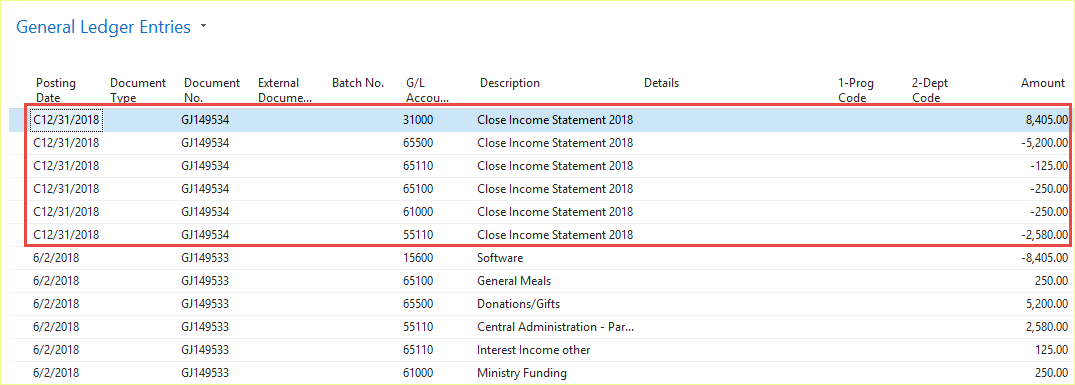
Validation of the posted entries:
- In the General Ledger Entries, you will see the entries posting dates that start with C.
Workaround
Not Applicable
Related Information
Important Note: If the Fiscal Year is closed by mistake and or earlier than expected, please create a case with Sparkrock Support and include reference number: CAS-22444.
Update History
The table below lists dates and actions pertinent to the history of this article, including any links.
| Date | Details | Link |
| 08/12/2019 | The first version of this Knowledge Base article was created. |
Keywords/tags
Not Applicable
Attachment
Not Applicable