

The issuing of Records of Employment (ROE) begins with the HR Request for the employee that has been terminated or for an employee whose HR Position has changed to inactive due to a leave (where issuing an ROE is required).
Termination and Inactivity are configured through the HR Reason code; however, the Cause of Inactivity table needs to be set to indicate if a reason code of inactivity is required to issue an ROE.
To generate a Record of Employment:
- Access the Records of Employment page. In the Search field, type Records of Employment and then select the page from the drop-down list.
The Records of Employment page displays, and lists employees who have been terminated. - The first day worked is the Calculation Start Date of the most current HR Position; if necessary, you can edit this on the Record of Employment First Day Worked line.
- The last day worked is the Calculation End Date of the most current HR Position; if necessary, you can edit this on the Record of Employment Separation Date line.
Note: If the Employee has terminated from All Positions the system will report the Position Title from the Last HR Position the employee received their final pay in, if necessary you can edit this in the Service Canada site. The ability to edit the ROE in Service Canada is available as long as the Export parameters were set as Draft.
- From the Ribbon, click the Navigate tab and then click Detail Lines.
- Enter details as required (that is, vacation pay, other monies, comments and so on.) If the amounts are posted and included in employees final pay, then add a checkmark to the Already Posted check box. This will ensure that the amounts do not get included in Purchase Payments twice.
Note: Where the Reason for Separation is ‘K', you must provide’ a comment.
- To export the file, from the Ribbon click the Actions tab and then click Export.
The Record of Employment page displays.
- In the Processing Method drop-down list, choose either:
- Draft: Choosing this method allows you to edit and submit the ROE in the Service Canada Site.
- Submission: Choosing this method will automatically submit the ROE when uploaded to Service Canada. In this case, the only way to correct the ROE would be to amend it.
Notes:
Remember to return to the Records of Employment page and enter the serial number provided by Service Canada.
If the export file is run multiple times in the same day the system will overwrite each one with the new details. If you wish to keep export files separated, then you may rename the file before doing your next export. You can give it any name you like, just do not change the file extension. You may also keep a separate folder for completed ROE’s and transfer the files completed into the folder.
- In the Export to Folder field, specify that path where you want to export the Record of Employment.
- Click OK.
Test the export file on the Service Canada Web Site using their ROE WEB Demo section.
Note when using the Demo page, you will not be able to use your organization's BN. There will be a list of BN in the site for you to use.
Loading or Entering Detail Lines
If sufficient payment history exists for an employee, you can load details lines from the last pay and review/edit the data.
NOTE: Depending on the configuration of your calculations, the number of active positions for this employee, and the available history, these amounts may need to be reviewed/adjusted or populated altogether.
To load or enter detail lines:
- Populate the detail lines data to review by clicking the Actions tab and then clicking Load Detail Lines from Last Pay.
The detail lines from the last pay display. - Review or enter detail by clicking the Record button and selecting Detail Lines.
The ROE Detail Lines page displays.
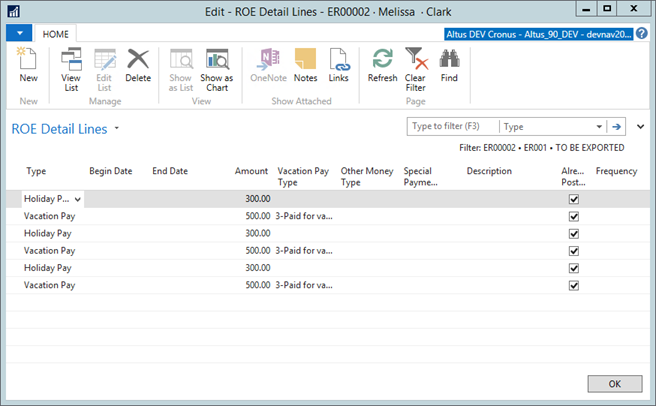
- The following table provides information and tips for completing the Detail Line fields.
NOTE: This field is only applied if the option selected in the Type column is Sick/Parental Payments.
| Field Name | Description |
| Type | Displays the payment type. Select the appropriate type of line from the available options. |
| Date | Displays the date upon which the payment was processed. Enter the date for the entry. NOTE: Some line types do not require dates. If you enter a date in these lines, the information you put in the field is deleted. |
| Amount | Displays the dollar amount for the line detail. Enter the amount for the line detail entry. NOTE: Some line types do not require an amount. If you enter an amount in these lines, the information you put in the field is deleted. |
| Other Money Type | Select the appropriate value for the entry. NOTE: This field is only applied if the option selected in the Type column is Other Money. |
| Description | Displays a description for the entry. Enter a brief description for the entry type you selected. NOTE: Some line types do not require a description. If you enter a description in these lines, the information you put in the field is deleted. |
| Already Posted | Place a checkmark in this field if the entry has already been posted. |
| Frequency | Select the appropriate frequency. |
Exporting the Record of Employment
The Record or Employment file can be exported and transmitted electronically to Service Canada.
To export the Record of Employment:
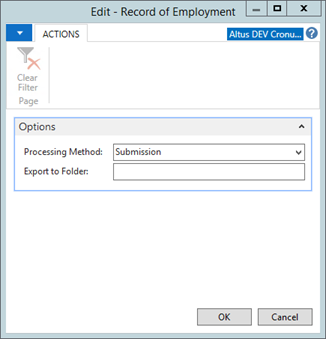
- In the Record of Employment page, from the Ribbon, click the Actions tab and then click Export.
The Altus Record of Employment dialog displays. - In the Processing Method drop-down list, choose one of the following:
- Draft: Choosing this method allows you to edit and then submit the ROE in the Service Canada Site.
- Submission: Choosing this method automatically submits the ROE when uploaded to Service Canada. The only way to correct the ROE would be to amend it.
- Click OK.
Note: Remember to return to the Records of Employment Page and enter the serial number provided by Service Canada.