

The Payroll granule is designed to be easy for you to use when processing normal tasks such as a payroll run and at the same time. This tool is comprehensive and robust enough to handle a variety of different payroll conditions.
In this section, the tasks you must perform to run a payroll are covered in detail to assist you in generating a payroll run. There are a variety of different payroll generation processes (hourly, salaried, bonus, and so on), so depending on the payroll you want to run, the exact process differs based on the payroll controls, employee type, and so on. However, for the most part, the data entry, calculation, printing, and posting process is the same.
Generating a Payroll Run
Payroll processing takes place within the Payroll Journal. Generally, the entire payroll generation process is run by pay period in a batch. The appropriate batch is loaded using the Payroll Journal Pre-Load for the one pay period, then the payroll calculation is run, and finally a test report is run for the entire batch.
Pre-defined batches include the details for the payroll run (payroll, vacation accrual, and so on) you want to calculate. Creating batches (Journal Templates) enables you to save time when running the payroll calculation and avoid errors and omissions.
For details on creating batches for the payroll runs you regularly process, see Defining Payroll Journal Templates.
Defining the Parameters to Include in the Payroll Generation
Each time you generate a payroll run, the last batch you generated is automatically selected. The Payroll Journal Pre-Load/Entry Setup feature stores the last batch you generated and pre-loads this batch into the Payroll Journal page. If you want to run a different batch, you need to select the appropriate batch to from the list of pre-defined journal templates.
The Payroll Journal page also contains fields and filters for customizing the payroll run to include the employees, payroll controls, and time frame you want to calculate.
To define the options for the payroll generation:
- In the Search field, type Payroll Journal and select the page from the drop-down list.
The Payroll Journal Template List displays.
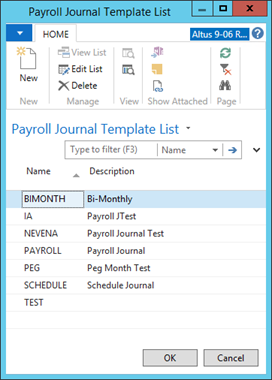
- Select the record for the payroll journal you want to open.
- Click OK.
The Payroll Journal page opens.

- In the Batch Name field, select the batch you want from the drop-down list.
- In the Default Pay Cycle Period field, select the default pay cycle period from the drop-down list.
- In the Override Calculation Order field, select a value (if applicable) from the drop-down list.
Creating and Editing Payroll Journal Entries
You can create or edit payroll entries as required to ensure the payroll processes successfully.
To create and edit entries:
- Open the Payroll Journal that you want to edit.
- From the Ribbon, click Payroll Journal Pre-Load.
The Payroll Journal Pre-Load page opens.
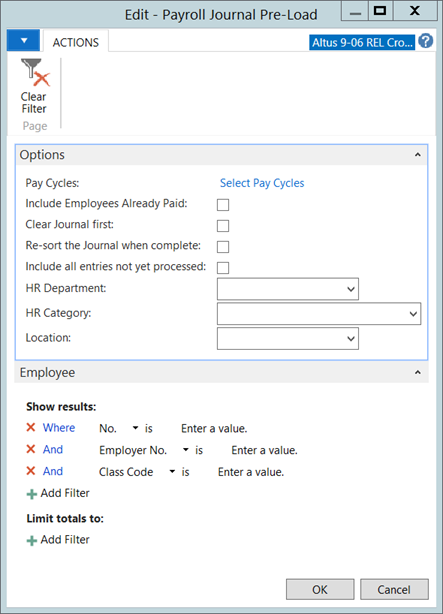
- In the Options section, click Pay Cycles.
- In the Pay Cycle Code field, select the appropriate code, then click OK.
- In the Pay Cycle Term field, select the appropriate term, then click OK.
- In the Pay Cycle Period field, select the appropriate period, then click OK.
NOTE: The other fields are populated by default.
- Close the Payroll Journal Cycles page.
- Click OK.
The Payroll Journal page re-opens and the employees belonging to the class code, for the pay cycle you selected, display, including all the payroll controls for each of these employees. - Using the Filter fields, filter the results based on the payroll control you want. The data in the journal is filtered based on your selections.
- In the Payroll Amount field, enter the number of hours worked (if the payroll run is for hourly employees).
TIP: If there is a large number of employees, enter the value for the first employee, then move to the next field and press F8, which inserts the previous value. Repeat for each row/employee. - Remove the filter.
The entries you need to generate a payroll run for these employees are created. See, Calculating Pay.
Calculating Pay
Once you select the filters to customize the payroll run and confirm that all the required data for the employees contained within the payroll you want to generate is provided you can begin the process of calculating pay for these employees. See, Defining the Parameters to Include in the Payroll Generation and Creating and Editing Payroll Journal Entries for steps/details.
To calculate pay:
- In the Payroll Journal page, from the Ribbon click Payroll and select Calculate.
NOTE: You can select the Calculate Single Employee (Shift + F8) option to recalculate one employee after making changes to one of the Payroll Controls. For details and steps, see Calculating Pay for a Single Employee.
The Calculate Payroll page opens.
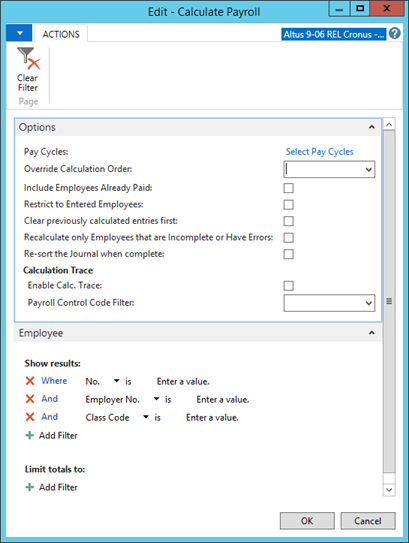
- If a filter exists in the No. field, remove it.
- In the Options section, select the following check boxes:
- Restrict to Entered Employees
- Clear previously calculated entries first – only if changes were made to more than one employee. (If changes are made and this box is not checked, the old calculations are not cleared and the new calculations do not occur.)
- Re-sort the Journal when complete (As an employee's pay is being calculated, new lines are being added to the journal for each Payroll Control (deductions, taxes, etc.). By re-sorting, you group all of the employee's entries together. Without the re-sort, an employee's transactions are randomly scattered in the journal.)
NOTE: When you are determining whether to use the re-sort function, you need to take the following into account:- The number of employees contained in the payroll run. If there are many employees, you may not want to re-sort because there is a considerable performance impact.
- Although check printing and posting tasks do not require the re-sort, it does make it easier to review the Payroll Journal.
- Click OK.
The Payroll Journal calculates. - In the confirmation dialog (which details the calculation actions, errors, warnings, and so on), click OK. The Payroll Journal populates with the payroll control values assigned to the employee’s record.
Once the calculation is successfully completed (errors resolved) you can print checks and process direct deposit transmissions, if required. For details and steps, see Previewing and Printing Checks.
Calculating Pay for a Single Employee
If you detect and omission (perhaps overtime for an employee was not recorded during the initial setup), you can make this change and then recalculate for only that employee. The Calculate Single Employee option only calculates the selected employee. The single employee function is useful in the event that you make an error or forget something, you do not have to invest considerable time in recalculating all employees.
To calculate pay:
- In the Payroll Journal, click the Actions tab.
- Click Calculation and then click Calculate. The Calculate Payroll page opens.
- If a filter exists in the No. field, remove it.
- In the Options section, select Re-sort the Journal when complete. (The other check boxes can be left the way they are.)
NOTE: To save even more processing time, when you have multiple employees to recalculate, only select the re-sort when recalculating the last employee. - Click OK.
The Payroll Journal calculates.
NOTE: Once the process is initiated, a verification of the entry is performed to ensure the correct sign (positive or negative) for the type of item is provided. For example, if you try to change a control (enter a deduction, such as a tax), when the verification is performed, you receive a warning if you did not use the appropriate sign. In the case of a deduction, the number must be a negative.
Testing the Payroll Calculation and Resolving Errors
Running a Test Report
Once you calculate payroll, it is a good practice to run a Test Report to determine if there are any errors. This way, you can resolve any errors and save time before you begin the check printing process.
To run a test report:
- In the Payroll Journal page, click Test Report.
The Payroll Journal Test Report page opens.
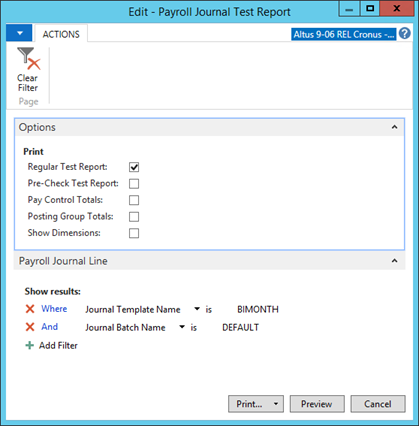
- Click the Options section, click the Pre-Check Test Report check box. (Since you are yet to print the checks, you want to use the Pre-check option for running the test report.)
- The print option selected by default is Regular Test Report.
NOTE: The following warning messages display on each line of the report if you leave the default option Regular Test Report selected:
- Warning! “Check Printed must be Yes when Bank Payment Type is “Computer Check”
- Warning! “Document No. must be specified.”
These errors are generated because the checks are not yet printed.
- Click Preview. A preview window opens displaying the test report.
NOTE: There is a line at the top of the report which states “This is a pre-check printing report, so errors which indicate that checks have not been printed are not reported.”
If any errors do occur, you need to review the content of the message and return to the Payroll Journal page to review more details for the errors and to resolve the outstanding issues before you re-calculate the payroll run. See the next section for details on error resolution. - Close the Preview window.
If after reviewing the test report you determine that everything calculated correctly, then you can transmit the EFTs (Payroll, Electronic Payments, Export, and then Transmit) and the payroll is posted.
Resolving Calculation Errors
When errors occur during the payroll calculation, you can review the errors to determine the cause and resolve. Calculation errors are displayed by batch or by single employee.
To resolve calculation errors:
- In the Payroll Journal > Actions (from the ribbon), click the Calculation dropdown and select Calculation Errors.
The Payroll Errors page opens displaying the errors generated during the calculation process.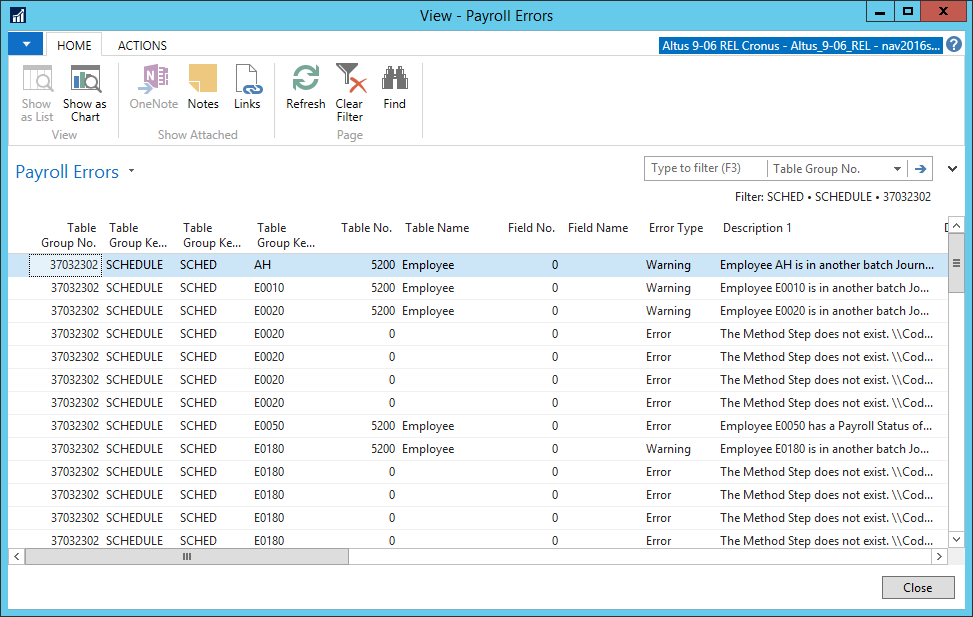
- Resolve any errors.
- Close the page and re-calculate the payroll. For details see, the Calculating Pay section.
Previewing and Printing Checks
When all the calculation errors (if any were detected) are resolved, you can begin the check printing process.
As well, you can view the pay check and the stub for the payroll run for an individual to ensure the appropriate details display for the employee.
Previewing a Check and Pay Stub for an Employee
Depending on what you send or require, you can preview both the printed check details as well as the pay stub an employee receives (if direct deposit, electronic payment is used).
A nice feature with the check previewing and printing function is that you can actually preview the check and stub exactly as they will print.
To preview an employee’s pay check or pay stub before printing:
- In the Payroll Journal page, click the Actions tab and then click Preview Check.
The Payroll Check Preview page opens.
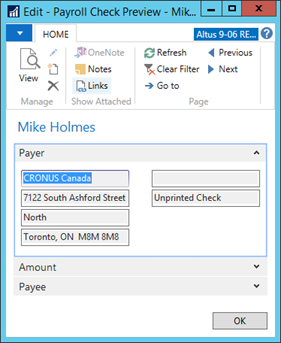
- Review the check details to ensure the information is correct.
- Close the page.
- From the Ribbon, click Preview Check Stub.
The Payroll Check Stub Preview page opens. This is the information that displays on the employee's check stub.
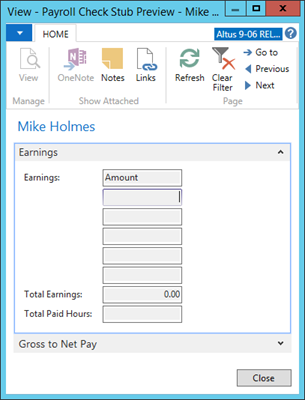
- Check all the data before printing to forms.
- Close the page.
Printing Checks
Once you are confident that the payroll calculation is error-free and the appropriate details display for the employee’s checks and paystubs, you can begin printing the checks.
NOTE: To assign check numbers, you can only print checks to a printer or a file.
To print checks:
- In the Payroll Journal page, click the Actions tab and then click Print Checks. The Payroll Check page opens.
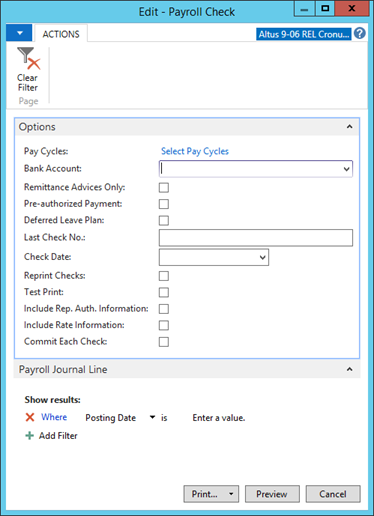
- From the Bank Account drop-down, select the appropriate bank account from the list.
- Click OK. Once the bank account is selected, the Last Check No. field is automatically populated with the same value from the Bank Account Card.
NOTE ABOUT BANK ACCOUNT SETUP:
For checks to print you must ensure the bank account setup is correct:
- Select the ‘Net Pay’ Payroll Control, then from the Payroll Posting Group drop-down, select Net Pay to enable you to check which value is in the ‘Bank Account No.’ field. Verify that it is the appropriate bank account number for processing payroll in your organization. If it is different, then you must select the same bank account when printing checks.
- Go to General Ledger > Bank Accounts to verify that the No. field on the General tab lists the same bank account as well.
- In the Bank Account Card Posting tab, confirm that there is a value in the Last check No. field. If not, enter 0001 and close the card.
NOTE ABOUT PRINTING CHECKS WHEN USING DIRECT DEPOSIT:
If the employee’s entire net pay goes to direct deposit, then the physical paycheck is printed as VOID . For pay runs in which most of the employees receive actual checks, this is an efficient way to handle this situation.
If, however, you have a large number of employees who are 100% Direct Deposit and do not receive physical paychecks, you may not want to print a large number of void checks on your check stock.
To avoid wasting your check stock on void checks, you can use the remittance advice only option (in the Options tab of the Payroll Check page). This option enables you to print only those checks that come out as zero (voided). You can print these on regular paper or separate stock made for this purpose.
Additionally, these remittance advices are given a separate sequence of numbers so as not to use your check numbers.
- If your policy is to print remittance advices, you must print the remittance advices first. Otherwise, all checks not printed will be printed, in addition to those considered remittance advice.
- If you plan to print all the checks and remittance advice on regular check stock, then you don’t need to change your check processing procedures.
- In the Check Date field, choose the appropriate date (depending on your policy/procedure) from the drop-down list.
- Click Preview.
The Preview page opens displaying the check for the first employee in the Payroll Journal page. You can scroll through all the checks, if required. - Close the Preview page.
- Click Print.
A standard Windows Print window opens. - Select Print to File.
- Enter a name for the print file and click OK. The Payroll Journal page re-opens.
NOTE: The Document No. field now contains the check number.
Processing Payroll Using Direct Deposits
Exporting Direct Deposits
Once all paychecks/remittance advices are printed and reviewed, the next step is to export the direct deposits to the bank for processing (transferring the funds to the employee bank accounts).
To export direct deposits:
- In the Payroll Journal, click the Actions tab.
- Click Direct Deposits > Export.
The Export Direct Deposits page opens.

- In the Bank Account No. field, select the required bank account from the drop-down list.
- Add a checkmark to the Pre-authorized Payment check box to indicate the this is a pre-authorized payment.
- Add a checkmark to the Deferred Leave Plan check box if this direct deposit is part of a deferred leave plan.
- Click Print.
The file is exported using the file name and path entered in the Bank Accounts Card. A report is printed detailing all of the direct deposits being exported.
Voiding the Direct Deposit Export
If, while reviewing the paychecks and the direct deposit export report, you discover a problem, you will find that you cannot void just one check, if that check has a direct deposit component. If you need to make modifications at this point, you will have to void the entire export of the direct deposit, and then void the paycheck that needs correction, make the correction, and re-export.
To void the export of the direct deposit:
- In the Payroll Journal, click the Actions tab and then click Direct Deposits > Void.
The Void/Transmit Direct Deposits page opens with the Direct Deposit Operation field automatically set to Void.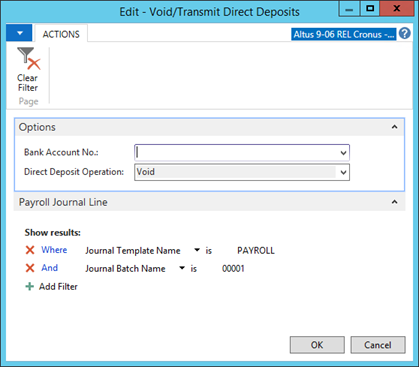
- In the Bank Account No. field, select the correct bank account from the drop-down list (be sure to select the same bank account you selected for the export).
- Click OK.
- A warning dialog displays. When prompted click Yes.
The entire export is voided and the file deleted.
NOTE: There is no way to void a single direct deposit transaction.
Transmitting the Direct Deposit Export
Once you have reviewed everything, it is time to transmit the export file to the bank. This must be done about three days before the date that you want the money to reach the employee’s bank accounts, depending on your bank’s rules.
To transmit the direct deposit export file:
- In the Payroll Journal, click the Actions tab and select Direct Deposits > Transmit.
The Void/Transmit Direct Deposits page opens with the Direct Deposit Operation field automatically set to Transmit. - In the Bank Account No. field, select the correct bank account from the drop-down list (be sure to select the same bank account you selected for the export).
- Click OK.
- In the confirmation message that opens, click Yes.
Using the transmission program name and path already entered on the bank account, the file is transmitted to the bank. For details and steps for initiating direct deposit functionality for your organization see ‘Setting up Direct Deposits’.
At the end of the batch job, a confirmation message opens to confirm whether or not the transmission was successful.
NOTE: Once a direct deposit is transmitted to the bank, there is no way to void it or make any further modifications in the payroll journal. You can void one employee’s Direct Deposit(s) in the Bank’s check ledger entries.