

The Periodic Activities menu contains options for the functions that only need to be performed from time to time. From the Periodic Activities menu you can post liabilities to Accounts Payable, update jobs, departments, and projects with labor burden, recalculate certain taxes to reduce reporting errors and account for rate changes. You can also limit how much certain balances can carry forward from one year to the next.
Also contained within the Periodic Activities functions is the option for making recurring journal entries. You can perform these activities each pay cycle or less often, at your discretion. You can review and verify your employee’s social security numbers. And finally, you can use the Update Tax Data periodic activity to update your payroll taxes or import sample payroll controls.
Creating a Recurring Payroll Journal
Creating a recurring payroll journal is just like creating a standard journal. However, once the journal entry is created, you need to indicate that it is a recurring journal.
The process for creating a recurring journal involves two main steps; creating a journal template and then setting the journal template with the appropriate recurring options.
To create a recurring journal:
- From the Payroll menu select Setup > Payroll Journal Template.
The Payroll Journal Templates page opens.

- Enter the information for the journal you are creating in the fields provided. For details on completing each of the fields, see Defining a Payroll Journal Template.
- Place a checkmark in the Recurring field to set this particular journal as a Recurring Journal.
- After you enter the information for the journal, close the page.
- From the Payroll menu, select Periodic Activities > Recurring Journals.
- The recurring journal you created from the Payroll Journal Templates page opens.
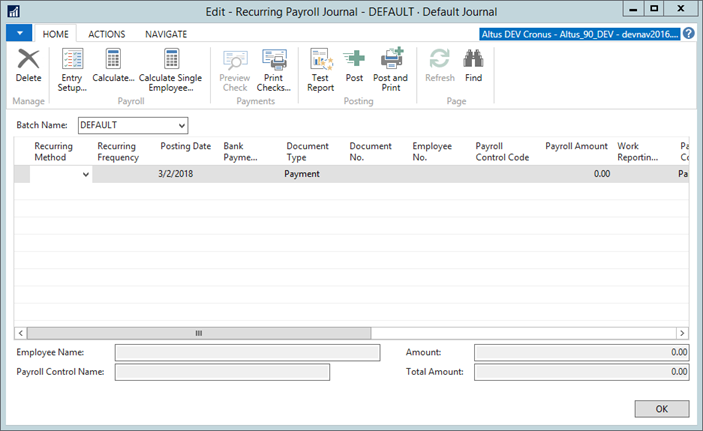
As you set up the recurring journal, there are some specific fields you need to fill in. - From the Recurring Method drop-down, select the option you want to apply to this recurring journal. This field determines how the program handles the entry from one posting to the next. There are two options:
- Fixed: The amount in the entry remains in the journal after posting.
- Variable: The amount in the entry is cleared after posting. You are prompted to enter an amount each time.
- In the Recurring Frequency field enter how often you want the transaction to run. This field indicates how often this transaction should occur. Use standard Navision date formulas, such as:
- 1M - Once a month
- 1Q - Once a quarter
- 1D - Once a day
- 1W - Once a week
- 1Y - Once a year
Because not all months have the same number of days, enter 1D+1M-1D to post the entry on the last day of each month. For example, suppose you post as of February 28 and you want the next posting date to be March 31. If you enter 1D+1M-1D the entry is interpreted as follows:
- 02/28 + 1D =03/01
- 03/01 + 1M =04/01
- 04/01 – 1D =03/31
If you were to enter 1M, then the next posting date would be 3/28.
Posting Liabilities to Accounts Payable
The Liabilities to A/P batch job runs through the posted Payroll Ledger Entries, looking for liabilities to post to Accounts Payable. This process removes the liabilities from the G/L Accounts posted to payroll and then posts them to the Vendors’ G/L Accounts. It also adds a vendor invoice to the vendor, enabling you to pay the liability through Accounts Payable.
Posting payroll liabilities to vendors makes cutting checks to vendors an easier task. This routine finds all the vendors you set up for Payroll and all of their associated transactions and posts them to the vendor.
It is important to understand that these entries have already been posted to the G/L as part of normal payroll processing. This routine reverses those entries and re-posts them to a vendor using the vendor’s posting group to determine the liability account. This routine does not create a physical invoice for the vendor. It creates a payable line in the vendor’s ledger entries.
NOTE: To ensure your vendor ledger always reflects the balance in the G/L, run this routine after the payroll run.
To post liabilities to A/P:
- From the Payroll menu, select Periodic Activities > Liabilities to A/P.
The Liabilities to A/P page opens.
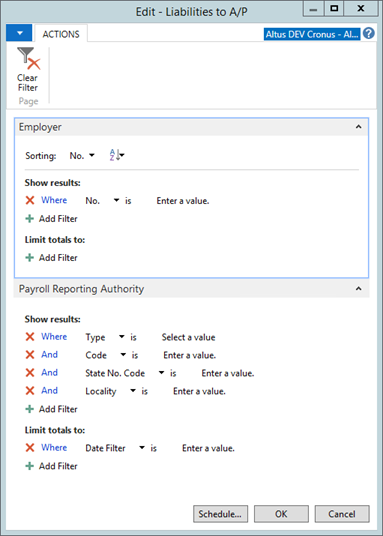
- In the Employer FastTab, enter the filters you want to apply to the batch run. To limit the amount of information, set the proper filters before you print a report. You can enter filters manually in the fields, or select from the drop-down lists provided. If the filter you want is not listed, you can add it to the bottom of the scroll list. In the Field column, enter the name of the filter field and then add the filter values in the Filter column.
- When running this batch job, you can also select the Reporting Authorities to process. To do so, click the Payroll Reporting Authorities tab.
- Enter the filters you want to apply. A lookup is not available for setting filters in the Payroll Reporting Authority FastTab (except for reporting authority type and reporting authority code). Use the Copy/Paste function to ensure the name of the Reporting Authority placed in the Filter column exactly matches the name in the Reporting Authority table. Do not set any filters to run ALL Liabilities to A/P. For reporting authority names that have parentheses in them enclose the name in single quotations to prevent receiving an error message.
- In the Date Filter field, enter a range of dates next to date filter. A good practice is to use a range of dates which runs to the date of your most recent payroll run from the date of the payroll run before that. This determines the range of Payroll Ledger Entries to search. The last date in this range becomes the invoice date of the vendor invoices created here. Ignore overlapping previous dates entered as no payroll ledger entry can be posted to accounts payable twice.
- Click OK.
The report, which determines outstanding liabilities in the Payroll Ledger Entry table and posts them to the Vendor Ledger Entry table, is generated.
Notes about Vendors, Reporting Authorities, and the Interaction with A/P
Vendors are set up for the different reporting authorities. When interfacing with accounts payable, the payroll control must be a liability control (G/L Post Types: Post Liability and Cash to G/L or Post Expense and Liability to G/L). The payroll control’s Authority code is used as a look up in the Reporting Authority list to find the vendor number.
The following steps must be completed for the interaction with A/P:
- You must have the reporting authority with a vendor number assigned to it.
- The Vendor No. field is available on the Employer Reporting Authorities form (Employer Card > Payroll button > Reporting Authorities).
- The payroll control must have a G/L Post type of Post Liability and Cash or Post Expense and Liability.
- The authority code must be assigned to a payroll control.
- The payroll control must be assigned to the calculation order.
- The employee must be paid with that payroll control.
- You must run the transfer Liabilities to A/P batch job.
Note: If you receive the error “Amount must not be zero”, one vendor has no entries. Filter this vendor out of the function.
Posting Employer Expenses to the Appropriate Areas
Some payroll entries include split earnings posted based on jobs and/or departments and/or projects. The Post Labor Burdens batch job posts the labor burden (employer expenses other than employee earnings) to the appropriate jobs, departments, and projects based on the proportions by which the earnings were split. This periodic activity distributes all employer paid benefits (G/L Post Type of ‘Post Expenses and Liability to G/L’) to the appropriate jobs and dimensions.
An added feature to this function is that the Payroll Granule is capable of allocating the actual burden as opposed to just an estimate.
To post labor burdens to the appropriate areas:
- From the Payroll menu, select Periodic Activities > Post Labor Burden.
The Post Labor Burden page opens.
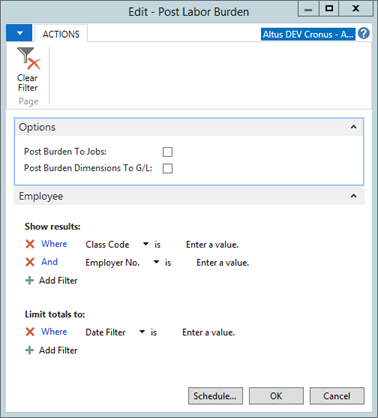
NOTES:
- To limit the amount of information, set the proper filters before you print a report. You can enter filters manually in the fields, or select from the drop-down lists provided.
- If the filter you want is not listed, you can add it to the bottom of the scroll list. In the Field column, enter the name of the filter field and then add the filter values in the Filter column.
- Select one of the following check boxes to post the labor burden:
- Click the Post Burden To Jobs check box to post the labor burden to the appropriate jobs.
- Click the Post Burden Dimensions to G/L check box to post the labor burden dimensions to the general ledger.
- In the Date Filter field, enter a date or date range.
- Click the Options tab.
- Click OK.
- Once the routine is complete, open the Job Card and look at the entries.
Recalculating Payroll Controls to Account for Tax Rate Changes
The Quarter Recalculation periodic activity is a routine that recalculates payroll controls with the most current information in the control. It can be used to correct withholdings or accruals when a tax rate or limit has been changed midway through the year. Reasons for a change can include a new tax rate assigned (such as a new unemployment rate) or a new limit such as the annual RSP limit update. Changing the tax rate or limit may make the previously calculated amounts incorrect. The Quarterly Recalculation job enables you to correct those calculations easily.
NOTES:
- Only run the quarter recalculation when you are trying to correct an error. This job does not correct small rounding errors that occur throughout the quarter. The recalculation is done on a day-by-day, employee-by employee basis, which does not allow for correcting accumulated rounding errors.
- Controls, such as child support, that consider net pay in its calculation do not recalculate properly and should not be recalculated.
- Due to these limitations, avoid running a quarterly recalculation every quarter.
Run this batch job to recalculate taxes in preparation for printing quarterly government forms or reports. Once run, this job posts adjusting entries so that the Payroll and General Ledgers match the results of this calculation. If these results affect an employee, then a contra adjustment is also posted so that each employee remains in balance. It also recalculates the taxable on which the tax is based.
Although this batch job is intended to be used to recalculate taxes, it can be used to recalculate any calculated payroll control. Usually the payroll controls recalculated are employer expenses and accruals such as unemployment taxes.
However, normally, you will not recalculate a payroll control that affects an employee’s withholdings, because the employee has already been paid. When you recalculate any control that affects an employee’s withholdings, you must post a contra-adjustment to another control so that the employee remains in balance.
CCP and EI withheld are reported to the CRA on the appropriate forms, and is a calculated amount based on the employee’s earnings. Consequently, the amount withheld must be correct. If this amount is incorrect, it must be corrected. To correct the amount, run the quarterly recalculate on the appropriate controls using FIT as the contra–adjustment control.
NOTE: If the employee has over/under withheld income taxes, you generally leave this discrepancy unless it is a large amount.
To run the quarter recalculation job:
- From the Payroll menu, select Periodic Activities > Quarter Recalculation.
The Quarter Recalculation page opens.
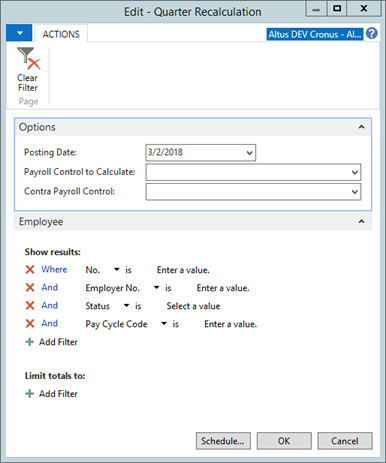
- In the Posting Date field, enter the date you want the adjustments posted. This is normally a date on or after the date of your last payroll run of the quarter, but on or before the last date of the quarter. The entries from the beginning of the quarter to this date are recalculated.
- In the Payroll Control to Calculate field, enter the code for the payroll control to recalculate. (The payroll control you select must have already been calculated; otherwise adjustments are not made.)
NOTES:
- The payroll control you select must currently be calculated for this batch job to work, although it is not necessary that its value was calculated throughout the quarter.
- The Net Pay Test field on the payroll control must be set to Do Not Test for the Quarter Recalculations to run successfully.
-
If the payroll control selected in the previous field, affects the employee (if the value changes a pay check) in the Payroll Control to Calculate field, enter a payroll control to post the difference against. It may or may not be a calculated control, but it must affect the employee.
NOTE: Even though a net pay control qualifies, you cannot select it, since this batch job does not print checks or make direct deposits. If you want to refund the money to the employee (or have the employee reimburse you) enter a qualifying ‘holding’ payroll control, and on the next pay run, back the amount out of the ‘holding’ control and calculate it into net pay. - Expand the Employee FastTab.
- If necessary, select employee status and whether to include blocked employees.
- Click OK.
Running an Absence Carry Forward Report
Many employers limit the amount of vacation and sick days an employee can carry forward from one year to the next. If you have either or both of these policies, the Absence EOY Carry Forward report shows the adjustment of hours that have accrued within a given time period. This can be used for vacation balances if only a fixed number of hours can be retained in the next year, or if a fixed minimum is set at the beginning of a new year.
For any single Hours type of payroll control, this function automatically:
- Calculates the number of hours the employee has in balance.
- Compares that balance to an entered maximum and, optionally, to an entered minimum.
- Posts a payroll ledger entry that automatically adjusts the balance if it falls above the maximum or below the minimum.
NOTES:
- You can use this function at any time, not just at the end of a fiscal or calendar year.
- Before you begin, make sure you already posted your payroll journal entries. Only information already posted into the payroll ledger is processed by this option.
To run an EOY Carry Forward report:
- In the Search field, type Absence EOY Carry Forward, and then select the page from the drop-down list.
The Absence EOY Carry Forward page displays.
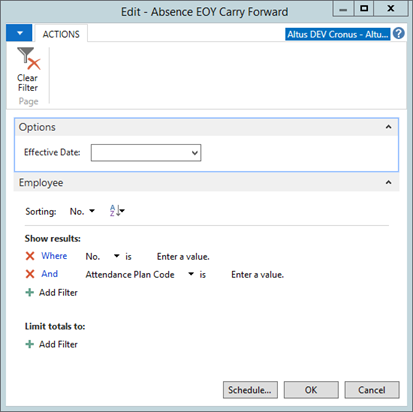
- Enter a date in the Effective Date field to run this report. This field enables you to determine the date by which the balance is calculated, as well as the date of the adjustment.
- Expand the Employee FastTab.
- In the No. field, enter the employee number.
- Click OK. An adjusting entry is posted to the Payroll Leger for each employee exceeding the maximum allowable balance, or who does not have the minimum allowable balance, as of the date entered.
- Open the individual’s Employee Card and view Employee Statistics (F9).
- Click the Controls tab and look at the Vacation Bank line, and see that the Balance field is blank.
Finding Invalid Social Insurance Numbers
The Social Security Review report enables you to create a list of employees that do not have a valid Social Insurance Number or if the formatting of the SIN is incorrect.
These must be fixed prior to year end reporting. Once you have the list, you can use the Social Security Verification report (see next section) process to fix the errors/invalid SINs.
To create a list of invalid or incorrectly formatted SINs:
- From the Payroll menu, select Periodic Activities > Social Security Review.
The Social Security Review page opens.
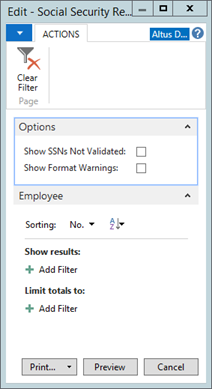
- Select the search options you want:
- Add a checkmark to the Show SSNs Not Validated check box to find invalid SINs.
- Add a checkmark to the Show Format Warnings check box to find formatting errors.
- Select both options to find all SIN issues/errors.
- Click Preview to see the report before printing.
- Click Print to print out the list.
Using the Social Insurance Verification to Verify SINs
This periodic activity allows you to communicate with the Canada Revenue Agency (CRA) to verify and update an employee’s Social Insurance Number.
- From the Payroll menu, select Periodic Activities > Social Security Verification.
The Social Security Verification page opens.
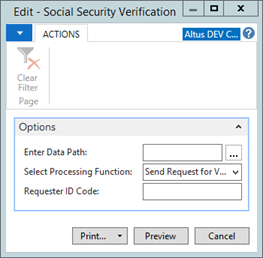
- In the Enter Data Path field, enter a path to save/place the generated file.
- In the Select Processing Function field, make sure the Receive Verification from the SSA option is selected.
- In the Requester ID Code field, enter your ID number.
- When you select either Print or Preview you get a confirmation message, click OK.
The file is created in a format accepted by the CRA. - Send the file for verification.
Importing Existing Payroll Control Data and Updating Tax Data
When you are initially setting up your payroll controls, you can import any existing payroll control data you may have set up/established within another application, and so on. Additionally, when there are changes to your tax data, you can use this option for updating your tax data.
To update your tax data:
- From the Payroll menu, select Periodic Activities > Import Payroll Setups by Payroll Control.
The Import page opens. - In the File Name field, enter the full path to the tax update information. For example, if the update information is on a CD or USB, enter the drive (e.g. d:\) and the file name. Alternately, use the Import page to browse for the file.
- Click OK.
The Payroll Control Update Worksheet opens listing all the payroll controls.
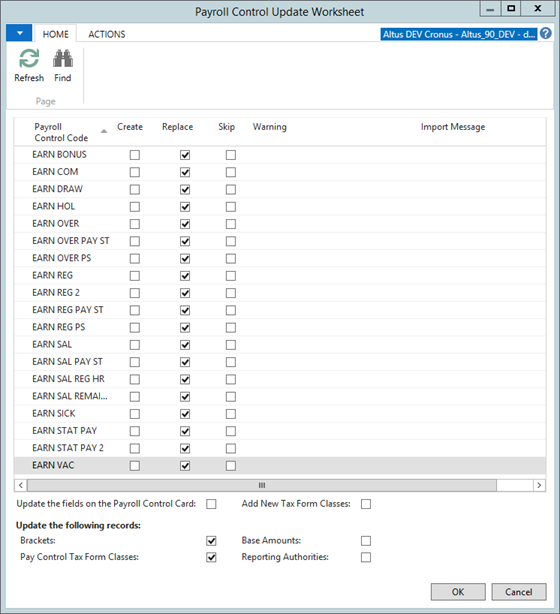
- In the corresponding Create, Update, and Ignore columns for the controls listed, add a checkmark to the action you want to perform. For example, to update a payroll control, add a checkmark to the Update column.
- Repeat Step 4 for all the controls you want to create, update, or ignore.
- Click the Update the fields on the Payroll Control Card check box to replace with new data (new controls, and so on)
- Click the Add New Tax Form Classes check box to replace with any new tax form classes that have been added.
- In the Update the following records section, click to add a check mark next to the records you want to update.
- Click OK.
Performing Mass Updates on Controls, Rates, and Tax Information
The Payroll Granule contains some options where updates can be performed en masse. Depending on the size of your organization, this function is a valuable time saver for updating generic amounts that apply to large groups of employees or all employees within the organization.
The Mass Updates functions enable you to perform mass updates on several employee records simultaneously. You can do the following:
- Attach a group of payroll controls to an employee or group of employees
- Update employee rates for regular pay, salary, overtime, etc.
- Update employee tax information for specific tax authorities
Attaching Payroll Controls to Employees
The Attach Control Group to Employee option enables you to attach a group of payroll controls to an employee, which can save time when a number of controls need to be either updated or added to a new employee.
Once you create a Payroll control group (that applies to many existing employees and will apply to new employees as well), this feature then enables you to attach the payroll control group to these employee(s) as a mass update function. This makes the set up and management of employee payroll controls easy and efficient.
NOTE: The Attach Control Group To Employee – Test option enables you to ‘test’ the attachment of a group of Payroll Controls to employees before actually completing the operation of attaching the control group to an employee(s).
This report creates a listing of all the pay controls that will be affected by attaching the Payroll Control Group to the employee(s) for you to review and verify before performing the update.
To attach a group of payroll controls to employees:
- From the Payroll menu, select Periodic Activities > Mass Updates > Attach Control Group to Employee.
The Ctrl. Grp. To Emp page opens displaying the Employee tab.
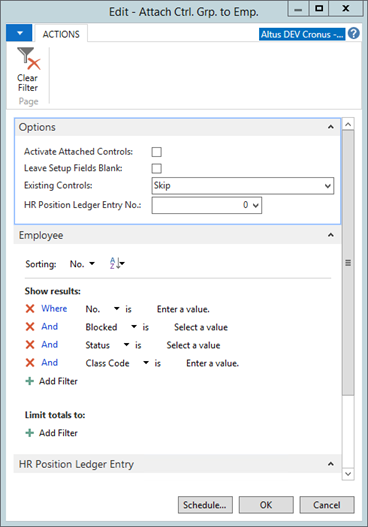
- In the Options FastTab, you can select the following:
-
Add a checkmark to the Activate Attached Controls check box to activate the employee payroll controls after they are added (by default they are not active).
-
Add a checkmark to the Leave Setup Fields Blank check box to leave the setup fields Monthly Schedule and Payroll Posting Group blank (by default, the settings from the Payroll Control Group Control are copied to the Employee Payroll Control).
-
From the Existing Controls drop-down, select the appropriate option to specify how to handle situations where a payroll control is already attached to the employee.
-
In the HR Position Ledger Entry No. field, click the Assist icon to select the ledger entries you want to include.
- In the Employee FastTab, enter the filters you want or remove any you do not need.
NOTES:
- To limit the amount of information, set the proper filters before you run the process. You can enter filters manually in the fields, or select from the drop-down lists provided.
- If the filter you want is not listed, you can add it to the bottom of the scroll list. In the Field column, enter the name of the filter field and then add the filter values in the Filter column.
- In the Payroll Control Group tab, add the desired filters if you want to update the employee payroll controls.
NOTE: Skip this tab to leave the controls that are already on the Employee Card intact. - Click OK.
The Payroll Control Group is attached/updated to the employee(s) you selected.
NOTE: You can also attaching payroll control groups from the Employee Card. The Employee Card enables you to attach a group of Payroll Controls to a single employee. For detailed steps, see Updating the Payroll Controls Using the Attach Control Group Function.
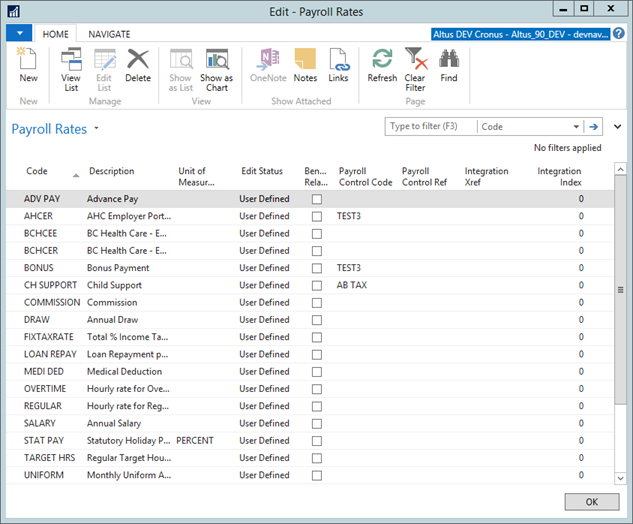
Updating Rates for an Entire Employee Class
The Mass Rate Update feature enables you to update rates for all employees within a specific employee class. This can save you a lot of time when a payroll rate has changed. The Payroll Rate Update function enables you to set filters, as required, to specify the parameters for the rate updated and to define how you want the rate adjusted, and to set a new effective date.
To update payroll rates for an entire employee class:
- From the Payroll menu, select Periodic Activities > Mass Updates > Rates.
The Rates page opens.
- Select the payroll rates code you want to update.
- From the Navigate tab, select Employees.
The Payroll Rate Employees page opens displaying all employees with that rate code (and effective date) attached to their record. - From the Actions tab, select Payroll Rate Update.
The Payroll Rate Update page opens.
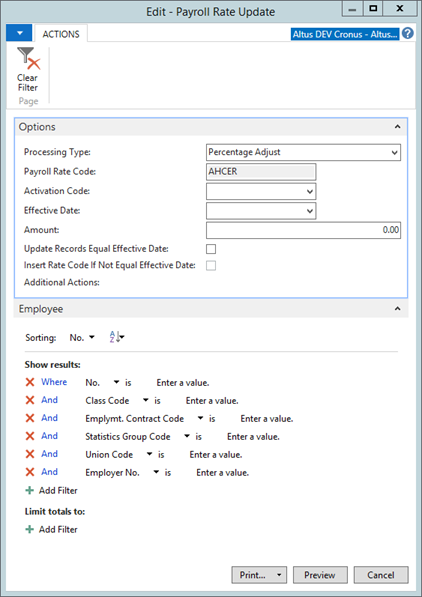
- In the Options tab, you can set the following:
- From the Processing Type drop-down, select the type of update you want to perform to the rate. The default is Percentage Adjustment.
- If the rate is dependent upon a specific activation timeframe, select the appropriate activation in the Activation Code field.
- In the Effective Date field, enter the date upon which the rate change comes into effect.
- In the Amount field, enter the new rate amount.
- To update records so that they equal the effective date, add a checkmark to the Update Records Equal Effective Date checkbox.
- To insert rate codes if the record does not equal the effective date, add a checkmark to the Insert Rate Code If Not Equal Effective Date checkbox.
- In the Employee tab, enter the filters you want.
NOTES:
- To limit the amount of information, set the proper filters before you run the update function. You can enter filters manually in the fields, or select from the drop-down lists provided.
- If the filter you want is not listed, you can add it to the bottom of the scroll list. In the Field column, enter the name of the filter field and then add the filter values in the Filter column.
- Once you define the changes for the rate, select:
- Preview to view a report showing what the update will include.
- Print to send the report to the printer (or File) and to run the process of updating the rate(s).
After the report is run, you are returned to the Payroll Rate Employees page displaying the updated rate information.
Updating Tax Information for All Employees or Groups of Employees at Once
When tax information changes, for example, the federal government modifies a deduction percentage or makes changes to eligibility, or benefit allocations change for certain benefit types. You can perform one update to apply across several employees and employee types. Not only does this save you considerable time, but it also eliminates the possibility of errors or omissions in performing crucial government tax information changes.
To update tax information globally or to large groups of employees:
- From the Payroll menu, select Periodic Activities > Mass Update > Mass Employee Tax Info Update.
The Mass Employee Tax Info Update page opens displaying the Employee tab.
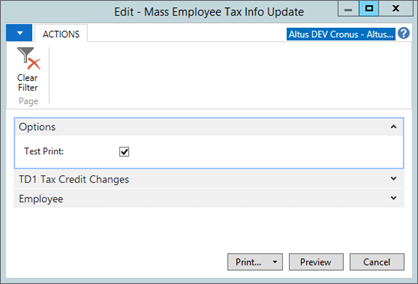
- In the Options tab, add a checkmark to the Test Print check box to print a test report first before creating the full update report. (This option is selected by default.)
- Expand the TD1 Tax Credit Changes FastTab and do the following:
- In the Effective Date field, enter the date upon which the tax information changes are set to occur.
- In the Reporting Authority field, select the reporting authority to which you need to make adjustments.
- In the Old Amount field, enter the existing dollar amount.
- In the New Amount field, enter the new dollar amount reflecting the update.
- Repeat for any additional reporting authorities that require updates.
- In the Employee FastTab, enter the filters you want to select the appropriate employees or groups of employees.
NOTE: To limit the amount of information, set the proper filters before you run the process. You can enter filters manually in the fields, or select from the drop-down lists provided. - Once you define the changes for the rate, select:
- Preview to view a report showing what the update will include.
- Print to send the report to the printer (or File to save a copy of the tax information updates) to create a physical copy for your records.
Importing Employee Other Authority Information
There is a data port and an XML port that imports data directly to the Employee Other Auth. Info table. The format of the input file is .csv comma delimited and has the following columns:
- Employee No.
- Other Authority Code
- Effective Date
- Filing Status Code
- Amount
- HR Position Code
- Employer Code
- HR Position Ledger Entry
To import other authority information:
- From the Payroll menu, select Periodic Activities > Mass Updates > Import Emp. Other Auth. Info.
- Locate the file (must be .csv – comma delimited format).
- Click Open.
- Under Direction, select the Import radio button.
- If the file has a header row, select the My file has a header check box.
- Click OK.
The file is imported into the Employee Other Auth. Info table.