

The following sections outline how to use the journals to post payroll activities, track employee time cards, and calculate time off.
Entering Hours Manually Using Time Journals
The Time Journal is a repository for time entries and is used when you are entering the data from manual timesheets for hourly employees.
NOTE: If you use the Time Entry portal, Scheduling, or Positions to record time for an employee, the Time Journal is not necessary or used.
The Time Journals page enables you to enter hours and earnings, which are split according to job, location, department, or dimension, for your employees. You can post these entries to the Job Ledger (on a daily basis, if required) and to the Payroll Journal.
The Time Journal is specialized (limited) in its payroll functionality, which means the remaining processing takes place in the payroll journal.
To enter time and earning information:
- From the Search field, type Time Journal.
- Select Time Journal.
- From the Payroll menu, select Time Journals.
The Time Journals page opens.
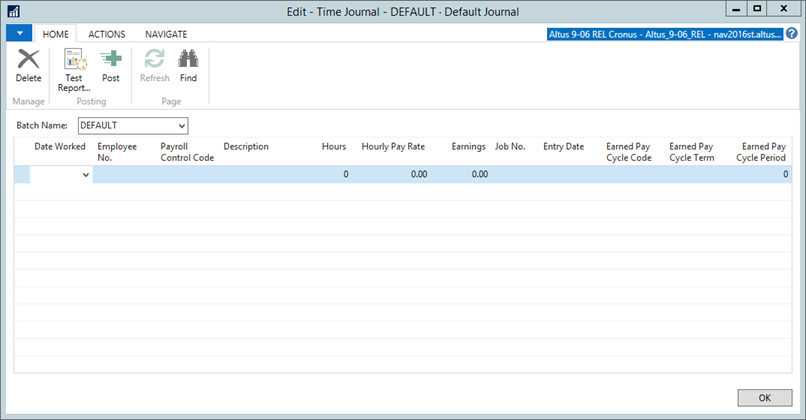
- Use the following table for assistance in completing the fields within the Time Journal page.
| Field | Description |
|
Date Worked |
The actual date that the employee worked the hours. |
|
Employee No. |
The employee number for the individual who worked the hours. |
|
Payroll Control Code |
The payroll control that is affected by the hours. EARN REG for Regular Hours, EARN OVER for Overtime Hours, and so on. |
|
Description |
The description defaults the description for the Payroll Control name. |
|
Hours |
Enter the actual number of hours worked. |
|
Hourly Pay Rate |
The pay rate per hour. If the rate does not default for the employee, enter the hourly rate here. |
|
Earnings |
The earnings are automatically calculated based on the number of hours and multiplied by the rate. |
|
Job No. |
The job that the hours are charged to. |
|
Job Task No. |
The job tax that the hours are charged to. |
|
Entry Date |
Defaults to the current work date, but you can override this date by entering the date in the field provided. |
|
Earned Pay Cycle Code |
Defaults from the Employee Card. |
|
Earned Pay Cycle Term |
Defaults from the Earned Pay Cycle Code field. |
|
Earned Pay Cycle Period |
Defaults based on the Date Worked field. |
- From the Ribbon, click New to create a new record and enter time for a different employee or additional hours for the same employee.
- Repeat steps 1-3 for as many time entries you need to add to the journal.
- Once you finish entering the time, post the entries. (See the following sections for details.)
Understanding the Controls Attached to the Time Journal
The buttons in the Time Journals page contain controls that enable you to view information connected to the journal information you created. As well, once you finish entering the time journal details, you can post this information to the Payroll Journal.
Line button:
- Dimensions: Selecting this option displays the dimensions for the currently selected line.
Employee button:
- Card: Selecting this option displays the Employee Card for the currently selected line.
- Ledger Entries: Selecting this option displays the ledger entries associated with the employee for the currently selected line.
Posting button:
- Test Report: Selecting this option displays the test report for the batch. See ‘Generating a Test Report’ for details.
- Post: Selecting this option displays a confirmation window. Click Yes to post the journal lines. The batch is posted to the payroll journal.
Generating a Test Report
Once you complete the time entries required, you can create a test report to ensure that the entries are error-free or, to correct any issues if errors do occur.
To generate a test report:
- From the Ribbon, click Test Report.
The Time Journal Test Report page displays. - Click Preview to see how the report will look once generated.
- Close the Preview page.
- Click Print.
- In the Print window, click OK to print the report.
Using Payroll Journals to Enter Manual Pay or Adjustments
Generally, the Payroll Journal fields are populated by the Entry Setup routine or the Payroll Calculation routine and are not manually entered. There are some reasons why the fields would be manually populated, for example, entry of beginning balances or making correcting adjustment entries, and so on. If manual entry is required, the Payroll Journals page is where you enter them.
NOTE: Once a computer generated paycheck is printed, you cannot modify it except by voiding.
To enter time and earning information:
- In the Search field, type Payroll Journal.
- Select Payroll Journal.
The Payroll Journal Template List displays. - Double-click a payroll template to open the Payroll Journal page.
The Payroll Journal page displays.
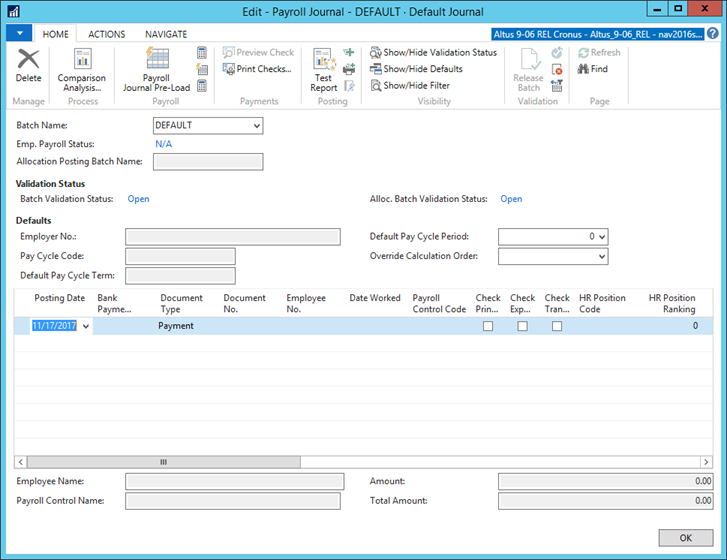
- From the Default Pay Cycle Period field, select the pay cycle period for which you want to enter pay or adjustments and click OK.
- Use the following table for assistance in completing the fields within the Payroll Journal page:
NOTE: There are a considerable number of fields on this page. For fields that are not used or required in your organization, you can leave blank or ‘Hide’ if you want. Right-click the header of any column and select Show Column. Remove checkmarks next to any field you want to remove and click OK.
| Field | Description |
|
Posting Date |
Enter the date the entry will be posted. This date serves as the check date. Enter ‘t’ for the current date and ‘w’ for the work date. |
|
Date Worked |
Enter the actual date that the employee worked the hours. |
|
Bank Payment Type |
This field displays the default based on the employee’s setup. The options are:
NOTE: If this entry is a payroll adjustment and no payment is involved, leave this field blank. |
|
Document Type |
This field indicates if the entry is a payment. If not, the field is blank to indicate the entry is an adjustment. |
|
Document No. |
If the Bank Payment Type is Computer check or Electronic Payment, the application is triggered to assign a check number or remittance advice number automatically. If this is an adjusting entry (Bank Payment Type is blank), you can enter a document number yourself, if required. |
|
Employee No. |
The employee number for the individual you want to pay. |
|
Employee Name |
This field is automatically populated based on the employee number selected. |
|
Payroll Control Code |
If the payroll control is calculated, then a pay journal line is generated for each active payroll control from Employee Payroll Controls. The payroll controls are displayed in the same sequence that they appear in the Calculation Order. |
|
Description |
Displays a description for the payroll control code. |
|
HR Position Code |
Displays the HR position code for the selected employee. |
|
HR Position Ranking |
Displays the ranking assigned to this position. |
|
HR Position Ledger Entry No. |
Displays the HR position ledger entry number for the employee. If the employee occupies more than one position, select the position for which you are making a payment or adjustment from the drop-down list and click OK. |
|
Hours Minutes |
For Hourly payroll control types, you can enter actual minutes rather than decimal divisions of an hour. Your entry is stored in the Payroll Amount field as a decimal value. For example, if you enter 1.45 for 1 hour 45 minutes, your entry is translated to 1.75 (hours) and displays that amount in the Payroll Amount field. |
|
Calculated |
This checkmark is automatically populated for any lines that are calculated by the Payroll Calculate process. Amounts that have been entered by the user are not checked. |
|
Payroll Amount |
The amount displayed in this field is dependent upon the payroll control type for the line. It could display a number of hours or an actual dollar amount. Based on G/L Post Type of the Payroll Control, this amount may post to the General Ledger. Generally, this amount is what appears on the employee’s pay stub. This amount is stored in the Payroll Journal. |
|
Payroll Control Type |
This field displays the payroll control type from the payroll control code assigned to this line. This field is not editable. |
|
Date Worked |
This field contains the day that the employee actually worked. |
|
Pay Cycle Code |
This field defaults from the Employee Card and stores the code of the type of pay cycle (weekly, biweekly, monthly, and so on). |
|
Pay Cycle Term |
This field displays the specific term (normally year) that is automatically populated based on the Pay Cycle Code. |
|
Pay Cycle Period |
This field displays the current pay cycle period. |
|
Taxable Amount |
For calculated Payroll Controls, this value contains the amount used to calculate the payroll amount. This amount is stored in the Payroll Journal. |
|
Adjusted Amount |
This variable is not stored and is only used as a temporary holding place while the payroll control is executed. |
|
Temp Amount |
This variable is not stored and is only used as a temporary holding place while the payroll control is executed. |
|
Insurable Hours |
This field displays the number of insurable hours worked during this pay cycle period. |
|
Dimension Combination Code |
Displays the dimension combination code that will be applied to this pay adjustment. |
|
Override Earn/Exp Acc. No. |
Displays the G/L account number for an override to apply to this pay adjustment when posted. |
|
Employer No. |
Displays the employer number based on the HR position, not the Employee Card, but this can be changed. From the drop-down, select the appropriate option. |
|
Work Reporting Authority Code |
This field stores the state reporting authority code of where the employee actually worked. It defaults from the Employee Card. |
|
Province |
This field shows the province that was entered on the Default Work Reporting Authority Code (previous field) for that employee. |
|
Locality |
This field shows the locality that was entered on the Default Work Reporting Authority Code for that employee. |
|
Job No. |
This field displays the job number associated with this particular pay adjustment. |
|
Job Task No. |
If the job associated with this entry contained multiple tasks, enter the job task number code associated with this entry. |
|
Work Type Code |
If this field is displayed in the journal, the default work type code entered in the default work type field on the employee’s card will be displayed here. This field can be changed. |
|
Payroll Posting Group |
Determines to which G/L or Bank Account this payroll data will be posted. The program automatically retrieves this information from the payroll control card. |
|
Dimension Codes |
You may see up to eight additional fields depending on the dimensions you have set up. Some examples could be Departments and Projects. These values will default from the employee’s card and can be overwritten if necessary. |
|
Entry Date |
This field contains the date that the payroll journal line was created/entered. |
|
Pay Cycle Code |
This field displays the pay cycle code for which the pay adjustment is being processed. |
|
Pay Cycle Term |
This field displays the pay cycle term for which the pay adjustment is being processed. |
|
Pay Cycle Period |
This field displays the pay cycle period for which the pay adjustment is being processed. |
|
Pay Period End Date |
This field displays the pay period end date for the term in which the pay adjustment is being processed. |
|
Earned Pay Cycle Code |
This field displays the code of the type of pay cycle (weekly, biweekly, monthly, etc.) that the Payroll Control was earned or worked in. |
|
Earned Pay Cycle Term |
This field displays the specific term (normally year) that the Payroll Control was earned or worked in. |
|
Earned Pay Cycle Period |
This field displays the actual pay cycle period that the Payroll Control was earned or worked in. |
|
Regular Pay |
This check box indicates the journal line is part of regular payroll. (A checkmark is the default entry.) Leave this field blank if this line is not part of a regular payroll. |
|
HR Request No. |
Displays the HR request number associate with this record, if applicable. |
- From the Ribbon, click New to create a new record and enter time for a different employee or additional hours for the same employee.
- Repeat for as many payroll entries you need to add to the journal.
Once all the entries are made, computer generated checks are printed and the direct deposit file is exported and transmitted, you can print a posting test report, post your payroll entries, and print a posting report while posting.
Understanding the Controls Attached to the Payroll Journal
The buttons in the Payroll Journals page contain controls that enable you to view information connected to the journal information you created. Additionally, you can perform calculations for the batch or for one employee, along with view and fix any calculation errors that occurred.
As well, once you finish entering the pay details and verify the calculations, you can generate a test report, post this information, and print the posting details for reference.
Line button:
- Dimensions: Selecting this option displays the dimensions for the currently selected line.
Employee button:
- Card: Selecting this option displays the Employee Card for the currently selected line.
- Ledger Entries: Selecting this option displays the ledger entries associated with the employee for the currently selected line.
Payroll button:
- Journal Header: Selecting this option opens the payroll journal header for the currently selected line. You can make changes to the header, if required. Enter text or select from the available options to make your changes.
- Card View: Selecting this option switches to the Card view, which contains additional details for the selected employee (based on the currently selected line). See, Viewing Employee Payroll and Calculations in Detail for steps and details.
- Entry Setup: Selecting this option opens the Entry Setup page for the currently selected line. To populate the lines in the journal, you can use entry setup. All payroll controls that have Auto Insert checked are added to the journal for the pay cycle and employees selected.
- Calculate: Selecting this option opens the Calculate Payroll page where you can calculate payroll for a group of employees.
- Calculate Single Employee: Selecting this option opens the Calculate Single Employee page enabling you can calculate payroll for a specific employee (the selected employee).
- Calculation Errors: Selecting this option opens the Payroll Errors page which displays the calculation errors for the batch or single employee, if an error occurred.
- Import Payroll Journal: Selecting this option opens the Import Payroll Journal page where you can import a file and assign a payroll control code, document number and pay cycles to the imported journal.
- Payroll Journal Pre-Load: Selecting this option opens the Payroll Journal Pre-Load page where you can load all entries from:
- Position Ledger Entries – entries for assignments within the Calculation Start and End Date are inserted into the journal. Entries that have an effective date within the periods are pro-rated based on the number of days for the period.
- Load Employee Allocations: Selecting this option opens the Load Allocations page where you can load allocations that were pre-set for the employee on the Employee Card under ‘Employee Allocations’.
- Get Time Entries: Selecting this option opens the Time Entry Payroll Calculation page where you can retrieve all timesheets that are approved for the pay period in question.
- Comparison Report: Selecting this option generates a page that displays a comparison between the current payroll results and a previous pay. The information is grouped by employee number and payroll control code. The results are displayed in the Difference in Pay page where you can view and filter the results.
Payments button:
- Preview check: Selecting this option opens the Payroll check Preview page displaying the details to appear on the check for the selected employee.
- Preview check stub: Selecting this option opens the Payroll check Stub Preview page displaying the details to appear on the check stub for the selected employee.
- Bank Accounts Used: Selecting this option opens the Journal Bank Account Usage page where you can create a report of the bank accounts used in the batch.
- Print checks: Selecting this option opens the Payroll Check (CPay) page where you can print the payroll checks/remittance advices.
- Direct Deposits: Selecting this option displays an additional menu of options; Export, Void, and Transmit.
- Export: opens the Export Direct Deposits page enabling you to create the electronic file to be sent to the bank.
- Void: opens the Void/Transmit Direct Deposits page enabling you to void the electronic file.
- Transmit: opens the Void/Transmit Direct Deposits page enabling you to transmit your electronic file directly to the bank. (This depends on your bank account card setup.)
- Void Single check: Selecting this option enables you to void a single check in the batch (for the currently selected employee). Click Yes to proceed.
- Void All checks: Selecting this option opens a notification window to confirm that you want to void all the checks for the batch in the Payroll Journal page. Click Yes to proceed.
Posting button:
- Test Report: Selecting this option displays the test report for the batch. See Generating a Test Report for details.
- Post: Selecting this option displays a confirmation window. Click Yes to post the journal lines. The batch is posted to the payroll journal.
- Post and Print: Selecting this option displays a confirmation window. Click Yes to post the journal lines and print the posting report. The batch is posted to the payroll journal and a payroll register report is printed.
Generating a Test Report
Once you complete the payroll entries required, you can create a test report to ensure that the processing will complete error-free or, to correct any issues if errors do occur.
To generate a test report:
- Open the Payroll Journal page.
- From the Ribbon, click Test Report.
The Payroll Journal Test Report page opens. - In the Options section, select from the available options to determine what data prints in the report. (Regular Test Report is the default option selected.)
- Once you define your options for the test report, click Preview to see how the report will look once generated.
- Close the Preview window.
- Click Print.
- In the Print window, click OK to print the report.
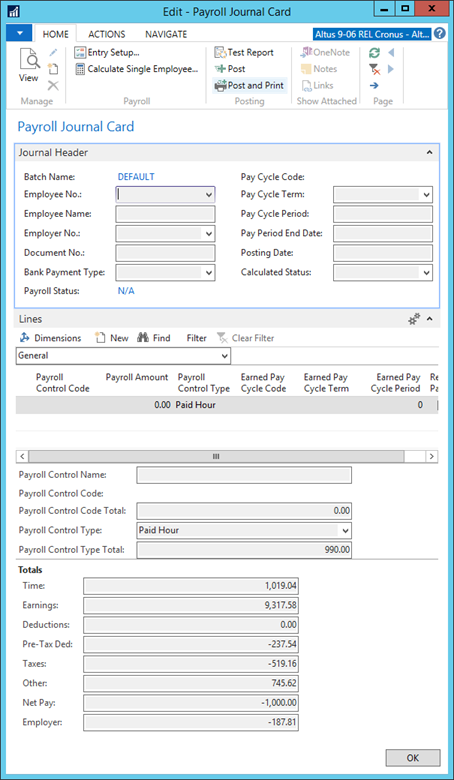
Viewing Employee Payroll and Calculations in Detail
When creating entries typically you perform your work in the journal view (grid). However, if you are looking more closely at a single employee, the Payroll Journal Card provides more detailed view that makes it much easier to understand details and calculations pertaining to a single employee at a time.
To switch to the Payroll Journal Card:
- Open the Payroll Journal.
- From the Ribbon, click the Navigate tab and then click Card View.
- Click Payroll and select Card View (shortcut key = <shift> F4).
The Payroll Journal Card opens displaying the payroll details for the employee.
Using Accrual Journals for Paid Time off Calculations
The Accrual Journal option enables you calculate employer liabilities, which are based on paid time off (PTO) hours accumulated by your employees (paid time off includes vacation time accrued, sick time accrued and any other accruals), and post the value of these liabilities to the general ledger, reversing the entry automatically the next day, the closing date or on the last day of the next period.
In addition, these journals allow you to create payroll accruals for payroll earned but not yet paid. You can also make payroll-related manual adjustments to your general ledger using this journal.
Recording Payroll Earned but Not Yet Paid Accruals
Technically, payroll expenses should appear on financial statements in the same period as they were incurred, that is, the period in which the work was done. The payroll journal entries are posted as of the date of the paycheck, which may very well fall into another financial period.
To resolve this inconsistency, you must post a payroll accrual covering the payroll which has been earned, but not yet paid. This accrual must be reversed on or by the actual payroll date so that payroll entries are never double posted.
To know both the reversal date and the actual accrual amount to post, this accrual can be calculated only after the first payroll of the next financial period has been posted. If the pay period end date of this payroll is on or before the ending date of the financial period (the accrual date), then 100% of the payroll is accrued in that financial period. If the pay period end date of this payroll is after the accrual date, then only a portion of the payroll is accrued in that financial period. This portion is determined by the number of days of the payroll period (determined by the pay cycle) that is on or before the accrual date divided by the total number of days in the payroll period.
Although the entire payroll is calculated, only the expenses are posted to their actual G/L accounts as set up in the posting groups. The liabilities (and net pay) are all posted to a single accrued payroll account, which is usually a liability account.
To record accruals:
- In the Search field, type Accrual Journal.
- Select Accrual Journal.
The Accrual Journals page displays.
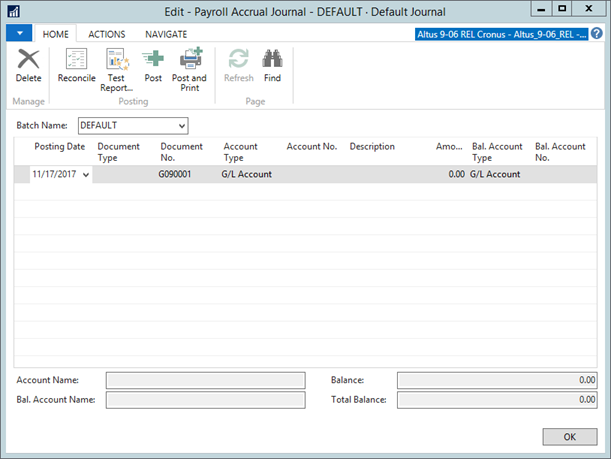
NOTE: If you have only one journal, the Payroll Accrual Journal page does not display. Instead, the program displays the default Accrual Journal page. To set up another journal, type and select Journal Templates from the Search field. If you need to set up a new batch, in the Accrual Journal Batch List page, click the Batch Name field and enter the new batch. - Use the following table for assistance in completing the fields within the Accrual Journal page:
| Field | Description |
| Posting Date | Enter the date to post the entry. |
| Document Type |
Use this field to indicate the document type for the entry on this line. Your options include leaving it blank, which would be an ordinary G/L entry or payment (for payments from a customer or to a vendor). This field can also contain: Invoice, Credit Memo, Finance Charge Memo, Reminder, and Refund. For the purpose of a payroll accrual entry, the Document Type is normally blank, since these entries are posted to a G/L account. |
| Document No. | The Document No. field is automatically populated by the No. Series designated on the batch. If you want to assign numbers manually, remove the No. Series from the General Journal Batch form. |
| Account Type | Several options are available; however, accrual entries are usually G/L account. |
| Account No. | For the purpose of a payroll accrual entry, the Account Type defaults to G/L account and the G/L account No. is retrieved from the Payroll Posting Groups tables. |
Description |
This field displays a description of the entry. The default description is a combination of the payroll class and the name of the payroll control code. You can change the description. |
| Amount | This is the amount that is posted to the G/L account for this entry. The program, using the Payroll Control showing in the Description field, calculates this field. |
| Bal. Account Type | For the purpose of a payroll accrual entry, the Bal. Account type defaults to G/L Account and the G/L Account No. is automatically retrieved from the Payroll Posting Groups table. |
| Bal. Account No. | Select the number of the account to which that the entry on the journal line will be posted. The list that appears depends on the balancing account type you selected in the Bal. Account Type field above. |
Recording Paid Time off Accruals
There are three methods for handling paid time off (PTO):
Method 1: Accrue at Time of Posting Payroll
You can create a payroll control to post the value of the PTO hours at the time that the hours are accrued or used during normal payroll processing. This is handled the same as any other employer paid benefit, by posting to a liability account and to an expense account.
The advantage of this method is that everything is handled automatically during normal payroll processing, and no special accrual entries are necessary.
The disadvantage is that your liabilities may be misstated, especially if employees accrue PTO hours for long periods of time. This is because your liability for PTO hours is computed at the employee’s current rate of pay, while this method accrues the liability at the rate of pay the employee had at the time the hours were accrued.
Method 2: Accrual Journal with Next-Day Reverse
You can create a payroll control type Accrual, which calculates the liability based on the total number of hours accrued. Payroll controls of this type are not calculated during normal payroll processing, but are calculated in the payroll accrual journal. Again, they are posted the same way as any other employer paid benefit, by posting to a liability account and to an expense account. However, the entry is automatically reversed the day after it is posted, so the entries do not accumulate.
The advantage of this method is that your liabilities are stated correctly as of the day you post this accrual. If you use this method, you should run it once a month, just before you print monthly financial statements.
The disadvantage is that your liabilities are correctly stated only on the day the accrual is posted, and at all other times these liabilities are not stated at all.
Method 3: Accrual Journal with Reverse on Next Accrual
The third method is similar to the second. The only difference is that you modify the date the entry is reversed to match the date on which you will next run the accrual. If you use this method, you should run it once a month, on the last day of the month, just before you print monthly financial statements.
The advantage is that you can print your financial statements at any time, and the preceding accrual will still be there. Most of the time, it will be accurate enough for most mid-month reporting purposes.
The disadvantage is that it can be inaccurate, depending on how many pay cycles occur between months. In addition, it is somewhat inflexible because it must be run at the end of the month. Once it has been run, it cannot be run again until the next month is over (and the original entry is reversed).
Calculating Accrual Journal Entry for Reversals (Methods 2 and 3)
The accrual journal enables you to generate automatically calculated entries. (Generally you would not make manual entries in the accrual journal. The calculation function along with payroll controls of the type Accrual, populate the journal for you automatically.)
To generate an automatically calculated journal entry:
- In the Accrual Journals page, from the Batch Name field (if you have multiple batches), select the appropriate batch from the drop-down list.
- From the Ribbon, click Actions and then click Paid Time Off.
The Calculate PTO Accruals page opens.
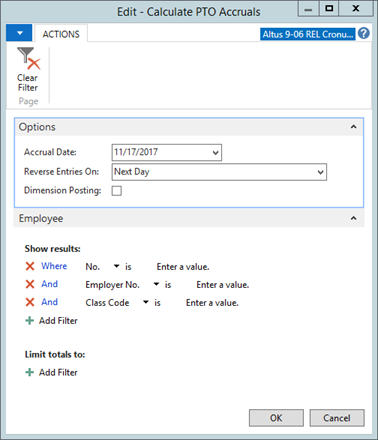
- Use the following table to complete the fields in the Calculate PTO Accruals page:
| Field | Description |
| Accrual Date | The date of the accrual. |
| Reverse Entries On | Select one of the options from the Reverse Entries On drop-down; Next Day, Closing Date (can be used only on the last day of the fiscal year), or Last Day of Next Period. |
- Click OK to start the calculations.
The accrual is calculated and the results of all the accruals set up as payroll controls. A reversing entry is created (calculated from the accrual date using the selection you made in the Reverse Entries On field).