To Mass Create Records of Employment:
- Open Microsoft Dynamics NAV 2016.
- In the Search field, type Mass Create Records or navigate to Human Resources Management > Periodic Activities > Mass Processing HR Requests.
- Select Mass Create Records of Employment.
The Mass Create Records of Employment page displays.
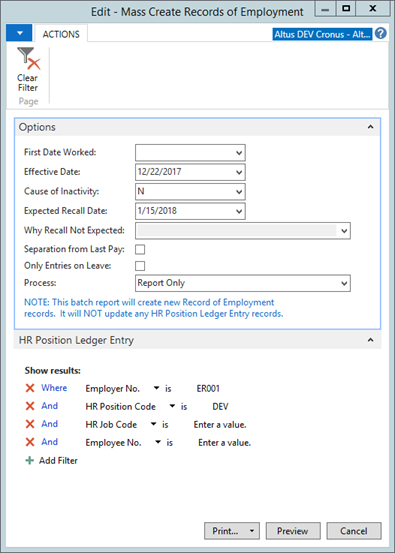
- In the First Date Worked field, either specify the first date worked or leave the field blank. If blank, the system determines a value for First Date Worked from the first paid hour Payroll Ledger entry record that has a date worked on or after the Assignment Start Date from the related HR Position Ledger Entry record.
- In the Effective Date field provide an effective date for the
Record of Employment. This field determines which position assignment records are considered using the
calculation start and end dates from the HR Position Ledger Entry record.
NOTE: If the Separation from Last Pay checkbox is blank, the effective date is used as the separation date in the newly-created Record of Employment record. - In the Cause of Inactivity field, choose a code representing the reason for inactivity.
- Complete either the Expected Recall
Date or Why Recall Not
Expected fields:
- Expected Recall Date: This value is used to populate the Expected Recall Date field in the newly-created Record of Employment record. If this field is left blank, the system uses the value in the Why Recall Not Expected field to populate the newly-created Record of Employment record.
- Why Recall Not Expected: if the employee is not expected to be recalled, provide a reason in this field.
- Add a checkmark to the Separation from Last Pay check box if you want to populate the Date of Separation field in the new Record of Employment record with the date worked value from the employee’s last Paid Hour Payroll Ledger Entry record. Leaving the check box blank populates the Date of Separation in the new Record of Employment record with the value entered in the Effective Date field.
- Add a checkmark to the Only Entries on Leave check box to restrict the batch report to only see HR Position Ledger Entry records in which the On Leave field is checked.
- In the Process drop-down, choose either Report Only (to preview results) or Create ROE.
- (Optionally) Use the HR Job and HR Position FastTabs to filter results to a particular HR job or position code.
- (Optionally) You can use the HR Position Ledger Entry FastTab to filter your results by Employer No., HR Position Code, HR Job Code, or Employee No.
- Click Preview.
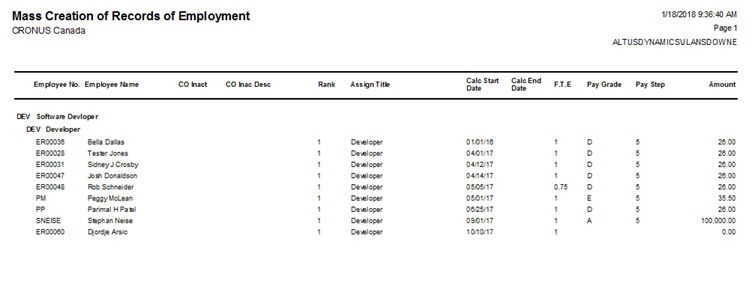
The following is an example generated report: