

Use the HR Requisitions function to generate requisitions for HR transactions that are processed by either (or both) the Human Resources and Payroll departments. Using the HR Requisitions ensures a complete record is generated for the requisition, which adds the completion steps and assigns the steps to the appropriate individuals responsible for completing the task.
Note: The HR Requisitions function in the Employee Center does not Process All Steps. This task is done in NAV by the user who has the permissions to do so.
The NAV user will also have to refresh the Unprocessed Steps number in the Fact Box by simply clicking on Process Individual Steps and then exiting that view. Only then will the Unprocessed Steps value refresh.
Viewing the HR Requisition List
HR Requisitions stores the complete list of HR Requisitions that a manager has submitted. There are many ways to filter and view the information as well as search for specific requisitions. A manager can also view and edit the details for any of the HR Requisitions displayed in the list.
To view your HR Requisitions list:
1. Click Manager Self Service from the menu bar then select the HR Requisitions link.
The HR Requisitions window opens displaying a list of the HR Requisitions you have created and that have a status of Open.
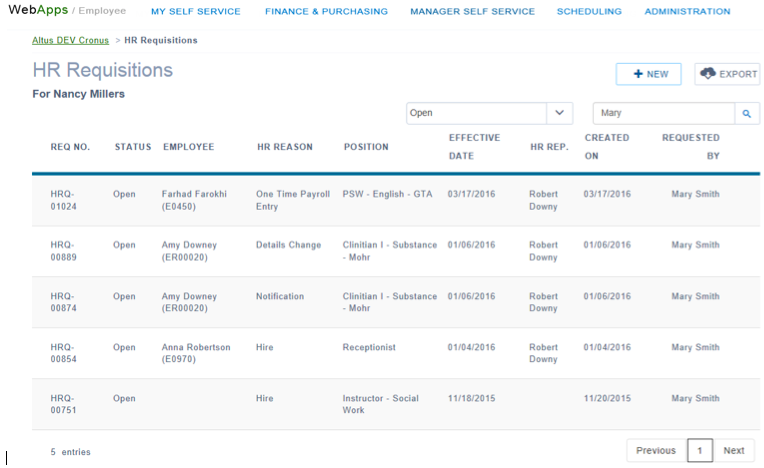
2. View the HR Requisitions for a specific status by selecting the status from the drop-down.
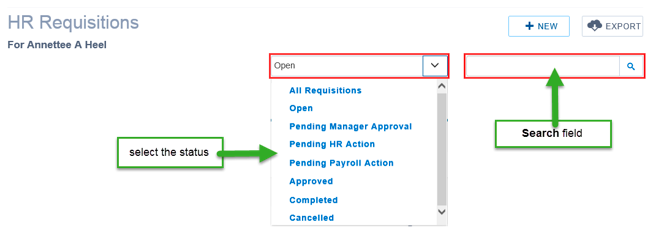
3. To search for a specific requisition, using the Search field enter the information you know for it and click the Search icon.
Exporting the HR Requisitions List to Excel
Users can export the items in their HR Requisition list to Excel where they are able to save and/or manipulate the data.
To export the HR Requisition List to Excel:
1. Select the status you want to export. Only the selected status is exported. To export all the HR Requisitions, select All Requisitions).
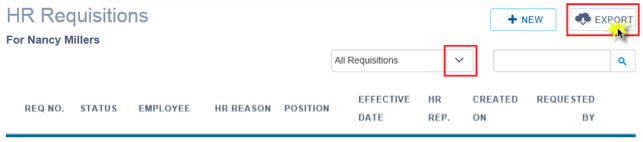
2. Click the Excel Export button.
3. In the File Download window, click Open to view the data in Excel.
The HR Requisition data displays in an Excel file.
4. To keep this data for your records; from the File menu select Save As, create a file name, and click Save.
Viewing and Editing the Details for an Existing HR Requisition
A manager can access and edit an HR Requisition that has a status of Open (not yet submitted for processing) as often as required. As well, a manager can view the details for an HR Requisition in any status. However, once they submit an HR Requisition, it cannot be changed unless it is denied (requires additional information, etc.), which means it is returned to the manager and the status returns to Open.
If for some reason a manager needs to make changes to an already submitted record, they will need to create a new HR Requisition that then processes the difference applied to the original one. When creating the new requisition, use the Notification process type to provide the additional information/changes to the existing requisition and reference the HR Requisition number for the original record. (For details on using the Notification process type see, the next section, Creating a New HR Requisition and follow the Adding the Notification Details steps.
Depending on the status of the requisition, editing options may be limited.
To view or edit an HR Requisition:
1. Locate the HR Requisition you want by selecting from one of the statuses available and using the search function.
2. Hover over the line of the requisition you wish to edit to view the hidden menu options.

3. Click the View link.
The HR Requisition window opens for the selected item.
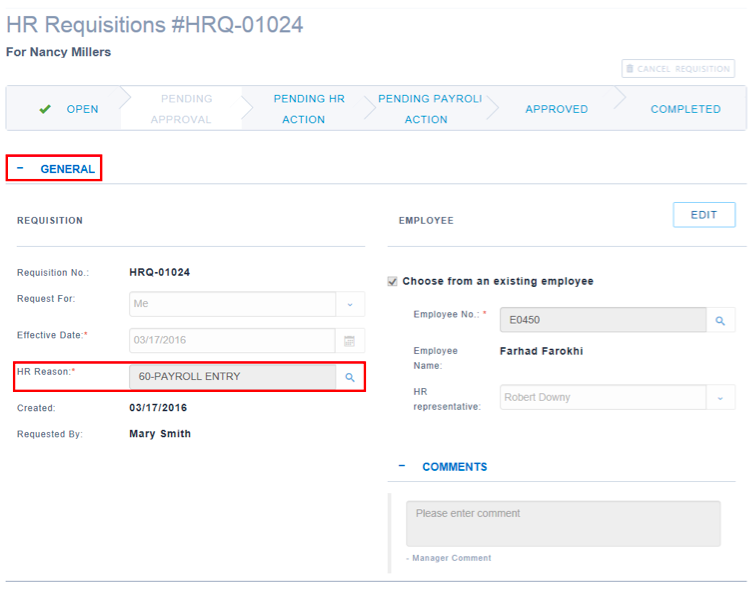
NOTE: Depending on the Process Type (Reason Code), different collapsible sections will be visible below the General collapsible section.
4. Click the Edit button to enable changes to the editable fields.
5. Using the editable fields within the collapsible sections available, make the required changes to the requisition.
6. As you finish making your changes, click the Save button.
7. Conversely if you have made a mistake you can click Cancel to cancel your most recent unsaved changes.
Creating a New HR Requisition
HR Requisitions are used for existing employees that report to a manager, employees that used to work for the organization that a manager wants to rehire, and to create employee records for new hires. Depending on the type of HR Requisition, there are different methods for initiating the requisition.
Selecting the Appropriate HR Requisition Process Type
Each HR Requisition that is created must have a Process Type attached. (The reason codes vary depending on the company’s particular implementation; however, the reason code selected must be based on the correct process type.)
The following Process Types are used when generating HR Requisitions and are linked to the Reason Codes available:
| Process Type | Details |
|---|---|
|
Hire |
Use a reason code with this process type when creating a requisition for a new hire. |
|
Assignment Change |
Use a reason code with this process type to request a change in assignment or position for an employee. |
|
Details Change |
Use a reason code with this process type to request a change in the details for an employee, such as FTE or Step or Grade, Assignment End Date, etc. |
|
Payroll Entry |
Use a reason code with this process type to requisition an entry that will be processed by payroll such as a bonus or a termination payment. |
|
Termination |
Use a reason code with this process type when terminating an employee. |
|
Notification |
Use a reason code with this process type when sending any other kind of notification or requisition to HR/Payroll that does not fit into the above categories. Include the details in the Attachment and/or Comment fields. The Notification process type is also used to make changes to an already submitted HR Requisition. For example, if you make an error within the HR Requisition, but do not realize until it has already been submitted, or if you have additional information/files to include, you would use the Notification process type to create a new HR Requisition and then within the Comment field, reference the original requisition (HR Requisition Number) and provide complete details for the update to the original requisition. |
NOTE: As mentioned previously, there may be multiple reason codes with the same process type attached. Use the Description field to determine the correct reason code to use. Reason codes may use the same process type to capture the data, but are likely to be linked to different actions in processing the requisition. It is critical to select the correct reason code.
Creating an HR Requisition for an Existing Employee that Reports to You
When creating an HR Requisition for an existing employee that is on a manager’s direct team, the manager will need to select from the available reason codes for existing employees.
The following are the available process types for existing employees:
- Hire
- Assignment Change
- Details Change
- Payroll Entry
- Notification
- Termination
To create an HR Requisition for an existing employee:
1. In the HR Requisitions page, click the New button.
The HR Requisition window opens with the General collapsible section expanded. (A red asterisk * indicates required fields.)
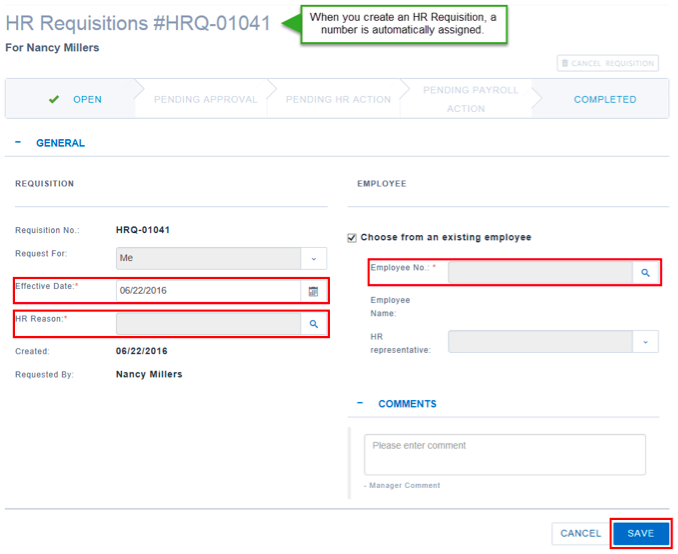
2. Under the Employee section click the Search icon next to the Employee No. field.
The Employee Lookup window opens.

3. Click the Select button in the last column on the right for the applicable employee.
The requisition re-opens with the Employee No. and Employee Name fields populated.
4. From the HR Representative drop-down, select the appropriate individual. (This ensures the appropriate HR representative receives the HR Requisition notifications).
5. In the Requisition section, click the Search icon next to the HR Reason field.
The HR Reason Code Lookup window opens.
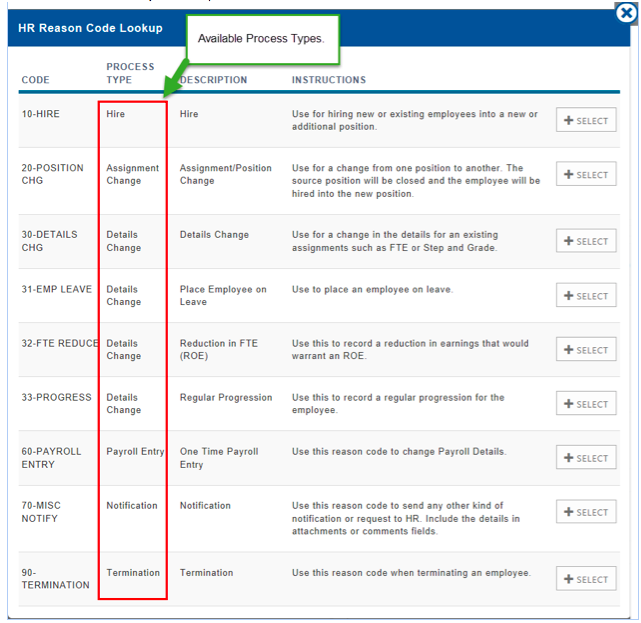
6. Click the Select button in the last column for the applicable reason code (Hire, Termination, Assignment Change, Details Change, Payroll Entry, Notification, etc. Again, the reason codes available depend on your particular organization’s configuration).
The HR Requisition window re-opens with the HR Reason field populated and depending on the reason code you selected, you see different collapsible sections added to the HR Requisition window.
7. In the Manager Comments section, provide a detailed explanation for the HR Requisition.
NOTES:
- If you select Hire for an existing employee for whom you are adding a position, the Assignment collapsible section is added and you must enter required details. See: Adding the Assignment and Payroll Details for Hire of existing employees into an additional position.
- If you select Assignment Change or Details Change the Assignment collapsible section is added and you must enter required details for the assignment or details change. See: Adding the Assignment and Payroll Details for an Assignment Change or Adding the Assignment and Payroll Details for a Details Change for necessary steps.
- If you select Payroll Entry, the Payroll Entry collapsible section is added where you must enter required details for the payroll entry. See: Adding the Entry Details for a Payroll Entry for necessary steps.
- If you select Termination, the Termination Details collapsible section is added where you must enter the required details for the termination of employment. See: Adding the Termination Details for necessary steps.
- If you select Notification, the Comments collapsible section becomes required and you must enter the details for the requisition. See: Adding Comments to the Notification for necessary steps.
Adding the Assignment and Payroll Details for Hire of existing employees into an additional position
A manager may need to add an additional position to an existing employee such as when hiring an employee into two part time positions.
NOTE: If you are creating an HR requisition for a new hire, these instructions do not apply. Please go to: Creating a New Hire HR Requisition Record.
To add the required information to the Assignment collapsible section when hiring an existing employee into an additional position:
When you select the Hire reason code in the General collapsible section the Assignment collapsible section is added to the HR Requisition and it displays expanded. A red asterisk * indicates required fields.
a. Click Edit to enable the fields in the Assignment collapsible section.
b. Click the Search icon next to the HR Position field.
c. Add information to the other fields in the Assignment Detail section as needed. Depending on your configuration most fields will auto populate once you select the HR
Position.
d. Scroll down to the Payroll detail section. Again most fields will have auto populated.
e. If this is a job-share hire or a part-time position, don’t forget to adjust the Hours/Week field accordingly. Other fields in the Payroll Detail section will readjust accordingly.
f. Click the Save button at the bottom right of the Assignment collapsible section.
Go to Step 8 to complete the HR Requisition for an assignment change.
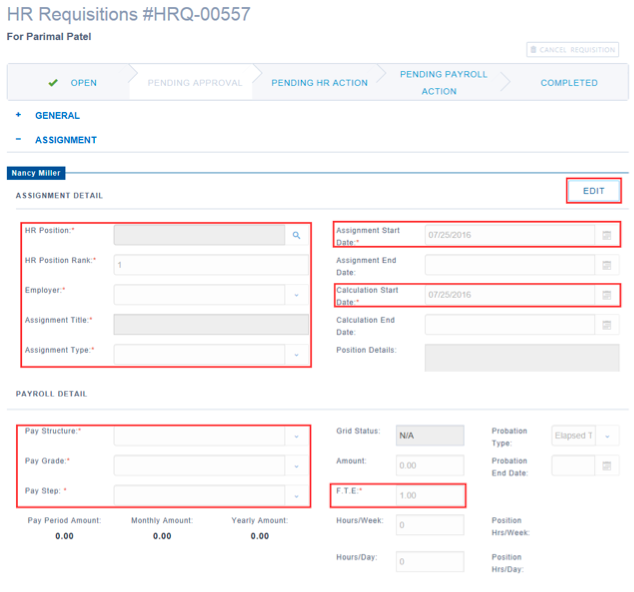
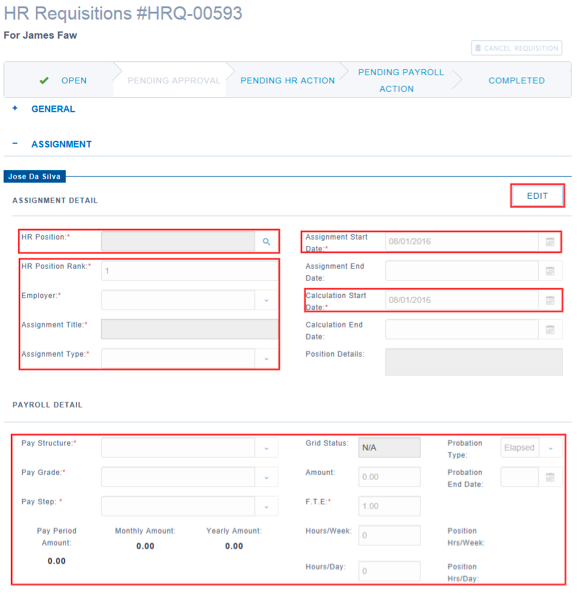
Adding the Assignment and Payroll Details for an Assignment Change
To add the required information to the Assignment collapsible section:
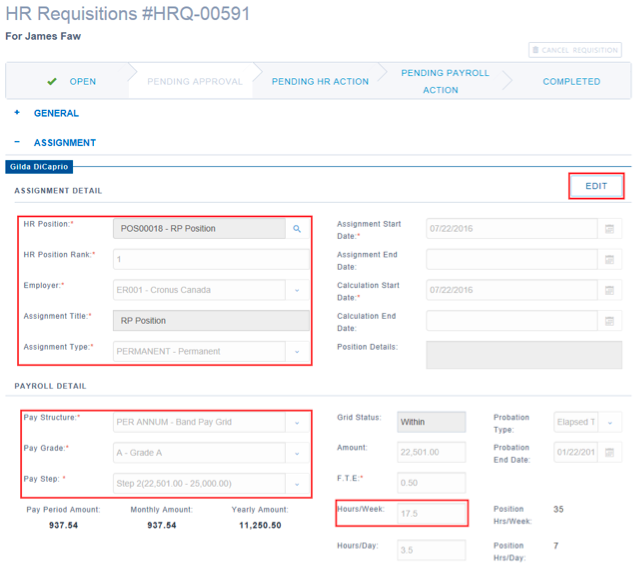
When you select the Assignment Change reason code in the General collapsible section the Assignment collapsible section is added to the HR Requisition and it displays expanded. A red asterisk * indicates required fields.
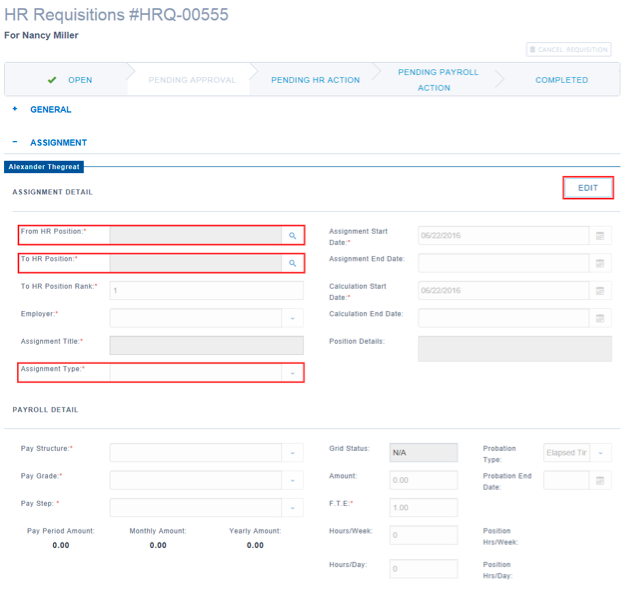
a. Click Edit to enable the fields in the Assignment collapsible section.
b. Click the Search icon next to the From HR Position field.
The Employee Position Lookup window opens.
c. Click the +Select button in the last column of the applicable row.
d. Click the Search icon next to the To HR Position field.
The Employee Position Lookup window opens.
e. Click the +Select button in the last column of the applicable row.
The Assignment Details section now also displays with the To HR Position Rank field, the Employer field and the Assignment Title field populated.
f. In the Employer field, select the appropriate Employer for this assignment. This value will default form the Position but can be manually changed if needed.
g. In the Assignment Type field, select the appropriate option. All options will be categorized as Casual, Permanent, Sessional, or Contract.
h. If the assignment is temporary and has an end date, in the Assignment End Date field, enter the date.
i. In the Calculation Start Date field, enter the date from which calculations should start if it is different than the Assignment Start Date.
j. Scroll down to the Payroll Details section.
The Payroll Details section automatically populates depending on the selections you have made in the Assignment Details section (A red asterisk * indicates required
fields). You may want to manually adjust some of the selections.
k. From the Pay Structure drop-down select the payment structure for this employee.
l. From the Pay Grade drop-down select the payment grade for this employee.
m. From the Pay Step drop-down select the payment step for this employee.
n. In the Amount field, enter the yearly salary amount.
o. In the F.T.E. field, enter the full time equivalency for this assignment.
NOTE: Once you complete the above fields, the Pay Period Amount, Monthly Amount, and Yearly Amount fields are calculated and displayed.
p. In the Hours/Week field, enter the required hours the employee must work per week.
q. In the Hours/Day field, enter the required hours the employee must work per day.
r. If the employee is required to complete a probationary period, enter the appropriate details in the Probation Type, Probation End Date, and Probation Hours fields.
s. Click the Save button at the bottom right of the Assignment collapsible section.
Go to Step 8 to complete the HR Requisition for an assignment change.
Adding the Assignment and Payroll Details for a Details Change
To add the required information to the Assignment collapsible section:
When you select the Details Change reason code in the General collapsible section the Assignment collapsible section is added to the HR Requisition and it displays expanded (A red asterisk * indicates required fields).
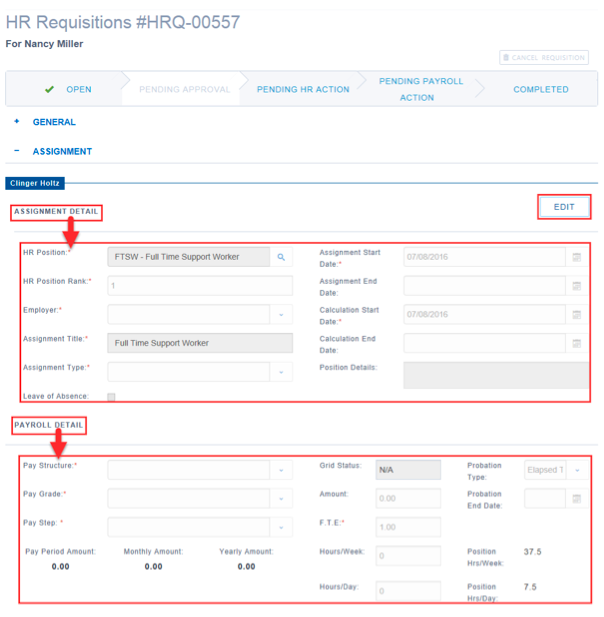
a. Click the Edit button.
b. Most of the fields in the Assignment Detail section auto populate. Ensure all mandatory fields are populated and you add the information about the detail(s) to be
changed.
c. If you need to change to a different HR Position, click the Search icon.
The Employee Position Lookup window opens.
d. Click the +Select button in the last column of the applicable row.
Most of the other fields in the Assignment Details section will auto populate dependent on the HR Position selection, however you can adjust as necessary. Ensure all
mandatory fields are populated.
e. Scroll down to the Payroll Details section.
f. Most of the fields are already populated based on the position you selected in the Assignment Details section.
g. If the details of this particular position for this individual require modification, make changes to any of the editable fields. Ensure all mandatory fields are populated and
you add the information about the detail(s) to be changed.
h. Click the Save button at the bottom right of the Assignment collapsible section.
Go to Step 8 to complete the HR Requisition for a details change.
Adding the Entry Details for a Payroll Entry
To provide the details for a payroll entry:
When you select the Payroll Entry reason code in the General collapsible section the Payroll Entry collapsible section is added to the HR Requisition and it displays expanded (A red asterisk * indicates required fields).
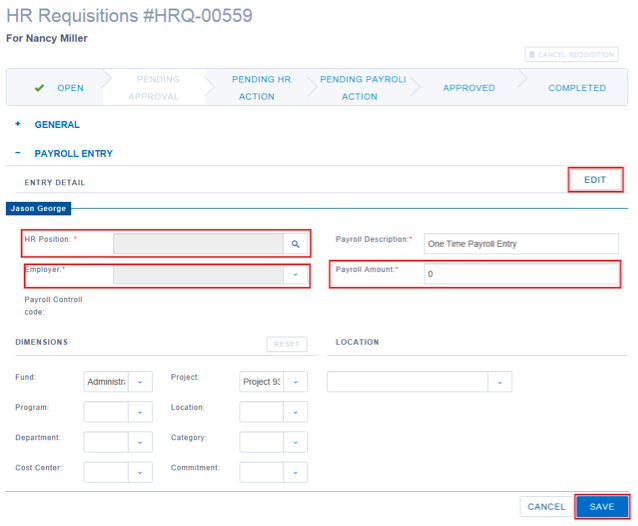
a. Click the Edit button in the Payroll Entry collapsible section, so the fields become editable.
b. Click the Search icon next to the HR Position field.
The HR Position Lookup window opens.
c. Click the +Select button in the last column of the applicable row.
d. In the Payroll Amount field, enter the dollar amount for the payroll entry.
e. Ensure all other required fields are complete.
f. Scroll to the bottom of the Payroll Entry collapsible section and click Save.
Go to Step 8 to complete the HR Requisition for a payroll entry.
Adding Comments to the Notification
When the HR Requisition falls outside of an assignment change, details change, payroll entry, or termination, you need to use the Notification reason code to complete your requisition.
To add the notification details:
a. In the General collapsible section of the HR requisition, click the lookup icon next to the HR Reason field, and select the Notification reason code.
No additional collapsible sections are added when a Notification reason code is selected, however the Manager Comment becomes mandatory.
b. Click the lookup icon next to the Employee No. field and select the employee to whom the HR requisition pertains.
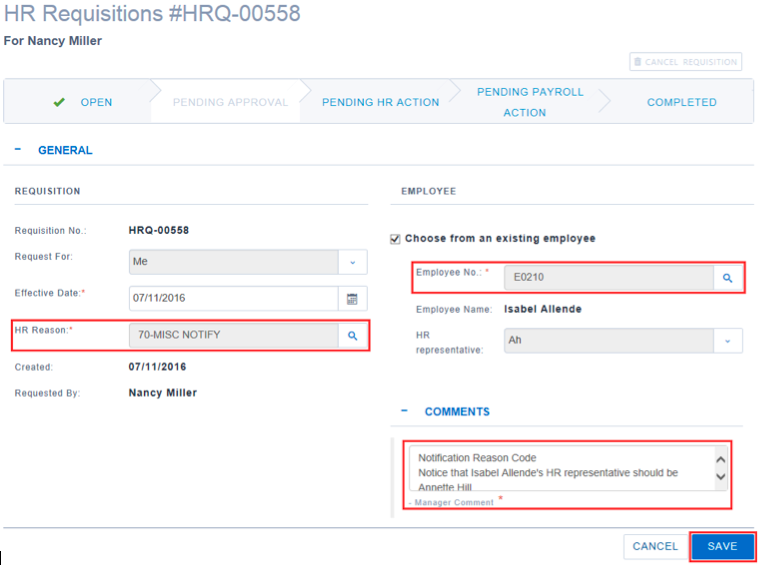
c. In the Manager Comments field, enter the complete details for the HR Requisition.
d. Click Save.
Go to Step 8 to complete the Notification HR Requisition.
Adding the Termination Details
To add the termination details:
When you select the Termination reason code in the General collapsible section the Termination Detail collapsible section is added to the HR Requisition and it displays expanded (A red asterisk * indicates required fields).
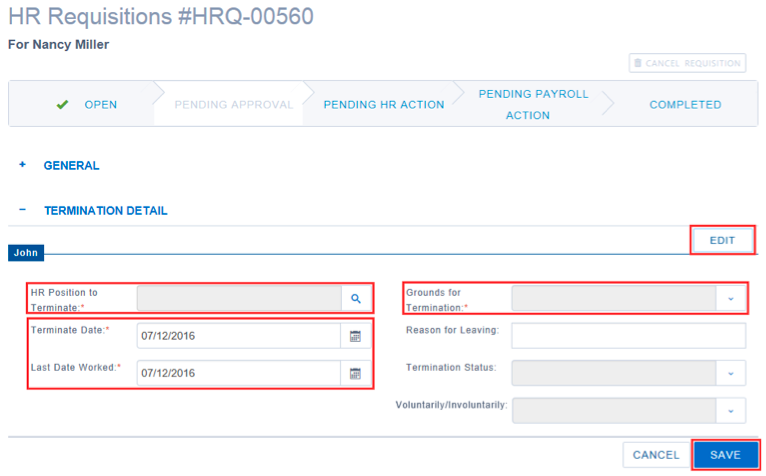
a. Next to the HR Position to Terminate field, click the Search icon.
The Employee Position Lookup window opens.
b. Click the +Select button in the last column of the applicable row.
c. In the Termination Date field, enter the date the termination takes effect, or click the Calendar icon to select the date. (This field auto populates with the date you
create the HR requisition.)
d. In the Last Date Worked field, enter the last day of work for the employee, or click the Calendar icon to select the date. (This field auto populates with the date
you create the HR requisition.)
e. From the Grounds for Term. Code drop-down, select the appropriate termination code.
f. Fill in any information you need in the non-required fields.
g. Click Save.
Continue to Step 8 below to complete the Termination HR Requisition.
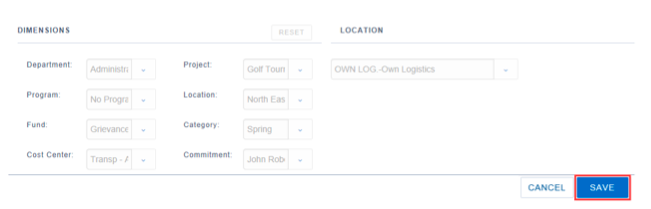
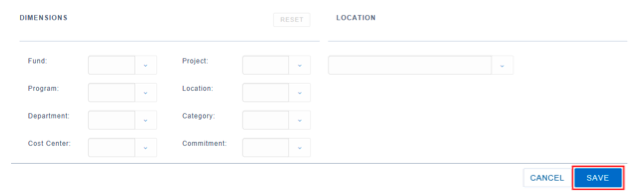
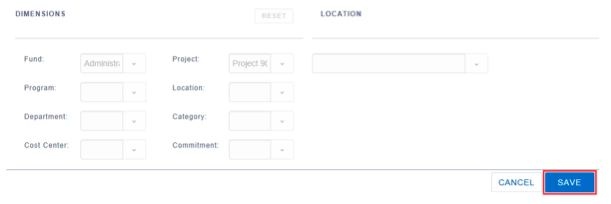
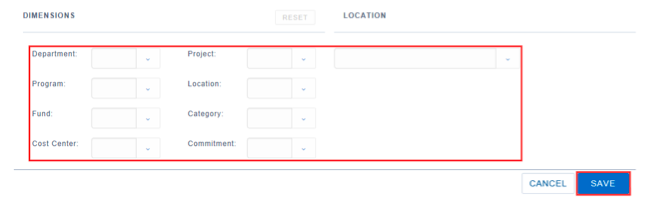
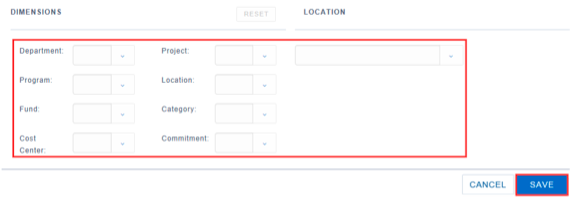
8. Scroll down to the Dimensions section (found at the bottom of the added collapsible section).
NOTE: Depending on your company set up, the dimensions may be pre-established by the position selected and supplied by default, but they can be overwritten or
completed as required. You will need to click the Edit button to enable changes to the Dimensions section.
If you need to you can select or change the appropriate dimensions for the position assignment to this employee by typing the first letters in each of the dimension fields. The fields in the dimensions section are type as you go. By starting to type you narrow the available options.
9. Complete all dimension fields.
Creating an HR Requisition for an Inactive Employee (by Social Insurance Number)
If the employee is no longer active and this is a rehire requisition, it is possible to search for the employee by Social Insurance Number.
To create an HR Requisition for an inactive employee:
1. In the HR Requisitions page, click the + New button.
The HR Requisition window opens displaying the General tab.
2. In the General section, next to the HR Reason field, click the Search icon.
The HR Reason Code Lookup window opens.
3. Click the +Select button in the last column of the HIRE row.
The HR Requisition window displays with additional fields added to the Employee section.
4. Add a checkmark to the box ahead of the Choose from employees by SIN No. field.
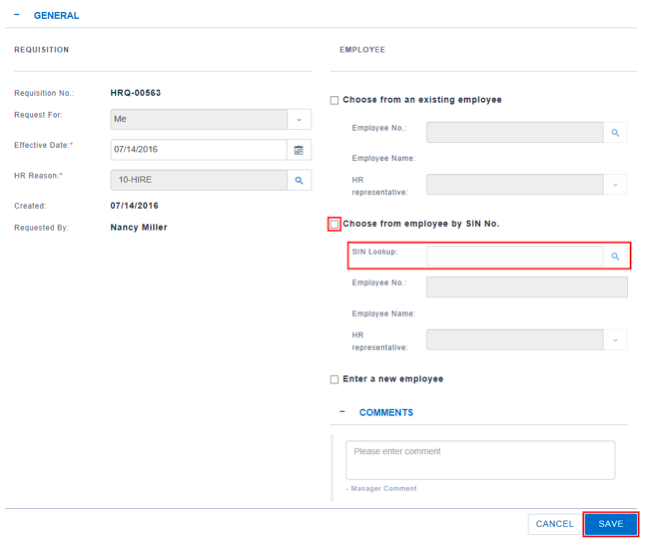
5. In the SIN Lookup field, enter the Social Insurance Number for the individual you want to locate and click the Search button.
The Employee No. and Employee Name fields are populated with the individual matching the SIN you entered. The HR Requisition window refreshes and additional tabs are now available.
(For example, the Position Details tab and Payroll Details tabs are now visible for entering required details.)
6. From the HR Representative drop-down, select the appropriate individual. (This ensures the appropriate HR representative receives the HR Requisition notification.)
7. When you select the Hire reason code and select an employee by SIN No. in the General collapsible section the Assignment collapsible section is added to the HR Requisition and it displays expanded (A red asterisk * indicates required fields).
8. Next to the HR Position field, click the Search icon.
The Employee Position Lookup window opens.
9. Click the +Select button in the last column of the applicable row.
The Position Details tab re-opens with the HR Position, Assignment Title, and Position Details fields populated.
10. In the HR Position Rank field, enter the ranking for the position you selected.
11. In the Assignment Type field, select the appropriate option. All options will be categorized as Permanent or Temporary.
12. If the assignment is temporary and has an end date, in the Assignment End Date field, enter the date.
13. Click the Payroll Details tab.
The Payroll Details tab opens. Most of the fields are already populated based on the position you selected in the Position Details tab.
14. If this position for this individual requires modification, make changes to any of the editable fields.
15. Click the Dimensions tab.
The Dimensions tab displays.
16. Select the appropriate dimensions for the position assignment to this employee.
NOTE: The dimensions established by the position selected are supplied by default to this tab, but they can be overwritten or completed as required.
Creating a New Hire HR Requisition Record
If a manager is responsible for managing the hiring process for new employees, this may include creating the HR Requisition for the hire. Creating a Hire HR Requisition record provides the complete details for the individual and the position to Human Resources and Payroll to ensure accuracy and accountability.
To create a new hire HR Requisition:
1. In the HR Requisitions page, click the +New button.
A new HR Requisition opens with the General collapsible section expanded.
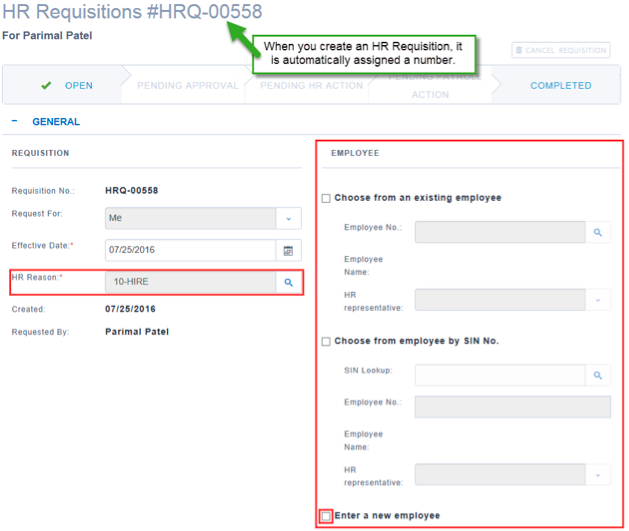
2. Click the Search icon next to the HR Requisition Reason field.
The HR Requisition Reason Code Lookup window opens.
3. Click the +Select button in the last column for the HIRE reason code.
The HR Requisition displays with the HR Reason field populated and more options under the Employee section
4. Add a check mark to the Enter a new employee field.
The Employee Details collapsible section is added.
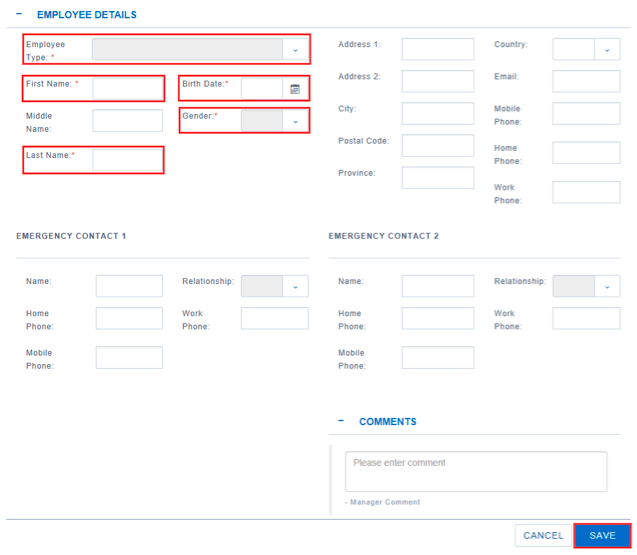
5. Fill in all the detail you have for the Employee (a red asterisk * indicates required fields).
6. In the Emergency Contacts section enter two emergency contacts for the new employee.
7. Click Save.
8. Scroll down to the Assignment Details collapsible section and click the Edit button.
9. Click the Search icon next to the HR Position field.
The Employee Position Lookup window opens.
10. Click the +Select button in the last column of the applicable position row.
The Assignment Detail section displays with many of the fields populated.
11. Fill out any field that needs more information (a red asterisk * indicates required fields).
NOTE: If the assignment is temporary and has an end date, in the Assignment End Date field, enter the date.
12. Scroll down to the Payroll Detail section.
13. From the Pay Structure drop-down select the payment structure for this employee.
14. From the Pay Grade drop-down select the payment grade for this employee.
15. From the Pay Step drop-down select the payment step for this employee.
16. In the Amount field, enter the yearly salary amount.
17. In the F.T.E. field, enter the full time equivalency for this assignment.
NOTE: Once you complete the above fields, the Pay Period Amount, Monthly Amount, and Yearly Amount fields are calculated and displayed.
18. In the Hours/Week field, enter the required hours the employee must work per week.
19. In the Hours/Day field, enter the required hours the employee must work per day.
20. If the employee is required to complete a probationary period, enter the appropriate details in the Probation Type, Probation End Date, and Probation Hours fields.
21. Scroll down to the Dimensions tab.
22. Select the appropriate dimensions for the position assignment to this employee.
NOTE: The dimensions established by the position selected are supplied by default to this tab, but they can be overwritten or completed as required.
23. Click the Save button on the bottom right of the Assignment collapsible section.
Submitting an HR Requisition
When all of the required information has been completed for an HR Requisition, it can be submitted for processing and for approval (if required) by HR and/or Payroll. (If you are a delegate for someone, the requisition requires approval before submission to HR/Payroll).
To submit an HR Requisition:
1. In the HR Requisitions window, scroll to the Status bar across the top below the requisition number.
The Status tab opens.

2. Click the Next Step button. The system moves to the next step in the process (if you are a delegate it will go to Pending Approval first).
NOTE: If Next Step is greyed out instead of displaying green this indicates some missing information must be completed in order to move forward in the process. You will need to review the requisition and add the appropriate information.
3. Click Yes to confirm that you want to submit the Requisition.
Cancelling an HR Requisition
If an HR Requisition is no longer required, it can be cancelled. An HR Requisition can be cancelled by either the creator of the HR Requisition or any of the Approvers, up until the time that the HR Requisition is fully approved.
After the requisition is approved, it can only be cancelled by an HR or Payroll representative through the HR Requisition Inbox.
To cancel a requisition:
1. In the HR Requisitions page, hover over the line for the requisition you wish to cancel, this will expose the hidden menu (blue circle with three dots) click it and then click View.
The HR Requisition opens.

2. Scroll down to the Status bar.
3. Click the Cancel Requisition button.
4. When the confirmation window opens, click Yes.
5. The HR Requisition is removed from the status it is in and moved to the Cancelled status.
NOTE: Once you cancel an HR Requisition, it is no longer editable. If the requisition becomes valid again or you cancel a requisition accidentally in error, you need to create a new requisition. See the previous section: Creating a New HR Requisition for details.