

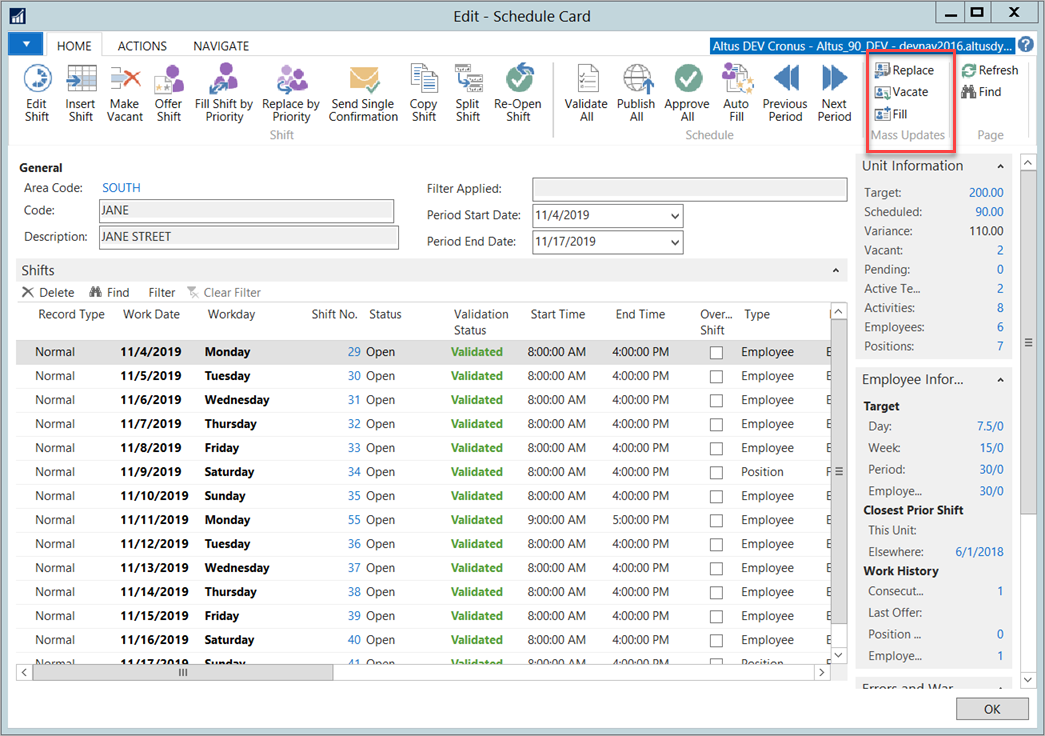
Use Mass Updates to remove or replace an employee from several shifts within a Schedule Unit, to fill a set of vacant shifts within a Schedule Unit with a specific employee, or to change one position to another. The Mass Updates functions appear on the tool ribbon of the Schedule Card.
- Changes to Schedule
- Changes to Templates
- Replacing One Employee with Another
- Replacing One Position with Another
- Replacing an Employee (Making Shifts Vacant)
Changes to Schedules
Filling Vacant Shifts
You can fill multiple vacant shifts for one specific position.
Note: If you need to fill vacant shifts with several different positions, repeat this process once for each position.
To fill vacant shifts:
- Search for the Schedules list.
- Open the Schedule card for the Unit you wish to work on.
Notes:- If several vacant rows exist for the desired position, it does not matter which specific vacant row you select. You will be able to act on multiple rows, even across pay cycles. Schedule Start Date will default to the date of the shift that you select.
- If you have an Employee row selected when you click the Fill button, you will see a warning dialog. Select a row with Type equal to Position and try again.
- The Mass Update Schedule Shifts dialog displays.
This dialog sets up filters that produce a range of candidate shifts. You will narrow down this selection in a subsequent step before any shifts are filled.
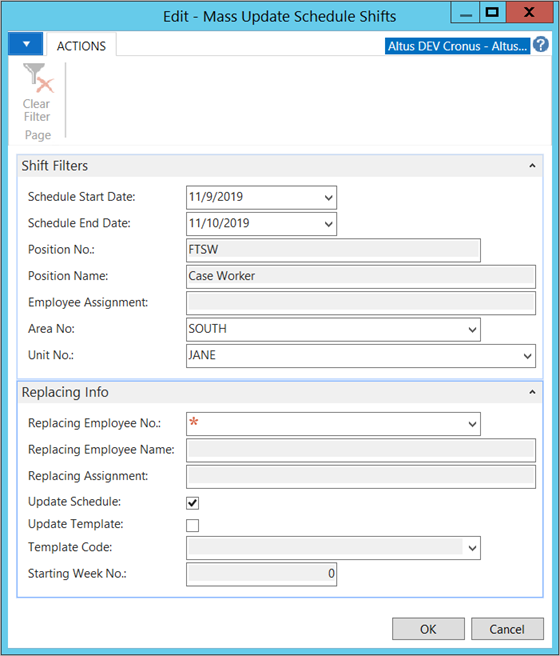
In the Shift Filters FastTab of this dialog:- Select a Schedule Start Date and a Schedule End Date to determine the range of vacant shifts to act on. This range can cross pay cycles if desired.
- Confirm that the Position No. and Position Name are correct. If not, use the Cancel button to exit the dialog and choose the correct row.
- Employee Assignment will be blank when using the dialog for the Fill action.
- Area and Unit are displayed for your reference.
- In the Replacing Info FastTab:
- Use the Replacing Employee No. drop-down selector to choose the employee to fill the shifts that you will choose on the next step. The Replace Employee dialog appears. Your initial choices will be limited to employees associated with the unit, but if needed, you can use the Show All button on the ribbon to select other employees from the Unit’s Area. Once you choose an employee the Replace Employee dialog closes. Verify that the expected Employee No. and Name appear.
- The Update Schedule check box will be selected, and the Update Template check box will be unselected. Do not change these settings when using the Fill action.
- Template Code and Starting Week No. are not used.
- Click OK to continue.
This does not yet apply any changes to the schedule. The Shift Changes Selection dialog displays.
Note: It may take a moment for this dialog to appear if you have selected a wide date range and/or have many shifts within the range. - A list of potential shifts that can be filled by the chosen employee appears. This list is filtered to remove potential conflicts with absences or overlapping shifts. Review the list.
- If you want to fill the entire list with the chosen employee, choose the Process All option from the Ribbon.
- If you wish to fill only certain shifts, select those specific rows in the dialog. The dialog supports multi-row selection using the Ctrl and Shift keys (Ctrl + click to pick individual rows, or Shift + click to select a range of rows, or mix the two). Then use Process Selection on the Ribbon.
- The selected shifts are filled. When you are done, press OK.
Note: If there are any errors, those shifts will be marked with the Mass Update Error check box selected (you may need to scroll the dialog to the right to see this column) and any associated messages will be displayed in the Mass Update Error Text dialog.
Removing an Employee (Making Shifts Vacant)
You can vacate multiple shifts for one specific employee. They will be set back to position (vacant) shifts with a position of your choosing. For example, you might want to change the shifts from a regular position to a casual position.
Note: If you need to remove the employee and set up the vacant shifts with different positions, repeat this process once for each needed position.
To remove an employee:
- Search for the Schedules list.
- Open the Schedule card for the Unit you wish to work on.
- Select a row with any shift that is assigned to the employee whom you wish to replace.
- In the Mass Updates section of the Ribbon, click the Vacate icon.
Notes:
- If several shifts exist for the employee, it does not matter which specific row you select. You will be able to act on multiple rows, even across pay cycles. Schedule Start Date will default to the date of the shift that you select.
- If you have a Position row selected when you click the Fill button, you will see a warning dialog. Select a row with Type equal to Employee and try again.
- The Mass Update Schedule Shifts dialog displays. This dialog sets up filters that produce a range of candidate shifts. You will narrow down this selection in a subsequent step before any shifts are made vacant.
In the Shift Filters FastTab:- Select a Schedule Start Date and a Schedule End Date to determine the range of vacant shifts to act on. This range can cross pay cycles if desired.
- Confirm that the Employee No. and Employee Name are correct. If not, use the Cancel button to exit the dialog and choose the correct row.
- Area and Unit are displayed for your reference.
- In the Replacing Info FastTab:
- Use the Replacing Position No. drop-down selector to choose the position to use for the shifts that you will make vacant in the next step. The Schedule Unit Positions dialog appears. Your choices will be limited to positions associated with the unit. Once you choose a position, verify that the expected position No. and Name appear.
- The Update Schedule check box will be selected, and the Update Template check box will be unselected. Do not change these settings when using the Vacate action.
- Template Code and Starting Week No. are not used.
- Select Do Not Fill if the vacant shifts should not be made available to other employees.
- Click OK to continue.
This does not yet apply any changes to the schedule. It opens another dialog called Shift Changes Selection.
Note: It may take a moment for this dialog to appear if you have selected a wide date range and/or have many shifts within the range. - A list of shifts that can be made vacant by removing the chosen employee appears. Review the list, double-checking that the Replacing No. and Name are for the position you intended.
- If you want to remove the employee from the entire list, and set all shifts to the chosen replacing position, choose the Process All option from the ribbon.
- If you want to make only certain shifts vacant, select those specific rows in the dialog. The dialog supports multi-row selection using the Ctrl and Shift keys (Ctrl + click to pick individual rows, or Shift + click to select a range of rows, or mix the two). Then use Process Selection on the ribbon.
- The selected shifts are made vacant. When you are done, press OK
Note: If there are any errors, those shifts will be marked with the Mass Update Error check box selected (you may need to scroll the dialog to the right to see this column) and any associated messages will be displayed in the Mass Update Error Text dialog.
Replacing one Employee with Another
You can replace one employee with another in multiple shifts.
Note: If you need to replace one employee with several different employees, repeat this process once for each replacing employee.
- Search for the Schedules list.
- Open the Schedule card for the Unit you wish to work on.
- Select a row with any shift assigned to the employee whom you wish to replace.
- In the Mass Updates section of the Ribbon, click the Replace icon.
Notes:
- If several shifts exist for the employee, it does not matter which specific row you select. You will be able to act on multiple rows, even across pay cycles. Schedule Start Date will default to the date of the shift that you select.
- Unlike the other Mass Update modes, if you have a Position row selected when you click the Replace button, you can proceed. See Replacing One Position with Another.
- The Mass Update Schedule Shifts dialog displays. This dialog sets up filters that produce a range of candidate shifts. You will narrow down this selection in a subsequent step before any replacements are made.
In the Shift Filters FastTab:- Select a Schedule Start Date and a Schedule End Date to determine the range of assigned shifts to act on. This range can cross pay cycles if desired.
- Confirm that the Employee No. and Employee Name correctly represent the employee being replaced. If not, use the Cancel button to exit the dialog and choose the correct row.
- Area and Unit are displayed for your reference.
- In the Replacing Info FastTab:
- Use the Replacing Employee No. drop-down selector to choose the employee to use for the shifts that you will update in the next step. The Replace Employee dialog appears. Your initial choices will be limited to employees associated with the unit, but if needed, you can use the Show All button on the ribbon to select other employees from the Unit’s Area. Once you choose an employee, the Replace Employee dialog closes. Verify that the expected replacing Employee No. and Name appear.
- The Update Schedule check box is selected, and the Update Template check box is unselected. Do not change these settings when using the Replace action.
- Template Code and Starting Week No. are not used.
- Click OK to continue.
This does not yet apply any changes to the schedule. It opens another dialog called Shift Changes Selection.
Note: It may take a moment for this dialog to appear if you have selected a wide date range and/or have many shifts within the range. - A list of shifts that can be changed to replace the current employee with the new employee appears. This list is filtered to remove potential conflicts. Review the list, double-checking that the Replacing No. and Name are for the employee you intended.
- If you want to replace the employee as shown for the entire list, choose the Process All option from the Ribbon.
- If you want to process only certain shifts, select those specific rows in the dialog. The dialog supports multi-row selection using the Ctrl and Shift keys (Ctrl + click to pick individual rows, or Shift + click to select a range of rows, or mix the two). Then use Process Selection on the Ribbon.
- The selected shifts are assigned to the new employee. When you are done, press OK.
Note: If there are any errors, those shifts will be marked with the Mass Update Error check box selected (you may need to scroll the dialog to the right to see this column) and any associated messages will be displayed in the Mass Update Error Text dialog.
Replacing one Position with Another
You can replace one position with another in position (vacant) shifts.
Note: If you need to replace one position with several different positions, repeat this process once for each replacing position.
- Search for the Schedules list.
- Open the Schedule card for the Unit you wish to work on.
- Select a row with any shift assigned to the employee whom you wish to replace.
- In the Mass Updates section of the Ribbon, click the Replace icon.
Notes:
- If several vacant shifts exist for the position, it does not matter which specific row you select. You will be able to act on multiple rows, even across pay cycles. Schedule Start Date will default to the date of the shift that you select.
- Unlike the other Mass Update modes, if you have an Employee row selected when you click the Replace button, you can proceed.
- The Mass Update Schedule Shifts dialog displays. This dialog sets up filters that produce a range of candidate shifts. You will narrow down this selection in a subsequent step before any replacements are made.
In the Shift Filters FastTab:- Select a Schedule Start Date and a Schedule End Date to determine the range of assigned shifts to act on. This range can cross pay cycles if desired.
- Confirm that the Position No. and Position Name correctly represent the position being replaced. If not, use the Cancel button to exit the dialog and choose the correct row.
- Area and Unit are displayed for your reference.
- In the Replacing Info FastTab:
- Use the Replacing Position No. drop-down selector to choose the employee to use for the shifts that you will update in the next step. The Schedule Unit Positions dialog appears. Your choices will be limited to positions associated with the unit. Verify that the expected Replacing Position No. and Name appear.
- The Update Schedule check box is selected, and the Update Template check box is unselected. Do not change these settings when using the Replace action.
- Template Code and Starting Week No. are not used.
- Click OK to continue.
This does not yet apply any changes to the schedule. It opens the Shift Changes Selection dialog.
Note: It may take a moment for this dialog to appear if you have selected a wide date range and/or have many shifts within the range. - A list of shifts that can be made changed appears. Review the list, double-checking that the Replacing No. and Name are for the position you intended.
- If you want to replace the position as shown for the entire list, choose the Process All option from the Ribbon.
- If you want to process only certain shifts, select those specific rows in the dialog. The dialog supports multi-row selection using the Ctrl and Shift keys (Ctrl + click to pick individual rows, or Shift + click to select a range of rows, or mix the two). Then use Process Selection on the Ribbon.
- The selected shifts change to the new position. When you are done, press OK.
Note: If there are any errors, those shifts will be marked with the Mass Update Error check box selected (you may need to scroll the dialog to the right to see this column) and any associated messages will be displayed in the Mass Update Error Text dialog.
Changes to Templates
Note: Sparkrock recommends using the Export Template(s) button on the Process area of the Schedule Templates list page before making any mass changes. That way, if something goes wrong or changes need to be reversed, you can reload the template from the backup file that results.
Replacing one Employee with Another
You can replace one employee with another in multiple shifts within a Schedule Template.
Note: If you need to replace one employee with several different employees, repeat this process once for each replacing employee.
- Search for the Schedule Templates list.
- Open the Schedule Template card for the Unit you wish to work on.
- Select a row with any shift assigned to the employee whom you wish to replace.
- In the Mass Updates section of the Ribbon, click the Replace icon.
Note: If several shifts exist for the employee, it does not matter which specific row you select. All rows for the selected employee on the template will be changed. - The Mass Update Schedule Shifts dialog displays.
In the Shift Filters FastTab:- The Schedule Start Date and a Schedule End Date can be ignored if you are only changing the Template. Optionally, you can also act on existing schedule shifts for the associated unit. In this case, select a Schedule Start Date and a Schedule End Date to determine the range of assigned schedule shifts to act on.
- Confirm that the Employee No. and Employee Name correctly represent the employee being replaced. If not, use the Cancel button to exit the dialog and choose the correct row.
- Area and Unit are displayed for your reference.
- In the Replacing Info FastTab:
- Use the Replacing Employee No. drop-down selector to choose the employee to use for the shifts that you will update in the next step. The Fill Template Shift dialog displays. Your initial choices will be limited to employees associated with the unit, but if needed, you can use the Show All button on the ribbon to select other employees from the Unit’s Area. Once you choose an employee, the Fill Template Shift dialog closes. Verify that the expected Replacing Employee No. and Name appear.
- The Update Schedule check box is unselected, and the Update Template check box is selected. Select the Update Schedule check box if you wish to act on existing schedule shifts for the associated unit in addition to changing the template.
- Verify that Template Code reflects the expected template. For a template with more than one week, Starting Week No. can be set to any valid week. You might use this feature to make changes only to the back half of a multi-week schedule template.
- Click OK to continue.
Unlike the Mass Update functions on the Schedule card, changes to the Template take place immediately. Double check your settings to be sure they are correct, and if you have not already done so, consider backing up your template before you proceed. - If you selected the Update Schedule check box, the Shift Changes Selection dialog opens.
NOTE: It may take a moment for this dialog to appear if you have selected a wide date range and/or have many shifts within the range. - A list of assigned schedule shifts that can be changed to replace the current employee with the new employee appears. This list is filtered to remove potential conflicts. Review the list, double-checking that the Replacing No. and Name are for the employee you intended.
- If you want to replace the employee as shown for the entire list, choose the Process All option from the Ribbon.
- If you want to process only certain shifts, select those specific rows in the dialog. The dialog supports multi-row selection using the Ctrl and Shift keys (Ctrl + click to pick individual rows, or Shift + click to select a range of rows, or mix the two). Then use Process Selection on the Ribbon.
Caution: In this step you are acting on the actual unit schedule, not on the template.
- The selected schedule shifts are assigned to the new employee. When you are done, click OK. A dialog confirming the number of template shifts that were modified appears. click OK.
Note: If there are any errors, those shifts will be marked with the Mass Update Error check box selected (you may need to scroll the dialog to the right to see this column) and any associated messages will be displayed in the Mass Update Error Text dialog.
Replacing one Position with Another
You can replace one position with another in multiple shifts within a Schedule Template.
Note: If you need to replace one employee with several different employees, repeat this process once for each replacing employee.
- Search for the Schedule Templates list.
- Open the Schedule Template card for the Unit you wish to work on.
- Select a row with any shift assigned to the employee whom you wish to replace.
- In the Mass Updates section of the Ribbon, click the Replace icon.
Note: If several shifts exist for the position, it does not matter which specific row you select. All rows for the selected position on the template will be changed. - The Mass Update Schedule Shifts dialog displays.
In the Shift Filters FastTab:- The Schedule Start Date and a Schedule End Date can be ignored if you are only changing the Template. Optionally, you can also act on existing schedule shifts for the associated unit. In this case, select a Schedule Start Date and a Schedule End Date to determine the range of vacant schedule shifts to act on.
- Confirm that the Position No. and Position Name correctly represent the position being replaced. If not, use the Cancel button to exit the dialog and choose the correct row.
- Area and Unit are displayed for your reference.
- In the Replacing Info FastTab:
- Use the Replacing Position No. drop-down selector to choose the position to use for the shifts that you will update in the next step. The Schedule Unit Positions dialog appears. Your choices will be limited to positions associated with the unit. Once you choose an employee, the Replace Employee dialog closes. Verify that the expected Replacing Employee No. and Name appear.
- The Update Schedule check box will be unselected, and the Update Template check box will be selected. Select the Update Schedule check box if you wish to act on existing schedule shifts for the associated unit in addition to changing the template.
- Verify that Template Code reflects the expected template. For a template with more than one week, Starting Week No. can be set to any valid week. You might use this feature to make changes only to the back half of a multi-week schedule template.
- Click OK to continue.
Unlike the Mass Update functions on the Schedule card, changes to the Template take place immediately. Double check your settings to be sure they are correct, and if you have not already done so, consider backing up your template before you proceed. - If you selected the Update Schedule check box, the Shift Changes Selection dialog opens.
NOTE: It may take a moment for this dialog to appear if you have selected a wide date range and/or have many shifts within the range. - A list of vacant schedule shifts that can be changed to replace the current position with the new position appears. This list is filtered to remove potential conflicts. Review the list, double-checking that the Replacing No. and Name are for the position you intended.
- If you want to replace the position as shown for the entire list, choose the Process All option from the Ribbon.
- If you wish to process only certain shifts, select those specific rows in the dialog. The dialog supports multi-row selection using the Ctrl and Shift keys (Ctrl + click to pick individual rows, or Shift + click to select a range of rows, or mix the two). Then use Process Selection on the Ribbon.
Caution: In this step you are acting on the actual unit schedule, not on the template.
- The selected schedule shifts are assigned to the new employee. When you are done, click OK. A dialog confirming the number of template shifts that were modified appears. clock OK.
Note: If there are any errors, those shifts will be marked with the Mass Update Error check box selected (you may need to scroll the dialog to the right to see this column) and any associated messages will be displayed in the Mass Update Error Text dialog.
Removing an Employee (Making Shifts Vacant)
You can vacate multiple shifts for one specific employee. They will be set back to position (vacant) shifts with a position of your choosing. For example, you might want to change the shifts from a regular position to a casual position.
Note: If you need to remove the employee and set up the vacant shifts with different positions, repeat this process once for each needed position.
To remove an Employee:
- Search for the Schedule Templates list.
- Open the Schedule Template card for the Unit you wish to work on.
- Select a row with any shift assigned to the employee whom you wish to replace.
- In the Mass Updates section of the Ribbon, click the Vacate icon.
Notes:
- If several shifts exist for the employee, it does not matter which specific row you select.
- If you have a Position row selected when you click the Fill button, you will see a warning dialog. Select a row with Type equal to Employee and try again.
- The Mass Update Schedule Shifts dialog displays.
In the Shift Filters FastTab:- The Schedule Start Date and a Schedule End Date can be ignored if you are only changing the Template. Optionally, you can also act on existing schedule shifts for the associated unit. In this case, select a Schedule Start Date and a Schedule End Date to determine the range of assigned schedule shifts to act on.
- Confirm that the Employee No. and Employee Name are correct. If not, use the Cancel button to exit the dialog and choose the correct row.
- Area and Unit are displayed for your reference.
- In the Replacing Info FastTab:
- Use the Replacing Position No. drop-down selector to choose the position to use for the shifts that you will make vacant in the next step. The Schedule Unit Positions dialog appears. Your choices will be limited to positions associated with the unit. Once you choose a position, verify that the expected position No. and Name appear.
- The Update Schedule check box will be unselected, and the Update Template check box will be selected. Select the Update Schedule check box if you wish to act on existing schedule shifts for the associated unit in addition to changing the template.
- Verify that Template Code reflects the expected template. For a template with more than one week, Starting Week No. can be set to any valid week. You might use this feature to make changes only to the back half of a multi-week schedule template.
- Select Do Not Fill if the newly vacant shifts should not be made available to other employees.
- Click OK to continue.
Unlike the Mass Update functions on the Schedule card, changes to the Template take place immediately. Double check your settings to be sure they are correct, and if you have not already done so, consider backing up your template before you proceed. - If you selected the Update Schedule check box, the Shift Changes Selection dialog opens.
NOTE: It may take a moment for this dialog to appear if you have selected a wide date range and/or have many shifts within the range. - A list of shifts that can be made vacant by removing the chosen employee appears. Review the list, double-checking that the Replacing No. and Name are for the position you intended.
- If you want to remove the employee from the entire list, and set all shifts to the chosen replacing position, choose the Process All option from the Ribbon.
- If you want to make only certain shifts vacant, select those specific rows in the dialog. The dialog supports multi-row selection using the Ctrl and Shift keys (Ctrl + click to pick individual rows, or Shift + click to select a range of rows, or mix the two). Then use Process Selection on the Ribbon.
- The selected shifts are made vacant. When you are done, press OK. A dialog confirming the number of template shifts that were modified appears. Press OK.
Note: If there are any errors, those shifts will be marked with the Mass Update Error check box selected (you may need to scroll the dialog to the right to see this column) and any associated messages will be displayed in the Mass Update Error Text dialog.