

Configuring the EWA User Card
Important: All time entry users MUST be an EWA User.
The NAV UserID field on the Details tab of the EWA User Card must be populated if the time entry user will use the back-office time entry pages.
To configure the EWA User Card:
- In the Search field, type EWA User and select the page from the drop-down list.
The EWA Users page displays. - Select the user that you want to configure and from the Ribbon click Edit.
The EWA User Card displays. - Expand the Time Entry FastTab.
- Complete the following:
- Time Entry User Group Code: specify the Time Entry User Group for which the employee will be performing time entry.
- Time Entry Approval User Group: If the employee shares time sheet approval responsibility with another user, specify the Time Entry Approval User Group to which the employee belongs.
- Expand the Details FastTab.
- From the NAV UserID drop-down, select the employee's User ID.
- Click OK.
Configuring the Time Entry Setup Page
- In the Search field, type Time Entry Setup and select the page from the drop-down list.
The Time Entry Setup page displays.
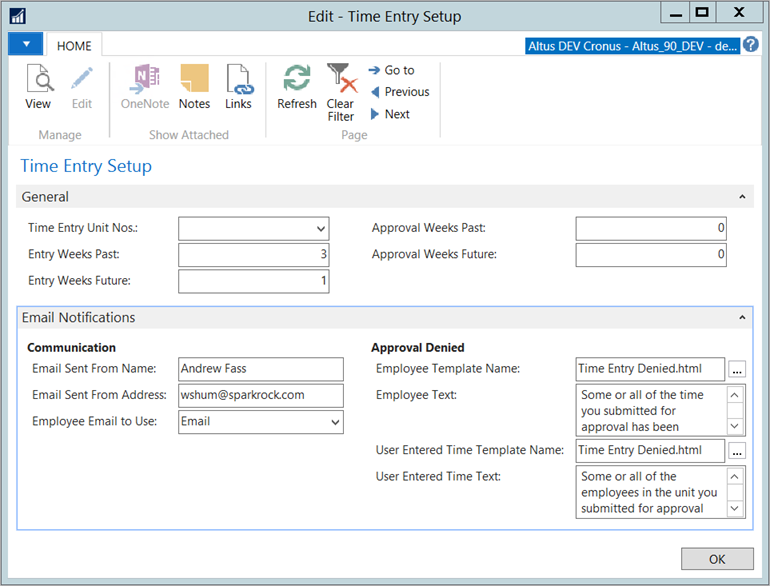
- Expand the General FastTab and complete the following:
- Time Entry Unit Nos: (optional) specify the number series that you want to use for the Time Entry Unit Nos.
- Entry Weeks Past: specify the number of weeks time can be entered in the past (before this week)
- Entry Weeks Future: specify the number of weeks time can be entered in the future (after this week).
- Approval Weeks Past: specify the number of weeks in the past that Approvers can approve time.
- Approval Weeks Future: specify the number of weeks in the future that Approvers can approve time.
- Expand the Email Notification FastTab and complete the following:
- Employee Template Name: specify the html template file used when sending approval denials to employees who entered their own time. This is the default time entry approval denial template.
- Employee Text: specify the approval denial text to use when sending notifications to employees who entered their own time.
- User Entered Time Template Name: specify the html template file used when sending approval denials to users who entered time for other users. This is the default time entry approval denial template.
- User Entered Time Text: specify the approval denial text to use when sending notifications to employees who entered time for other users.
- click OK.
Creating Time Entry Units
The Time Entry Unit is a logical grouping of employees by positions and activities that share an approver.
To create Time Entry Units:
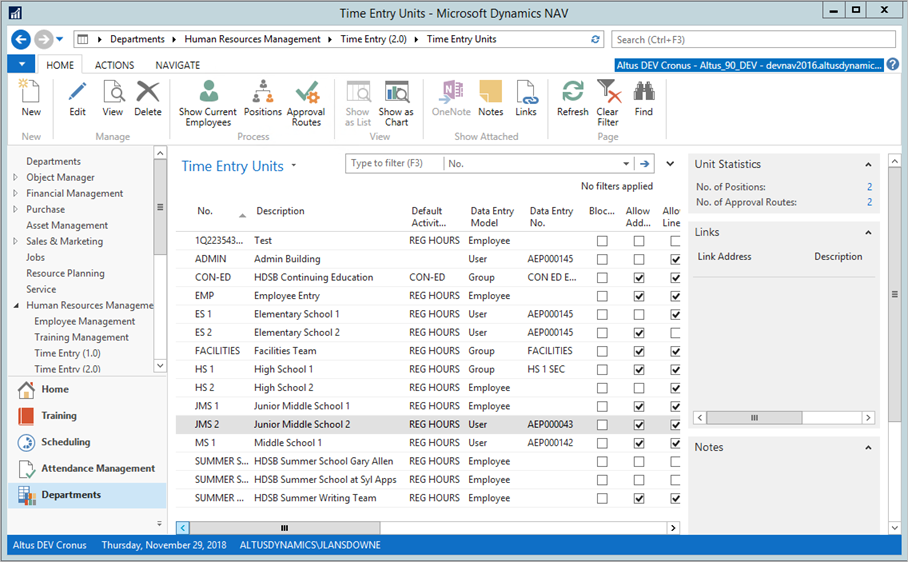
- In the Search field, type Time Entry Units and select the page from the drop-down list.
The Time Entry Units list displays.
- From the Ribbon, click New.
A new Time Entry Unit card displays. - Expand the General FastTab and complete the following:
- No. : Either provide a number or have the system generate a number for you.
- Description: enter a description of the Time Entry Unit.
- Default Activity Code: Specify the default activity code for Unit Position Activities attached to this time entry unit.
Note: Time entry is done by activity, so each Time Entry Position must have at least one activity. Having a Default Activity Code setup for the Unit will cause the default activity to be automatically added to the Unit Position Activity. If this field is left blank, you must manually add at least one activity to all Unit Positions. - Data Entry Model: This determines how time entry will be done for this time entry unit; valid options are Employee, User, or User Group:
- Employee: Employees perform their own time entry.
- User: A user other than the employee is responsible for performing time entry for the Time Entry Unit.
- User Group: Time entry for the unit is done by one or more people in the group.
- Data Entry No.: Specify the group that will perform time entry. This field is only editable if the Data Entry Model is either User or User Group.
- Allow Adding of New Lines: Add a checkmark to this checkbox to allow users to add new time lines. This function creates a copy of an existing record and does not allow you to change the position/activity from the existing record.
Use this option if the time entry user needs to change a dimension value between the same time entry unit position activity they are entering time against. In this case, you should also set the Allow Dimension Use field to True. Adding new lines may also be used in the case of partial week data entry where only part of the week was entered and submitted for approval. You could add a new line to finish time entry for the week and submit those new hours for approval. This field is used by the NAV Backoffice and Employee Center. - Allow Line Comments: Add a checkmark to enable users to enter comments (for the week). This field is used by the NAV Backoffice and Employee Center.
- Allow Entry Comments: Add a checkmark to enable users to enter comments at the day level. This field is used by the NAV Backoffice and Employee Center.
- Display Approved Absences: Add a checkmark to display approved absences on the Employee Center Time Entry page.
- Include Absences in Test for Max. Hours: Add a checkmark to include approved absences from Absence Registration in the check for minimum/maximum hours per day.
Note: This field does not effect the calculation for minimum/maximum Hours per Week. - Submit Date Calculation: Enter a date formula that is used to determine when the time sheet should be submitted. The date calculation is based on the Payroll Setup Week Start field.
Note: This field will be used by future Email reminder functionality. - Approval Date Calculation: Enter a date formula that is used to determine when the time sheet should be approved. The date calculation is based on the Payroll Setup Week Start field.
- Minimum Hours per Day: Specify the minimum number of hours per day. The numbers of hours entered must be equal or greater than this value. This field is optional.
- Maximum Hours per Day: Specify the maximum number of hours per day. The numbers of hours entered must be less than or equal to this value. This field is optional.
- Per Day Control Flag: This field controls whether the per day hours will cause a warning or error when the time line is submitted. This field is optional.
- Minimum Hours per Week: Specify the minimum number of hours per week. The numbers of hours entered must be equal or greater than this value. This field is optional.
- Maximum Hours per Week: Specify the maximum number of hours per week. The numbers of hours entered must be less than or equal to this value. This field is optional.
- Per Week Control Flag: This field controls whether the per week hours will cause a warning or error when the time line is submitted. This field is optional.
- Disable Notification Emails: This field controls whether notification emails will be sent for the unit. Currently, emails are only sent when a time line is disapproved.
- Blocked: Add a checkmark to to prevent this time entry unit from being used for time entry.
- Expand the Dimension Use FastTab and complete the following:
- Allow Dimension Use: Add a checkmark to display editable dimensions on the Employee Center page. When set to True, the dimension fields become editable. Each dimension field can be set to Hide, View, or Edit:
- Hide: the Dimension field is hidden from the time entry user.
- View: the Dimension field is visible but not editable by the time entry user.
- Edit: the Dimension field is both visible and editable by the time entry user.
- Allow Dimension Use: Add a checkmark to display editable dimensions on the Employee Center page. When set to True, the dimension fields become editable. Each dimension field can be set to Hide, View, or Edit:
- Expand the Dimension Filtering FastTab.
The dimension fields on this fast tab are used to control the dimension values that a time entry user would see if they have the ability to edit the dimensions. These fields control what the user can see for data entry.
For each setup Dimension, there is a Filter Action and Filter field. The Filter Action field tells the system how the time entry unit dimensions should work in relation to the same filter fields from the EWA User and EWA User Profile. If the filter action is Append, the dimension filter is added to existing dimensions from EWA User and EWA User Profile. If the filter action is Override, the Time Entry Unit dimension filter is used in place of any dimensions specified on the EWA User and EWA User Profile. The Filter field specifies one or more-dimension values to be used for the time entry data entry. - Click OK.
Working with Time Entry Unit Positions
Time Entry Unit Positions are the positions that are associated with the Time Entry Unit for time entry purposes. Only employees having an assignment with those positions can do time entry for the time entry unit.
Additional fields for the HR Position can be used to further filter or control which employee assignments can do time entry for this unit. The employee assignment (HR PLE) must match all defined filter fields for an employee assignment to be available for time entry for the unit.
The additional filter fields are: Location Code, Pay Cycle Code, Employer No., HR Job Code, HR Department, HR Category, Location Class, Work Status, Union Code and All Dimensions.
Note: If a HR Position has been previously used for time entry in a Unit, but is no longer valid, the HR Position can be Blocked. This prevents time being entered for that Position in the Unit.
To create a Time Entry Unit position:
- On the Time Entry Unit Card, from the Ribbon click Positions.
The Time Entry Unit Positions page displays.
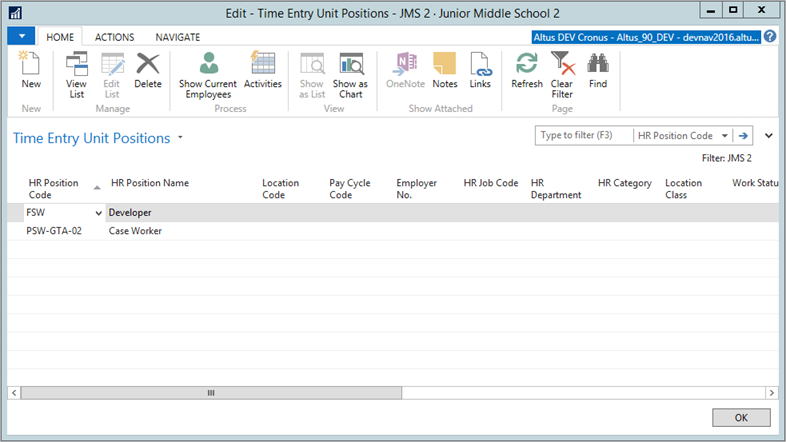
- From the Ribbon, click New.
A new line is added to the page. - Complete the fields as required.
Working with Time Entry Unit Position Activities
Activity Codes are associated with Time Entry Unit Positions. Activities represent the type of work being done for the position. Activities allow for overriding dimension values and/or overriding the hourly rate used. This is beneficial if, for certain types of employee positions, they have variable rates of pay depending on the type of work they do.
At least one Activity must exist for each Unit Position since time entry is done by Unit Position Activity.
Activity Codes must be setup as a Time Entry Activity before they can be assigned to a Time Entry Unit Position Activity. This is to force standardized values across all Unit Position Activities.
To create Time Entry Unit Position Activities:
- On the Time Entry Unit Positions page, from the Ribbon click Activities.
The Time Entry Unit Position Activities page displays.
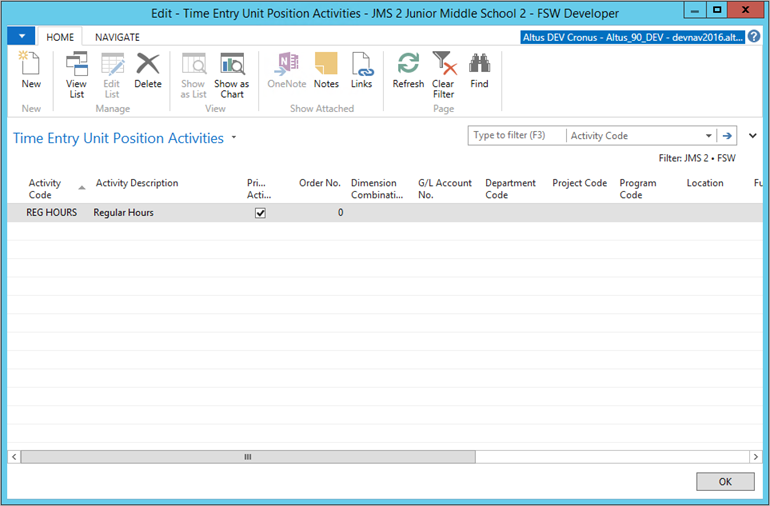
- From the Ribbon, click New.
A new line is added to the page. - Complete the following fields:
- Activity Code: provide a short description of what the activity represents. The activity code must be pre-defined in the Time Entry Activity before it can be added as a Unit Position Activity.
- Primary Activity: specify the activity to default hours from the assignment/HR PLE Hours per Day. Hours are only defaulted for the activity that is the Primary. Only one activity can be selected for the Unit Position Activity.
- Order No.: this field is used to control the order in which multiple activities appear in Employee Center and NAV during time entry.
- Dimension Combination Code and Dimension fields: these fields are used as an override when the time sheet data is sent to the Payroll Journal.
- Payroll Control Code: specify an override to the Payroll Control from the employee assignment. This field is a look up to the list of Payroll Controls where Type is Paid Hour or Hour. If this field is blank on the Unit Position Activity, the Payroll Control Code will come from the employee assignment.
- Override Hourly Rate: specify an override for the rate from the employee assignment.
- Blocked: add a checkmark to prevent employees from entering time against this Unit Position Activity.
- Click OK.
Show Current Employees
This action shows the employees that have an assignment (HR PLE) that match the Time Entry Unit Positions filter criteria. There is also a Show Current Employees action from the Time Entry Unit Position. This is informational and is intended to aid in the setup of and association with employees to Time Entry Unit Positions.
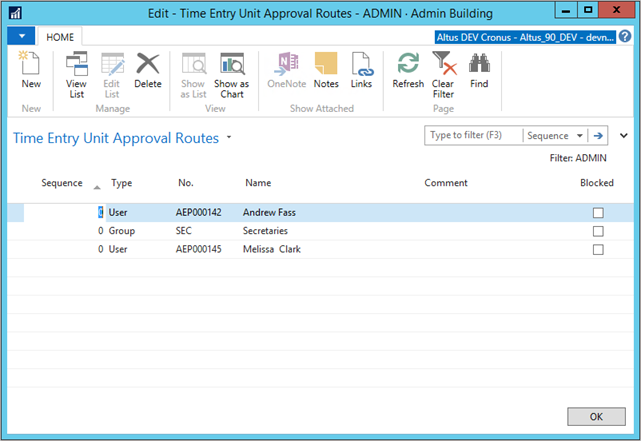
Approval Routes
This action shows the approval routes that have been defined for the Time Entry Unit. If no approval routes exist for the Time Entry Unit, all submitted time sheets will be auto-approved.
Approvals can be done by an individual user, user group or a combination of users and user groups. A user group is a way to group multiple users together. If a user group contains multiple users, the first person in the group to approve will cause the approval to move to the next approver in sequence.
To create an Approval Route:
- On the Time Entry Unit Card, from the Ribbon click Approval Routes.
The Time Entry Unit Approval Routes page displays.
- From the Ribbon, click New.
- Complete the following fields:
- Sequence: Specify an integer value to control the order that approvers will see the time sheets for approval. If a single sequence is setup, then the approval route for the Time Entry Unit will consist of a single user or user group. Approvals follow the Sequence number. After the approver from the first sequence has acted, the approval moves to the approver in the next sequence, and so on. Each Sequence must approve the entries before the approval will move to the next Sequence approver.
- Type: specify the type for this approval route sequence. Valid options are either User or Group. If User, then the No. field displays the list of EWA Users. If Group, the No. field will show the list of Time Entry User Groups.
- No.: This field identifies the approver. This field is either the EWA User or the Time Entry User Group that is responsible for approving at this Sequence.
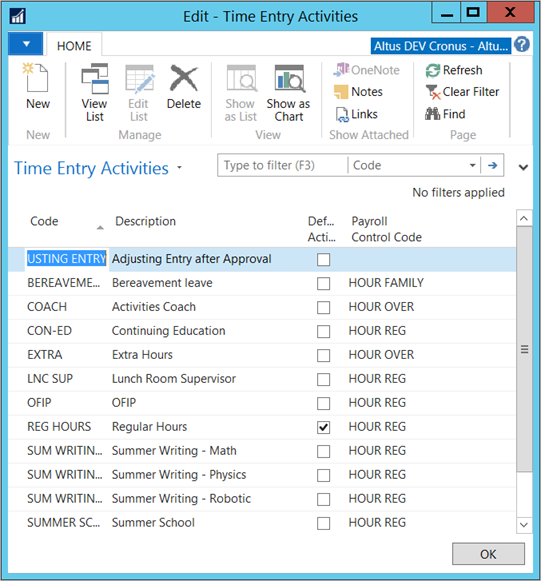
Configuring Time Entry Activities
The Time Entry Activity is a setup table of valid activity codes that can be assigned to Time Entry Unit Positions. Each Time Entry Unit Position must have at least one Activity Code assigned. At least one Time Entry Activity must be defined in this table.
To add a Time Entry Activity:
- In the Search field, type Time Entry Activities and select the page from the drop-down list.
The Time Entry Activities page displays.
- From the Ribbon, click New.
A new line is added to the page. - Complete the following:
- Code: Specify a value that represents the types of activities being performed by employees. Can be a maximum of 20 alpha numeric characters.
- Description: Provide a short text description that describes the code. Can be a maximum of 50 characters.
- Default Activity: Add a checkmark to this check box to indicate that this is the default Time Entry Activity. – Only one Code can be selected as the default value. Selecting a Time Entry Activity to be the Default Activity will cause the system to set this Activity as the Primary when it’s added as a Time Entry Unit Position Activity. Having a Primary Unit Position Activity will cause the Hours per Day to default into the Time Line.
- Click OK when finished.
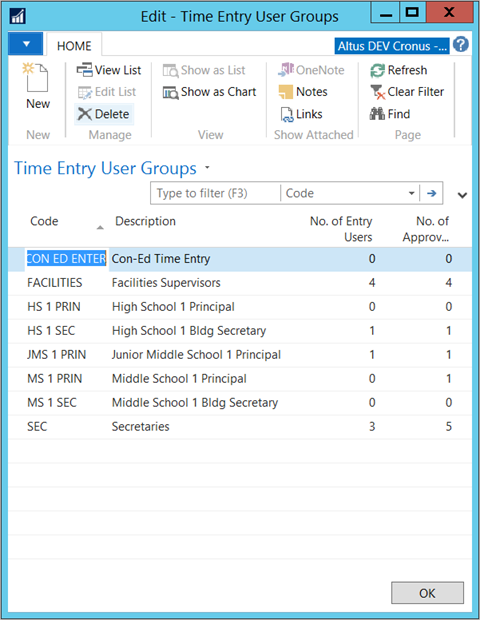
Configuring Time Entry User Groups
The Time Entry User Group is a setup table of valid codes that can be assigned to the EWA User either as an Entry Group or an Approver Group. A single EWA User can only be assigned to one Entry Group and one Approver Group.
This page shows the number of times the code has been used on the EWA User. Each count is drillable and will show the records that make up the count. Once Time Entry User Groups have been setup, you can assign them to EWA Users as the TE Entry User Group Code and/or the TE Approval User Group Code.
To create a Time Entry User Group:
- From the Search bar, type Time Entry User Group and select the page from the drop-down list.
The Time Entry User Groups page displays.
- From the Ribbon, click New.
- Complete the following:
- Code: specify a value that represents the group. Can be a maximum of 20 alpha numeric characters.
- Description: provide a short text description that describes the code. Can be a maximum of 50 characters.
- Click OK when finished.
Time Entry User Group Setup Examples
To reduce maintenance in the case of personnel changes, you could setup generic or general Time Entry User Groups for each data entry person/group and each approver or approver group. Using generic Time Entry Groups would mean that only the EWA User Card would be changed in the case of employee responsibility changes.
For example, Mary Smith was the Principal at School A and moved to the Principal position at School B. The EWA User Card for Mary Smith while she was the Principal at School A, looked like:

When Mary Smith became the Principal at School B, the EWA User Card changes to:

The Time Entry Unit Approval Routes would not need to change because the generic code was used instead of using Mary Smith’s EWA User “No.”.