

Before users (employees and managers) can use the Time Entry Employee Center application to create, manage, approve, and submit timesheets, a number of set up and administration tasks need to be performed.
The general parameters for the Time Entry application are maintained under the Human Resources Management module, Time Entry folder. As the Time Entry administrator, you have access to this setup table, where you define the fields and field content for the Employee Center pages that users see.
Accessing the Time Entry Menu List
To access the set up menu items:
- From the Navigation Pane, click Departments > Human Resources Management > Time Entry (1.0)
The Time Entry navigation pane opens.
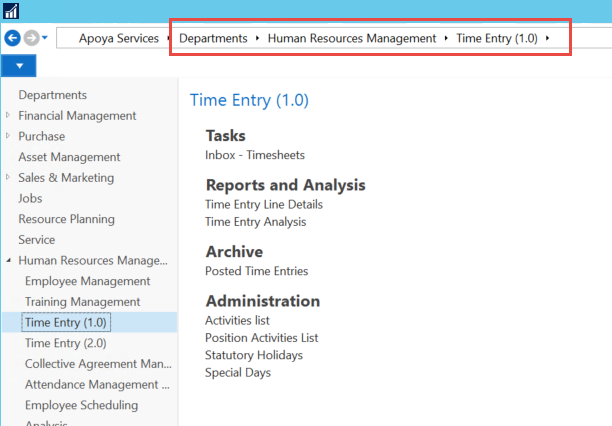
Note: Time Entry 1.0 is available in vers 9.08.01 and higher, if your version is prior to this then the Menu will read Time Entry. - From the Time Entry (1.0) page, select Administration > Activities List.
The Activities List page displays.
Defining Time Entry Activities
Activities can be defined universally and then assigned to applicable positions. The activities can be
linked to a G/L Account that can determine the dimension to validate against the activity for the time
entry, if Dimension Combination Control is being used.
To define time entry activities:
- Open the Human Resources Management menu.
- From the Time Entry (1.0) folder, select Administration > Activities List.
The Activities List displays.
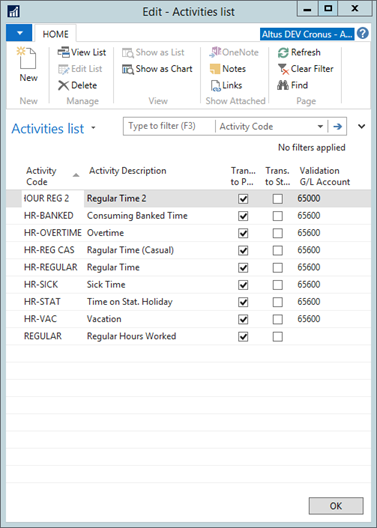
- To create a new activity, from the Home Ribbon click New.
- Complete the following fields:
- Activity Code: Enter a code for the time entry activity (for example, 1-regtime, 2-overtime, and so on.) This populates the Activities drop-down on Employee Center.
- Activity Description: Enter a description for the activity. This populates the Activities drop-down on Employee Center.
- Transfer to Payroll: Add a checkmark to this check box to transfer the activity to payroll.
- Validation G/L Account: Select the G/L Account (for which Dimension Combination Codes are set up) that you want used in dimension combination validation activities on entries with this activity. This is used in the dimension selection and validation on Employee Center.
- Click OK.
Assigning Activities to Positions
Once you define the universally assigned/used Activities you can assign them to a specific position where you can add/attach further details to those activities.
To assign position-specific activities:
- Open the Human Resources Management menu.
- From the Time Entry (1.0) folder, select Administration > Position Activities List.
The Position Activities List displays.
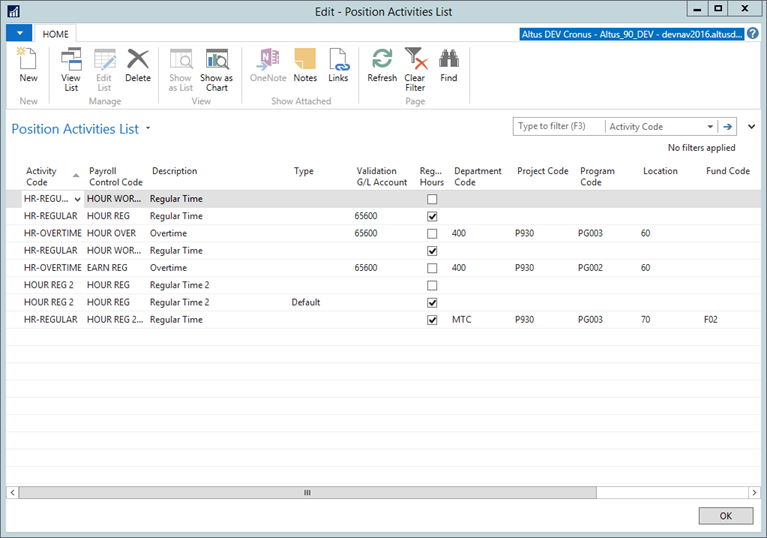
Note: You can also access the Position Activities List by selecting the Position Card > HR menu, then selecting Time Entry Activities. - To create a new activity, from the Home Ribbon click New.
- Complete the following fields:
- Activity Code: Select the activity to assign to this position. This is used by Employee Center's Activities List drop-down.
- Payroll Control Code: Select the Payroll Control Code to apply to all entries with this activity. This is used in the Payroll Journal.
- Description: Enter a brief description for the entry. The description defaults but can be overwritten.
- Type: Specify the position type. Options are: Default, Statutory, and Overtime.
- Validation G/L Account: Select the G/L Account (for which there has been Dimension Combination Codes
set up) that you want used in dimension combination validation activities on entries with this activity. The Activities G/L Account code defaults but can be overwritten for this position. This value is used in the dimension selection and validation on Employee Center. -
- Regular Hours: Place a checkmark in this field if the time associated with this activity is to be included in the Regular Hours calculation. This field is used to determine total regular hours on the timesheet. Timesheets without sufficient regular hours cannot be submitted.
- Dimensions 1-8 Code: Select any default dimensions for the position activity.
Note: These are default values and do not stop the Employee Center user from changing the values when a list is available. You can 'lock down' these values on the EWA User card's Security filter.
- Click OK.
Note: This only applies if Enable Dimension Combination Control is turned on in the Employee Intranet Setup page.
This page does not exist. New location?