

Schedule templates allow you to create patterns of shifts that you can reuse to fill the schedule for many pay cycles. Templates may be set up with positions, employees, or a mix of both.
Creating Templates
Employee Scheduling enables schedulers to create schedule templates to apply to a specific unit. This simplifies the schedule creation and makes the creation process much more efficient.
To create a schedule template:
- Search for Schedule Templates in the search box and select the page from the drop-down list.
The Schedule Templates list opens.
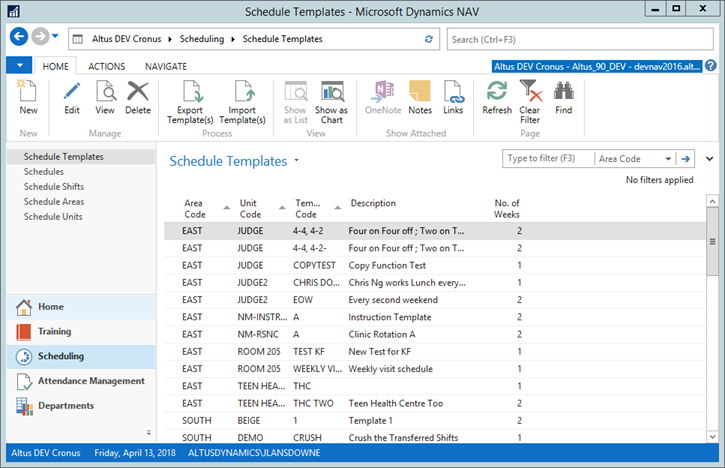
- From the Ribbon, click New. A new Schedule Template Card opens.
- Use the drop-down to select the Area Code field, and then the Unit Code field.
- Create a code in the Template Code field. This is a user-created code to uniquely identify each template for the Unit.
- In the Description field, enter a longer description for the template if necessary.
- In the No. of Weeks field, enter the duration of the template as a number of weeks. The Shifts lines will populate with one row for each day in the cycle.
- In the Type field, choose Weekday or Rotation. Weekday uses a Sunday to Saturday work day pattern. Rotation provides extra options to build more complicated patterns.
Understanding the Template
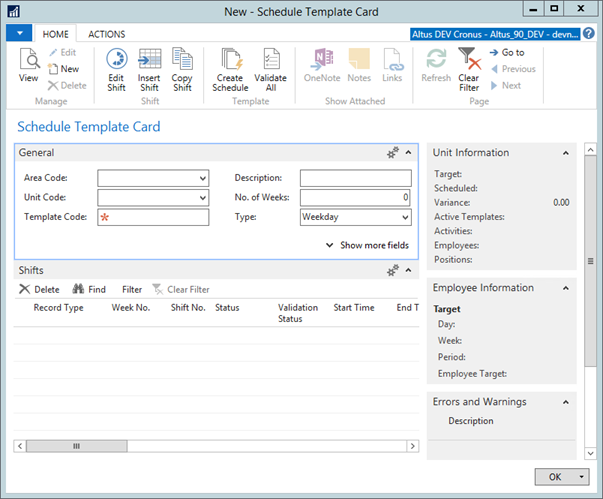
The template contains information based on the unit selected. In addition, the Unit Information FactBox displays important totals for the template.
To view the Template:
- Search for Schedule Templates in the search box and select the page from the drop-down list.
The Schedule Templates list opens. - Select the specific template that you wish to view from the list.
- From the Ribbon, select View or Edit. The Schedule Template Card displays.

Unit Information
The following table explains the fields that are contained in the Unit Information fact box to the right of the template. The information simply provides an explanation for the fields and the data displayed.
| Field Name | Details |
| Target | This is the total weekly hours specified in the Unit Positions, multiplied by the number of weeks to schedule. |
| Scheduled | This is the total number of hours booked in the template detail lines. |
| Variance | This figure indicates whether the template is over or under budget. A negative number indicates that the template has been created with more labor hours than required according to the budgeted hours. A positive number indicates that the template has been created with less labor hours than required according to the budgeted hours. |
| Vacant | The number of vacant shifts in this template. Vacant refers to a shift that has been created but not assigned to a specific employee yet. |
| Pending | This field is not applicable to templates. |
| Active Templates | The number of active templates for this unit. Clicking the value will open a report that lists the active templates. |
| Activities | The number of Activities associated with this Unit. Clicking the value will open the Schedule Unit Activities card. You can use this to create new activities and to manage the activity list. At least one Activity is required. |
| Employees | The number of Employees associated with this Unit. Clicking the value will open the Schedule Unit Employee card. You can use this to manage the list of employees associated with this unit. At least one Employee is typically required, to be designated as the unit supervisor. |
| Positions | The number of Positions associated with this Unit.Clicking the value will open the Schedule Unit Position card. You can use this to manage the list of positions associated with this unit. Note that it not necessary to assign positions to the unit, it is valid for this value to be 0, in which case all positions eligible for scheduling will be used. |
Creating and Maintaining Template Shifts
The Shifts FastTab of the Schedule Template is designed for users to add entries that make up the schedule template.
To add entries to the Scheduling Template:
- From the Schedule Template Card, in the Ribbon, click Edit Shift.
The Shift Card Template page displays.
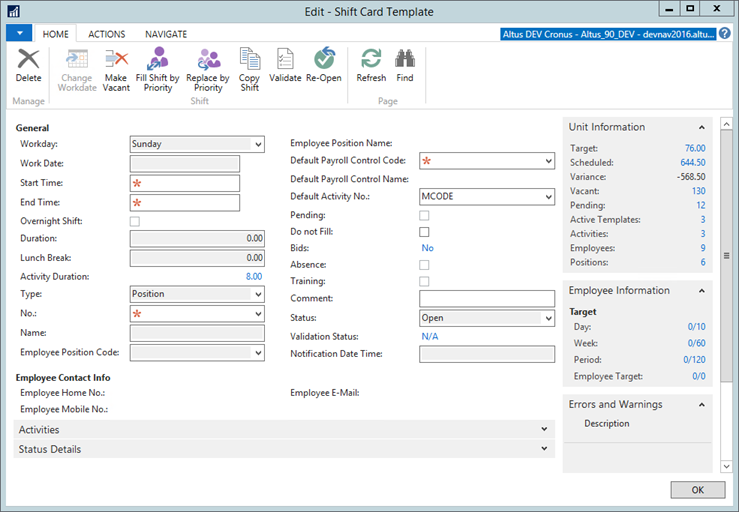
- Click on one of the lines that were created automatically by the template and from the Ribbon click Edit Shift to edit the details. If you would like to add another shift on the same day, use the Insert Shift button on the ribbon to insert a new shift.
- The following table explains how the General fields should be completed:
| Field Name | Details |
| Workday | This field displays the day of the week. It will display a weekday for the Weekday template type, or a Day No. for the Rotation template type. In the Shifts list, if it is blank, then the value is the same as the row above it. It is filled in based on the line selected when the Insert Shift was used. |
| Work Date | This field is blank for Templates but will be populated with the Week No. |
| Start Time | Enter the Start Time of the Shift. This field is required. |
| End Time | Enter the End Time of the Shift. This field is required. |
| Overnight Shift | This is a calculated value, it will be checked if the shift crosses over a date (at midnight). |
| Duration | Calculates the duration between the start and end time. |
| Activity Duration | Calculates the total duration of the activities specified below. |
| No. | This field is required. If the shift is vacant, this field shows the Position Code. This is the default when first creating a shift. If the shift is filled, this field will display the employee no. of the employee scheduled for this shift. See Managing Employee Assignment for details on how to change this field's type and value. |
| Name | This will display either the Position Name or the Employee Name depending on the No. |
| Employee Position Code | If the shift is filled, this field will display the position for which the employee is scheduled to work this shift. |
| Employee Position Name | Name of the employee’s position. |
| Default Payroll Control Code | This field is required, but will often default based on the Position Code chosen in the No. field. If it does not, select the default payroll control code from the drop-down. |
| Default Payroll Control Name | Displays the description that corresponds to the chosen Payroll Control Code. |
| Default Activity No. | Select the default activity number from the drop-down. Possible values come from the Schedule Unit. |
| Vacant | Checked when this shift is vacant. |
| Do Not Fill | Check the box if you do not want this shift to be filled. Prevents employees from bidding on the shift. |
| Bids | For a template shift, this value will always be No. Template shifts cannot have bids against them. |
| Change Requests | For a template shift, this value will always be No. Template shifts cannot have change requests against them. |
| Absence | Checked when this shift records a scheduled employee absence. |
| Absence Request No. | Filled in for a vacant shift which was created to track an employee absence. |
| Cause of Absence Code | Filled in for a vacant shift which was created to track an employee absence, providing the code for the absence. |
| Cause of Absence Description | Filled in for a vacant shift which was created to track an employee absence, providing the comment which accompanied the absence request. |
| Comments | Use this field to specify any significant details about the shift, such as a special qualification that may be needed. |
| Status | Describes the status of the shift.
|
| Validation Status | For a filled shift, reports if validation is pending, OK, had warnings, or had errors. |
| Notification Date Time | The notification date and time. |
The Employee Contact Info fields are display-only:
| Field Name | Details |
| Employee Home No. | Displays the employee’s home phone no, if available, for a shift which is filled. |
| Employee Mobile No. | Displays the employee’s mobile phone no, if available, for a shift which is filled. |
| Employee E-Mail | Displays the employee’s email address, if available, for a shift which is filled. |
Managing Employee Assignments
To fill a shift:
- First select the Position Code, if it has not already been set.
- Use the Fill Shift by Priority button in the ribbon to select an employee. To replace an employee, from the Ribbon, click Replace by Priority to select an employee.
- For both operations, you will be shown the employees associated with the unit by default. You can use Show All to see all employees in the Area. Employees from another Area cannot be selected.
- To remove an employee and go back to a vacant shift, from the Ribbon click Make Vacant to select a position. This can be different from the initial position, for example to open a shift to casual workers.
Activities
A single activity that spans the duration of the shift will be created by default. This can be broken up into discrete activities as desired. The total of the individual activity durations must match the duration of the shift.
Using Copy Shift
- Copy Shift will copy the currently selected line of the table to other days within a chosen week. Use it to repeat a shift entry across multiple days of the template. The source (selected) line must be a valid shift, that is, it must have a start and end time, a position (or an assigned employee) and a payroll control code.
- If you need to correct a mistake and replace shifts that you've previously copied, use the Overwrite flag to do so.
- The Copy Shift function supports multiple row selection. Select the desired row(s) before clicking the Copy Shift button.
Validating a Template
Shifts with assigned employees will be validated as they are configured, but you can use Validate All to recheck the entire set of filled shifts when you have completed the template.
Creating a Schedule From a Template
Creating the schedule requires the relevant pay cycle periods to be created as a prerequisite.
To create a schedule from a template:
- From the Ribbon, click Create Schedule. The Create Shifts dialog opens.
- Select the desired Pay Cycle period(s) (From Preiod and To Period) from the Create Shifts dialog.
- If you want to remove any existing shifts in the target pay cycle(s) and start fresh, check the Clear Schedule check box.
- If you want to replace any shifts with the same day and times, check the Overwrite Existing Shifts check box.
- If you want to include blank placeholder shifts in the schedule, check Copy Blank Shifts.
- If you want to include activities, which you normally will, check the Copy Activities check box.
Rotation Options
A rotation template provides two additional options:
- First Day Shift No. defaults to the very first line in the template.
Note: If you want to begin the pay cycle using a different shift, select it from the drop down. This is useful if you need, for example, to start a pay cycle with the "Day 3" shifts instead of the "Day 1" shifts. This option is most useful if you need to resume applying a template that was "part way through" its pattern at the end of a previous pay cycle, where you stopped creating shifts. - Pay Cycle Start Offset defaults to zero. It represents the number of days to skip at the start of the first pay cycle. Use this, for example, if the pay cycle starts on a Sunday, but you want to start applying the template on the next day (Monday). In this case the Pay Cycle Start Offset would be one day (set this value to 1).