

Use the Schedule Setup page to define the major business rules and communication settings for employee scheduling. These settings are applied company-wide, that is, they affect all schedule units.
General FastTab
To configure schedule setup:
- In the Search field, type Schedule Setup and select the page from the drop-down list.
The Schedule Setup Card displays. - Expand the General FastTab.

- In the Schedule Selection Sort drop-down, select the option for how you want employees sorted when filling a shift:
- Seniority Date - select this option if you want employees listed in order of earliest seniority date first.
- Seniority Hours - select this option if you want employees listed in order of who has the most seniority hours first. See Viewing Employee Card - Seniority Hours.
- In the Cleanup Frequency field, specify in minutes how often you want the system to remove old entries from temporary tables that are used to share data between Sparkrock 2016 and Employee Center. Setting this value lower can help system performance.
Errors/Warnings FastTab
- Expand the Errors/Warnings FastTab.
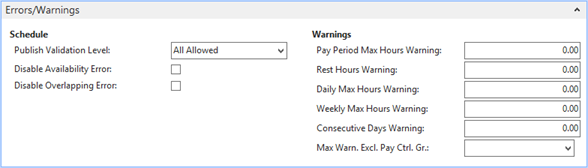
- In the Publish Validation Level drop-down, select the option for error/warning tolerance that you allow for publishing of shifts:
- All Allowed - This option allows shift to be published even if they have errors and warnings that have not yet been resolved.
- Validated & Warnings Allowed - This option allows shifts to be published if they are validated and are OK or have warnings, but not if they have errors.
- Validated Allowed - This option permits shifts to be published only if they are validated without warnings or errors.
Note: This feature can cause problems with Employee Center if the Publish Validation Level is not set to All Allowed. This prevents incomplete position shifts, including those created in Employee Center, from being published. If you see uneditable shifts in Employee Center after creating a new shift, and the shift status is Open, this is most likely the problem.
- Add a checkmark to the Disable Availability Error check box if you want to disable availability-related warnings.
- Add a checkmark to the Disable Overlapping Error check box to turn off the warnings for overlapping shifts for the same employee. When this option is disabled it warns users if an employee is scheduled in two places at the same time.
- (Optionally) In the Warnings section, specify the following:
- Pay Period Max Hours Warning - Enter the total hours for an employee at which you want the system to warn schedulers for the pay period. Typically, this may trigger overtime. For bi-weekly pay periods this may be 76 or 80 hours, depending on your jurisdiction.
- Rest Hours Warning - Enter the minimum hours required as rest time between shifts. If a single employee is scheduled in two shifts with less than this amount of time in between, it will generate a warning.
- Daily Max Hours Warning - Enter the total hours for an employee at which you want the system to warn schedulers for the day. Typically, this may trigger overtime.
- Weekly Max Hours Warning - Enter the total hours for an employee at which you want the system to warn schedulers for the week. Typically, this may trigger overtime.
NOTE: The week calculations are from Sunday to Saturday. - Consecutive Days Warning - Enter the number of consecutive working days at which you want the system to trigger the consecutive days warning.
- Max Warn. Exc. Pay Ctrl. Group - Select the Payroll Control Group that contains the type of hours to be excluded from the warnings. These are typically sleep time, vacation time, or sick time.
Note: When calculating rest requirements for overnight shifts based on the settings in the Schedule Setup for pay period and daily and weekly maximum hours, the calculation takes into account time scheduled per date. The portion of the overnight shift before midnight is counted toward the first day, while the portion of the overnight shift after midnight is counted towards the second day.
Shift Notifications FastTab
Use the Shift Notifications FastTab to enter the text of the standard messages to appear in the emails that will be exchanged in the process of schedule booking between the employees and the schedule administrators and supervisors.
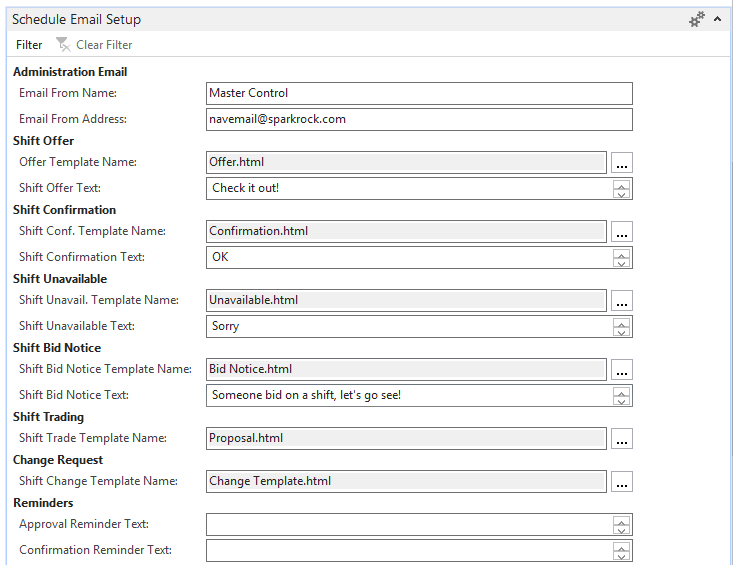
Administration Email
- In the Email From Name field, type the name you wish to appear as the sender of the email. Typically, this is something generic like your company name and "Scheduler". For example, "Cronus Scheduler".
- In the Email From Address field, type the email address that should appear as the sender of the messages. For example, "scheduling@sparkrock.com"
Note: If the Email From Address is different from the User ID on the SMTP Mail Setup card, then some extra permissions will need to be configured in your email system. The email address specified in Email From Address will need to grant 'Send As' and/or 'Send on Behalf' permissions to the SMTP Mail Setup User ID, making the latter a delegate. This step is not required if both email addresses are the same.
Shift Offer
Shift offer emails are sent to employees when the Offer Shift feature is used either from the Schedule page in NAV or by the Unit Supervisor online.
- In the Offer Template Name field, browse to and attach the HTML file that contains the Shift Offer template.
Sparkrock provides a sample template which you can download: Offer.html (right-click to download). - In the Shift Offer Text field, enter the text to include in the message sent when a shift is offered to an employee.
This is typically something like:
You have been offered the shift below. Please click on the link below to review the details. You can accept the offer on the linked Employee Center page. Shifts not accepted within 4 hours may be offered to additional staff.
Shift Confirmation
Shift Confirmation emails are sent to employees when an offer or bid has been accepted in the Employee Center. It is also used when the “Send Single Confirmation” is used from the schedule.
- Shift Conf. Template Name – Browse to and attach the HTML file that contains the Confirmation template.
Sparkrock provides a sample template which you can download: Confirmation.html (right-click to download). - Shift Confirmation Text – Enter the text to include in the message sent when a shift is assigned to an employee based on a bid or offer. This is typically something like:
You have been confirmed for the shift below. Should you have any questions or concerns, please contact your supervisor.
Shift Unavailable
Shift unavailable emails are sent to employees when a shift which they have been offered or have bid for is assigned to a different employee. All unsuccessful bidders or offers receive this message so that they know the shift was awarded to someone else.
- Shift Unavail. Template Name – Browse to and attach the HTML file that contains the Unavailable template.
Sparkrock provides a sample template which you can download: Unavailable.html (right-click to download). - Shift Unavailable Text – Enter the text to include in the message sent when a shift has been assigned to a different employee. This is typically something like:
The shift is no longer available. Should you have any questions or concerns, please contact your supervisor.
Shift Bid Notice
Bid Notice emails are sent to unit supervisors only if their Schedule Unit Employee record is configured to send them bid notices. Bid Notice emails are generated whenever an employee bids on a shift. The email includes a link which allows the unit supervisor to review any and all bids that have been registered for their unit.
- Shift Bid Notice Template Name – Browse to and attach the HTML file that contains the Bid Notice template.
Sparkrock provides a sample template which you can download: Bid Notice.html (right-click to download). - Shift Bid Notice Text – Enter the text to include in the message sent to unit supervisors when an employee bids on a shift in the unit. This is typically something like:
A bid was recently placed on this shift.
Shift Trading
Shift Trade emails are generated at various stages of the Shift Trade transaction process. The email includes a link which allows the employee or unit supervisor to review the trade transaction and to take appropriate actions.
Note: You must have the Shift Trading add-on to use this feature.
- Shift Trade Template Name – Browse to and attach the HTML file that contains the Trade template.
Sparkrock provides a sample template which you can download: TradeProposal.html (right-click to download).
Change Requests
- Shift Change Template Name – Browse to and attach the HTML file that contains the Change Request template.
Sparkrock provides a sample template which you can download: Change Template.html (right-click to download)
Reminders
The system can be configured to send out emails to remind staff to confirm their shifts worked and to supervisors to approve schedules for their units at the end of the pay cycle. Configure the content of these email messages with the settings below:
- Approval Reminder Text – Enter the text to be included in the email sent for the reminder to the supervisor to approve timesheets. This is typically something like:
Please approve timesheets for your unit. These are due within 3 days of receiving this message and are required for staff in our unit to be paid. - Confirmation Reminder Text - Enter the text to be included in the email sent for the reminder to the employee to confirm their shifts worked. This is typically something like:
Please confirm the shifts worked for this period. These are due within 3 days of receiving this message.
Schedule Unit Defaults FastTab

These defaults provide initial settings for new units.
- Area Code - Select a default area if you want one specific area to be the default for new units. For more details, see Setting up Areas.
- Pay Cycle Code determines the Pay Cycles for this unit.
Shift Change Date Tolerance controls the range in which a shift can be adjusted. This change can be made directly by Unit Supervisors when editing a shift, or can be requested by non-supervisors when submitting a change request. This setting applies to both employee types equally — you cannot have one setting for Unit Supervisors and another for employees.
- The default selection, None, prevents changing the date on a shift.
- The Current Week selection allows a change to be made or requested for the date of the shift within the current week, starting Sunday and ending Saturday.
- The Current Pay Cycle selection allows a change to be made or requested for the date of the shift within the current pay cycle, which is determined by the pay cycle start and end dates.