

The Employee Card is where all employee-related information is stored. A card exists for each employee and is a valuable reference for information about the individual. Within the Employee Card you can set, add, edit, update, and delete employee pay rates, employee payroll controls, and tax information on tables accessed from this card. You can also look up employee statistics and payroll entries.
The Human Resources Management granule is linked to payroll functions by the Resource No. on the Payroll tab. When you update certain basic information about an employee (such as name, address, social insurance number, employment date, and so on) in the Employee Card, an automatic update is performed to the employee information across the entire system.
Employees should be created from the HR Requests and not directly from the Employee Card. However, the Employee Card should be used for updating an existing employee record. The employee record is created through the On-Boarding process and includes the employee data entered in the HR Request form for adding a new employee and a number of supporting tables generated from the default values per HR Position information. Payroll personnel need to ensure all the data elements required to process payroll are in place. A system of pre-defined tasks and workflow ensures that payroll personnel have the record and tasks to be performed in the appropriate Inbox. Once the required tasks are performed, the payroll user can set the record to ‘next step’ passing the workflow to the next person responsible for the employee setup.
Providing Employee Payroll Information
The Payroll tab contains information required to create and generate a payroll process for the employee. Use this tab to record the full payment arrangement details for the employee.
To configure the Payroll tab:
- In the Search field, type Employees and select the page from the drop-down list.
The Employees page displays. - Double-click the employee name whose payroll details you want to access.
The Employee Card for the selected employee displays. - Expand the Payroll FastTab.
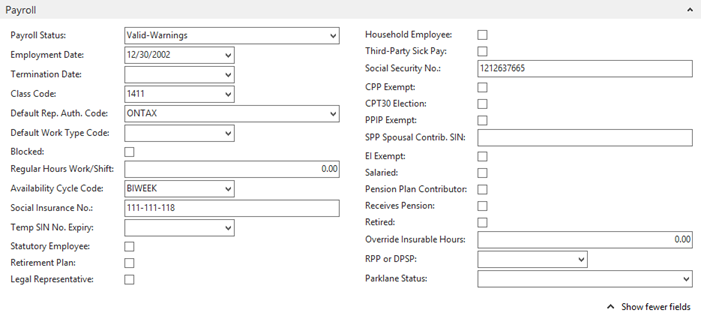
- Use the following table for information on how to complete the Payroll FastTab:
| Field | Description |
| Birth Date | Displays the employee’s birth date. Enter/modify this date as required. |
| Employment Date | Displays the employee’s start date. Enter/modify this date as required. |
| Termination Date | Displays the date upon which the employment was terminated, if applicable. Enter/modify this date as required. |
| Position Code | Displays the position code for the employee. |
| Original Position Code | Displays the original position code to which the employee was first hired. |
| HR Position Code | Displays the HR position code for the employee. |
| Class Code | Displays the payment class code. Depending on the option selected in the Position Code field, this field is automatically populated. |
| Default Rep. Auth. Code | Displays the code for applicable tax reporting authority. |
| Default Work Type Code | Displays the work type code that the employee is eligible to claim, if applicable. |
| Blocked | Select this check box to prevent any further transaction from taking place with this employee. |
| Regular Hours Work/Shift | Displays the daily number of hours the employee must work. Enter/modify this number as required. |
| Availability Cycle Code | Displays the pay cycle to which this employee is assigned. |
| CPP Exempt | Indicates that the employee is exempt from contributing to Canada Pension Plan. If the employee has tax exemptions, click to add a check mark in the CPP Exempt check box. |
| EI Exempt | Indicates that the employee is exempt from contributing to Employment Insurance. If the employee has tax exemptions, click to add a check mark in the EI Exempt check box. |
| Salaried | If the employee is salaried, click to enter a check mark in the Salaried check box. |
| Override Insurable Hours | Displays the number of insurable hours required to override insurable hours. |
| RPP or DPSP | Displays the In the RPP or DPSP field. |
Working with the Rates and Controls Assigned to an Employee
The Payroll button contains options enabling you to set employee pay rates, employee payroll controls, and tax information to the Employee Card. You can also look up employee statistics and payroll entries. The following provides a description of some of the options available from the Payroll button.
Reviewing the Payroll Controls Assigned to an Employee
The payroll controls assigned to an employee are stored in the Employee Payroll Control Card. You can review the controls (and the specific details for a control) to confirm the correct controls are assigned to the employee.
To review payroll controls assigned to an employee:
- In the Employee Card, click the Navigate tab.
- Click Payroll and then click Pay Controls.
The Employee Payroll Controls page opens.
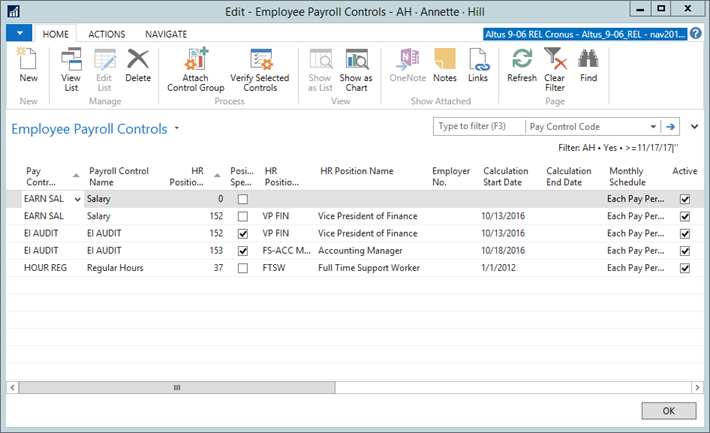
- The following table provides an explanation for the fields in the Employee Payroll Controls page:
| Field | Details |
| Pay Control Code | Displays the code assigned to the payroll control. |
| HR Position Ledger Entry No. | Displays the HR Position Ledger Entry No. to which the control is related. This is applicable for position-specific payroll controls only. |
| Position Specific | Indicates the control is linked to the employee’s position(s). This is applied automatically and not editable. |
| HR Position Code | Displays the HR Position Code. |
| HR Position Name | Displays the name of the HR Position. This field is automatically updated based on the HR Position Code selected. |
| Employer No. | Displays the employer number associated with this employee. |
| Calculation Start Date | Displays the date by which the calculation of the payroll control begins. In the space provided, enter the date. |
| Calculation End Date | Displays the date by which the calculation of the payroll control ends. In the space provided, enter the date. |
| Monthly Schedule | Indicates the schedule by which the payroll control is applied to the employee pay. From the drop-down, select the schedule that applies. |
| Active | Indicates that the payroll control is active for this employee. Click to add a check mark if this is true. |
| Payroll Posting Group | Displays the payroll posting group to which the payroll control is attached. |
| NOTES ABOUT GARNISHMENTS:
Occasionally, employers are requested by various external authorities (Garnishment Court, Canada Revenue Agency, and so on) to garnishee employee wages to satisfy debts. When the withholdings are made against an employee, there is often a requirement to report to said authorities the amounts that were withheld from the employee on their behalf, including pertinent reference details along with providing them with the funds collected in either a check or EFT payment. The following fields enable you to generate a Garnishment report to provide the necessary “backup” documentation for payments made to external authorities relative to garnishments. For details on generating a Garnishment report, see Generating Payroll Reports – Garnishment Report. |
|
| Garnishment Acc. No. | Displays the garnishment account number assigned to this employee’s file by the garnishment authority. |
| File/Reference No. | Displays the reference number assigned to the employee’s garnishment file. Used to link the payment to the appropriate file. Enter the file/reference number provided by the garnishment authority. |
| Contact Name | Displays the name of the garnishment authority’s representative. This individual serves as the contact for the garnishment arrangement. |
| Garnishment Description | Displays a brief description of the garnishment arrangement/explanation. Enter the arrangement details in the space provided. For example, Income Tax garnishment. |
| SIN No. Suffix | The code that is printed following the SIN number for the external authority associated with a garnishment. For example, CRA garnishments contain the suffix value ‘RI’. |
| Contact Phone, Contact Extension | Displays the contact details for the garnishment authority’s representative. This individual serves as the contact for the garnishment arrangement. |
Updating the Payroll Controls Using the Attach Control Group Function
To update payroll controls using the Attach Control Group function:
- From the Employee Card, find the employee for which you need up revise the payroll controls.
- Click Payroll and select Pay Controls.
The Employee Payroll Controls page opens. - Delete all of the existing payroll controls.
- Click the Actions tab and then click Attach Control Group.
The Attach Ctrl. Grp. To Emp. page opens.
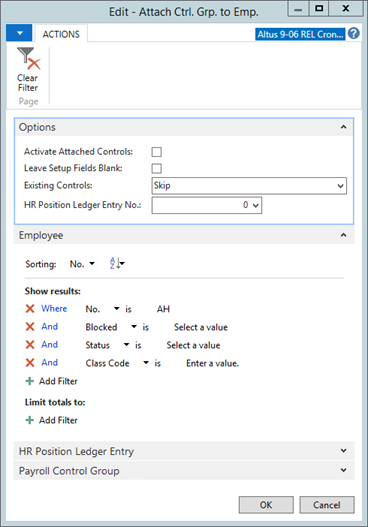
- In the HR Position Ledger Entry No. field, enter the ledger entry number to apply to the employee.
- Click OK.
Updating Payroll Controls Using an HR Request
To update payroll controls by submitting an HR request:
- Create an HR request with a reason code that has a Process Type (Leave, Details Change, and so on) that attaches Payroll Controls to the employee.
For more information on creating an HR request, see Creating a New HR Requisition. - Process the request and review the entries.
The records are automatically updated based on the HR request.
Updating Rates for an Individual Employee
The Employee Card provides you the option of updating the rates attached to a single employee.
To update rates for an employee:
- Open the Employee Card for the employee whose rates you want to update.
- In the Ribbon, click the Navigate tab.
- Click Payroll and then click Rates.
The Rates page opens.
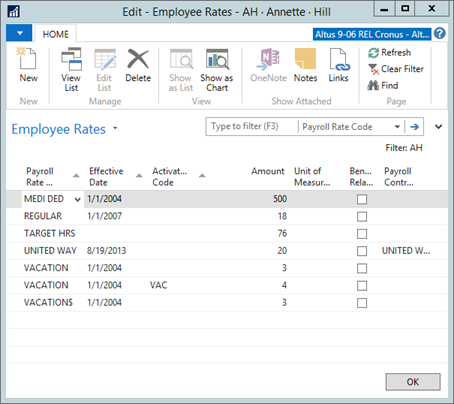
- Locate the payroll rate you want to update and change the following:
- If the rate is dependent upon a specific activation timeframe, in the Activation Code field, select the appropriate activation.
- In the Effective Date field, enter the date upon which the rate change comes into effect.
- In the Amount field, enter the new rate amount.
- Click OK.
For details updating rates for groups or classes of employees, see Updating Rates for an Entire Employee Class.
Adding Pay Structures
Pay structures are attached to each applicable employee to initiate automatic calculation of earnings, and so on. When an employee’s position and/or position ranking changes, you must submit new pay structure information for the employee using an HR Request.
However, you can review an employee’s current or reference an employee’s past pay structures (which are maintained) using the Pay Structures page.
To add a pay structure for an employee:
- Open the Employee Card for the employee to whom you want to add a pay structure.
- In the Ribbon, click the Navigate tab.
- Click Payroll and select Pay Structures.
The Pay Structures page opens listing the pay structures applied to the employee.
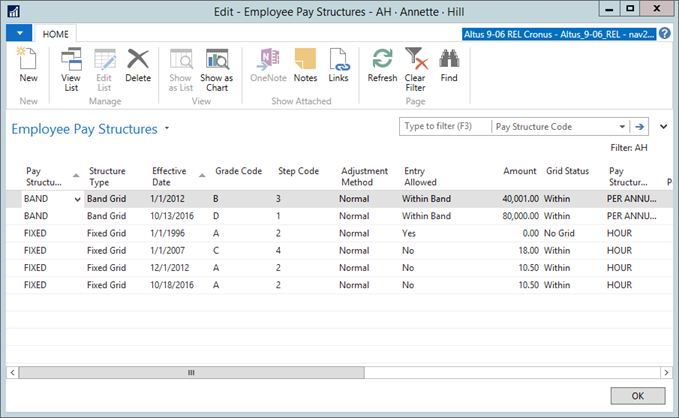
- From the Ribbon, click New.
- In the Pay Structure Code field, select a pay structure from the drop-down list.
- Use the following table to enter information in the fields within the Employee Pay Structures page.
NOTE: Alternatively, if you need to make changes to an existing pay structure rather than add a new one, make changes to the existing record using the following table as well.
| Field | Description |
| Pay Structure Code | Displays the code for the pay structure. |
| Structure Type | Displays the type applied to this pay structure. From the drop-down list select a pay grid – Fixed or Band or None (Fixed Amount). |
| Effective Date | Displays the date upon which the pay structure becomes effective (is applied to the employee). Enter the date in the field using the DD/MM/YY format. |
| Grade Code | Displays the grade code assigned to the pay structure. |
| Step Code | Displays the step code assigned to the pay structure. |
| Adjustment Method | Displays the method by which this pay structure is to be applied to the employee. From the drop-down list select an adjustment method – Normal, Hold Amount, Grid Catch Up Hold, or Same Adjustment. |
| Amount | Displays the amount of the pay (hourly amount, yearly amount, and so on), which is also based on the Pay Structure Unit of Measure. Enter the amount in the space provided. |
| Pay Structure Unit of Measure | Displays the unit of measure applied to the pay structure. |
| Grid Status | Displays the status for the pay grid. |
| HR Position Ledger Entry No. | Displays the HR Position Ledger Entry No. associated with the pay structure. |
| HR Position Code | Displays the HR position code. |
| HR Position Name | Displays the name of the HR position. |
| Pay Period Amount | Displays the amount the employee receives each pay period. Enter the amount in the field provided. |
| Monthly Amount | Displays the amount the employee receives each month. Enter the amount in the field provided. |
| Yearly Amount | Displays the amount the employee receives each year. Enter the amount in the field provided. |
| F.T.E | Displays the full time equivalent value for the position. |
Making Changes to an Employee’s Tax Authority Information
If an employee has additional deductions/withholdings or any other special tax circumstances, this information can be added or changed for an employee using the Tax Authority Information page.
To make changes to an employee’s tax authority information:
- Open the Employee Card for the employee that you want to change tax authority information.
- In the Ribbon, click the Navigate tab.
- Click Payroll and select Tax Auth. Info.
The Employee Tax Auth. Info page opens listing the tax authorities applied to the employee.
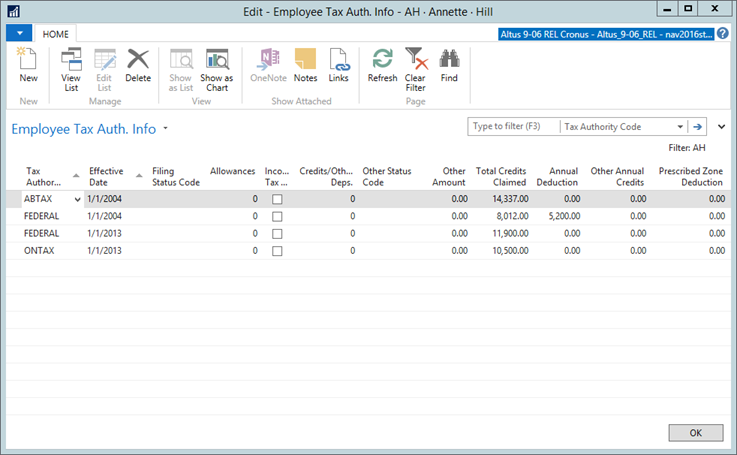
- From the Ribbon, click New.
- Use the following table to enter information in the fields within the Employee Tax Auth. Info page.
Note: Depending on your particular configuration, some columns may not be visible to you or may not be required for completion.
| Field | Description |
| Tax Authority Code | Displays the code for the pay structure. |
| Effective Date | Displays the date upon which the new tax authority becomes effective (is applied to the employee). Enter the date in the field using the DD/MM/YY format. |
| Filing Status Code | Displays the filing status associated with the Tax Authority Code selected. |
| Allowances | Displays the number of allowances required by the tax entity selected. Enter the appropriate number of allowances for this employee as required by the tax entity that was selected in the Tax Authority Code field. |
| Income Tax Exempt | Indicates whether the employee is income tax exempt. Click to add a check mark if this is the case for this employee. |
| Credits/Other Deps. | Displays the number of credits or other dependents of the employee. Enter the number applicable to the employee, if required. |
| Other Status Code | Displays the filing status for the individual.
NOTE: Some tax calculations require a status different from the one selected in the Filing Status Code field on the same line. |
| Other Amount | Some tax calculation method steps require an employee specific amount as part of the calculation. Enter that annual amount here. |
| Total Credits Claimed | Displays the amount of the total tax credits the employee can claim. This is specific to Canadian payroll. |
| Annual Deduction | Displays the total allowable amount of annual deductions for this employee. This is specific to Canadian payroll. |
| Other Annual Credits | Displays the total amount of annual credits to which the employee is eligible. This is specific to Canadian payroll. |
| Prescribed Zone Deduction | Displays the prescribed zone deduction to which this employee is eligible. If the employee lives and/or works in a prescribed zone (northern region), the individual may be eligible for this deduction. This is specific to Canadian payroll. |
Updating an Employee’s Other Authority List
Payroll Controls, such as medical insurance deductions and other controls that use filing statuses in their calculations, use the Other Auth. Info page to determine the filing status. The Employee Other Authorities page displays the benefit enrollment and allocations for the employee. You can add/modify the entitlements or deductions selected as required.
To update an employee’s other authorities list:
- Open the Employee Card for the employee that you want to update.
- In the Ribbon, click the Navigate tab.
- Click Payroll and select Other Auth. Info.
The Employee Other Auth. Info page opens listing the tax authorities applied to the employee.
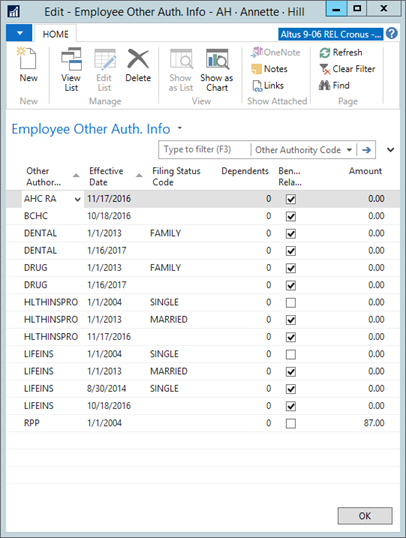
- From the Ribbon, click New to create a new record.
- In the Other Authority Code field, select the reporting authority you want to add from the drop-down list.
- Use the following table to enter information in the fields within the Employee Other Auth. Info page:
NOTE: Depending on your particular configuration, some columns may not be visible to you or may not be required for completion.
| Field | Description | |
| Other Authority Code | Displays the code for the pay structure. | |
| Effective Date | Displays the date upon which the new reporting authority becomes effective (is applied to the employee). Enter the date in the field using the DD/MM/YY format. | |
| Filing Status Code | Displays the filing status for the employee. | |
| Dependents | Displays the employee’s number of dependents. Enter the number in this field. | |
| Benefit Related | Indicates whether the reporting authority is related to benefits for the employee. Click to add a check mark in this column if this reporting authority is related to employee benefits. | |
| Amount | Displays the amount of the deduction. Enter the amount in the space provided. |
Defining an Employee’s Pay Distribution
For each employee receiving direct deposit, you must record the banking details for depositing the payment funds. As well, many employees may select to distribute their pay to different accounts/account types. All this information is recorded for the employee using the Pay Distribution page. This information is then pulled during payroll processing to ensure the funds are deposited correctly.
If an employee makes changes to the banking institution used, etc., this information needs to be updated here. To define an employee’s pay distribution details:
- Open the Employee Card for the employee whose pay distribution you want to update.
- In the Ribbon, click the Navigate tab.
- Click Payroll and select Pay Distribution.
The Employee Pay Distribution page opens.
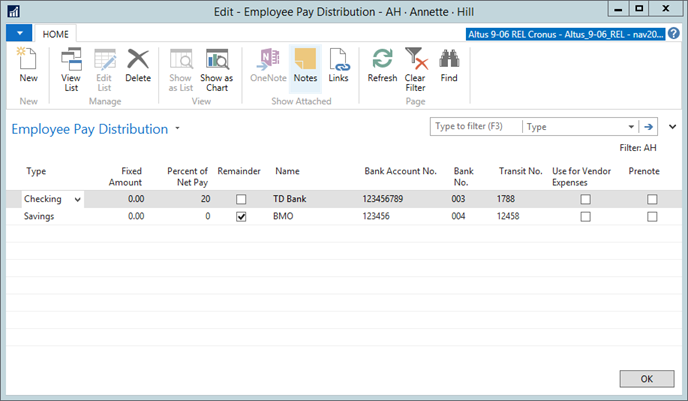
- From the Ribbon, click New to create a new record.
- Use the following table to enter information in the fields within the Employee Pay Distribution page:
NOTE: Depending on your particular configuration, some columns may not be visible to you or may not be required for completion.
| Field | Description |
| Type | Displays the payment type for the employee. From the drop-down list, select the applicable option. |
| Fixed Amount | Displays the fixed amount the employee wants to receive each pay. Enter a fixed amount of money in this field if the employee wants to receive a certain amount of pay in this manner.
For example, if the employee wants to be sure a $100 pay check is received every pay day, enter 100 in this field. Set the ‘Type’ to ‘Pay Check’. NAV Payroll will give this employee a $100 pay check each pay period, providing the funds are available in the net pay. |
| Percent of Net Pay | Displays the percentage of the total pay that is directed to this bank account. Enter the percent of net pay that the employee wants to receive.
For example, if the employee wants 20% of net pay sent to a savings account each pay period, then enter and make sure to set the ‘Type’ to Savings. |
| Remainder | Indicates that the remaining amount of the pay for this employee. Be sure you set one line as a remainder for those cents or other amounts that may be left over from the splitting.
NOTE: The remainder field can be selected on one line only. |
| Name | Displays the name of the employee’s bank. |
| Bank Account No. | Enter the employee’s bank account number. The employee will provide the bank account number. |
| Transit No. | Enter the transit number for the employee’s bank. The employee will provide the bank account number.
NOTE: The bank may refer to this as the “RDFE Transit/ABA Number”. DO NOT enter any hyphens, spaces or other characters in this field. The banking system has a check digit as the last digit at the end of this number. NAV checks this digit to ensure the number entered is a valid Transit no. This number is 9 digits. |
| Use for Vendor Expenses | Indicates whether this account can be used for reimbursing the employee for vendor expenses. |
| Prenote | Select this check box if you want to send a prenote (deposit instructions only) to the bank. A checkmark is automatically entered in this field when an entry is made or a change is made to either the Bank Account No. or the Transit No. field.
NOTE: NAV automatically removes the checkmark from the Prenote field after a successful transmission to the bank. You can manually add the checkmark to this field. It is recommended that you DO NOT manually remove the checkmark from this field. A prenote run needs to me made to the bank to ensure all transmitted information is correct and that the transmit file is acceptable to the bank. |
Viewing Employee Ledger Entries
The Ledger Entries function enables you to see the year to date earnings, deductions, contributions, payment parameters (pay cycle, and so on) posted by payroll for an employee. This information is based on the HR position, benefit enrollment, tax, and other authority information that is pre-defined for the employee.
To view the ledger entries for an employee:
- Open the Employee Card for the employee whose ledger entries you want to view.
- In the Ribbon, click the Navigate tab.
- Click Payroll and select Ledger Entries.
The Employee Ledger Entries page opens.
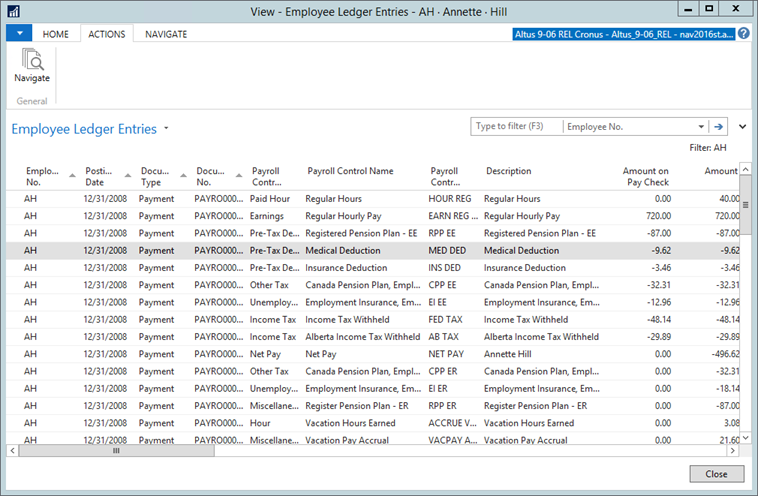
- Scroll through the columns to view the information for each ledger entry.
- To view a ledger entry in more detail, select the appropriate row, click the Actions tab and then click Navigate.
From here you can view the entries in detail and you can also create a print out of the information.
Viewing the Payroll Check Ledger
The Payroll Check Ledger enables you to see an entry for each of the checks that have been created for an employee. From this page, you can view the specific breakdown (deductions, contributions, and so on) for a payment as well.
To see the pay check details for an employee:
- Open the Employee Card for the employee whose Payroll Check Ledger you want to view.
- In the Ribbon, click the Navigate tab.
- Click Payroll and select Payroll Check Ledger.
The Payroll Check Ledger page opens.
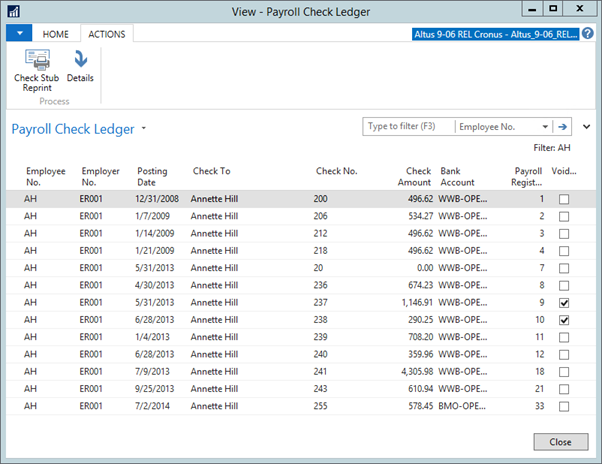
- Scroll through the columns to view the information for each pay check ledger entry.
- To view the payment breakdown for a check in more detail, select the appropriate row, click the Actions tab, and then click Details.
The Payroll Check Ledger Details page opens providing the details for the paycheck.
Viewing Earning and Expenses Statistics
You can view the payment statistics (from the current year) for an employee to see the total earning and expenses broken down by quarter, year to date, and most recent, and prior year to date.
There are two different views; The General view is in summary form and the Controls menu that has details. To view the pay statistics for an employee:
- Open the Employee Card for the employee whose payment statistics you want to view.
- In the Ribbon, click the Navigate tab.
- Click Payroll and select Statistics.
The Employee Statistics page opens displaying the earning and expense details for the employee.
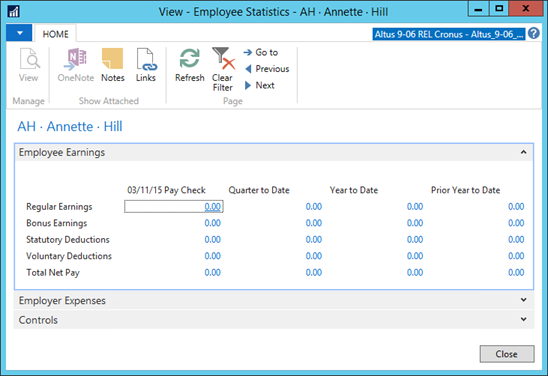
- Expand the Controls FastTab.
The employee controls details display.
Viewing Records of Employment Generation for an Employee
You can view the previously generated Record of Employment (ROE) for an employee (for example, leave data or for contract personnel, termination data when a contract ends, and so on) to see the details (reason, dates, and so on) for the ROE.
To view the ROE history for an employee:
- Open the Employee Card for the employee whose payment statistics you want to view.
- In the Ribbon, click the Navigate tab.
- Click Payroll and select Records of Employment.
The Employee Record of Employment page opens displaying the details for the ROE.
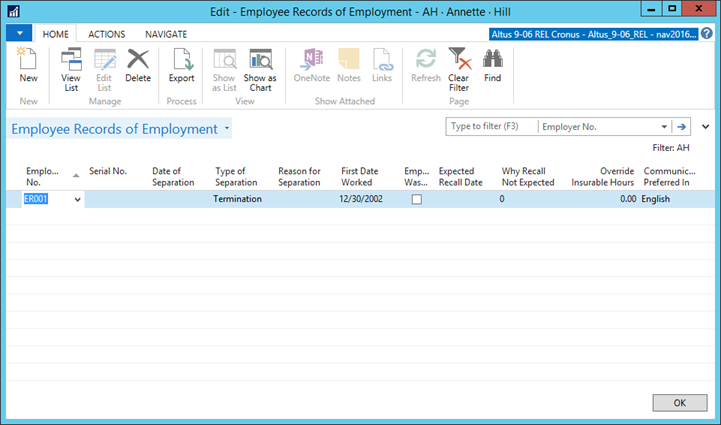
- For steps and details for generating Records of Employment for an individual, see Generating Records of Employment.
Setting Up Allocations for an Employee
If an employee’s costs are to be allocated across multiple dimension combinations relatively consistently each pay period, you can set up the allocation in the Employee Allocations page. The allocations are applied based on how the Payroll Controls are configured and may apply across all positions, if the employee has multiple.
To set up allocations:
- Open the Employee Card for the employee whose allocations you want to update.
- In the Ribbon, click the Navigate tab.
- Click Payroll and select Allocation.
The Employee Allocations page opens.

- Click the Payroll Control Code field select the appropriate code from the drop-down list.
- Click the Payroll button and select Allocations.
- Enter the appropriate dimension codes for the allocation.
- Enter the dollar amount for the allocation.
NOTES:
- NAV treats the total of the amount in all the lines as 100% and considers the amount in each of the lines as a percentage of that total. If you are working with percentages, make sure the total adds up to 100%.
- The allocations are loaded into the Payroll Journal using the Load Employee Allocation function.
Validating an Employee
You can use the Validate command to perform a check to ensure the required information for the employee has been entered to the Employee Card. Once all the details for an employee are inputted within the Employee Card, the next step is to confirm the information and activate the employee record.
NOTES:
- The functionality is based on the employee type. The validation does not function unless you have an employee type specified on the Personal tab.
- If the employee is not valid, you are unable to process payroll for this employee until the error is corrected.
To validate an employee:
- Open the Employees page.
- Select the employee that you want to validate.
- From the Ribbon, click Validate Employee.
The Validate Employee page opens.
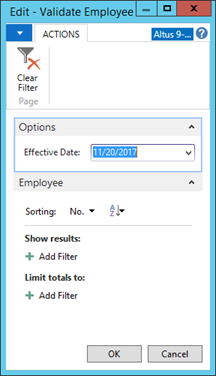
- In the Options section, select the Effective Date for the validation to evaluate. (The default is the current date.)
- Click OK.
The Payroll Details section beside the Employee Card is updated with the payroll status. - In the Payroll Details section, click the Payroll Status Valid-Warnings link to view the details of any error or warning messages.
The Errors and Warnings page opens.
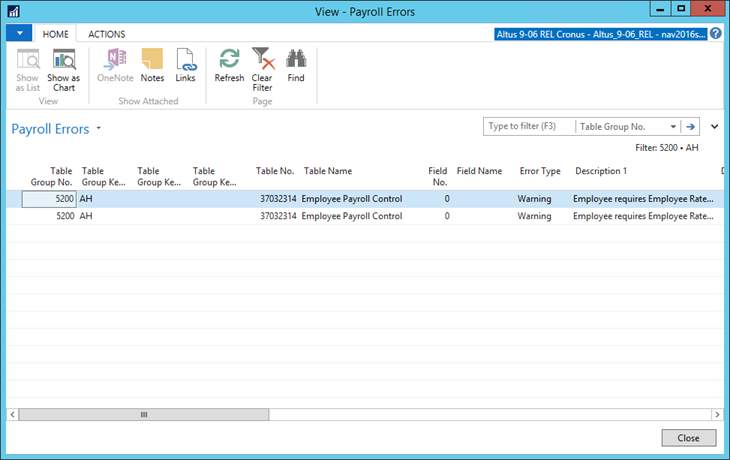
- Correct each of the warnings in the appropriate section of the employee setup and re-run the validation until all errors are cleared and warnings are resolved.
Reviewing an Employee’s Position, Dimension, Payroll, and Leave Details
The following provides a description for the information captured on the Assignment page. Many of these fields apply to payroll functions and calculations.
To view an employee's position:
- Open the Employee Card for the employee whose position you want to update.
- From the Ribbon, click the Navigate tab and then click Assignment.
The Assignment page displays.
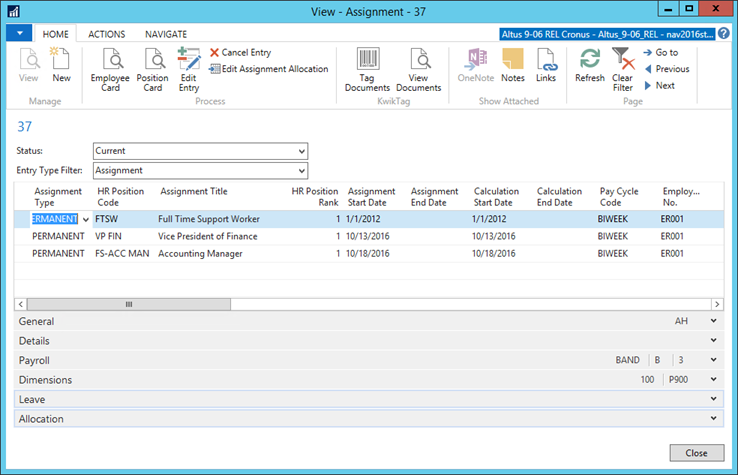
- Use the following tables to explain Assignment page fields:
| Field | Description |
| Assignment Type | Displays the employee employment type. |
| HR Position Code | Displays the code for the position assigned to the employee. |
| Assignment Title | Displays the title the individual receives under this position. |
| HR Position Rank | Displays the ranking for this position as it relates to other positions currently active. |
| Assignment Start Date | Displays the date upon which the employee begins/began the assignment to this position. |
| Assignment End Date | Displays the date upon which the assignment to this position ends. |
| Calculation Start Date | Date to be used by the payroll calculations as the starting date. |
| Calculation End Date | Date to be used by the payroll calculations as the ending date. |
| Pay Cycle Code | Displays the pay cycle frequency. |
| Employee No. | Displays the employee number. This field automatically updates based on the information provided in the Personal tab. This field is hidden by default. |
| F.T.E. | Displays the full time equivalency amount to which this employee is assigned to this position. |
| Pay Structure | Links the appropriate pay structure to this position. |
| Pay Step | Links the appropriate step code to this position. |
| Pay Grade | Links the appropriate pay grade code to this position. |
| Pay Structure Amount | Displays the pay amount in the unit of measure established for the pay structure. This field is populated automatically. |
| No. of Assignment Qualifications | Displays a count of the qualifications associated with the position. |
| No. of Changes | This field shows a count of change log entries that have been recorded for this assignment record. |
| No. of Allocations | Displays the number of allocation lines associated with this assignment record. |
| Location Code | Displays the code for the location in which the employee works. |
| HR Department | The HR department to which the employee belongs. |
| HR Category | The HR category to which the employee belongs. |
| Union Code | Specifies code for the union. |
| Assignment Start Reasoning Code | Assignment start reasoning code. |
| Assignment End Reasoning Code | Assignment end reasoning code. |
| Attendance Mgmt. Rank | This field controls where the absence requests are routed for approvals. Absence requests will always go to the “Reports To” with the assignment having an Attendance Mgmt. Rank of 1. |
| Seniority Date | The date when the employee was hired. |
| Seniority Group | Indicates either the length of the employee's tenure, or the terms and conditions of the collective agreement that their employee group has negotiated with the organization. |
| HR Job Code | Displays the job code to which the position is connected. |
| Cause of Inactivity | Reason for the employee's inactivity. |
| Leave Expected Return Date | If this entry represents a leave, this field displays the date upon which the employee is set to return to work/end of leave date. This field is automatically populated based on the HR Request. |
| Leave Type | Displays the leave type for employees that are on a leave of absence. |
| Replacement Employee No. | For employees that are on leave, this field displays the replacement employee number. |
| Replacement Employee Name | For employees that are on leave, this field displays the replacement employee name. |
| Entry No. | Displays automatically calculated entry number for the records. |
| Benefit Eligible | Indicates if the employee is eligible for benefits. |
Configuring Records of Employment
The issuing of Records of Employment (ROE) begins with the HR Request for the employee that has been terminated or for an employee whose HR Position has changed to inactive due to a leave (where issuing an ROE is required).
Termination and Inactivity are configured through the HR Reason code; however, the Cause of Inactivity table needs to be set to indicate if a reason code of inactivity is required to issue an ROE.
Configuring the Record of Employment Payroll Control
A payroll control that captures both, insurable hours and insurable earnings is required to capture the necessary information to be printed/exported in the record of employment.
This payroll control, typically named EI AUDIT, needs to capture insurable hours under the Payroll Amount field and insurable earnings under the Insurable Earnings field. See Creating Payroll Controls for details.
The Payroll control used in ROE generation needs to be configured in the Altus HR Setup page. To configure the ROE payroll control:
- In the Search field, type HR Setup.
- Select Altus HR Setup.
The Altus HR Setup page displays.
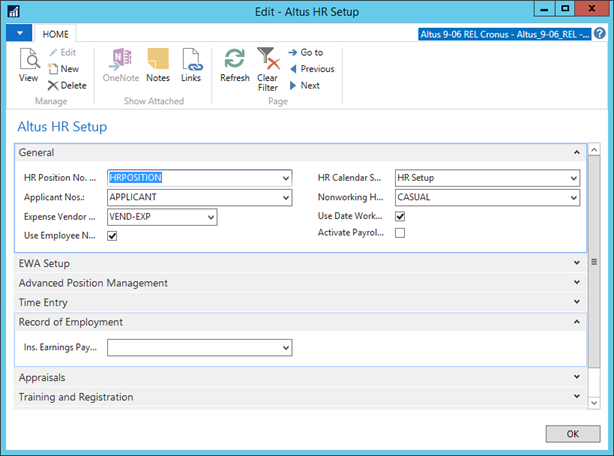
- Expand the Record of Employment FastTab.
- In the Ins. Earnings Pay Ctrl. Code field, select the EI AUDIT (or the ROE payroll control set up for your organization) payroll control from the drop-down list.
- Click OK.
The HR Setup page re-opens with the ROE payroll control assigned. - Close the HR Setup page.
Generating an ROE through an HR Request Using an HR Function
Records of Employment (ROE) can be created automatically by setting up an HR function to complete the process.
Setting Up an ROE HR Function
To set up a Record of Employment HR Function:
- In the Search field, type HR Functions.
- Select HR Functions.
The HR Functions page displays. - In the next available row, insert a new entry for the ROE:
- In the Code column, enter a code for the HR Function.
- In the Description column, type a description for the HR Function.
- In the Function ID column, enter the Function ID 38.
- Close the HR Functions page.
Assigning the ROE HR Function to the Appropriate Reason Codes
Once you create the Record of Employment HR Function, you need to then assign this HR function to the reason codes that require this particular function (for example, Leave and Termination reason codes).
To assign the Insert ROE HR function to a reason code:
- In the Search field, type HR Reason.
- Select HR Reason Codes.
The HR Reason Codes page displays.
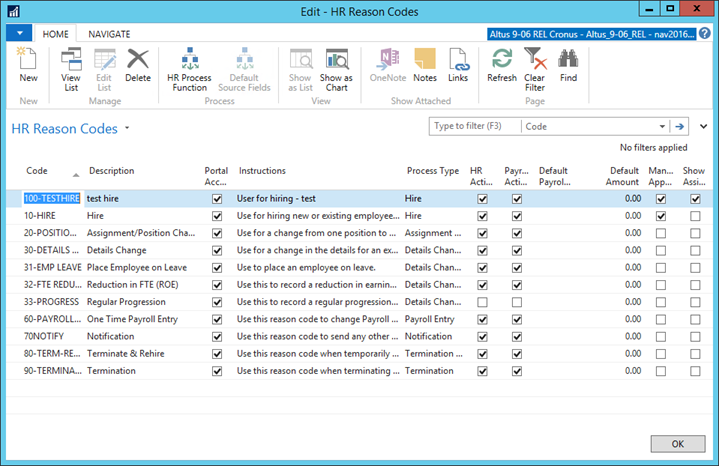
- Select the reason code to which you are assigning the ROE HR function (for example, termination).
- From the Ribbon, click the Navigate tab and then click HR Process Function.
The HR Process Functions page displays.
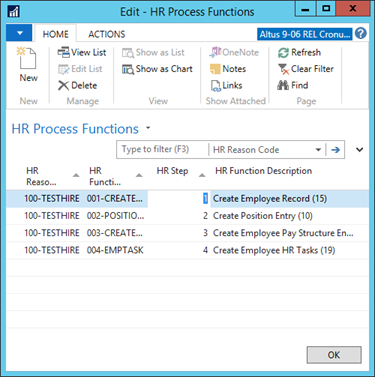
- Click the next available row.
The HR Reason Code is automatically added. - In the HR Function Code column, Select the Insert ROE function from the drop-down list.
NOTEs:
- The ROE function must be added after the record that creates the entry used with the ROE (that is, the process where the Position Ledger Entry is created).
- Once the ROE entry is created using the HR request processing, the function Load Records of Employment from Position Ledger Entries is not required. If you run this function, and the HR function has already created an entry, you receive an error.