

A number of setup steps are required initially to customize the Payroll granule to meet your organization’s specific requirements. This section provides detailed set up and configuration information to assist you in defining and creating the payroll platform you envision.
Your initial setup contains many defaults and samples for you to use within your organization. Many of the options in the tables are already populated for you by the Sparkrock Client Services team based on your company requirements and preferences.
The set up options provide you with powerful tools for customizing the Payroll granule specifically for your organization. With the options available you can add, edit, and delete pay cycles, classes, pay control category codes, filing statuses, reporting authorities, tax forms, tax types, required fields, employee types, direct deposit layouts, rates, brackets, base amounts, activation codes, method step calluses, payroll control groups, calculation orders, pay grades, pay steps and pay structures. You can use the journal templates option to create additional time, payroll, and accrual journals.
For the most part, this is a one-time process to complete. Once you complete the set up steps for all the required tables and tasks you need for the payroll management of your payroll team and employees, you’ll just need to add or define options/items on an as-needed basis.
The majority of your payroll tasks will then take place in the Payroll Controls, Employee, and Journal modules. The information you define in the setup tables is automatically populated and pulled into the appropriate areas.
Configuring the Payroll Setup Table
The Payroll Setup table contains a number of fields and tabs for defining how/where data is stored that will be used for payroll calculations and by other parts of the application.
To configure the Payroll Setup table:
- Open Microsoft Dynamics NAV.
- In the Search field, type Payroll Setup and select the page from the drop-down list.
The Payroll Setup page displays. - In the fields provided, select from the drop-down menus.
When you complete the information you require for the General FastTab, continue to click through the remaining tabs to enter the applicable codes and information for the fields within these tabs. Use the following tables for assistance in completing the remaining tabs:
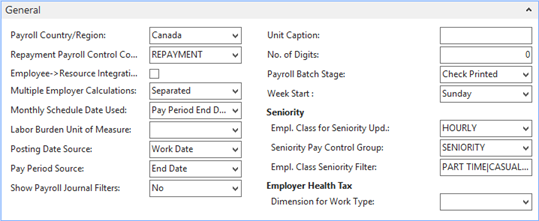
Payroll Setup General FastTab
| Field | Description |
| Payroll Country/Region | Select the appropriate country or region to which the payroll control applies. |
| Repayment Payroll Control Code | This Payroll control is used when you initiate the Void Check Only option when voiding a posted payroll check. |
| Employee > Resource Integration | This flag directs the application to update the Employee record when changes are made to the Resource page or vice versa. |
| Multiple Employer Calculations | Choose either Separated or Combined from the drop-down list. If Combined is selected and an employee works for more than one employer throughout the year, the employee’s data is combined for reports and year to date calculations. |
| Monthly Schedule Date Used | This field indicates which date you want the system to use when determining if it’s the first pay period of the month, second pay period of the month, and so on. Your options are Pay Period End Date or Pay Date. |
| Labor Burden Unit of Measure | Select the unit of measure to be used with the Post Labor Burden periodic activity. |
| Posting Date Source | Select the posting date source. Can be either Work Date or System Date. |
| Pay Period Source | Select the pay period source. Can be either End Date or System Date. |
| Show Payroll Journal Filters | Select whether or not you want to show payroll journal filters. |
| Unit Caption | Displays the unit caption. |
| No. of Digits | Determines the number of digits to display. |
| Payroll Batch Stage | Can be one of:
|
| Week Start | The start day of the week. |
| Empl. Class for Seniority Upd. | The employee class you want included for seniority hours calculation. |
| Seniority Pay Control Group | The payroll control group used to increment the seniority hours. |
| Empl. Class Seniority Filter | The filter for the employee classes that you want included in the seniority hours calculations. |
| Dimension for Work Type | Specifies which dimension holds the reference to the work type. For more information, see Specifying Dimensions for Work Type Mapping. |
Payroll Setup Numbering FastTab

| Field | Description |
| A/P Invoice Nos | Select the appropriate number series option to apply to A/P invoices. |
| Labor Burden Doc Nos. | Select the appropriate number series option to apply to Labor Burden documents. |
| Quarter Recalculation Doc Nos. | Select the appropriate number series option to apply to quarter recalculation documents. |
| Carry Forward Doc Nos. | Select the appropriate number series option to apply to the carry forward documents. |
Payroll Setup License FastTab

| Field | Description |
| Active Employees | Displays the number of active employees. |
| Active Employees Percent | Displays the percentage licenses used by active employees. |
| Licensed Employees | Displays the number of employees the license allows. |
Payroll Setup Regulatory Reporting FastTab

| Field | Description |
| Regulatory Reporting File Path | The directory where regulatory reporting files are stored. |
| Filing Center Executable Path | The directory where the filing center executable is located. |
| Employee Email Source | The employee email source. Can be either: Company E-Mail or Email. |
| CPCheck Executable Path | The directory where the CPCheck executable is located. |
Defining Payroll Journal Templates
The Payroll Journal template holds default values for the Payroll Journal and some processing information. You can use the journal templates option to create additional time, payroll, and accrual journals.
When payroll is run, the results are stored in the Payroll Journal. It is a temporary work space, allowing you to edit entries before finalizing payroll. The Payroll Journal is made up of one or more batches, each being a separate workspace. Typically, payroll clerks each have their own batch.
Once you create your required payroll journal templates, you can generate payroll runs using these templates. The payroll batches that you use are accessed and applied from within the Payroll Journal page when you generate a payroll run.
NOTE: If you have only one template, the Journal Template page does not display when opening the Payroll Journal. Instead, the default journal batch displays. This applies to the Time and Payroll Journals, but not Accrual Journals.
To create a payroll journal template:
- In the Search field, type Payroll Journal Templates and select the page from the drop-down list.
The Payroll Journal Templates page opens.
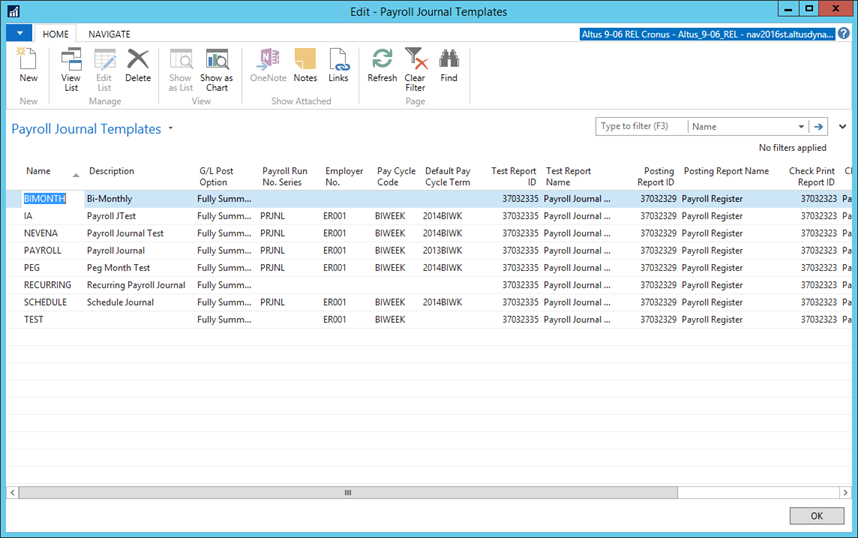
- From the Ribbon, click New.
- Use the following table for assistance in completing the columns within the Payroll Journal Templates page:
NOTE: Depending on your particular configuration, some columns may not be visible to you or may not be required for completion.
| Field | Description |
|
Name |
Displays the name of the template. Use this field to enter a name for the template you are creating. |
|
Description |
Provides the details for the template contents. Enter a brief description, to describe the purpose of the template you are creating. |
|
G/L Post Option |
Displays the detail in which the payroll run is displayed in the General Ledger. Select the General Ledger posting option for this template; Post in Detail, Summarize by Document, or Fully Summarized. |
| Payroll Run No. Series | Displays the payroll run number series for this template. |
| Employer No. | Displays the employer number associated with this template. |
| Pay Cycle Code | Displays the pay cycle associated with this template. |
| Default Pay Cycle Term | Displays the default pay cycle term to apply to this template. |
| Test Report ID | Displays the ID number for the test report (if you decide to run). |
| Test Report Name | Displays the test report name. This field is automatically populated based on the Test Report ID you selected. |
| Posting Report ID | Displays the ID number for the posting report (if you decide to run). |
| Posting Report Name | Displays the posting report name. |
| Check Print Report ID | Displays the ID number for the check print report. |
| Check Print Report Name | Displays the check print report name. |
| Force Posting Report | Indicates that you want to create a posting report. |
| Recurring | Indicates that you want to this report to be recurring. |
Creating Payroll Journal Batches
A batch job is a routine that processes data in groups, for example you may set up ‘Admin Staff’ and ‘Support Staff’ batch jobs. These batch jobs perform payroll calculation.
A batch job is similar to a report, except the batch job uses the result of its processing to update information directly, instead of capturing/printing the results. You can create multiple journal batches to then attach to specific journal templates. This is helpful for separating journal entries.
For example, you may create a batch for each payroll administrator that is inputting payroll information (each individual may take care of a certain group of employees) or, for different employee-group combinations (Admin Staff and Support Staff).
To create a payroll journal batch:
- In the Search field, type Payroll Journal Templates and select the page from the drop-down list.
The Payroll Journal Templates page opens. - From the Ribbon, click the Navigate tab.
- Click Batches.
The Payroll Journal Batches page displays. - From the Ribbon, click New.
- Use the following table for assistance in completing the fields within the Payroll Journal Batches page:
NOTE: Depending on your particular configuration, some columns may not be visible to you or may not be required for completion.
| Field | Description |
|
Name |
Displays the name of the batch. Use this field to enter a name for the batch. |
| Allocation Posting Batch Name |
The allocation posting batch name. |
| Use for Allocation Posting | Indicates if the batch is used for allocation postings. |
| Allocation Batch Released | Indicates if the batch has been released. |
|
Description |
Provides the details for the batch contents. Enter a brief description, for the batch you are creating. |
|
Payroll Run No. Series |
Displays the number series assigned to this batch. From the drop-down, select the appropriate option. |
|
Employer No. |
Displays the employer number to use with this batch. This field is non-editable. The value defaults from the template. |
|
Pay Cycle Code |
Displays the pay cycle to use with this batch. This field is non-editable. The value defaults from the template. |
| Pay Cycle Term | Displays the default pay cycle term to apply to this batch. |
| Override Calculation Order | Specifies an override calculation order to be used for this payroll journal batch. |
| Batch Line Count | The batch line count. |
| HR Department Code | The HR department code. |
| HR Category Code | The HR category code. |
| Location Code | The location code. |
Defining Time Journal Templates
Time Journal templates are used to define the details for the behavior of the Payroll Journals that are created with each template. Time Journals can be used to record time and/or attendance data that will later be brought into the Payroll Journal for processing.
To create a time journal template:
- In the Search field, type Time Journal Templates and select the page from the drop-down list.
The Time Journal Templates page opens.
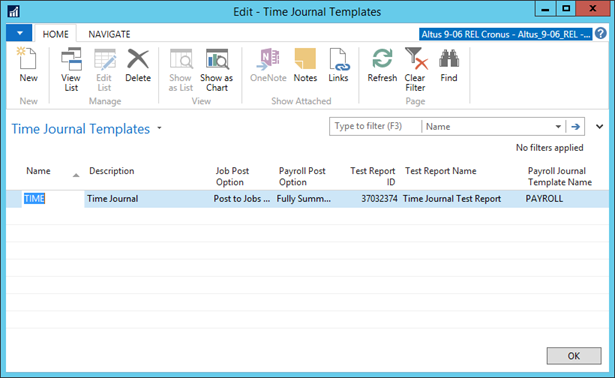
- From the Ribbon, click New.
- Use the following table for assistance in completing the fields within the Time Journal Templates page:
NOTE: Depending on your particular configuration, some columns may not be visible to you or may not be required for completion.
| Field | Description |
| Name | Displays the template name. |
| Description | Provides the details for the template contents. |
| Job Post Option |
This field determines if job entries are posted to Jobs as the Time Journal is posted or later when the Payroll Journal is posted. NOTE: Choosing the option Post to Jobs as Time Journal is Posted marks entries making them un-editable in the Payroll Journal. Make your correcting entries/edits in the Time Journal and post again to the Payroll Journal. |
| Payroll Post Option | Displays the detail in which the payroll run is posted. |
| Test Report ID | Displays the ID number for the test report (if you decide to run) that is generated when Test Report is selected from the journal. |
| Test Report Name | Displays the test report name. This field is automatically populated based on the Test Report ID you selected. |
| Payroll Journal Template Name | Displays the name of the payroll journal template being used. |
Creating Time Journal Batches
A batch job is a routine that processes data in groups, for example you may set up ‘Admin Staff’ and ‘Support Staff’ batch jobs. These batch jobs perform calculations based on the template for the ‘group’ defined within the batch.
A batch job is similar to a report, except the batch job uses the result of its processing to update information directly, instead of capturing/printing the results.
You can create time journal batches to then attach to specific payroll journal batches and templates, which is helpful for separating journal entries. For example, you can create a batch for different employee-group combinations (that is, salary vs. hourly) and then attach it to a payroll batch for calculation.
To create a time journal batch:
- In the Search field, type Time Journal Templates and select the page from the drop-down list.
The Time Journal Templates page opens. - Click the Navigate tab.
- Click Batches.
The Time Journal Batches page displays.
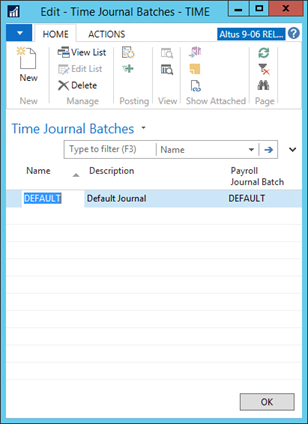
- From the Ribbon, click New to create a new batch record.
- Use the following table for assistance in completing the fields within the Payroll Journal Batches page:
NOTE: Depending on your particular configuration, some columns may not be visible to you or may not be required for completion.
| Field | Description |
|
Name |
Displays the name of the batch. Use this field to enter a name for the batch. |
|
Description |
Provides the details for the batch contents. Enter a brief description, for the batch you are creating. |
|
Payroll Journal Batch |
Displays the name of the payroll batch you want to attach to this time journal batch. From the drop-down, select the appropriate option. |
Performing General Set up Procedures
The general setup steps consist of options for tax and filing/reporting-related procedures. As well, defining options for payroll and employee classes and categories are also managed from the General Setup Options. The following sections provide the information you need to complete all the general setup procedures for defining/creating your particular payroll system.
Creating Pay Cycles
Depending on your organization’s requirements/regulations for paying employees, you can create a variety of pay cycles to meet the needs of the different payment requirements/setup for your employees.
Pay cycles have four different functions:
- The ability to determine how an employee gets paid (Weekly, Biweekly, Monthly, and so on) is set up on each employee’s card.
- The pay periods for the entire year are automatically created when you generate pay periods.
- The system automatically calculates the pay date.
- The pay period end date is stored when the payroll is posted so that pay period end reporting can be done.
To create a pay cycle:
- In the Search field, type Pay Cycles and select the page from the drop-down list.
The Pay Cycles page displays.
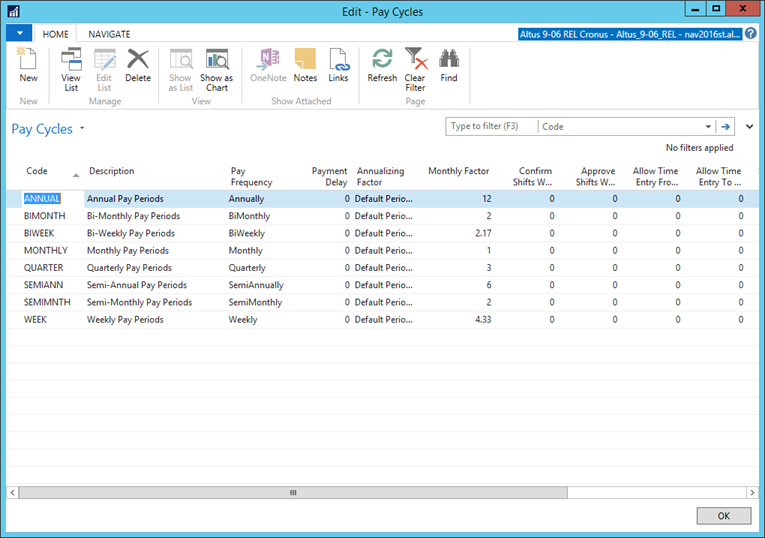
- From the Ribbon, click New.
- Use the following table for assistance in completing the fields within the Pay Cycles page.
NOTE: Depending on your particular configuration, some columns may not be visible to you or may not be required for completion.
| Field | Description |
|
Code |
Displays the code for the pay cycle. Use this field to enter a code for the pay cycle based on your department or company naming conventions/requirements. |
|
Description |
Provides an explanation of the pay cycle code. Enter a brief description for the pay cycle. |
|
Pay Frequency |
Displays the frequency by which this particular pay cycle is run or processed for employees. Select the applicable option from the drop-down (Weekly, BiWeekly, SemiMonthly, Monthly, BiMonthly, Quarterly, SemiAnnually, Annually) |
|
Payment Delay |
The number of days between the pay period end date and the payroll pay date. Enter the number of cycles in the field provided. If there is no delay for a pay cycle, enter 0. |
|
Monthly Factor |
Used to determine a monthly amount for a deduction or benefit when the employee’s pay period is not monthly. Enter the number in the field provided. |
| Confirm Shifts Worked Reminder Offset | The offset (in days) for the shift confirmation reminder email. |
| Approve Shifts Worked Reminder Offset | The offset (in days) for the shift approval reminder email. |
| Employee Absence Conf. Date Offset | The offset (in days) for the employee absence confirmation reminder email. |
| Approver Absence Conf. Date Offset | The offset (in days) for the approver absence confirmation reminder email. |
Assigning Pay Cycle Terms
Once you set up a pay cycle, you can attach the specific terms to the cycle to determine how the pay cycle is run.
To assign the terms for a pay cycle:
- In the Search field, type Pay Cycle and select the page from the drop-down list.
The Pay Cycle page displays. - Click the Navigate tab.
- From the Ribbon, click Terms.
The Pay Cycle Terms page displays.
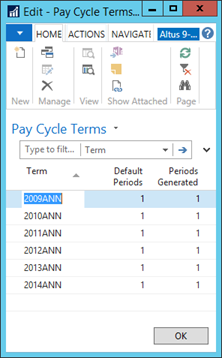
- Use the following table for assistance in completing the fields within the Pay Cycle Terms page:
| Field | Description |
|
Term |
Displays the descriptive title for the period of time to which the pay cycle is related. In the above screen capture the term is a year and biweekly. Enter the pay cycle term in the space provided. |
|
Default Periods |
Displays the default periods based on the pay cycle you are using. This field is automatically populated. |
|
Periods Generated |
Displays the number of periods generated after you run the Generate Pay Periods function. You need to run this to determine the appropriate number. See ‘Generating Pay Periods’ for details. |
Generating Pay Periods
The number of pay periods for a pay cycle term are automatically calculated. You need to run this function to provide the periods generated.
To generate the number of pay periods:
- Open the Pay Cycle Terms page.
- From the Ribbon, click Generate Pay Periods.
The Generate Pay Periods page displays.
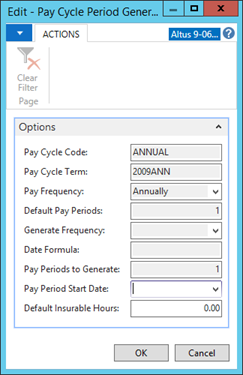
- Use the following table for assistance in completing the fields within the Pay Period Generator page:
| Field | Description |
|
Pay Cycle Code |
Displays the pay cycle code for the pay cycle you are working with. This field is automatically populated based on the data entered in the Pay Cycle Terms page. |
|
Pay Cycle Term |
Displays the pay cycle term for the pay cycle code. This field is automatically populated based on the data entered in the Pay Cycle Terms page. |
|
Pay Frequency |
Displays the frequency of the pay cycle. This field is automatically populated based on the data entered in the Pay Cycle Terms page. |
| Default Pay Periods | Displays the default number of pay periods. |
|
Generate Frequency |
Enter the number of pay periods that you want to generate. Normally this would by the same as the Default Pay Periods. |
|
Date Formula |
Enter the date formula if the field is editable. |
|
Pay Periods to Generate |
Depending on the pay frequency selected for the pay period, this field can be modified and you can enter the number of pay periods in the year. |
|
Pay Period Start Date |
Enter the date of the beginning of the first pay period. Normally this is the first day of the year when your payroll is following a calendar year. |
|
Default Insurable Hours |
Displays the number of insurable hours for this pay cycle. Enter the number in the space provided. |
- Click OK.
A confirmation dialog opens. - Click OK.
NOTE: To view all the pay cycles periods and pay dates for the pay cycle terms, click Term and select Pay Cycle Periods. - Close the page once you generate the pay periods for the pay cycle terms you added.
Defining Employee Classes
The Employee Classes table enables you to set up the employee categories you have within your organization to link similar employees together. The Class Code is then used as a filtering item when processing payroll.
For example, you may have the following employee classes:
- Hourly employees (no benefits)
- Salaried employees (w/ benefits)
- Contract employees (w/benefits)
- Contract employees (no benefits)
Once you set up the employee classes for all the employee types within your organization, they are available for you to assign to employees on their Employee Cards.
To define employee classes:
- In the Search field, type Classes and select the page from the drop-down list.
The Employee Classes page displays.
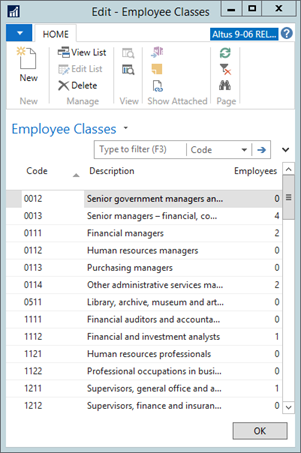
- From the Ribbon, click New.
- Use the following table for assistance in completing the fields within the Employee Classes page:
| Field | Description |
|
Code |
Displays the code for the employee class. Use this field to enter a code for the pay cycle/class based on your department or company naming conventions/requirements. |
|
Description |
Provides an explanation of the employee class code. Enter a brief description for the employee class. |
|
Employees |
Displays the number of employees within this class. This information is automatically filled/updated as employees are added to the employee class to which they belong (on the Employee Card > Payroll tab). |
Defining the Pay Control Category Codes
Use the Pay Control Category table to set up category codes for pay control to link similar Payroll Controls together.
To add pay control categories:
- In the Search field, type Pay Control Category Codes and select the page from the drop-down list.
The Pay Control Category Codes page displays.
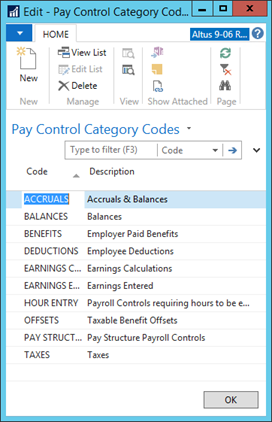
- The following table provides an explanation and instructions for entering data for each of the fields in the Pay Control Category Codes page:
| Field | Description |
|
Code |
Displays the code for the payroll category. Use this field to enter a code for the category to which this payroll control belongs (based on your department or company naming conventions/requirements). |
|
Description |
Displays an explanation of the payroll control category code. Enter a brief description for this payroll control category. |
- Close the page once all required codes are added.
Adding Applicable Filling Statuses
Use the Filing Statuses area to define additional filing statuses as required by a method step.
Your employees will differ from individual to individual in terms of filing status. You need to record the different filing statuses representing employees throughout your organization. After you add the applicable filing statuses representing employees within the organization, you can assign the appropriate filing status to the employees as required for payroll processing.
To add the filing statuses applicable to your organization:
- In the Search field, type Filing Statues and select the page from the drop-down list.
The Filing Statuses page opens.
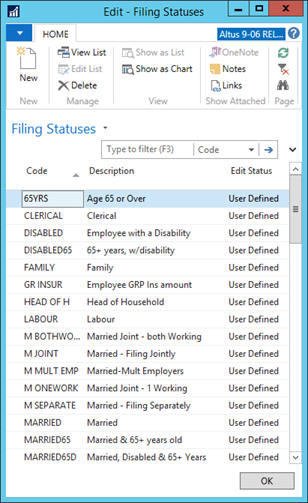
- From the Ribbon, click New.
- Use the following table for assistance in completing the fields within the Filing Statuses page:
| Field | Description |
|
Code |
Displays the code for the filing status. Use this field to enter a code for the filing status based on your department or company naming conventions/requirements. |
|
Description |
Displays an explanation for the code. Enter a brief description for this particular filing status. |
|
Edit Status |
Displays the editing access/rights users have for this filing status. From the drop-down, select the appropriate option to apply to this filing status (Master, Locked, User Defined). |
Defining Reporting Authorities
In the Reporting Authorities table, you set up additional reporting authorities. Reporting authorities are entities by which most employer liabilities are tracked, and to which the employer owes the money. Your tax IDs are entered into the reporting authorities from the Employer Card. Also from the Employer Reporting Authorities page you can link reporting authorities to your vendors.
To define additional reporting authorities required for your organization:
- In the Search field, type Reporting Authorities and select the page from the drop-down list.
The Payroll Reporting Authorities page displays.
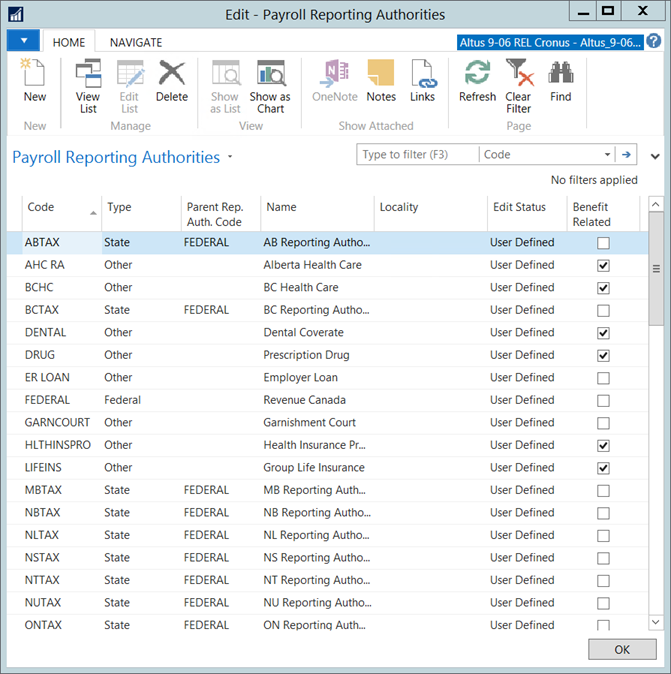
- From the Ribbon, click New.
- Use the following table for assistance in completing the fields within the Payroll Reporting Authorities page:
| Field | Description |
|
Code |
Displays the code for the reporting authority. Use this field to enter a code for the reporting authority based on your department or company naming conventions/requirements. |
|
Type |
Displays the tax authority designation. From the drop-down, select the appropriate option (Federal, State/Provincial, or Other). |
|
Parent Rep. Auth. Code |
Displays the reporting authority to which this reporting authority is attached. |
|
Name |
Displays the name for the reporting authority. Enter a full name or brief description for the reporting authority. |
|
Locality |
Displays the state/province to which this reporting authority belongs. Enter the appropriate state or province in this field. |
|
Edit Status |
Displays the editing access/rights users have for this reporting authority. |
|
Benefit Related |
Place a checkmark in this field if you want this record to show up on the Benefits tab on the Employee Card and on the Benefits section of the Employee Center. |
Adding the Applicable Payroll Tax Forms
The Payroll Tax Forms table enables you to identify the standard tax forms that are linked to a Reporting Authority Code. For each tax form, you attach tax form classes. Tax form classes are assigned to payroll controls to define what amounts are printed on the Tax Forms.
To add the appropriate payroll tax forms required in your organization:
- In the Search field, type Tax Forms and select the page from the drop-down list.
The Payroll Tax Forms page opens. - From the Ribbon, click New.
- Use the following table for assistance in completing the fields within the Payroll Tax Form page:
| Field | Description |
|
Code |
Displays the code for the tax form. Use this field to enter a code for the tax form based on government and/or your organization’s naming conventions/requirements. |
|
Description |
Provides an explanation of the tax form. Enter a brief description for the tax form. |
|
Reporting Authority Code |
Displays the code for the reporting authority linked to the tax form. |
Defining Payroll Tax Types
Tax types are used to classify a Payroll Control beyond the Payroll Control type. The sub-classification of tax types is used in split Payroll Controls setups and other related calculations (CREDIT 4 OTHER AUTH) to identify Payroll Controls that are of the same type.
To add the payroll tax types required in your organization:
- In the Search field, type Tax Types and select the page from the drop-down list.
The Payroll Tax Types page displays.
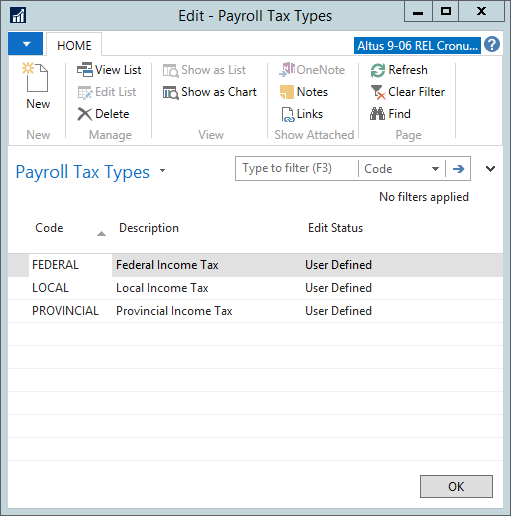
- From the Ribbon, click New.
- Use the following table for assistance in completing the fields within the Payroll Tax Types page:
| Field | Description |
|
Code |
Displays the code for the tax form. Use this field to enter a code for the tax form based on government and/or your organization’s naming conventions and requirements. |
|
Description |
Provides an explanation of the tax form. Enter a brief description for the tax form. |
|
Edit Status |
Displays the editing access/rights users have for this tax type. From the drop-down, select the appropriate option to apply to this tax type (Master, Locked, User Defined). |
Determining the Required Fields
The Required Tables table enables you select the tables containing data that is required (from here you can also view the data within the table to see what specific fields require data and how it is pulled – either system or user required) for various payroll processing functions.
Use this function to select the table and fields that are required for the employee setup. Some items are System Required (they are required to calculate payroll or print government reports) and some are User Required.
For example, if you want every employee to have a job title, you add the Job Title field and the User Required field is automatically selected.
Click the Required Fields button to see the list of fields required for the specific table. To define the required tables for pulling data:
- In the Search field, type Required Fields and select the page from the drop-down list.
The Required Tables page opens.
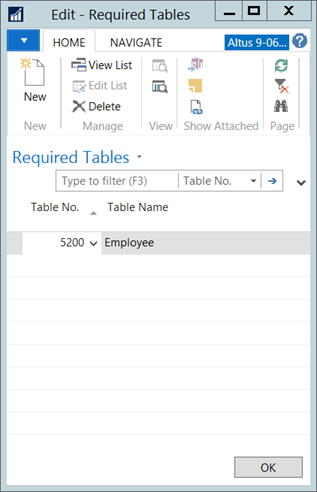
- From the Ribbon, click New.
- Use the following table for reference/assistance in completing the fields within the Required Tables page:
| Field | Description |
|
Table No. |
Displays the system-generated number for table containing the data you want to make a ‘required’ table. |
|
Table Name |
Displays the table name. This field is automatically populated based on the table number selected. |
Viewing the Required Fields in a Table
Once you select a table as a table containing data required for payroll processing, you can review the fields within the table to see what fields are required.
To view the required fields:
- In the Required Fields page, select the table you want to view.
- Click Required Fields.
The Required Fields page for the table you selected opens. The fields within the table that are required are listed in this page. - A checkmark in the System Required or User Required column (for each of the required fields) indicates where the data is inputted. You can set this as well.
Defining the Employee Types
The Employee Types work in conjunction with the Required Fields. For each type of employee, you can specify whether they need the System and/or User Required fields.
To add employee types:
- In the Search field, type Employee Types and select the object from the drop-down list.
The Employee Types page displays.
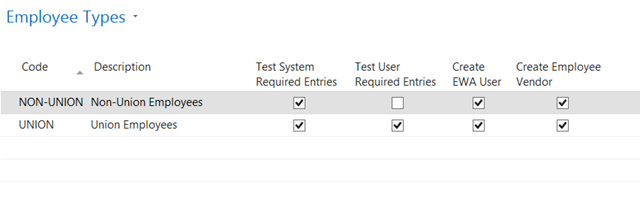
- From the Ribbon, click New.
- Use the following table for assistance in completing the fields within the Employee Types page:
| Field | Description |
|
Code |
Displays the code for the employee type. Use this field to enter a code for the employee type based on your organization’s naming conventions/requirements. |
|
Description |
Provides an explanation of the employee type. Enter a brief description for the employee type. |
|
Test System Required Entries |
Indicates that where system required fields have been populated for the employee at the time of running the employee validation process. Click to add a check mark if you would like these fields tested for this type of employee. |
|
Test User Required Entries |
Indicates that where user required fields have been populated for the employee at the time of running the employee validation process. Click to add a check mark if you would like these fields tested for this type of employee. |
|
Create AEP User |
Indicates that an AEP user account is created for the employees belonging to this employee type. Click to add a check mark if an AEP user record should be automatically created when a Hire HR Request is processed. |
|
Create Employee Vendor |
Indicates that an employee vendor account is to be created for the employees belonging to this employee type. Click to add a check mark if a vendor record should be automatically created when a Hire HR Request is processed. |
Creating Direct Deposit Layouts
Use the Direct Deposits Layout table to design a template for how direct deposit is transmitted to the bank for payment to employees.
To create a direct deposit layout:
- In the Search field, type Direct Deposits Layout and select the page from the drop-down list.
The Direct Deposits Layout page displays.
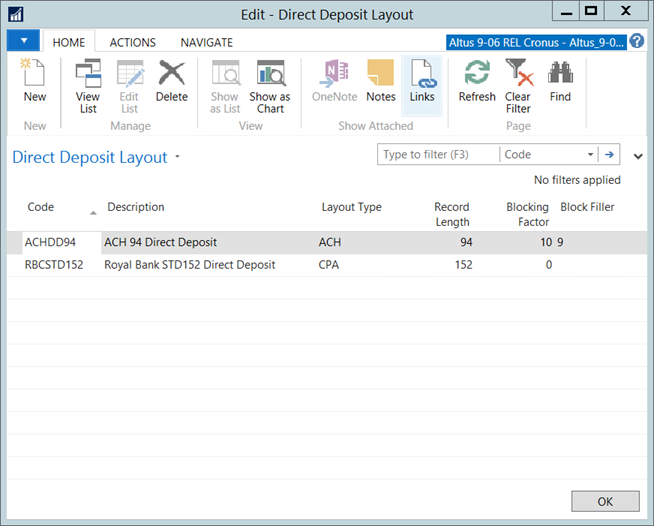
- Use the following table for assistance in completing the fields within the Direct Deposits Layout page:
| Field | Description |
|
Code |
Displays the unique identification of the direct deposit layout. Use this field to enter a code for the layout based on something meaningful, such as the bank. |
|
Description |
Provides an explanation of the layout to help locate the correct layout if the Code is not sufficient. Enter a brief description for the layout. |
|
Layout Type |
Indicates the layout type that will be applied to this layout. The options are; ACH (American) and CPA (Canadian). Select the option applicable to your organization. |
|
Record Length |
Indicates the length (lines) allowed per record. In the space provided, enter the maximum length per record. |
|
Blocking Factor |
Indicates the blocking factor to make up the record length. Enter the number in this field. |
|
Block Filter |
Indicates the filler for the extra spaces in the block to bring the record to the size of the blocking factor. Enter the number in this field. |
TIP: Once you create a direct deposit layout, you can copy this layout to create any additional layouts you require. This will save time and enable you to just modify the layout as required, rather than create a new layout for each direct deposit type your organization uses.
Defining the Sections for the Direct Deposit Layout
This is where you describe the sections of the file layout. More than one line for each section can be entered. The lines within each section are sorted by the sequence number.
To define the sections for the direct deposit layout:
- In the Direct Deposit Layout page, click Layout and then click Sections.
The Direct Deposit Sections page opens.
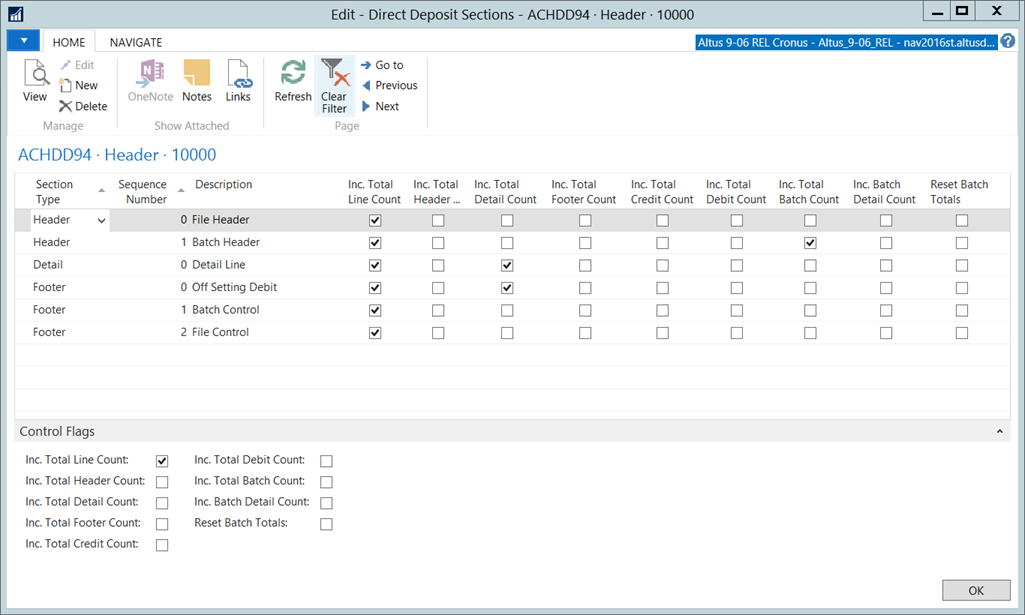
- Use the following table for assistance in completing the fields within the Direct Deposits Sections page:
| Field | Description |
| Section Type |
|
| Sequence Number | Indicates the sequence by which the lines are sorted. This number is used to sort the lines within each section. Enter the number in this field. Values can be any number zero or higher. |
| Description | Displays a description of what the line is from the banks documentation. This helps describe multiple lines within a section. Enter a description in the space provided. |
| Control Flags | When you select a check box in the Control Flags section, the corresponding column is automatically updated to display a check mark. |
| Inc. Total Line Count | If checked this field triggers the application to increment the Total Line Count field found in the DDB (Direct Deposit Buffer) table each time that a record in the section is written to the export file. |
| Inc. Total Header Count | If checked this field triggers the application to increment the Total Header Count field found in the DDB (Direct Deposit Buffer) table each time that a record in the section is written to the export file. |
| Inc. Total Detail Count | If checked this field triggers the application to increment the Total Detail Count field found in the DDB (Direct Deposit Buffer) table each time that a record in the section is written to the export file. |
| Inc. Total Footer Count | If checked this field triggers the application to increment the Total Footer Count field found in the DDB (Direct Deposit Buffer) table each time that a record in the section is written to the export file. |
| Inc. Total Credit Count | If checked this field triggers the application to increment the Total Credit Count field found in the DDB (Direct Deposit Buffer) table each time that a record in the section is written to the export file. |
| Inc. Total Debit Count | If checked this field triggers the application to increment the Total Debit Count field found in the DDB (Direct Deposit Buffer) table each time that a record in the section is written to the export file. |
| Inc. Total Batch Count | If checked this field triggers the application to increment the Total Batch Count field found in the DDB (Direct Deposit Buffer) table each time that a record in the section is written to the export file. |
| Inc. Batch Detail Count | If checked this field triggers the application to increment the Batch Detail Count field found in the DDB (Direct Deposit Buffer) table each time that a record in the section is written to the export file. |
| Reset Batch Totals | If checked this field instructs the application to reset the batch total fields in the DDB (Direct Deposit Buffer) table. Below are the batch total fields that are reset to zero:
|
Adding the Direct Deposit Lines Details
The Direct Deposit Lines page is where you describe each of the columns that make up the line in the Direct Deposit export file. You have options of choosing to use a literal value or selecting a field from one of the available tables. Additionally, there are several formatting options available from which you can select.
To add the line details:
- In the Direct Deposit Lines page, click Section and then click Lines.
The Direct Deposit Lines page opens.
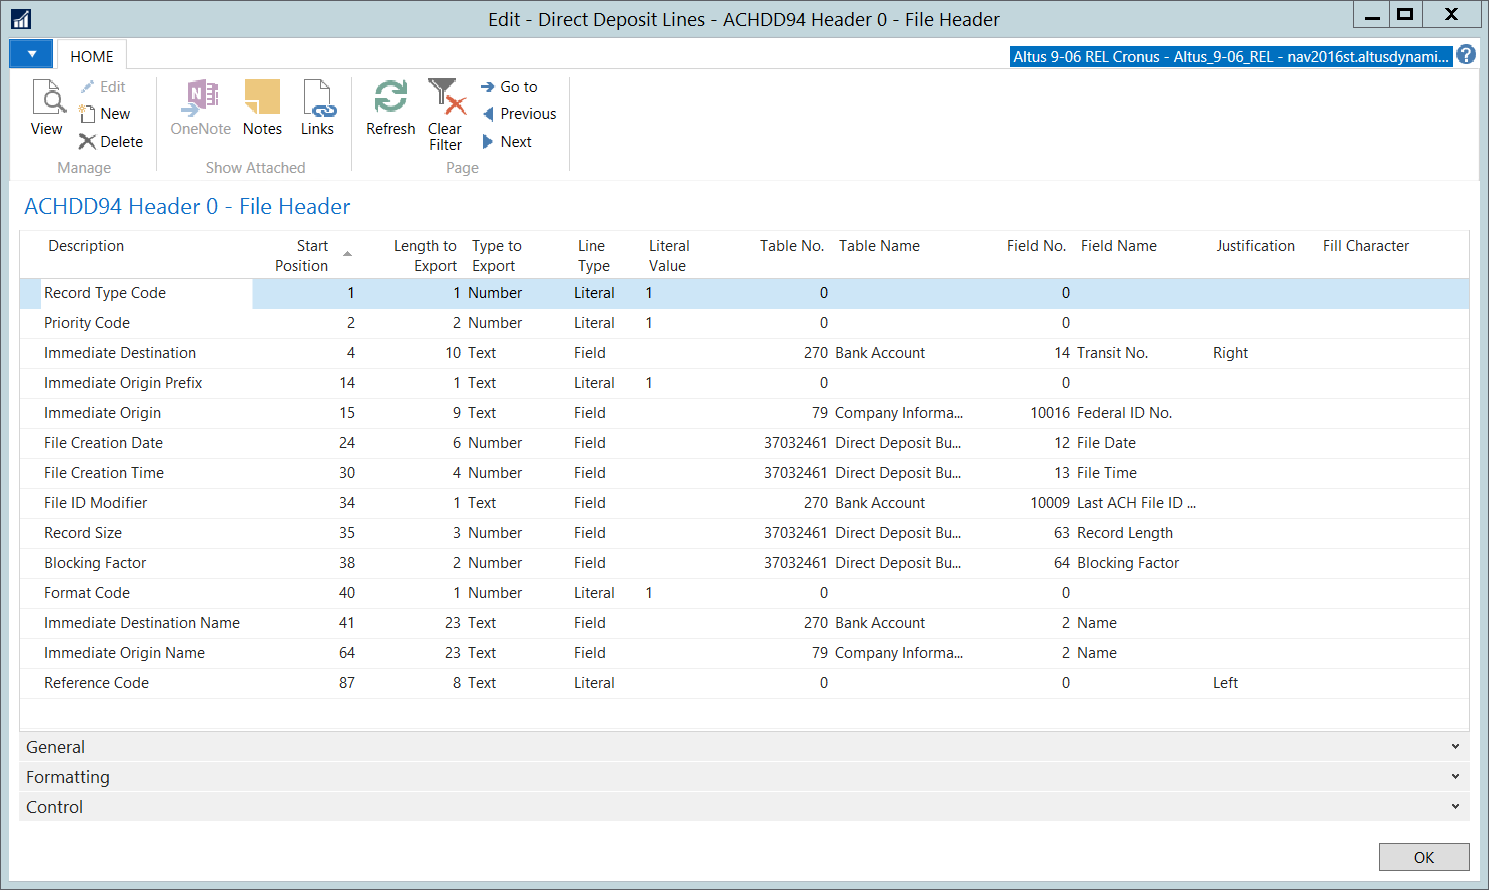
- Use the following table for assistance in completing the fields within the Direct Deposits Lines page:
| Field | Description |
|
General Tab |
The General tab is where you define where the column fits on the line and where the value for the column comes from. |
|
Description |
Description of what information the column contains from the banks documentation. |
|
Start Position |
The column number on the line where the information starts. |
|
Length to Export |
The number of characters for which the information will be output. |
|
Type to Export |
Select the type of data that the column displays based on the bank’s documentation. There are some exceptions to this to enable the direct deposit to format the output correctly. As well it may also be different depending on how the field type and length are defined if you selected a field from a table. Below are the options:
|
|
Line Type |
Select the Type associated with this line. Below are the options:
|
|
Literal Value |
The static value to be output for this column. |
|
Table No. |
The number of the table that a value will be output from. NOTE: The tables available for selection are restricted to those tables normally used during the processing. |
| Field Length |
Specify the number of characters to select from the value in the field.
|
|
Control Tab |
The Control tab is where you specify some validation checks and enables you to specify when certain running total amounts are updated. |
|
Required Field |
If selected, the value from the field is checked to determine if there is an entry. If not, then an error is generated. This setting applies only to line types of ‘Field’. |
|
Check Digit |
If selected, the value from the field is verified against the Check Digit algorithm. This is used to ensure that the Transit number entered is valid. This setting applies only to line types of ‘Field’. |
|
Update Total File Debit Amt. |
If selected this field triggers the application to add the value of the column to the Total Debit Amt. field found in the DDB (Direct Deposit Buffer) table each time that the column is written to the Export file. This setting works for both Literal and Field type lines. If the value added is not a numeric then an error is generated. |
|
Update Total File Credit Amt. |
If selected this field triggers the application to add the value of the column to the Total Credit Amt. field found in the DDB (Direct Deposit Buffer) table each time that the column is written to the Export file. This setting works for both Literal and Field type lines. If the value added is not a numeric then an error is generated. |
|
Update Hash Amount 1 and 2 |
If selected these fields trigger the application to add the value of the column to either or both the Hash Amt. fields found in the DDB (Direct Deposit Buffer) table each time that the column is written to the Export file. This setting works for both Literal and Field type lines. If the value added is not a numeric then an error is generated. |
|
Update Batch Debit Amt. |
If selected this field triggers the application to add the value of the column to the Batch Debit Amt. field found in the DDB (Direct Deposit Buffer) table each time that the column is written to the Export file. This setting works for both Literal and Field type lines. If the value added is not a numeric then an error is generated. |
|
Update Batch Credit Amt. |
If selected this field triggers the application to add the value of the column to the Batch Credit Amt. field found in the DDB (Direct Deposit Buffer) table each time that the column is written to the export file. This setting works for both Literal and Field type lines. If the value added is not a numeric then an error is generated. |
|
Update Batch Hash Amt. 1 and 2 |
If selected these fields trigger the application to add the value of the column to either or both the Batch Hash Amt. fields found in the DDB (Direct Deposit Buffer) table each time that the column is written to the Export file. This settings works for both Literal and Field type lines. If the value added is not a numeric then an error is generated. |
Adding Race Options
The Race table is where you can add all the race/ethnic groups represented within your organization (or all races in general). This enables you to assign the appropriate race/ethnic group to employees for EEO Reporting.
To add race options for assigning to employees:
- In the Search field, type Race and select the page from the drop-down list.
The Race page displays.
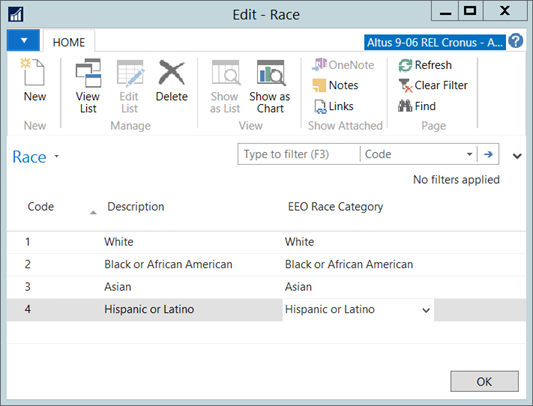
- From the Ribbon, click New.
- Use the following table for assistance in completing the columns within the Race page:
| Field | Description |
|
Code |
Displays the code for the race. Use this field to enter a code for the race you are adding. |
|
Description |
Displays an explanation for the code. Enter a brief description for this particular race/ethic group. |
|
EEO Race Category |
Displays the “EQUAL EMPLOYMENT OPPORTUNITY COMMISSION’s” race category. From the drop-down, select the appropriate option to apply to this group. |
Performing the Setup Procedures for Payroll Calculations
The Calculation options enable you to determine how payroll and payroll-related data is used and calculated. Based on your organization, government institutions and regulations, and the benefit provider used by your company, you can define the applicable rates, amounts, structures, and controls to automate payroll calculations.
Once the necessary options for performing calculations to determine compensation, deductions, etc. are defined, they are then applied to employees (based on their positions, and so on) on the Employee Card for each individual.
Defining Payroll Rates
Payroll rates are applied to an employee based on the required deductions, optional deductions, benefit selections, etc. to which they employee is eligible or opts into. The payroll rates applied to an employee determine what deductions (for benefits, RSP, and so on) or compensation the employee receives.
To apply rates to perform the required calculations, you need to set up all possible payroll rate scenarios used within your organization and required by law to ensure all the necessary payroll variables exist across the different employees and employee types. The required governmental rates are provided by the appropriate institutions.
To define the payroll rates used by your organization:
- In the Search field, type Rates and select the page from the drop-down list.
The Payroll Rates page displays.
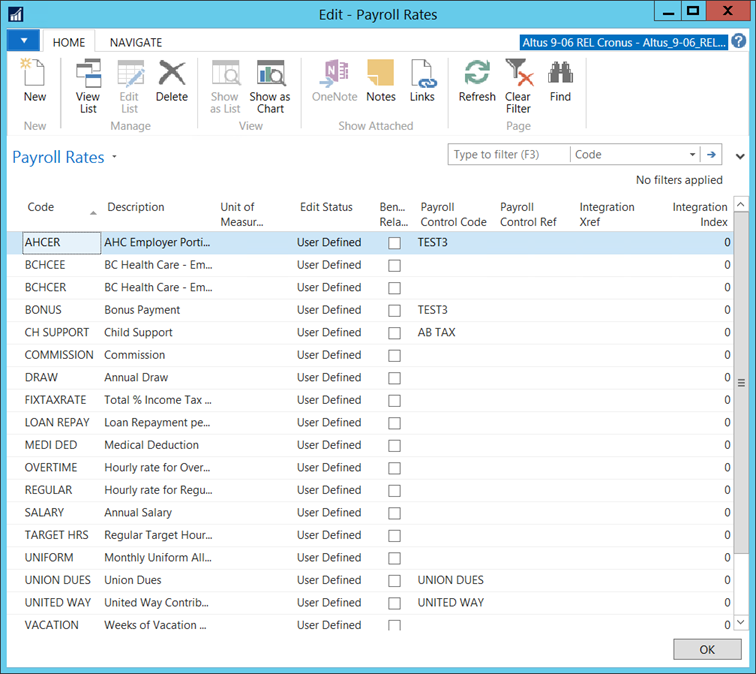
- From the Ribbon, click New.
- Use the following table for assistance in completing the fields within the Payroll Rates page:
| Field | Description | |||||||||||||||||||||||||||||||||||
|
Code |
Displays the code for the payroll rate. Use this field to enter a code for the payroll rate based on the naming standards used in your organization. |
|||||||||||||||||||||||||||||||||||
|
Description |
Displays an explanation for the code. Enter a brief description for this particular payroll rate. Some rates and codes are similar, so be sure to provide the specifics/distinction for each payroll rate in your description. |
|||||||||||||||||||||||||||||||||||
|
Benefit Related |
Indicates if the payroll rate is tied to benefits. If the payroll rate is dependent on or related to a benefit plan or benefit option/eligibility, enter a check mark in this field. |
|||||||||||||||||||||||||||||||||||
|
Edit status |
Displays the edit status for this payroll rate. From the drop-down select the appropriate option (User Defined, where employees select the option, Or defined in/based on the user account?, Master, and Locked) |
|||||||||||||||||||||||||||||||||||
|
Unit of Measure Code |
Displays the unit of measure used to calculate this payroll rate. |
|||||||||||||||||||||||||||||||||||
|
||||||||||||||||||||||||||||||||||||
| Table Name |
This will default based on the Table No. selected in the previous field. |
|||||||||||||||||||||||||||||||||||
|
Field No. |
The field number of the field whose value will be outputted for this column. |
|||||||||||||||||||||||||||||||||||
|
Field Name |
This will default based on the Field No. selected in the previous field. |
|||||||||||||||||||||||||||||||||||
|
Field Type and Length |
The type and length of the field if one has been selected. |
|||||||||||||||||||||||||||||||||||
|
Remove Spaces |
This setting only applies to Text output. Removes all spaces from the text before it is output. |
|||||||||||||||||||||||||||||||||||
|
Remove Special Characters |
Removes specific characters from a value before outputting it to the export file. The special characters removed are: .,!@#$%^&*():;<>? /|\{}[]-_ |
|||||||||||||||||||||||||||||||||||
|
Include Decimal |
Leaves the decimal point in the number when it is output to the export file. Normally, the decimal place is automatically removed before the output to the text file. This setting only applies to Amount output. |
|||||||||||||||||||||||||||||||||||
|
Date Format |
Allows the specification of several data formats. Format symbols used are:
|
|||||||||||||||||||||||||||||||||||
|
Time Format |
Allows the specification of several time formats. Format symbols used are:
|
|||||||||||||||||||||||||||||||||||
|
Field Start Position |
Displays the position at which the field value is extracted. Specify a start position of where the value in the field is extracted. |
|||||||||||||||||||||||||||||||||||
NOTEs:
- You can view all the employees assigned to a specific payroll rate. Select a payroll rate and click Rates, then select Employees. The employee list for that payroll rate opens.
- Some tables are not available in all sections. This is due to the processing and availability of the correct information in each table. The table below shows which tables are available in which sections.
Creating Tax Brackets
Brackets are lookup tables that contain information such as income tax withholding rates, health insurance deduction rates, and other information that is based on some status of the employee. Method steps that require bracket information use the codes to link to the bracket information required. When a method step is selected that requires a bracket code, the bracket code field is populated with the required bracket type and the lookup for the bracket code only displays the brackets that exist for that bracket type (that is, only brackets that work with the method step are displayed).
To define the bracket codes required by your organization:
- In the Search field, type Brackets and select the page from the drop-down list.
The Brackets page displays.
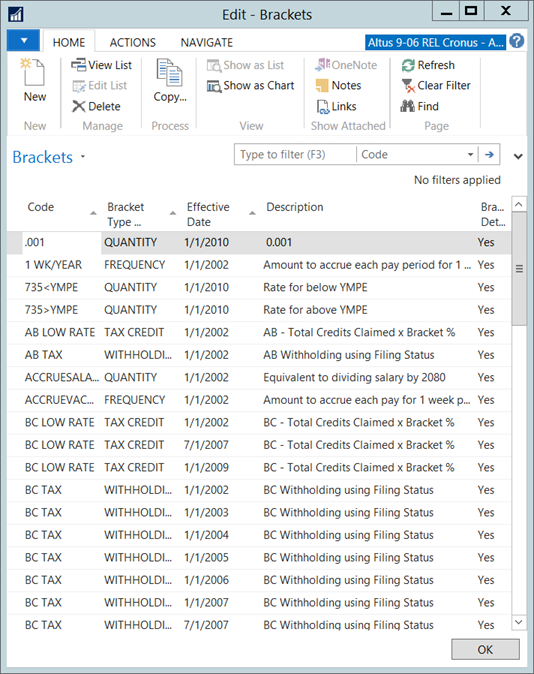
- From the Ribbon, click New.
- Use the following table for assistance in completing the fields within the Brackets page:
| Field | Description |
|
Code |
Displays the code for the bracket. Use this field to enter a code for the tax bracket based on the naming conventions/standards used in your organization. |
|
Bracket Type Code |
Displays the code associated with the bracket type (link to the bracket information required). |
|
Effective Date |
Displays the date upon which this bracket is effective. Enter the date in the space provided using the DD/MM/YY convention. |
|
Description |
Displays an explanation for the code. Enter a brief description for this particular tax bracket. Some brackets and codes are similar, so be sure to provide the specifics/distinction for each bracket in your description. |
| Edit status | Displays the edit status for this bracket. From the drop-down select the appropriate option (User Defined, Master or Locked). |
| Bracket Details Exist | Indicates that additional details for this bracket are available. This field automatically updates if bracket details have been entered for the Bracket. |
Setting up Base Amounts
Base amounts are used to determine the threshold (for example, a base amount could be the number of hours worked) by which the different rates (deductibles and benefits/compensation) are applied and calculated.
Method steps that require base amount information to perform calculations use the filter information from the code entered in the applicable field.
To set up base amounts:
- In the Search field, type Base Amounts and select the page from the drop-down list.
The Base Amounts page displays.

- From the Ribbon, click New.
- Use the following table for assistance in completing the fields within the Base Amounts page:
| Field | Description |
|
Code |
Displays the code for the base amount. Use this field to enter a code for the base amount using the naming conventions/standards for your organization. |
|
Effective Date |
Displays the date upon which this base amount is effective. Enter the date in the space provided using the DD/MM/YY convention. |
|
Name |
Displays the full name/explanation for the code. Enter a brief description for this particular base amount. Be sure to provide the specifics/distinction for each base amount in your description. |
|
Edit status |
Displays the edit status for this base amount. From the drop-down select the appropriate option (User Defined, where employees select an option. Or the option is pre-defined in/based on the user account, Master, and Locked) |
| Base Amount Details Exist |
Indicates that additional details for the base amount are available. If this is true for this base amount, enter a check mark in this field. |
Creating Activation Codes and Calculations
Some calculations for benefits, credits, and deductions are only activated for an employee after a specific timeframe of employment with the organization. For example, you can create a BEN code (for benefits) to indicate that the payroll components using this step only come into effect three months after the Employment Date displayed in the Employee card.
Depending on your particular organization, you may have a few or a large number of activation dates. For calculations that are timeline-specific, you can define all the appropriate activation timeframes you need and then trigger them to apply to payroll controls, rates, or brackets.
To create the appropriate timeframes:
- In the Search field, type Activations and select the page from the drop-down list.
The Activations page displays.
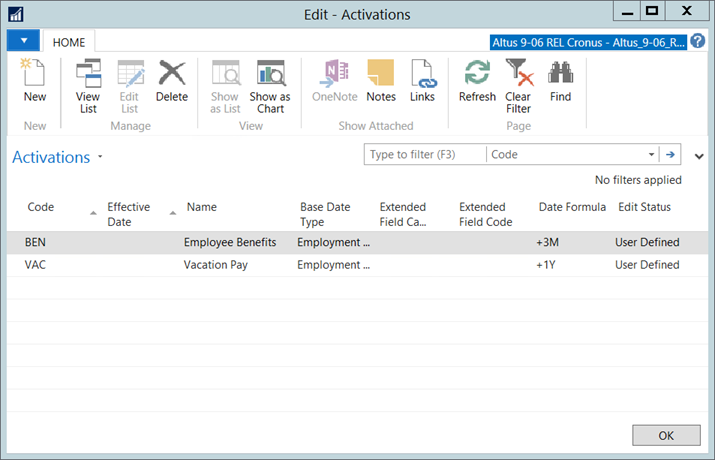
- Use the following table for assistance in completing the fields within the Activations page:
| Field | Description |
|
Code |
Displays the code for the activation. Use this field to enter a code for the base amount using the naming conventions/standards for your organization. |
|
Effective Date |
Displays the date upon which this activation is effective. Enter the date in the space provided using the DD/MM/YY convention. |
|
Name |
Displays the full name/explanation for the code. Enter a brief description for this particular activation code. |
|
Base Date Type |
Indicates the date to use to base the activation trigger. Select the appropriate option from the drop-down menu (Employment Date, Termination Date, Birth Date, Inactive Date, or Attribute Date). |
|
Attribute Class |
Displays the attribute class (employee group) to be affected by the activation code. |
|
Attribute Property |
Displays the attribute class properties for this activation. Used to specify further which employees the Activation Code affects. |
|
Date Formula |
Displays the date formula that triggers the activation to occur (along with the Base Date Type). Enter the date formula by which this activation is determined. |
|
Edit status |
Displays the edit status for this activation code. Used to lock the activation code to prevent users from editing the activation. From the drop-down select the appropriate option (User Defined, Master, and Locked). |
Adding Method Step Classes
Method Step classes are a means of identifying the type of method step, such as base amount or simple math. Most method steps are imported into the system at the time of setup.
To add method step classes:
- In the Search field, type Method Step Classes and select the page from the drop-down list.
The Method Step Classes page displays.
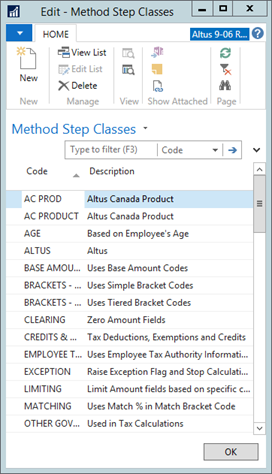
- From the Ribbon, click New.
- Use the following table for reference/assistance in completing the fields within the Method Step Classes page:
| Field | Description |
|
Code |
Displays the code for the method step class by which employee compensation is defined. Use this field to enter a code for the method step class using the naming conventions/standards for your organization. |
|
Description |
Displays a description of the code provided. Enter a brief description of explanation for the step class code you entered. |
Adding the Required Method Steps for Payroll Calculation
You can create a list of method steps enabling you to insert all the calculation formulas (steps) that need to be applied and performed for a payroll calculation.
The Method Steps table is where you define the individual steps in a payroll calculation. Payroll calculations are a series of method steps attached to a calculated payroll control. Each method step record has a payroll calculation function attached to it and executing this method step consists of calling that payroll calculation function.
Additionally, the tax bracket type is attached so the payroll calculation function can retrieve the appropriate data from the tax brackets table, if the payroll calculation function requires bracket information.
To create the appropriate method steps:
- In the Search field, type Method Step List and select the page from the drop-down list.
The Method Step List page displays.
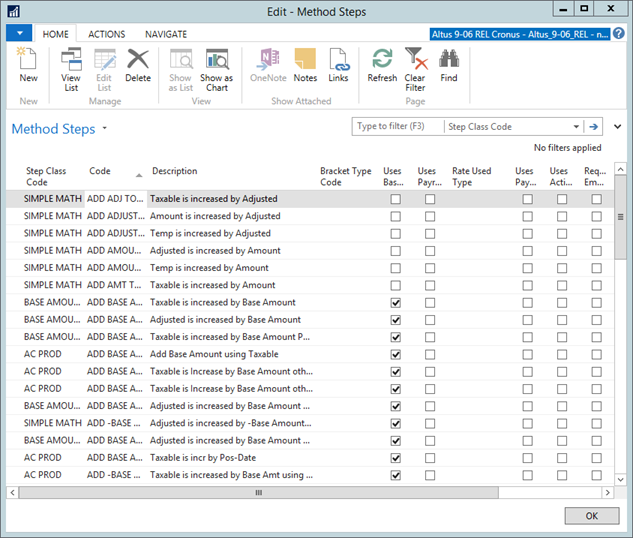
- From the Ribbon, click New.
- Use the following table for assistance in completing the fields within the Method Step List page:
| Field | Field |
|
Step Class Code |
Displays the Step Class Code for the Method Step. |
|
Code |
Displays the code for the method step. Use this field to enter a code for the method step using the naming conventions/standards for your organization. |
|
Description |
Displays a description for the code you provided. Enter a brief description to explain the code and the calculation it performs. |
|
Bracket Type Code |
Displays the bracket type code required for this step (calculation). |
|
Uses Base Amount |
Indicates that the calculation for the method step uses the base amount. If this is true for this particular method step, click to enter a check mark. |
|
Uses Payroll Rate |
Indicates that the calculation for the method step uses the payroll rate. If this is true for this particular method step, click to enter a check mark. |
|
Rate Used Type |
Displays the rate type used. From the drop-down menu, select the appropriate option. |
|
Uses Pay Structure |
Indicates that the calculation for the method step uses a pay structure. If this is true for this particular method step, click to enter a check mark. |
|
Uses Activation Code |
Indicates that the calculation for the method step uses an activation code. If this is true for this particular method step, click to enter a check mark. |
|
Requires Emp. Auth. Info |
Indicates that for this method step calculation to be applied, employee authorization is required. If this is true for this particular method step, click to enter a check mark. |
|
Bracket Status Selection Mode |
Indicates the bracket status for this method step. From the drop-down menu, select the appropriate option. |
|
Function No. |
Displays the function number (which is and HR function code) required for this method step calculation. Enter the appropriate number in the space provided. |
|
Comment |
Displays pertinent comments tied to this method step. Enter any additional details in the space provided. |
Defining Payroll Control Groups
When you define a payroll control group, Individual payroll controls are grouped together to manage specific tasks/activities. You can add all the necessary individual controls to larger groups to maintain (capture) the controls required for the calculations of a specific control group. This saves you time when attaching payroll controls to employees.
You have the ability to defining an unlimited number of groups that consist of specific payroll controls. This enables the payroll controls to get attached to an employee as a group rather than one at a time.
For example, you can define a payroll control group for benefits (many different benefit groups can be defined) in which all the payroll controls required for a specific benefit type are automatically applied whenever this payroll control group is initiated.
To define payroll control groups:
- In the Search field, type Payroll Control Groups and select the page from the drop-down list.
The Payroll Control Groups page displays.
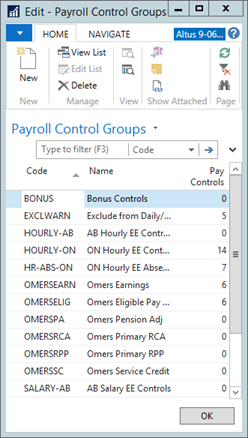
- From the Ribbon, click New.
- Use the following table for assistance in completing the fields within the Payroll Control Groups page:
| Field | Description |
|
Code |
Displays the code for the method step. Use this field to enter a code for the method step using the naming conventions/standards for your organization. |
|
Name |
Displays the name (description) for the code you provided. Enter a name to provide a description for the code (payroll control group). |
|
Pay Controls |
Displays the number of payroll controls attached/that are part of this group. Click the Pay Controls button to open the Payroll Control Group Controls list for the group you are creating. See, ‘Adding Payroll Controls’ for steps. |
Adding Payroll Controls
To add the payroll controls associated with the Payroll Control group:
- Click the Navigate tab.
- Click Payroll Controls.
The Payroll Control Group Controls page displays.
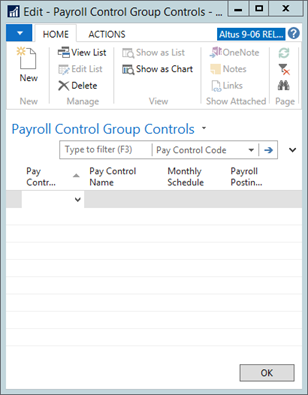
- In the Pay Control Code column, select the control you want to add to the group from the drop-down list.
- Repeat steps 2 and 3 to add as many payroll controls as required.
Note: You can use the Copy feature to create payroll control groups from existing groups. This can save you a lot of time if your payroll control groups are similar and contain a number of controls. Once you copy an existing payroll control group, you can remove or add different controls as needed to define the new payroll control group. See Copying Payroll Controls from Existing Payroll Control Groups.
Copying Payroll Controls from Existing Payroll Control Groups
- In the Payroll Control Group Controls list, click the Actions tab and then click Copy.
The Copy Payroll Control Group Controls page opens.
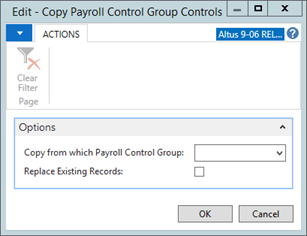
- In the Copy from which Payroll Control Group field, select the group from which you want to copy all the payroll controls from the drop-down list and then click OK.
NOTE: If you have already defined some payroll controls for this group, but you want to replace them with the copies group, click to add a check mark to the Replace Existing Records check box. - Click OK.
The Payroll Control Group Controls list re-opens populated with the controls copied from the existing group.
Defining Calculation Orders
The Calculation Orders page is where you specify the order in which payroll controls get calculated. The Master order is the order generally used for a regular payroll.
You can also add other orders for running specialized pays, such as bonus pays or retro pays. In this case, you like need less payroll controls to be calculated and they may require to be calculated in a different order.
To set calculation orders:
- In the Search field, type Calculation Orders and select the page from the drop-down list.
The Calculation Orders page displays.
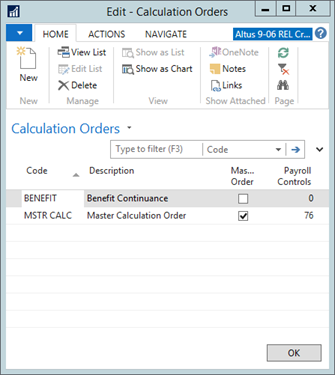
- From the Ribbon, click New.
- Use the following table for assistance in completing the fields within the Calculation Orders page:
| Field | Description |
|
Code |
Displays the code for the calculation order. Use this field to enter a code for the calculation order using the naming conventions/standards for your organization. |
|
Description |
Displays a description for the code you provided. Enter a description for the code (calculation order). |
|
Master Order |
Indicates whether the calculation order is the ‘master order’, which means it is the calculation order used by default for regular payroll processing To set a calculation order as the ‘master’ calculation order, click the Function button and select Define Master Order. In the confirmation dialog, click Yes. A check mark displays in the Master Order column for the selected calculation order. |
|
Payroll Controls |
Displays the number of payroll controls attached to this calculation order. This number is calculated automatically as you add payroll controls. |
Understanding Pay Structures
The Pay Structures table enables you to specify a pay rate or pay rate range for each unique combination of pay grade and step used within your organization. You can define as many pay scales as required.
Under each defined pay structure, you can set an unlimited number of grid header records. This enables your organization to retain the history of the grid and grid detail lines over time, as well as maintain a history of the rates at a particular given point in time and also can support retroactive calculations, if required.
Each payment structure contains a combination of pay grades and pay steps. You need to set up your pay grades and steps first and then you can create your payment structures and assign specific pay grids (combination of pay grades and steps) to each payment structure.
NOTE: Depending on your organization’s policies, pay grades, pay steps, and pay structures may be set up by your Human Resources department. If so, you can skip these sections.
Setting up Pay Grades
The details of the pay grades are already defined based on the requirements pre-supplied to the Sparkrock Client Services team by your organization. All that is required is that you add the pay grades applicable to the required positions within your organization. For each position, you need to assign the number of pay grades it contains.
Setting the pay grades associated with each position facilitates the employment process and payroll set up because it enables your organization to determine a fixed framework of salary ranges and/or hourly payment ranges. When creating a position using the Position Card, you then assign an appropriate pay grade to the position. The appropriate pay framework for a general position and specific job is then automatically assigned.
To set up pay grades:
- In the Search field, type Pay Grades and select the page from the drop-down list.
The Pay Grades page displays.
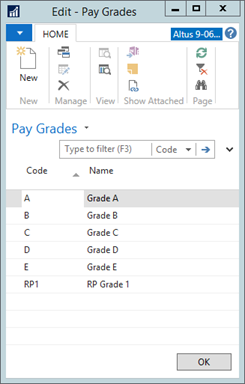
- From the Ribbon, click New.
- Enter a code for the pay grade (for example, GR1, GR2, and so on).
- In the Name column, provide an explanation for the pay grade.
- Repeat this procedure to add all the required pay grades.
- When you finish, close the page.
Adding Pay Steps
As with pay grade setup, the specific amounts of the pay steps are already defined based on the requirements pre-supplied by your organization. All that is required is that you add the pay steps applicable to the required pay grades. For each pay grade, you need to assign the number of pay steps it contains. When creating a position using the Position Card, you then assign an appropriate pay step to the pay grade for the position. The appropriate pay framework for a general position and specific job is then automatically assigned.
To add up pay steps:
- In the Search field, type Pay Steps and select the page from the drop-down list.
The Pay Steps card displays.
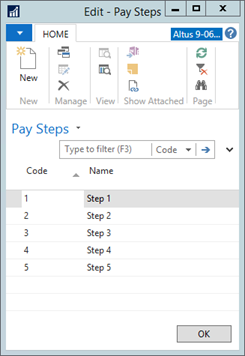
- From the Ribbon, click New.
- Enter a code for the pay step (for example, ST1, ST2, and so on).
- In the Name column, provide an explanation for the pay step.
- Repeat this procedure to add all the required pay steps.
- When you finish, close the page.
Defining Pay Structures
There are two types of pay structures, which are based upon the type of grid: fixed and band. A fixed pay structure grid is where you specify a single pay amount for each combination of grade and step. There is a single pay rate associated with a specific grade/step combination and the employee may be paid that exact amount or they may be under or over that exact amount.
| Grade Step | Step | Amount |
|
Grade A |
Step 1 |
$6.00 |
|
Grade A |
Step 2 |
$6.25 |
|
Grade A |
Step 3 |
$7.00 |
|
Grade B |
Step 1 |
$6.75 |
|
Grade B |
Step 2 |
$7.15 |
|
Grade B |
Step 3 |
$7.85 |
A band pay structure grid is where you specify a lower and upper limit for each combination of grade and step.
| Grade Step | Step | Lower Amount | Upper Amount |
|
Grade A |
Step 1 |
$6.00 |
$8.25 |
|
Grade A |
Step 2 |
$7.15 |
$10.85 |
|
Grade A |
Step 3 |
$9.45 |
$12.75 |
|
Grade B |
Step 1 |
$8.00 |
$10.35 |
|
Grade B |
Step 2 |
$9.75 |
$12.95 |
|
Grade B |
Step 3 |
$11.85 |
$15.00 |
Before Human Resources can assign a specific pay structure to an HR job and position, the pay structures for your organization need to be defined. Once defined, you can easily manage pay grades for hourly, salaried, contract, and so on jobs. Providing the appropriate parameters associated with a pay structure enables your Human Resources department to attach the pay structure to the HR Position, which are then attached to each applicable employee to initiate automatic calculation of earnings, and so on.
To create a pay structure:
- In the Search field, type Pay Structures and select the page from the drop-down list.
The Pay Structures page displays.
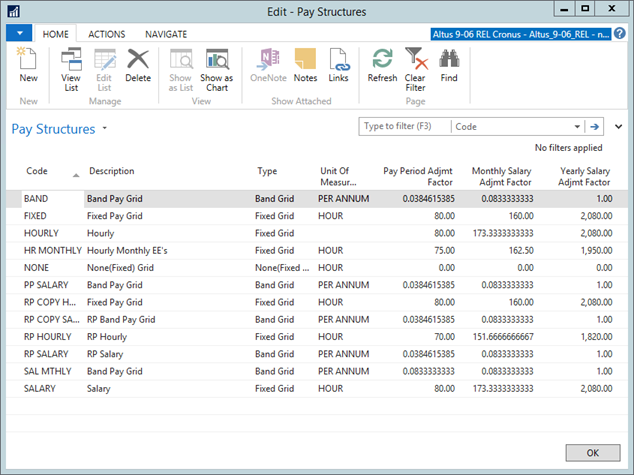
- From the Ribbon, click New.
- Use the following table for assistance in completing the fields within the Pay Structures page:
| Field | Description |
|
Code |
Pay structure code. For example, hourly, salary, contract, and so on. |
|
Description |
Pay structure explanation. |
|
Type |
Select a pay grid – Fixed or Band. |
|
Unit of Measure |
Select the applicable unit of measure. |
| Pay Period Adjmt Factor | Specify a factor to be used to convert the amount in the grid to the pay period amount. |
| Monthly Salary Adjmt Factor | Specify a factor to be used to convert the amount in the grid to the monthly salary amount. |
| Yearly Salary Adjmt Group | Specify a factor to be used to convert the amount in the grid to the yearly salary amount. |
- Repeat these steps to create any additional pay structures required.
Note: To save time, you can copy a pay structure and revise where needed. Click Functions, and select Copy Structure. - When you finish defining your required pay structures, close the page.
- From the Setup folder, select Calculation > Pay Structures.
Understanding Adjustment Factors for Pay Structures
The adjustment factors are used to calculate the Pay Period, Monthly, and Annual amounts that are displayed on the HR Request Payroll sections. Set up examples follow below.
For example, if your pay periods are semi monthly, and your pay structures are defined as annual amounts, the Pay Period Adjmt Factor will be 0.41667 (1/24). If you pay periods are monthly and your pay structures are monthly amounts the pay period adjustment factor will be 1.
| Pay Structure Unit Amount | Annual Adjmt Factor | Formula | Monthly Adjmt Factor | Formula | Pay Period Adjmt Factor | Formula | Notes | |
| Bi-Weekly | Annual | 1 | 1 |
0.083333 333 |
1/12 |
0.0384615 38 |
1/26 | |
| Semi-Monthly |
Annual |
1 |
1 |
0.083333 333 |
1/12 |
0.0416666 67 |
1/24 |
|
| Monthly |
Annual |
1 |
1 |
0.083333 333 |
1/12 |
0.0833333 33 |
1/12 |
|
| Bi-Weekly |
Hourly |
1950 |
1950 |
162.5 |
1950/ 12 |
75 |
1950/26 |
Assumes 1950 hrs/year |
| Semi-Monthly |
Hourly |
1950 |
1950 |
162.5 |
1950/ 12 |
81.25 |
1950/24 |
Assumes 1950 hrs/year |
| Monthly |
Hourly |
1950 |
1950 |
162.5 |
1950/ 12 |
162.5 |
1950/12 |
Assumes 1950 hrs/year |
Copying Pay Structures
You can copy existing pay structures to save time and make pay structure creation more efficient.
To copy a pay structure:
- In the Pay Structures card, click the Actions tab.
- Click Copy Structure.
The Copy Pay Structure page displays with the Source Pay Struct. Code field automatically populated with the name of the copied pay structure.
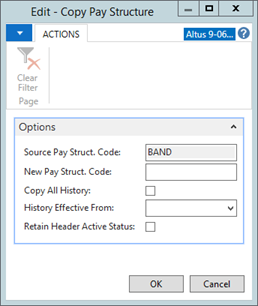
- Use the following table for assistance in completing the fields within the Copy Pay Structures page:
| Field | Description |
| Source Pay Struct. Code | The pay structure code that you want to copy. |
| New Pay Struct. Code | Name for the copied pay structure. |
| Copy All History | Click this check box to copy all the history for this pay structure. |
| History Effective From | The date from which you want to copy the pay structure history. |
| Retain Header Active Status | Click this check box for the grid header to remain active. |
- Click OK. The new pay structure is added to the Pay Structure page.
- Make any changes to the newly added structure as required.
Setting up the Grid Headers
Under each defined pay structure, your organization is able to define an unlimited number of grid header records. This allows you to retain the history of the grid and grid detail lines over time.
To set up grid headers:
- In the Pay Structures page, click the Navigate tab and then click Grids.
The Pay Structures Grid Headers page displays.
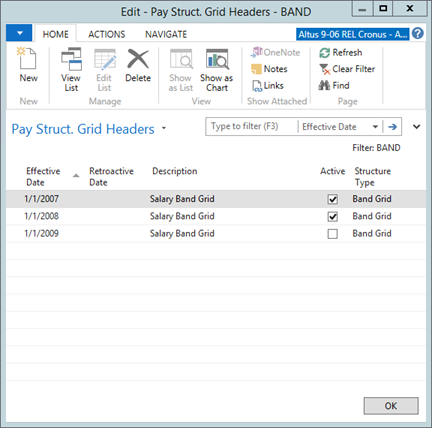
- In the Ribbon, click New.
- Use the following table for assistance in completing the fields within the Pay Structures Grid Headers page:
| Field | Description |
| Effective Date | The date upon which the new grid takes effect. |
| Retroactive Date | The date for which the new grid is retroactive to. |
| Description | Description for the pay structure grid. |
| Active | Add a check mark if the grid header is active. |
| Structure Type | Structure type for the grid header. |
Maintaining Grid Details
You can view the grid details for a selected grid header.
- In the Pay Structures Grid Headers page, click the Navigate tab and then click Details.
The Grid Header Details page opens.
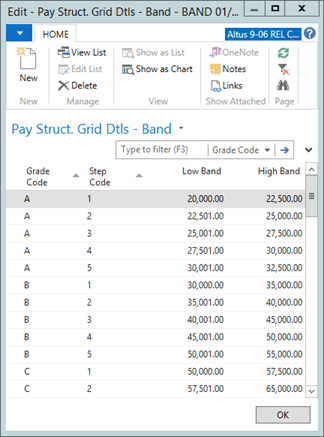
- In the Ribbon, click New.
- Use the following table for assistance in completing the fields within the Grid Header Details page:
| Field | Description |
| Grade Code | The grade code for the new grid header. |
| Step Code | The step code for the new grid header. |
| Low Band | Specifies the lower limit for the pay grade. |
| High Band | Specifies the upper limit amount for the pay grade. |
- Click OK.
Copying Grid Headers
You can copy existing grid header structures to save time and make grid header creation more efficient.
To copy a pay structure:
- In the Pay Structure Grid Headers page, click the Actions menu and then click Copy Header.
The Copy Pay Structure Header page opens with the Source Effective Date field automatically populated with the date the copied pay structure became effective.
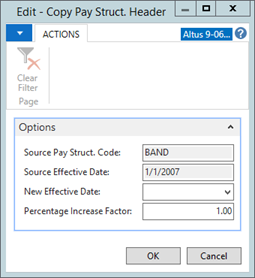
- In the New Effective field, enter the date for the new pay structure to take effect.
- Click OK. The new pay structure is added to the Pay Structure Grid Headers page.
Activating/Deactivating a Grid Header
- In the Pay Structure Grid Headers page, click the Actions tab.
- Click one of following:
- Activate Header
- Deactivate Header
Setting up Direct Deposits
Using direct deposit, you can send your employees their pay directly to the bank accounts of their choice. If an employee wants, you can also provide a combination of partial payment by direct deposit and partial payment by check.
Direct deposit processing occurs just after you print paychecks and before you post the payroll. An export file is created based on the format you set up. This file is then transmitted to your bank, and the bank handles the rest of the transaction.
Linking to the Organization’s Bank
You must set up the direct deposit links with your organization’s bank before you can start paying your employees through direct deposit. The bank will provide the transmission program, which a Sparkrock consultant will install or assist your administrator with the installation.
The following sections provide the steps for setting up your organization to use direct deposit for paying your employees.
Setting up the Employer Bank Account
Once you make arrangements with the bank, the first step is to set up the bank account to use direct deposit. You do this from the Bank Account page in the Financial Management granule.
To set up a direct deposit link with employer’s bank:
- In the Search field, type Bank Accounts and select the page from the drop-down list.
The Bank Accounts page opens.
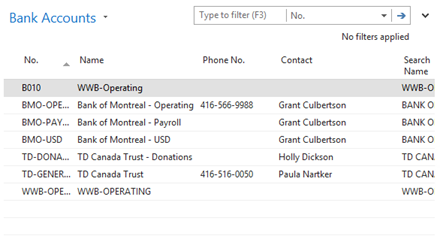
- Double-click WWB-OPERATING.
- Click the Posting tab.
NOTE: If your organization has a combination of printed paychecks and electronic payments, you may want to set up the direct deposit remittances to print differently (on different paper) from actual paychecks. If so, you need to enter an alternate numbering series for direct deposits remittance slips to ensure you can easily identify them from paychecks. - In the Last Remittance Advice field, enter a numbering series for the direct deposit slips. For example, RA00001 is a possible entry for this field.
- Click the Transfer tab.
The Transfer tab displays. - Use the following table to complete the fields in the Transfer tab:
| Field | Description |
| Export Format | CA is the default (for Canada). |
| ETF Export Format | Specify the ETF Export Format from the drop-down list. |
| E-Pay Export File Path | This field is required for direct deposit. Specify where the direct deposit file should be saved. Enter a full directory path, starting with the drive letter and ending with a back slash (\). Do not include the file name, just the path. |
| Last E-Pay Export File Name | This field is required for direct deposit. Enter a file name with no path. This file name should have digits in it, as it is incremented each time it is exported. This way, you maintain a permanent record of every file you export to the bank. For example, this is a common first entry for this field: DD00001.txt. |
| Last E-Pay File Creation No. | The system tracks the last no. of the file transferred to the Bank. The date is displayed in this field. |
| E-Pay Trans. Program Path | This field is required for direct deposit. Enter a full directory path, starting with the drive letter and ending with a back slash (\). The file name is not included here. During the transmission process, the export file is copied from the E-Pay Export File Path to the E-Pay Transfer Program Path. For this reason, it is vital that this field is not the same as the E-Pay Export File Path field as this is where the export file is moved. The file then becomes the Transmit File. A copy of the file remains in this directory even after the transmission to the bank is complete. |
| E-Pay Trans. Program Command | This field is required for direct deposit. Enter the command line that you normally use to launch the bank transmission program. The first word is the name of the program, and the remaining words are command arguments that must be used. The following “argument substitutions” can be used:
For example, “Transmit %2” is a possible entry for this field. |
| Client No. | Displays the client number used by the bank. Enter the client number in the space provided. |
| Client Name | Displays the client name used by the bank. Enter the client name in the space provided. |
| Input Qualifier | The input qualifier for the file sent to the bank. This information is typically provided by the Bank. |
| Direct Deposit Layout | Select the Direct Deposit format. For more information on direct deposit layouts, see ‘Creating Direct Deposit Layouts’ |
| Originator ID | The originator ID used for the bank. |
| Originator Short Name | The originator ‘Short Name’ used for the bank. |
| Originator Long Name | The originator ‘Long Name’ used for the bank. |
| Data Center | The Data Center. |
| Bank Code | The Bank Code. |
| Transit No. | The employer’s bank will provide a nine-digit Transit/ABA Number. (Sometimes this is called the routing number). |
| Bank Institution No. | The bank institution number. |
| Bank Account No. | The bank account number. A bank account number is required and may be of any length. Enter the number in the space provided. |
| Bank Account No. (MICR) | Magnetic Ink Character Recognition (MICR) of the bank account number. |
| Swift Code | International bank code. |
| IBAN | International Bank Account Number. |
| Creditor No. | Vendor identification number |
| Bank Name - Data Conversion | The bank's data format. |
| Bank Clearing Standard | The format standard used in bank transfers. |
| Bank Clearing Code | Routing codes that are used for making a payment to an account that doesn't have an IBAN. |
| MICR Sample | A sampe of the Magnetic Ink Character Recognition (MICR) account number. |
| Divider # | Used for printing/sizing the MICR line at the bottom of a check. |
| Format # | Used for printing/sizing the MICR line at the bottom of a check. |
| Spacing # | Used for printing/sizing the MICR line at the bottom of a check. |
| Print MICR Encoding | Add a checkmark to this check box to include MICR encoding. |
| PAP Layout | Specifies the Pre-Authorized Payment layout. Choose the appropriate option from the drop-down list. |
| PAP Last File Creation No | Specifies the last Pre-Authorized Payment number. |
| Last E-Pay Export File Name | Specifies the last e-pay export file name. |
- Once you provide the direct deposit transmission information, close the Bank Accounts page.