

Payroll Import file
The Payroll Import file is provided by OTIP based on a predefined monthly schedule. It contains data for payroll amounts for the benefit plans under the administration of OTIP and can include the following:
- Deduction amount (Employee Share),
- Taxable benefit amounts (e.g. ER Paid Life/AD&D),
- Retroactive amounts for any of the above,
- Payroll Effective Date.
Note: The payroll amounts from the file are applicable only for the month of the payroll effective date and cannot be used in subsequent months. The amount can be deducted only once for the respective month.
Instructions on how to configure your system to use the data from the file are provided later in this document.
Integration setup
You will need to add information to the ON - OTIP Provincial Plan fast tab in order to complete the integration setup.
To complete the integration setup:
- Open the Integration Setup page and expand the ON - OTIP Provincial Plan fast tab.
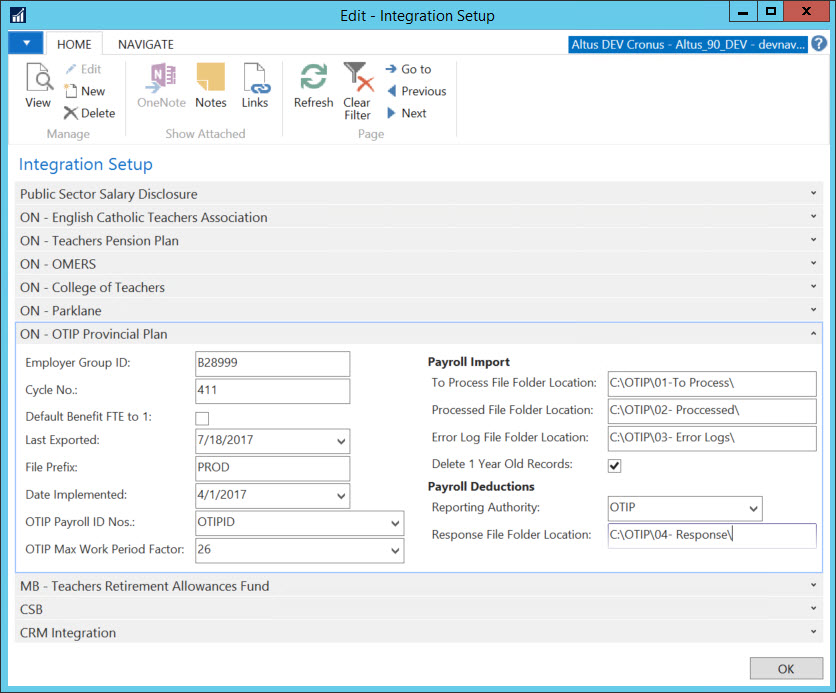
The following table includes the information required for each field on the ON - OTIP Provincial Plan fast tab.
| Field | Description |
| To Process File Folder Location | The location where you will store the file provided by OTIP. |
| Processed File Folder Location | Once the file is imported, it will be moved to the folder specified in this field. |
| Error Log File Folder Location | If errors exist with the file, the error log will be stored in the folder specified in this field. |
| Delete 1 Year Old Records | When this field is checked, the system will check if OTIP related employees rates more than an year old exist and delete them at the time of the new import. |
The above folders can be set up on either a shared network folder or the application server itself.
- A network shared folder should be in UNC format: \\Servername\folder\folder\
- A folder from the application server should have the following format: C:\folder\folder
Certain permissions need to be granted to these folders:
- The NAV app service account needs to have full permissions to these folders.
- Users that will be using this functionality need to have access to these folders to access the files.
Configuration package
To complete the configuration of the the OTIP Payroll Import, we provide a configuration package that has the data needed to be in place for the integration to work.
Configuration package file
The configuration package file is available for download below.
PackageOTIP_IMPORT_PACKAGE.rapidstart
Configuration package description
The tables that are part of the configuration package are as follows:
| Table ID | Table Name | Actions performed by the configuration package |
| 23020250 | Benefit Plan |
Importing this table:
Configuration considerations:
NOTE: Payroll control groups are attached to benefit plans. A benefit plan can be attached to an HR Position. When this position is used on an HR Request the payroll controls from that group are added to the employee as employee payroll controls. |
| 37032309 | Payroll Control |
Importing this table:
|
| 37032310 | Payroll Control Group |
Importing this table:
|
| 37032311 |
Payroll |
Importing this table:
|
| 37032322 | Payroll Posting Group |
Importing this table:
|
| 37032324 |
Payroll |
Importing this table:
|
| 37032344 | Payroll Rate |
Importing this table:
|
| 37032346 | Base Amount |
Importing this table:
|
| 37032347 |
Base |
Importing this table:
|
| 37032349 | Payroll Calc. Method |
Importing this table:
|
| 37032350 | Payroll Calc. Method Line |
Importing this table:
|
| 37032453 |
Pay |
Importing this table:
|
Other setup
After the configuration package has been imported and applied additional configuration needs to be completed.
- Configure the Integration Setup as described earlier in this document.
- Review the OTIP related payroll controls and get familiar with which payroll control codes are applicable to your organization.
- Adjust your method steps based on your pay cycles.
- For pay cycles that start at the beginning of the month, e.g. monthly or semi-monthly, please use method step 2608 AMOUNT IS EMP RATE PPSD (a rate within the month where Pay Period Start Date falls). This is the method step included in the configuration package.
- For bi-weekly pay cycles, please use method step 2703 AMOUNT IS EMP RATE PPED (a rate within the month where Pay Period End Date falls). You have to update your OTIP payroll controls either manually or by updating the configuration package provided.
- Add the OTIP related Payroll Controls to the applicable Calculation Orders.
- Link the OTIP Payroll Posting Group to G/L accounts. Or if you would like to use existing Payroll Posting Group and existing G/L Accounts, you need to update the Payroll Posting Group on the Payroll Control Codes under the payroll control group OTIP.
- For existing employees, the OTIP related Payroll Controls need to be attached to all employees that participate in the OTIP plan with Attach Payroll Control Group report.
- Attach the OTIP Benefit Plan to the Benefit Eligible Positions if you would like to use the new plan created by us. In the event you are using your own plan ensure that the Payroll Control Group on that plan is updated with the OTIP related Payroll Controls.
- If you would like to use Liability to AP, you need to link the OTIP Vendor to the Reporting Authority from the employer card. Otherwise you can manually create invoices for the reporting authority.
- If you would like to use a monthly schedule different from 1st Pay Period you should make the necessary adjustments.
If you want to use the Lump Sum Employer Payroll Control provided, you need to: - Add the employer rate OTIP ER to the relevant employers and assign the amount.
- Update the calculation order(s) with payroll control OTIP-ELHT ER.
NOTE: It is expected that the OTIP HRIS Import has been set up before configuring the Payroll Import.
Employer deductions
As a result of the change to how OTIP handles employer contribution (lump sum per month) we have added an optional Employer Rate OTIP ER and Payroll Control Code OTIP-ELHT ER that you can use if you would like to allocate cost per employee per month based on a flat rate. This deduction might not reconcile to the lump sum you pay monthly as the number of employees can fluctuate but still provides you with an opportunity to do an approximate allocations for employer contributions.
To set this up:
- You have to add the employer rate to the employer and specify an amount.
- You have to make sure the reporting authority for this payroll control is blank or different from OTIP.
- You have to make sure the employer deduction payroll control is added as employee payroll control to the affected employees.
NOTE: The employer deduction payroll control is added to the OTIP Payroll Control Group and the OTIP Benefit Plan as part of the configuration package update. - You need to add the employer deduction payroll control to your calculation order(s).
Running the Payroll Import
You will need to run the Payroll Import report to have the information contained into it uploaded into your system.
To complete the import:
- Store the file provided by OTIP in the To Process File Order Location folder specified on the Integration Setup.
- Open the OTIP Payroll Import page.
- Add a Checkmark to Populate Payroll Deductions ONLY if you are generating a Payroll Response File from our system and you would like to only load the deductions information into the OTIP Payroll Deductions page.
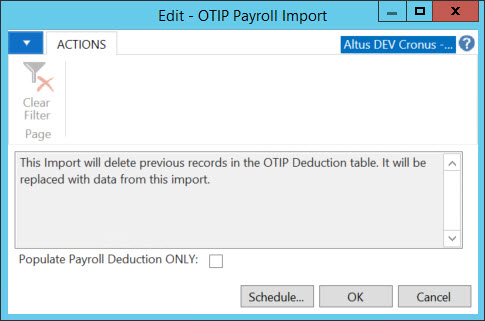
- Click OK.
- A message will display if previous records exist on the Payroll Deductions page. Click Yes to replace them.
- Once the file is imported you will see a message that indicates that the file was successfully processed. Click OK.
- The file will be moved to Processed File Order Location folder specified on the Integration Setup.
With the import of the data coming from the Payroll Import the following records are being updated:
- OTIP ID is added to newly hired employees as reported in the HRIS Export.
- Employee Pay Rates are added per employee for the respective month. This data is then used for Payroll Calculations.
- The Payroll Deductions page is updated with the information from the file. It will be used as part of the payroll response process to send back comparison between the deductions sent by OTIP and the actual deductions during the respective month.
Processing the Payroll
Once you have all data imported and any additional configuration completed you are ready to run your payroll. Depending on how you have configured the monthly schedule on your payroll controls, the deduction amounts will be calculated in total in a pay cycle with a pay cycle period start date within the month to which the deductions apply. By default we are configuring the monthly schedule to be 1st Pay Period.
Finding Employee Rates
Sparkrock provides two method steps that are used to find an employee rate that falls within the month of the payroll journal posting date.
- AMT IS EE RATE IN MO (Amount is Employee Rate for Entire Month based on Pay Date, Function No. 2704): If multiple rates are found, use the last one (or most recent date. For example, if rates from 3/25 and 3/5 are found, use the one from 3/25).
- EXCEPT IF START>15 (Raise the Exception if Employee is not active at the 15th of the Month using PP End, Function No. 2705): If the assignment starts ON or AFTER the 15th of the month, the exception flag will fire. It looks at the oldest assignment. Note that the calculation start and end dates are used to determine if the assignment is active, but the assignment start/end dates are used to determine the 15th of the month rule.