

OTIP Setup
You will need to add information to the OTIP Setup page in order to complete the integration setup.
To complete the integration setup:
- In the Search field, type OTIP Setup and select the page from the drop-down list.
The OTIP Setup page displays. - Expand the HRIS Export FastTab.
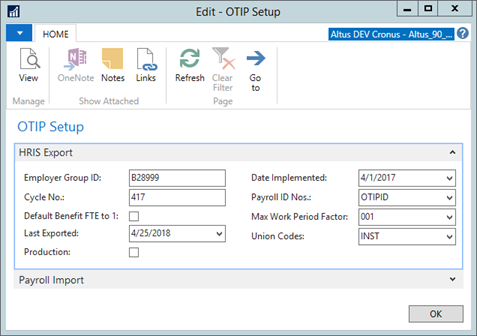
- The following table includes the information required for each field on the HRIS Export FastTab.
| Field | Description |
| Employer Group ID | Must be at least 6 characters long. This value is provided by OTIP. Note: This field should be considered mandatory because if left blank, the file will fail when OTIP loads it. |
| Cycle No. | Enter the cycle number. Cycle numbers are used in the header of the file to ensure proper processing order. This will increase at every (successful) file extraction and will reset to 001 after cycle 999. |
| Default Benefit FTE to 1 | Add a checkmark to this check box if the Benefit FTE for all your employees is always 1. |
| Last Exported | The Last Exported field is automatically populated by the report. |
| Production | Add a checkmark to this check box when you have completed testing and you are now submitting production files to OTIP. By checking this box, the file name generated will have a prefix PROD. Otherwise, it will be TEST. |
| Date Implemented | The Date Implemented field must be populated manually with the date of the OTIP Implementation. This is used in the export of initial data. Note: OTIP Export has two pieces of information: Initial Export, and Weekly Change. The Initial Export is done only once (at the time of the implementation), to provide a full list of benefit eligible employees. This date is used to update the Benefit Eligibility Date in the report for which historical information is currently unavailable. |
| OTIP Payroll ID Nos. | Select a code from the drop down list that you have previously defined in the No. Series page. Note: When defining your No. Series the code should be something identifiable such as OTIP ID and the starting no. should begin with 1 with no leading zeros and the ending no. can be up to 9999999999 (max of 20 characters or less). As a best practice we recommend that configuration packages be used to load this ID to the employee level (please review with your Sparkrock consultant). |
| OTIP Max Work Period Factor | Select the Work Period that represents a year. The value in this field is used in calculating the actual salary for the hourly employees and helps differentiate from employees on a 10 month cycle. |
| Union Codes | Select the union codes for the OTIP benefit eligible unions. You can have one or more values in this field. To select more than one code, click on the drop down, hold down the ctrl key and select the multiple codes, then click ok. |
Member Plan Setup
You will need to set up the Member Plan in order to identify the plan for which each member is eligible.
NOTE: Eligibility definitions of each plan are provided by OTIP in their Mapping Guide which is specific for each board.
To setup the Member Plan:
- In the Search field, type Member Plan and select the page from the drop-down list.
The Member Plan page displays.
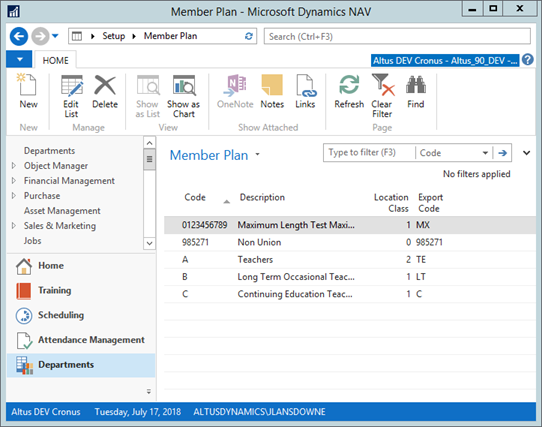
- Use the table below and setup the Member Plan as required:
| Field | Description |
| Member Plan | Enter the member plan code. The maximum length allowed is 10 characters. |
| Description | Enter a description for the member plan code. The maximum length allowed is 50 characters. |
| Location Class | This field shows the number of location classes linked to this member plan. You can drill down on this field. This is a flow field that does not allow editing. |
| Export Code | Complete this field with a 2 character code only. The Export Code is only used in the OTIP Export Report if the Member Plan Code exceeds 2 characters. Note: For example the Member Plan Code field allows a maximum of 10 characters. If you want to create a Member Plan code using the max characters allowed then the Export Code will populate the OTIP Export Report. |
Location Class Setup
Location/Class identifies within the Employer Group/Trust which class the member belongs to. The values are provided by OTIP in their mapping guide.
To set up location class:
- In the Search field, type Location Class and select the page from the drop-down list.
The Location Class page displays.
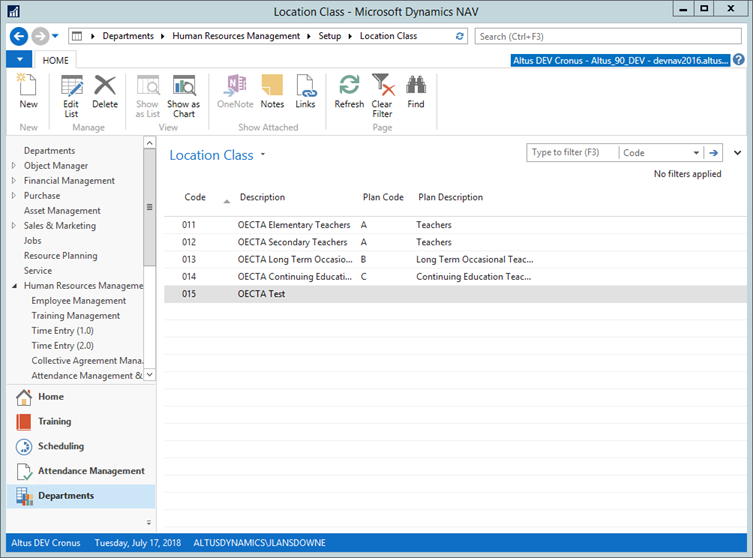
- Use the following table to set up the location class as required:
| Field | Description |
| Code | Enter the Location Class code. The maximum length allowed is 10 characters. |
| Description | Enter a description of the Location Class. The maximum length allowed is 50 characters. |
| Plan Code | Use the drop down to select the Member Plan. |
| Plan Description | Shows the Member Plan Description. You may drill on this field if you would like to see the full list of the Member Plan setup. This is a flow field that does not allow editing. |
Work Status Setup
The Work Status codes in combination with the Benefit FTE will be used to determine the members’ benefits eligibility as well as any applicable cost sharing. The values are provided by OTIP in their mapping guide.
To set up a work status:
- In the Search field, type Work Status and then select the page from the drop-down list.
The Work Status page displays.
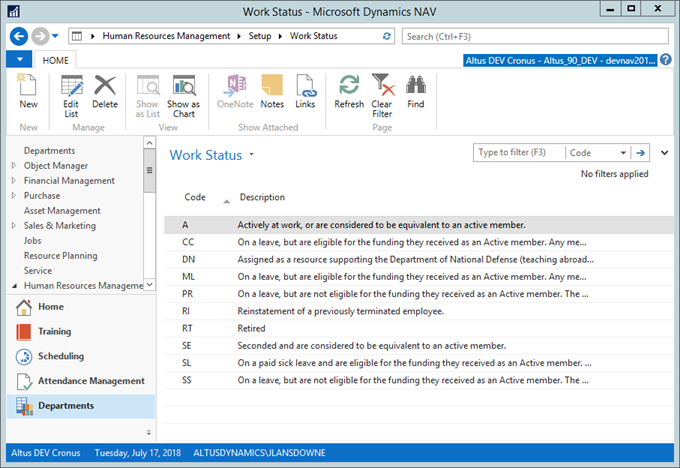
- Use the following table to set up the Work Status as required:
| Field | Description |
| Code | The Work Status Code. The maximum length allowed is 10 characters. |
| Description | Description of the work status. The maximum length allowed is 100 characters. |
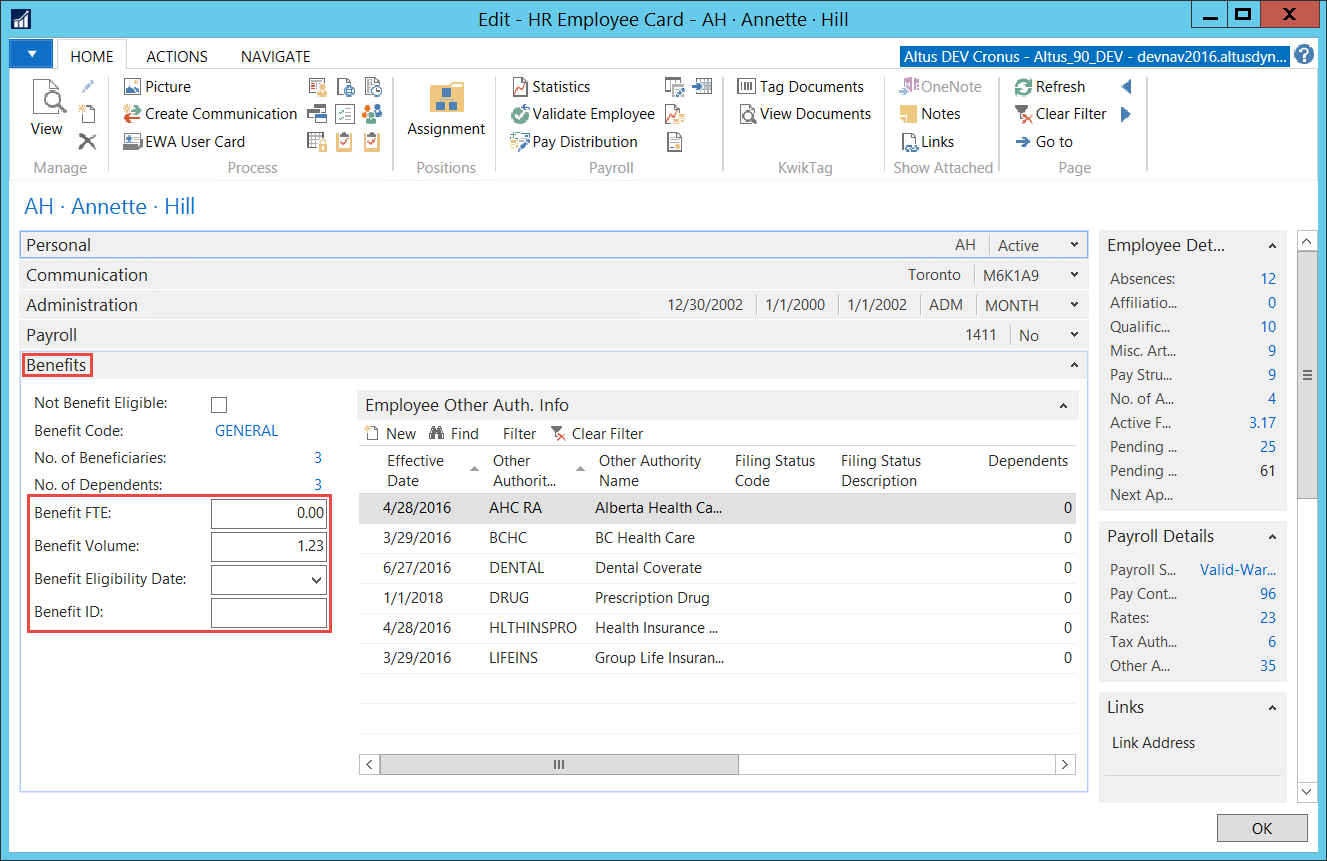
Viewing OTIP ID in the HR Employee Card
The OTIP ID is a unique identifier for every benefit eligible employee. Upon hiring an employee, employee information is sent to OTIP through the weekly change file. Once OTIP runs the info in this file through their system, the employee gets assigned a number. This number is then passed down to the board via the Payroll Import file and will be reported for all future changes for the employee.
To locate the OTIP identification number:
- Navigate to the HR Employee Card and expand the Administration FastTab.
- The OTIP ID No. is located at the bottom of the Termination section.
- The value of this field will be automatically populated by running the Payroll Import file passed down by OTIP.
NOTE: The maximum characters allowed in the OTIP ID No. field is 16.
- Under the Benefits tab, setup the new Benefit FTE, Benefit Volume, and Benefit Eligibility Date fields.
- Benefit ID will be automatically populated from the No. Series configured on the Integration Setup but can be manually edited in this field if required.
- Check Not Benefit Eligible for those employees who have benefit eligible assignments but are not eligible yet for benefits like Long Term Occasional hired for less than 3 months.
 NOTE: When a user enters or updates Employment Date, check for a warning dialog that reads "Please consider updating Benefit Eligibility Date as well."
Effective Dates
The Benefit section of the HR Employee Card has effective date fields that are not visible by default. To view these fields:
- Access the HR Employee card.
- Go to Customize this Page and make the following fields visible in the FastTab:
- Employment Effective Date
- Work Status Effective Date
- Salary Effective Date
- FTE Effective Date
Note: There should not be any reason you have to update any of the above effective date fields. All the effective date fields listed above will be populated once the OTIP Export Create File function is complete. If there was a change that falls within the from and to date specified on the OTIP Export then the date reported to the OTIP Export will be populated into the respective fields. If there is no change to any information relating to the Effective Date fields they will remain blank or remain with the last effective date auto populated.
For example, if there was a Salary Change or a Benefit Volume Change, the Salary Effective Date would be populated. The effective date of the HR Request is used to report the new effective date. The same is true if the FTE or Benefit FTE are changed. In all cases the effective date used in the HR Request will populate accordingly into the respective Effective Date field only when the OTIP Export Change file is run.
The table below explains the Effective Date logic.
| Field | Description |
| Employment Effective Date | This will update if the Location Class or Union Code (HRPLE) changes. |
| Original Hire Date | This will update if the Benefit Eligibility Date (HR Employee Card) changes. |
| Salary Effective Date | This will update if the Benefit Volume (HR Employee Card) or Salary (HRPLE) changes. |
| FTE Effective Date | This will update if the Benefit FTE (HR Employee Card) or FTE (HRPLE) changes. |
| Work Status Effective Date | This will update if the Work Status (HRPLE) changes. |
Configuring HR Positions
You will need to configure location class and decide on benefit eligibility in HR positions to enable OTIP integrations.
To configure these items:
- Scroll to the bottom of the General FastTab in the HR Position card.
- Select an option from the drop down beside the Location Class field.
- Select an option from the drop down beside the Member Plan field. If the Member Plan has been associated with a Location Class the value will be automatically populated with the selection of a Location Class.
- If this position is eligible for benefits, add a check to the Benefit Eligible boolean.
Configuring the Union Client ID
The Client ID is used to report the Provincial Plan Policy Holders. Examples of these are: OECTA, OSSTF. We track the policy holders through our union functionality and the Client ID is the policy holder number as provided by OTIP.
To configure the Union Client ID:
- Navigate to Departments > Human Resources Management.
- Click Setup and then click Unions from the list.
The Unions page displays. - Enter the the Client ID in the Client ID field.
Note: The values for the Client ID are provided by OTIP in their HRIS Spec for ELHT Plan Administration.
Updating HR Position Ledger Entries
You will need to configure Work Status and Location Class on the HR Position Ledger Entries for existing employees. These can be edited directly on the Assignment for the employee.
- From the Employee Card, go to the Employees Assignment and select the position you wish to update.
- From the Ribbon, click on Edit Entry.
- Scroll to the columns for Work Status and Location Class and make the appropriate selection.
NOTE: During implementation of OTIP the Sparkrock Application Consultant will have access to the Update Location Class report that populates the HR PLE Location Class field with the value from HR Position in the 50098 Report Object ID. The report is run from the Object Designer using the Development Client. It is only run for the initial setup.
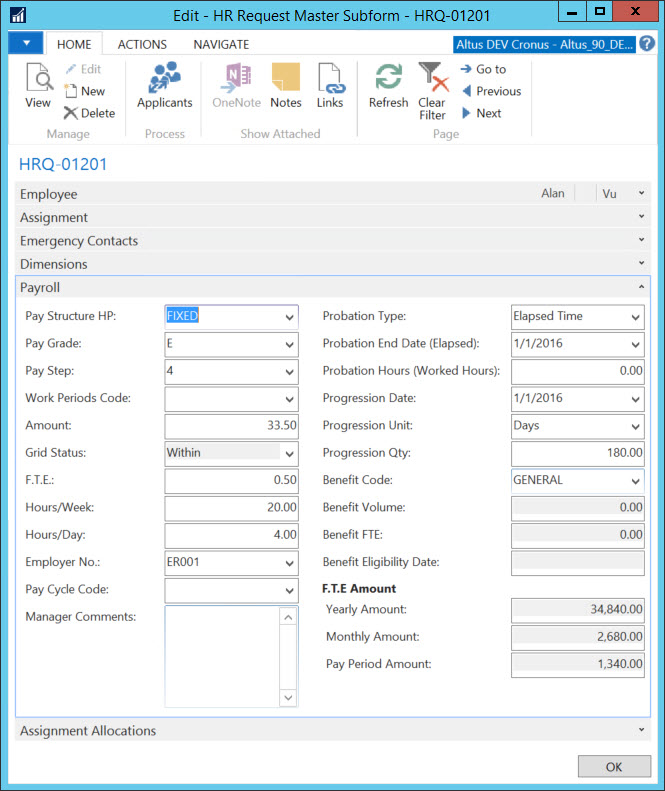
Configuring HR Request Details
Certain fields need to be populated on the HR Request when your organization is using the integration to OTIP.
To configure HR Request Details:
- In the HR Request Master Subform, configure the new Benefit Volume field on the Payroll FastTab for process Type Hire.
Note: The field will only be editable when the HR Reason code is Hire and the Employee No. is blank, otherwise it will default the value from the Employee Card Benefits FastTab. - Configure new Work Status field, lookup to the Work Status table under Assignment FastTab for process Types Hire, Details Change, Assignment Change, Terminate & Rehire.
Pay Structure Setup
You will need to set the Yearly Salary Adjmt Factor, on the Pay Structures page used for salaried employees, to 1.
Please add Field Above for: Benefit Eligibility Date - This will update if the Location Class or Union Code (HRPLE) changes.