

ONE-T is an integration to Cowan Insurance Group, which acts as a benefit administration provider for non-unionized School Board employees. The purpose of the HRIS interface is to provide data required for Cowan’s benefits administration system. You can set up the integration as follows:
ONE-T Setup
You will need to add information to the ONE-T Setup page in order to complete the integration setup.
To complete the integration setup:
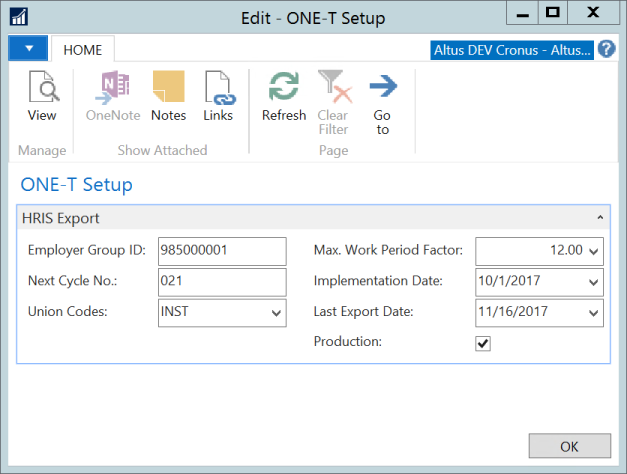
- Open the ONE-T Setup page and expand the HRIS Export FastTab.
- The following table includes the information required for each field on the HRIS Export FastTab:
| Field | Description |
| Employer Group ID | This value is provided by Cowan. Note: This field should be considered mandatory because if left blank, the file will fail when Cowan loads it. |
| Next Cycle No. | Enter the cycle number. Cycle numbers are used in the header of the file to ensure proper processing order. This will increase at every (successful) file extraction and will reset to 001 after cycle 999. |
| Union Codes | Select the union code(s) for the ONE-T benefit eligible unions. You can have one or more values in this field. To select more than one code, click on the drop down, hold down the crtl key and select the multiple codes then click on ok. |
| Max. Work Period Factor | Select the Work Period that represents a year. The value in this field is used in calculating the actual salary for the hourly employees and helps differentiate from employees on a 10 month cycle. |
| Implementation Date | The Implementation Date field must be populated manually with the date of the ONE-T Implementation. This is used in the export of initial data. Note: ONE-T Export has two pieces of information: Initial Export, and Weekly Change. The Initial Export is done only once (at the time of the implementation), to provide a full list of benefit eligible employees. |
| Last Exported | The Last Exported field is automatically populated by the report. |
| Production | Check this box when you have completed testing and you are now submitting production files to Cowan. By checking this box, the file name generated will have a prefix PROD. Otherwise, it will be TEST. |
HRIS Export Master Setup
The HRIS Export Master Setup page provides a set of controls and preferences that are global to all export types:
- In the Search field, type HRIS Export Master Setup and then select the page from the drop-down list.
The HRIS Export Master Setup page displays.
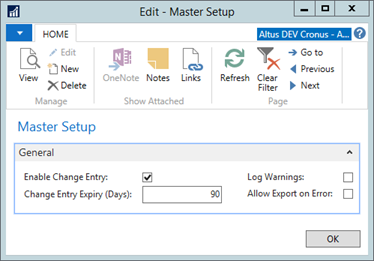
- Complete the following fields:
| Field | Description |
| Enable Change Entry | Add a checkmark to this check box to enable the logging of change entries. This should be enabled if there is at least one active integration. |
| Log Warnings | Add a checkmark to this check box to enable warnings in the Export worksheet. A warning is a secondary exception that shouldn’t strictly prevent the export or transmission of a file but may still need to be acted on (for example, a field value was truncated to fit the file requirements). |
| Change Entry Expiry (Days) | Controls the number of days a change entry is kept before it is removed by the automated maintenance routine. A value of “0” means that change entries have no expiry and are stored indefinitely. If a value higher than “0” is entered and there are current change entries, the maintenance routine will be executed using the value just entered. |
| Allow Export on Error | Add a checkmark to this check box to allow the export to complete with errors. |
HRIS Export Format Strings Setup
Format Strings are unique to HRIS Export and are meant to provide an easy to understand method of defining the formatting of export fields in export files, as specified by the vendor’s export specifications.
Note: Implementing new export strings (if required) is normally be handled by a developer. The list however is freely editable, therefore an implementation consultant or user can define new strings and provide them to a developer as part of a set of specifications.
To configure HRIS export format strings:
- In the Search field, type HRIS Export Format Strings.
The HRIS Export Format Strings dialog displays.
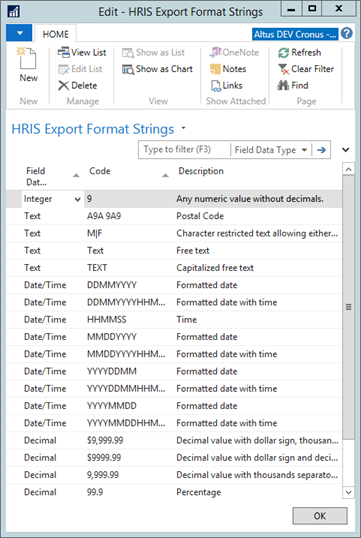
- To add a new export string, from the Ribbon click New.
- Specify the Field Data Type, Code, and Description.
- Click OK.
Format Strings are auto-populated by the system and can be refreshed or repaired. To refresh or repair format strings:
- Navigate to Departments > Administration > Application Setup > HRIS Exports.
- Under the Tasks heading, click Reset Definitions.
HRIS Export Setup
The HRIS Export Setup page shows a list of currently supported export types along with actions to define setup fields, file definitions and change definitions for each type.
Although the list and all peripheral data for each type is auto-generated for existing exports, it can be freely edited in the event an implementation consultant or user wishes to define a new export type and wants to specify setup fields, file definitions and change definitions as part of a set of specifications to be handed to a developer.
To configure the HRIS Export Setup page:
- In the Search field, type HRIS Export Setup and select the page from the drop-down list.
- Each integration that has been set up will be listed on the HRIS Exports page.
- To view or edit a list of setup fields used by the integration, highlight the integration and from the Navigate menu choose Setup Definitions.
- To view or edit a list of file definitions used by the integration, highlight the integration and from the Navigate menu choose File Definitions. This page describes the formatting and sequencing of the export file in complete detail. The file definition record should be a translation of the file specifications provided by the vendor. The purpose of each column is as follows:
| Field | Description |
| Export Code | The code for the export integration. |
| Section Sequencing | A file can have multiple different sections that include different fields. A typical export file consists of a “Header” record, a number of “Transaction” records and a “Trailer” record that may be used to sum transaction related data (record counts, and so on). This field defines the section and the sequence in which it is to appear. (1 = Header, 2 = Transaction, 3 = Trailer). There is no limit to the number of sections. |
| Field Sequence No. | The Field-ID within the section and the order in which the field is to appear. This must start at “1” for each new section. |
| Benefit Link ID |
This field maps the Export field selected to the Employee card's Benefit ID field. Every export format typically includes a field referencing the NAV Employee ID. The Employee No. field is NOT used due to having encountered formatting issues with OTIP. Instead, the Employee card uses a numeric only field named Benefit ID, which is a unique ID per Employee. |
| Field Name | The column name, as per the vendor’s export specifications. |
| Field Data Type | The column data type, as per the vendor’s export specifications. |
| Field ID | The unique identifier for the field, global to the export type across all sections, but should start at “1” for every new Export type. |
| Format String | The formatting string from the Format Strings table. |
| Character Limit | The number of permitted characters for the field. If zero is specified, then the limit is 250 characters, which is a NAV imposed field limit. If any number other than zero is specified, the field data will be truncated if needed. |
| Static Value | The vendor may sometimes require a static value (for example, “HDR” for a section identifier in a header record). If a static value is specified it will always take priority over any developer code. |
| Mandatory | Indicates if the field is mandatory. When and a blank value (or 0 values for data types “Decimal” and “Integer”) will generate an “Error” entry in the exception log. |
Set up Master Data
- Create a new union on the Unions card and name it "Non-Union Education Trust" or a similar unique name. Assign the ONE-T Client ID to the union.
Note: In this update, the OTIP export has been changed to exclude non-union employee data. See the OTIP changes section below. - Add the new ONE-T Work Statuses as provided by Cowan to the Work Status list. As per Cowan, the codes that are different are related to Re-instatement and Termination.
Note: You can find the full list in Cowan's specification, in Appendix 9.1.
Update Non-Union HR Positions
For all non-union benefit eligible positions under ONE-T, make these changes under the General FastTab:
- Select the newly-created Union entry ("Non-Union Education Trust" if you used the suggested value) as the Default Union Code for your non-union HR Positions.
- Select the Benefit Eligible check box.
For all non-union benefit eligible positions and all OTIP benefit eligible positions:
- Select a Member Plan from the drop-down list.
Update your Non-Union Employees
In the Benefits FastTab of the HR Employee Card:
- Add the Benefit FTE and Benefit Volume amount (the benefit salary amount).
- Add the Benefit ID if not already in place from the OTIP integration. It is usually the Employee No. without letters or additional symbols.
- Add the Benefit Eligibility Date if not already in place.
- Select the Not Benefit Eligible check box for employees that help benefit eligible positions but are not eligible for benefits.
Start Using the Data
Once you have gone through the setup steps, you can start using this master data in your daily activities.
New HR Requests
- Start using the Non-Union Education Trust union code on new transactions.
- Start using with Work Status for non-union employees.
- Start using with Work Period Code for non-union employees.
Update Existing Records
You can also use your new master data setup to update existing historical records. Update the non-union current employee assignments (HR Position Ledger Entry) with the following:
- Add/update the Union Code (with "Non-Union Education Trust" if you used the suggested value) if not already in place on the applicable assignments.
- Add/update the Work Status on the applicable assignments.
- Add/update the Work Period Code if not already in place for the applicable assignments.
- Add/update the Member Plan for the ONE-T applicable assignments.
Note: You can use the HRIS Export Initial Setup utility to do this assignment for you. To launch the utility, navigate to Departments > Administration > Application > HRIS Exports and under Tasks choose HRIS Export Initial Setup.
Date Fields used by the Initial HRIS Export
You can use the following date field values in the initial export.
| Export field | Comments |
| Date of Hire | The Benefit Eligibility Date from the employee card once you have updated this information. |
| Change Effective Date | This can be the date of the production file. |
| Salary Effective Date | The Benefit Eligibility Date from the employee card once you have updated this information. |
| FTE Effective Date | This can be the date of the production file. |
| Work Status Effective Date | This can be the date of the production file. |
| Estimated Return Date | The Leave Expected Return Date from the employees benefit eligible assignment on leave. |
Other Fields used by the Initial HRIS Export
This table provides guidance to complete certain fields in the export.
| Export field | Comments |
| Client ID | The value for this field is 985. |
| Payroll ID | Please use the Benefit ID used for OTIP from the employee. The maximum field size is 11 characters. |
| Employer Group ID | A unique ID for your board, provided by Cowan. |
| Class | Leave this blank. |
| Plan | As per the list provided by Cowan. |
| Work Status | The work status of the active benefit eligible assignment for the employee. |
| Leave Salary | The actual salary of the employee that is on leave for ONE-T eligible employee assignments only. |
| Annual Salary | This is the Benefit Volume field from the employee card. |
| Actual FTE | The sum of all FTEs on all active positions for the employee for ONE-T eligible employee assignments only. |
| Benefit FTE | This is the Benefit FTE field from the employee card. |
| Leave FTE | As most of you have the FTE for the employee on leave to be 0, we recommend that you use the Benefit FTE to report this value for ONE-T eligible employee assignments only. |
Changes to OTIP Setup
The following changes need to be implemented for OTIP to allow tracking different benefit provider eligibility per employee assignment:
- The setup of all OTIP integrations has been moved from Integration Setup to OTIP Setup. Please move your data to the new setup page.
- A new filter Union Codes has been introduced to the setup. Please add the OTIP benefit eligible unions to this filter, for example: ETFO|OECTA|OSSTF. This filter ensures that the OTIP HRIS Export only includes OTIP benefit eligible employees, and does not include other benefit eligible employees e.g. those covered by ONE-T.
- Update the OTIP applicable Member Plan on the HR Position based on the Location Class.
License
You need to have your license updated to have the new integration setup for ONE-T and OTIP available.