

Below are details for how to set up and use the Employee Association Management and Ontario College of Teachers integration. Any items that apply only to the Ontario College of Teachers (OCT) association are indicated with OCT.
Setup Steps
To set up an association, complete the following steps:
- In the Search box, type Associations and select the page from the list.
The Associations page displays. - From the Ribbon, click New to add a new line and enter the details of the new association.
- Add a check mark to the Use Professional Association No. checkbox to connect the association with the Prof. Association No. field from the HR Employee.
NOTE: If this Association is for OCT, this field must be checked for the integration to function properly.
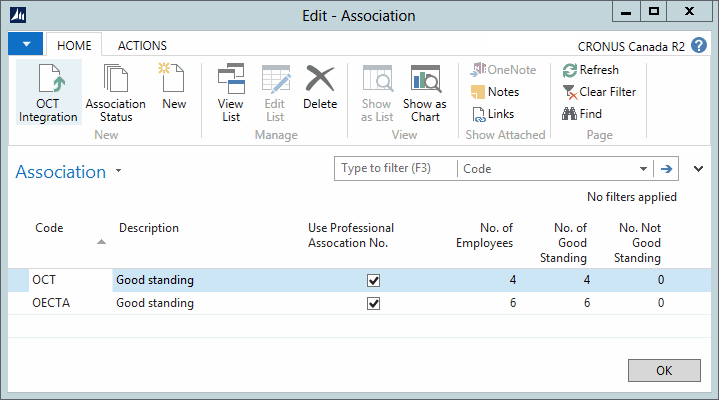
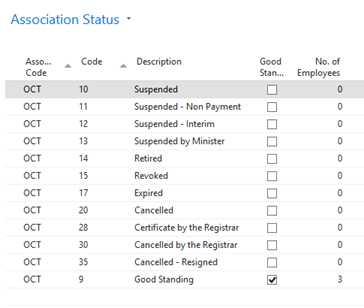
- Setup the association’s status by clicking Association Status.
The Association Status page displays. - Complete the fields and indicate which association is in good standing by checking the Good Standing Status field. The list below was obtained from the OCT website:
Configuring the Integration Setup
- In the Search field, type Integration Setup and select the page from the list.
The Integration Setup page displays.
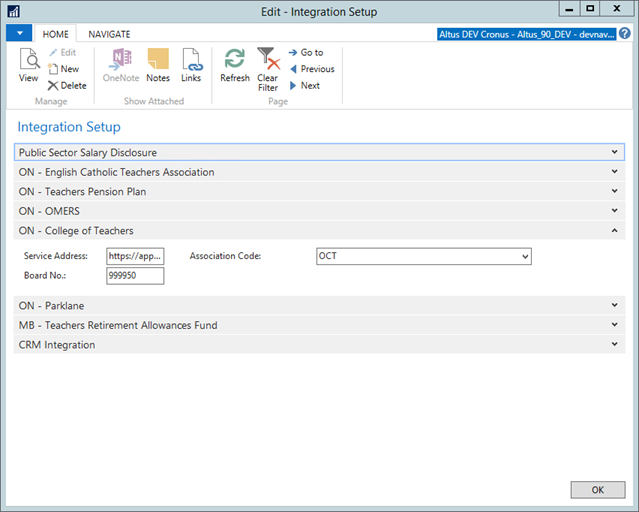
- Expand the ON – College of Teachers FastTab and complete the following fields:
- Service Address - use this URL to connect via web services to OCT:
-
Board No. - enter the number that OCT uses to refer to your Board.
-
Association Code - select the code that was set up for OCT in the Association list.
Customizing the Role Center
Users can add a stack in the HR Manager role center to display the number of employees who are not in good standing at their employee association. To customize the role center to show such a stack, follow the steps below:
- Open the HR Manager Role Center.
- Click the blue button
 at the top-left of the page. A drop down list of options displays.
 - In the drop down list, click Customize > Customize This Page.
The Customize the Role Center dialog displays.
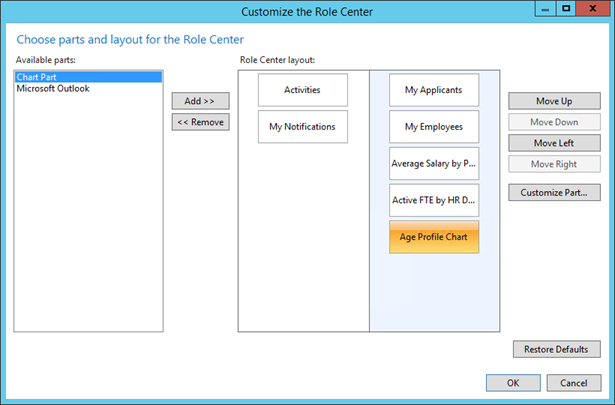
- In the Customize the Role Center dialog, click Activities > Customize Part.
The Customize Activities dialog displays.
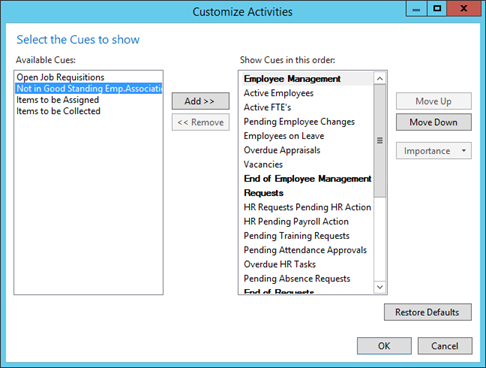
- Choose Not in Good Standing Emp. Associations from the left column, then click Add.
- Click OK.
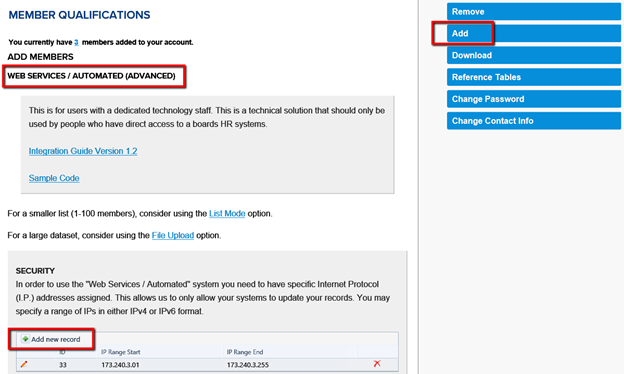
Registering Your IP Address with the Ontario College of Teachers
For the web service to function, it is required that your public IP address is registered with OCT for security purposes:
- Determine what your public IP address is. To do this, type "what is my ip address” in your search engine from any browser.
- Log into the OCT employer website.
- Click Add, Web Services / Automated (Advanced) and Add New Record to register your public IP address.
Using Employee Associations Functionality
Reviewing Employee Association Status
From the Associations page you can drill down to see a list of all employees in good standing or not in good standing. To review employee association status:
- In the Search field, type Associations and select the page from the list.
The Associations page displays.
- Both the No. of Good Standing and No. Not Good Standing fields show the number of standing’s status. Click the number in the line to drill down the values of individual employee’s status.
The Employee Association page displays those employees that are either in good standing or not in good standing.
Manually Adding Association Detail to an Employee
- In the Search field, type Employee Associations and select the page from the list.
The Employee Associations page displays.
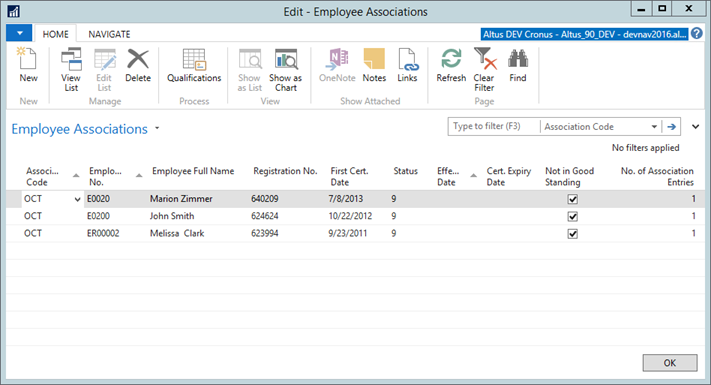
- From the Ribbon, click New to open a new blank line to the list.
- Choose an Association Code and Employee No., enter the Registration No. of the association and other information for the employee.
- Click OK.
NOTE: If the integration to the Professional Association No. has been turned on, and the Prof. Association No. has already been filled out in the HR Employee, the field Registration No. in Employee Associations will be filled out automatically.
Running the OCT Integration
The OCT integration is a set of web services that can either be run manually or can be scheduled to run on a periodic basis. These web services perform the following functions:
- Untag All Employees
- Tag All Employees
- Get List Qualifications
- Get Employee Qualifications
- In the Search field, type Associations and select the object from the list.
- In the Home ribbon, click the OCT Integration button. The OCT integration dialog displays.
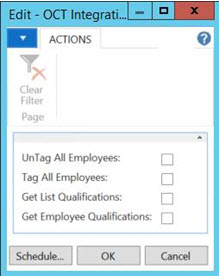
The table below provides detail on each of the fields in the OCT Integration dialog.
| Field | Details |
|
UnTag All Employees |
Un-tag all employees in the OCT Database (in order to update OCT with only current employees at the board). This method will remove all employees associated with the board in order to ensure that only active employees are tagged. |
|
Tag All Employees |
Tag all Current employees in the OCT Database. This method will re-associate all current employees with the board in OCT. Update the statuses on the Employee Association record from data within OCT. This method will update the status in NAV with the current status the employee has with OCT (Good Standing, Not in Good standing, and so on) |
|
Get List Qualifications |
Import all Qualification code master form OCT. This method will import all qualifications codes in the OCT system as Qualification codes in Dynamics NAV. |
|
Get Employee Qualifications |
Update employee records with the qualification data stored in OCT. This method will download and update an Employee’s record with all of the qualifications that are available in OCT for this employee. |
NOTE: Generally speaking, since the web service integration does not take long to run, it's best to run it with all 4 options selected every time (say once per month).
Manually Triggering the OCT Integration Function
To manually trigger the OCT Integration function, open the Associations list and from the Ribbon click OCT Integration in the Home ribbon.
Scheduling the OCT Integration Function
To schedule the integration, the Job Schedule must be set up on the NAS to run Codeunit 23032203 - OCT Integration on the desired schedule.
NOTE: NAS Server needs to be installed and functional for Job Queue Entries to work.
- In the Search field, enter Job Queue Entries, and then select the page from the drop-down list.
The Job Queue Entries page displays. - From the Ribbon, click New.
The Job Queue Entry card displays.
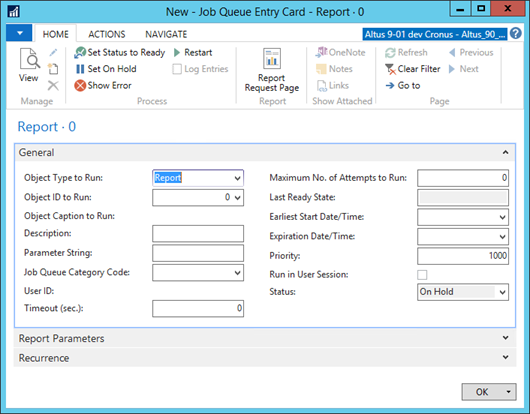
- Expand the General FastTab and complete the following fields:
- In the Object Type to Run field, choose Report from the drop down list.
- In the Object ID to Run field, enter 23032224. The Description field will automatically be populated.
- In the Priority field, enter a value.
- Expand the Recurrence FastTab and choose the days of the week and Starting/Ending Time for running the report.
- From the Ribbon, click Set Status to Ready to activate the Job Queue.
- Click OK.