

The Attendance Management & Integration tool enables you to track employee absences. This Human Resources functionality provides you with updated information on employee absences and allows you to see the information in various ways throughout the program and analyze employee absences. You can, for example, compare your company's rate of absenteeism to national or industry-related averages for absenteeism.
A sudden increase in an employee's absences may reflect personal problems on the employee's part. With this feature, you can take notice of these problems at an early stage.
If you have an integrated absence tracking application such as AESOP, separate documentation exists for recording and tracking employee absences. For details, see the ‘Attendance Management Integration Setup Guide’.
Registering an Employee's Absence Manually
For organizations without an integrated absence tracking application, absences can be manually recorded
To register employee absences:
- From the Human Resources Management menu, select Attendance Management & Integration > Tasks > Absence Registration.
The Absence Registration page displays.
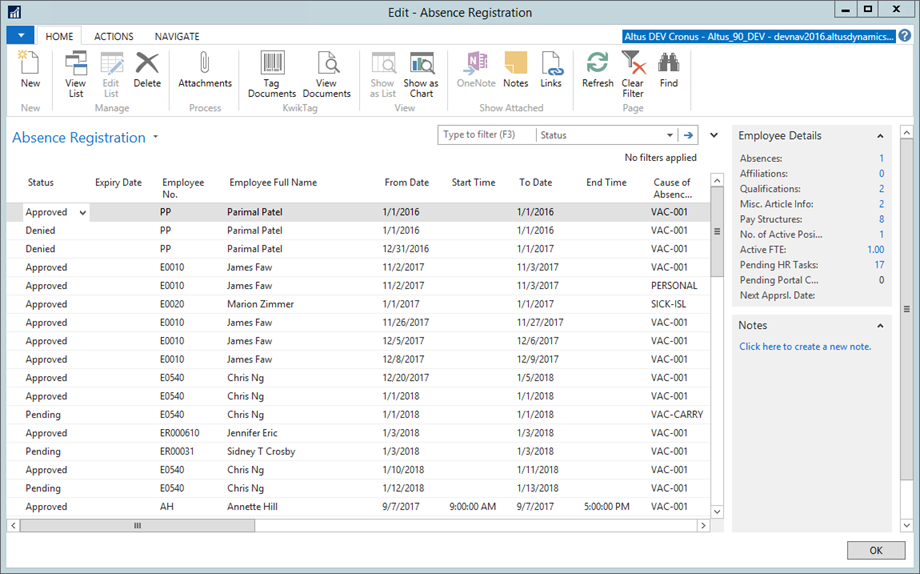
- On the Home Ribbon, click New.
- A new record is inserted with the Status field automatically populated as ‘Pending’.
- Use the following table for assistance in registering the employee absence:
| Tab Name | Description |
| Status | Pending, Approved, or Denied. Used by Employee Center to determine if the manager has approved the attendance request. If registering the absence manually, select the appropriate status. |
| Expiry Date | The expiry date calculation/formula is pulled from the From Date and is based on the Expiry Date formula from the Cause of Absence. NOTE: this formula should be preceded by either + or – sign. |
| Employee No. | Displays the number of the employee with the absence. This field is automatically populated if an employee enters an attendance request over Employee Center. |
| Employer No. | Employer number linked to the employee for the entry. |
| From Date | Start date of the absence. |
| To Date | End date of the absence, if known. |
| Cause of Absence | Displays the code for the absence. From the Cause of Absence Code drop-down, select the appropriate code. |
| Description | Displays the cause of absence description by default, but can be overwritten. The employee can optionally add a description if entered over the portal. |
| Quantity | Enter the quantity for the entry. The portal only supports entry of a quantity in the base unit of measure of the Cause of Absence code. However, if the unit of measure translations is set up, the NAV user can enter any unit of measure and it is automatically translated to the base unit of measure. For manual registrations, enter the total number for the absence based on the unit of measure. (For example, for one day, the unit of measure would be HOUR and the quantity would be 8.) |
| Unit of Measure | The unit of measure the quantity represents (applicable to this absence selected). |
| Safety Incident | If the absence occurred because of a health and safety incident, in the Safety Incident No. field, enter the incident number. |
| Payroll Control Code | If this entry will impact any payroll calculations, from the Payroll Control Code drop-down, select the applicable Payroll Control Code option. For example, if vacation time is accrued to the G/L and it needs to be recognized as it is taken, attach the payroll control code set up to post the G/L recognition of the absence. If there is a value in this field, then the Payroll Journal Pre-Load process retrieves the entry for processing and brings in the line to the payroll journal. If this field is blank, the entry is not used in payroll. For example, if you do not want to have a G/L impact to bereavement days or types of entries that need to be tracked only in the attendance sub-ledger and not posted to General Ledger. |
| Payroll Processed | Select this check box to indicate that this absence was processed through regular payroll processing. |
| Requested Date | This field is updated by the portal when the employee enters the attendance request. If entering manually, select the date upon which the request was made or the absence was taken. |
| To be Approved By | This field is updated by the portal based on the approval selections on the attendance request. If registering the request manually, select the appropriate approver for this employee. |
| Decision Date | This field is updated by the portal when the manager approves the attendance request. If registering the request manually and it has been approved, select the applicable date. |
| Decision Comment | This field is updated by the portal when the manager approves the attendance request. It is required information when the entry is denied. |
| Comment | Indicates whether comments are attached to this employee’s record concerning this absence. If the field displays ‘Yes’, click the Yes hyperlink to open the Comment List. |
| Closed | A check box indicates the absence request/registration is closed. Used for the Close Absence Entries processing report. When the Close Absence Entries report is run, the report matches negative entries against positive entries for the same Cause of Absence Code, Employer No., Employee No., and Status = Approved. It marks the entries as Closed so long as the amounts balance to zero. This matching occurs by date so that any entries after the cut-over date are not matched. |
| Closed As Of | Displays the date upon which the absence entry was closed. Used for the Close Absence Entries processing report. When the Close Absence Entries report is run, if employee absence entries are matched, the Closed as of is updated with the value from the As of Date and Closed becomes selected. |
| Accrued | Indicates the number of accrued hours used for the absence duration. A request to use vacation days displays as a negative quantity (i.e. to be used or used) in both NAV and over the Portal; a request to add to accrued vacation days will display as a positive quantity in both NAV and over the Portal. |
| Used | Indicates the number of regular hours used for the absence duration. |
| Pending | Indicates the total number of entries within the Pending status. |
- When finished registering the absence, click OK
Working with Absence Data
The Attendance Management & Integration tool enables you to analyze and create reports based on the absence data you capture.
Viewing the Employees on Leave Report
You can quickly determine the number of employees currently on leave, as well as review the ‘Leave’ details for each employee on leave, using the Employees on Leave report. Once the results display, you can further customize the results to filter for more specific information.
To view an Employees on Leave report:
- From the Human Resources Management menu, select Attendance Management & Integration > Reports and Analysis > Employees on Leave.
The Edit – Employees On Leave page displays.
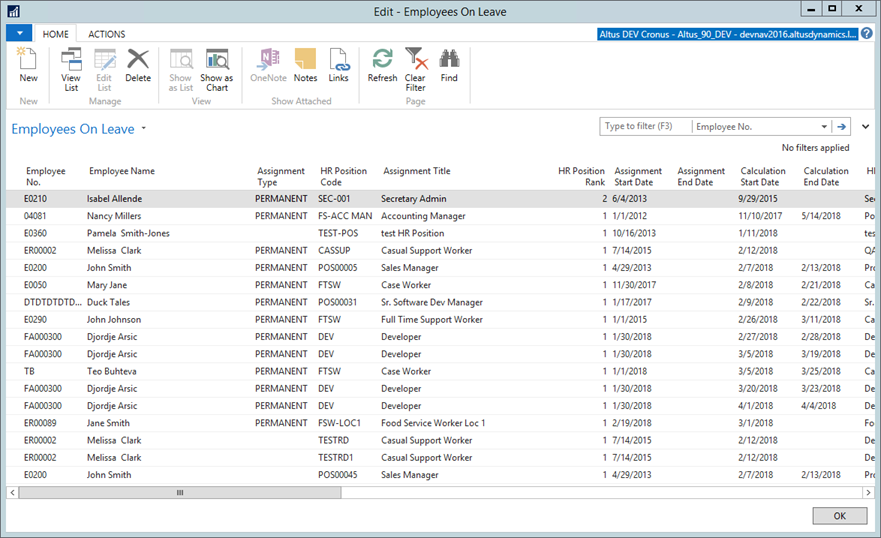
- To add a new row to the report, from the Home Ribbon click New.
- Complete the fields as required.
- Click OK when finished.
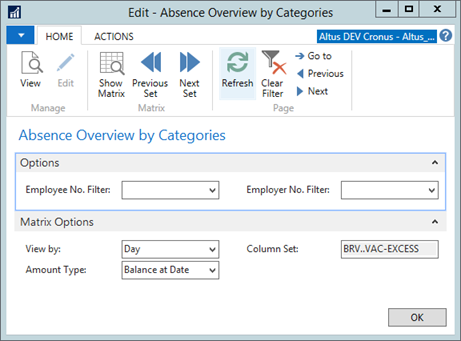
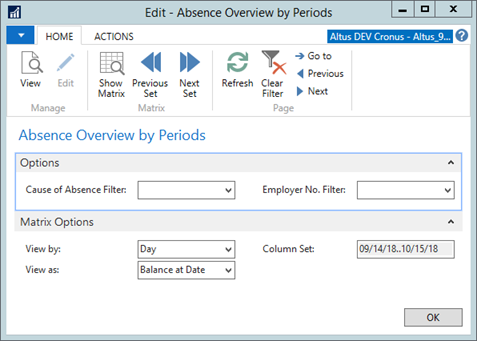
Analyzing Employee Absences by Category and Period
You can filter the employee absences by category and date (time period).
To review statistics for employee absences:
- From the Attendance Management & integration menu (under Reports and Analysis), select:
- Absence Overview by Categories - enables you to see the number of absences by an employee, broken down by absence type – vacation, sick, statutory holiday, floater, and so on.
- Absence Overview by Periods - enables you to see the number of absences by employee and type of absence over specific time periods. This option helps you identify specific time frames in which employee absences peak and decline.
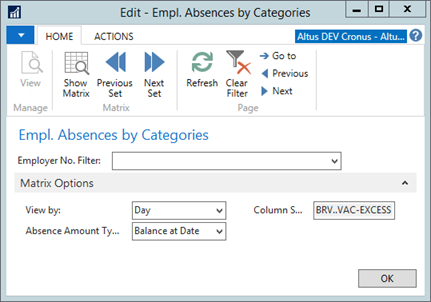
- Empl. Absences by Categories - enables you to see the absences broken down by absence type, but not individually by the employee.
- Absence Overview by Categories - enables you to see the number of absences by an employee, broken down by absence type – vacation, sick, statutory holiday, floater, and so on.
- Using the filter fields, select from the available options to customize the results you want.
- On the Home Ribbon, click Show Matrix.
The View – Abs. Overview by Category or Period (depending on what you originally selected) page opens displaying the results based on the filters/options you selected.
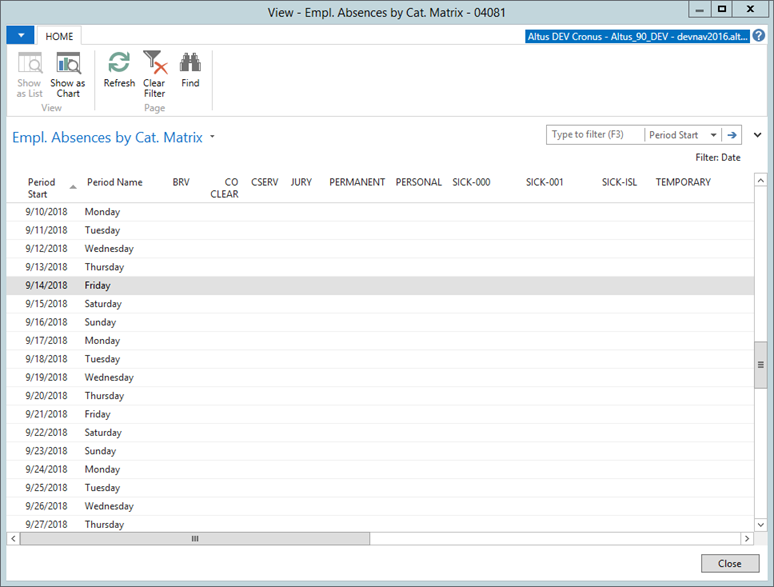
- You can export the report data to Word or Excel to analyze the absence information further. From the Actions menu, select Send To > Microsoft Word or Microsoft Excel.
- Click Close, then OK to return to the Absence Registration page.
Generating an Attendance Analysis Report
The Attendance Analysis report enables you to filter any and all attendance/absence-related data from a specific date.
To generate an attendance analysis report:
- From the Attendance Management & integration menu, select Reports and Analysis > Attendance Analysis Report.
The Attendance Analysis Report page displays.
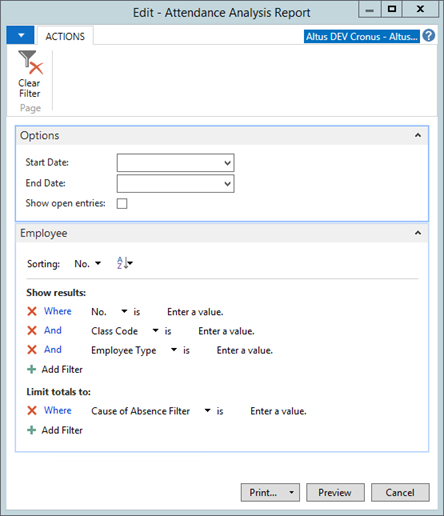
- In the Options section, from the As Of Date drop-down, select to the date you want to include in the report.
- To include open entries, add a checkmark to the Show open entries check box.
- In the Employee section, use the filter fields to customize the report data.
- Click Preview to see the data the report will include.
- Click Print or Print > PDF to create an electronic version of the report.