

Collective Agreement documenting and Grievance recording and tracking are an important part of Human Resources management for any organization that has a unionized workforce. Creating, managing, and resolving grievances is a responsibility made easy using the Collective Agreement Management granule.
Before you can begin recording and tracking employee grievances, some set up steps need to be completed. Also, as collective agreements are ratified, you may need to add or update articles over time.
Setting up Collective Agreement Management Recording and Tracking
To set up collective agreement parameters:
- From the Human Resources Management menu, select Setup > Administration > Altus HR Setup.
The Altus HR Setup page displays.
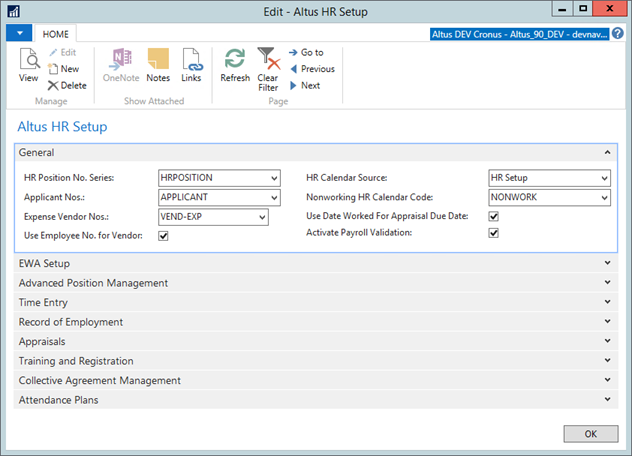
- Expand the Collective Agreement Management FastTab.
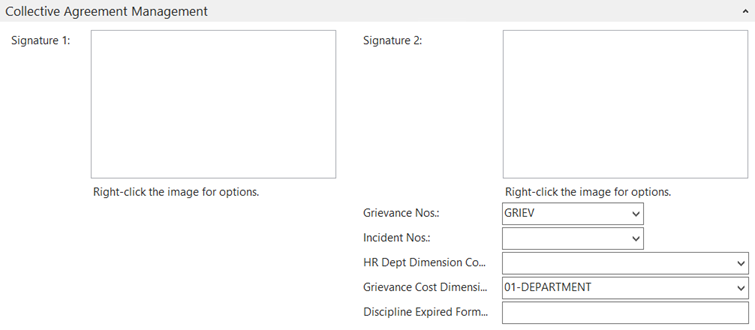
- In the Signature 1 section, right-click and choose Select Picture to import a signature file for grievances.
- Add another signature file by repeating the above step in the Signature 2 section.
- In the HR Dept Dimension Code field, select the dimension code that represents the departments.
- From the Grievance Cost Dimension Code drop-down select the appropriate code, if grievance costs will be collected automatically.
- In the Discipline Expired Formula field, enter the formula for discipline expiry. For example, you can enter one year, etc. depending on your company policy.
- From the Grievance Nos. drop-down, select the numbering series to use for grievances.
- If a numbering series is not already set up define a numbering series for grievances:
- From the Grievance Nos. drop-down, select New.
- In the Select – No. Series page, enter a code/numbering system for recording grievances.
- Click OK.
- Select the newly added ‘grievance’ number series code.
- Click OK.
Creating Grievance Resolution Methods
When a grievance is filed, it is tracked from the submission of the complaint to the successful resolution. When a resolution is finally reached, the details of the resolution need to be recorded in accordance with the collective agreement and to use as reference for future situations.
Depending on the situation, the resolution may be achieved through internal or external methods; therefore you need to set up the possible resolution methods for both scenarios.
Providing Internal Grievance Resolution Methods
When a grievance is settled internally, the resolution method needs to be recorded to track grievances appropriately and the effective resolution for future reference in the event a similar grievance is filed. (Ideally, internal resolution is preferred, so it is important to track the success rate and resolution method of internal resolutions.)
To set up internal grievance resolution methods:
- From the Human Resources Management menu, select Collective Agreement Management.
- Under Administration, select Griev. Int. Resolution Methods.
The Griev. Int. Resolution Methods page displays.
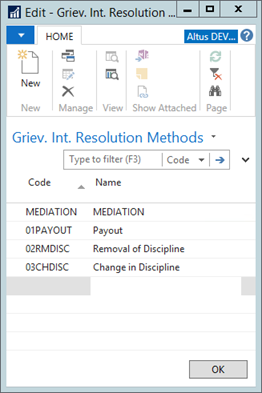
- On the Home Ribbon, click New.
- In the Code column, enter the alpha code or number applicable to the naming/numbering convention used in your organization.
- In the Name field, enter the corresponding resolution method for the code you added. For example, made payment agreement to pay for overtime not paid originally, and so on.
- Repeat steps 3- 5 to add all the applicable internal resolution methods.
- When you finish, click OK to close the page.
The grievance resolution methods you provided are used to apply against the grievances filed by employees and are recorded on the Grievance card.
Providing External Grievance Resolution Methods
When a grievance is settled externally, the resolution steps need to be recorded to track the external body’s process to ensure grievances are appropriately and effectively resolved.
To set up external grievance resolution methods:
- From the Human Resources Management menu, select Collective Agreement Management.
- Under Setup, select Griev. Ext. Resolution Methods.
The Griev. Ext. Resolution Methods page opens.

- On the Home Ribbon, click New.
- In the Code column, enter the alpha code or number applicable to the naming/numbering convention used in your organization.
- In the Name field, enter the corresponding resolution method to the code you added. For example, ‘financial settlement paid’, and so on.
- Repeat steps 3- 5 to add all the applicable external resolution methods.
- When you finish, click OK to close the page.
The grievance resolutions methods you provided are used to apply against the grievances filed by employees and are recorded on the Grievance card.
Setting up the Harassment Complaint and Resolution Details
When an employee files a harassment complaint, you need to provide the details for the complaint as well as the resolution to track and record the instances. This information is useful for managing future complaints as well as determining effective processes for reducing harassment complaints overall along with, resolving complaints quickly and effectively.
Before you can create a harassment complaint record and provide the resolution details, you need to set up the harassment types and resolution methods that will be applied against any complaints that are filed.
Adding Harassment Complaint Types
To add harassment complaint types:
- From the Human Resources Management menu, select Collective Agreement Management > Administration > Harassment Complaint Types.
The Harassment Complaint Types page displays.
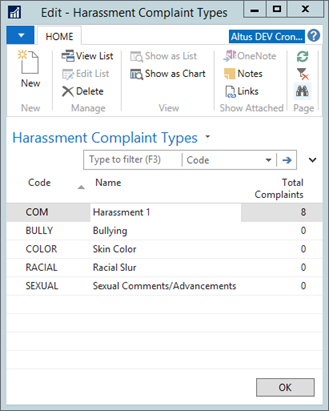
- On the Home Ribbon, click New.
- In the Code column, enter the code for the offense/complaint you use within your organization.
- In the Name field, enter the details for the harassment type matching the code you added. For example, ‘racial slur, skin color, sexual orientation, and so on.
- Repeat steps 2 - 4 to add all the applicable forms of harassment.
- When you finish, click OK to close the page.
The harassment complaint types you add will be used to apply against harassment complaints filed by employees.
Providing Harassment Resolution Methods
To provide the harassment resolution methods:
- From the Human Resources Management menu, select Collective Agreement Management > Administration > Harassment Complaint Types.
The Harassment Resolution Methods page displays.

- On the Home Ribbon, click New.
- In the Code column, enter the code the code for the disciplinary action/resolution you use within your organization.
- In the Name field, enter the corresponding resolution method to the code you added. For example, ‘offending individual suspended and registered for sensitivity training’, etc.
- Repeat steps 2 - 4 to add all the applicable harassment resolution methods.
- When you finish, click OK to close the page.
The harassment resolution methods you add will be used to apply against the harassment cases filed by employees.
Entering Collective Agreement Details
The Collective Agreement card is used to store and maintain collective agreement details. This is where you add the details for the collective agreement(s) active within your organization. As well, in this card, you need to provide the union information and attach the associated individuals that make up the union and Management team involved in negotiating and finalizing the agreement. When a grievance is filed, the collective agreement card enables you to retrieve the required information and details for the union and from the collective agreement to which the individual filing the grievance belongs.
To add the collective agreements active within your organization:
- From the Human Resources Management menu, select Collective Agreement Management > Lists > Collective Agreements.
The Collective Agreements List displays.
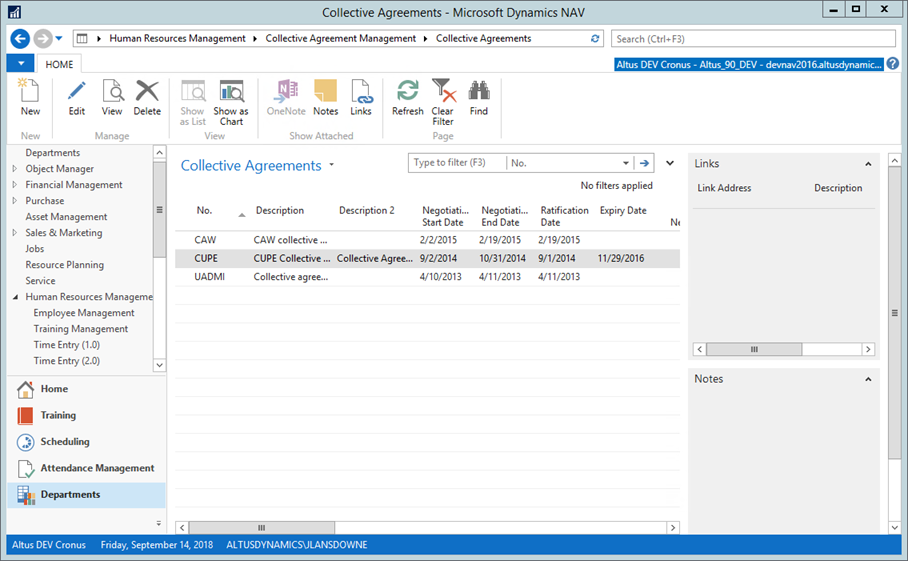
- On the Home Ribbon, click New.
A New - Collective Agreement Card opens.
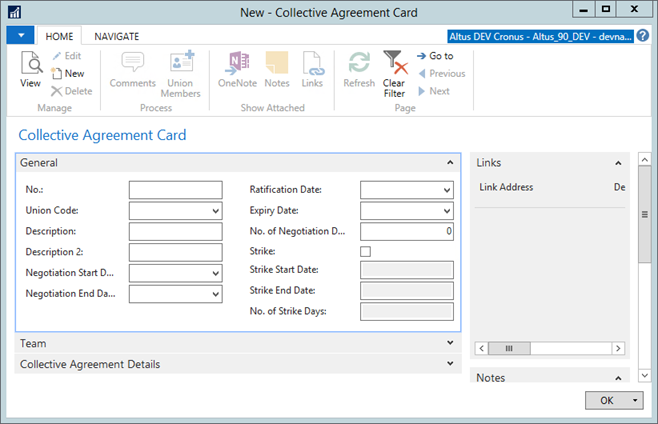
- Use the following table to complete the required information for the Collective Agreement details you are adding:
| Field | Description |
| General FastTab | |
| No. | This field displays a number that references a particular collective agreement. It is recommended that you enter the union acronym and a numeric date range that applies to the overall term of the agreement. |
| Union Code | |
| Description | Displays the details for this specific collective agreement. Enter the complete name and description for the agreement. |
| Description 2 | Displays additional details relative to the agreement. Enter any additional pertinent information concerning the description of the agreement in this additional field, if required. |
| Negotiation Start Date | The date upon which the negotiation process for the collective agreement begins. Enter the date in this field. |
| Negotiation End Date | The date upon which the collective agreement negotiations were completed. Enter the date in this field. This date may also be referred to as the settlement date |
| Ratification Date | The date upon which the terms of the collective agreement were ratified by the bargaining unit through the ratification process. Enter the date in this field. |
| Expiry date | The date when the collective agreement expires. |
| No. of Negotiation Days | The number of days it took to reach the ratification. This field is automatically calculated/populated based on the Negotiation Start and End Date fields. |
| Strike | Indicates a strike resulted. If a strike resulted, click to add a check mark. |
| Strike Start Date | The date upon which the strike began. Enter the date in this field. |
| Strike End Date | The date upon which the strike ended. Enter the date in this field. |
| No. of Strike Days | The number of days the strike lasted. This field is automatically calculated/populated based on the Strike Start and End Date fields. |
| Team FastTab | |
| The Team FastTab stores the names of all the individuals (both internal and external) that were active union members and outside resources who liaised together during the negotiations process to carve out an agreement. | |
| National Representative | Displays the name of the union national representative. Enter the name of this individual in the field provided. |
| Union President | Displays the name of the union president. |
| Union VP | Displays the name of the union vice president. |
| Union Treasurer | Displays the name of the union treasurer. |
| Senior Director of Service | Displays the name of the senior director of service. NOTE: Not every organization has this role in the negotiation process. If you have other roles that apply to your situation, contact your Sparkrock Application consultant to have these changed. |
| Executive Director | Displays the name of the executive director. |
| Front Line Supervisor | Displays the name of the front line supervisor. |
| HR Manager | Displays the name of the HR manager. |
| HR Assistant | Displays the name of the HR assistant. |
| CFO | Displays the name of the chief financial officer. |
| External Legal Council | Displays the name of the external legal council representative. Enter the name of this individual in the field provided. |
| Collective Agreement Details FastTab | |
| See the next section, ‘Inserting the Collective Agreement Details’ for more information. | |
Inserting the Collective Agreement Details
The Collective Agreement Details FastTab is where you define all the collective agreement ‘categories’ (basically the table of contents for the agreements) that apply to the various collective agreements your organization has entered into with your employees.
The information stored as Articles and Sub-Sections of the collective agreement is used to record and track grievances against any of the Articles and/or Sub Sections of the actual collective agreement.
To add details to a specific collective agreement:
- On the New Collective Agreement page, expand the Collective Agreement Details FastTab.
- In the Article No. column, enter the corresponding article number.
- In the Sub-section No. column, enter the corresponding article number.
- In the Description field, enter the corresponding heading or section title for the article. For example, Terms and Conditions, Definitions, Hours of Work, Compensation, and so on.
- Repeat steps 2- 4 to add all the applicable collective agreement sections.
- When you finish, click OK to close the page.
The collective agreement articles can then be used to apply against grievances filed by employees.
Viewing and Adding Union Members
You can see what employees are attached to a specific union from the Collective Agreement Card. You can also add the employees that should belong to the union from here.
To view or add union members:
- Open the New Collective Agreement page.
- On the Home Ribbon, click Union Members.
The Edit – Employee Unions page opens displaying the list of employees that are members of the selected collective agreement.
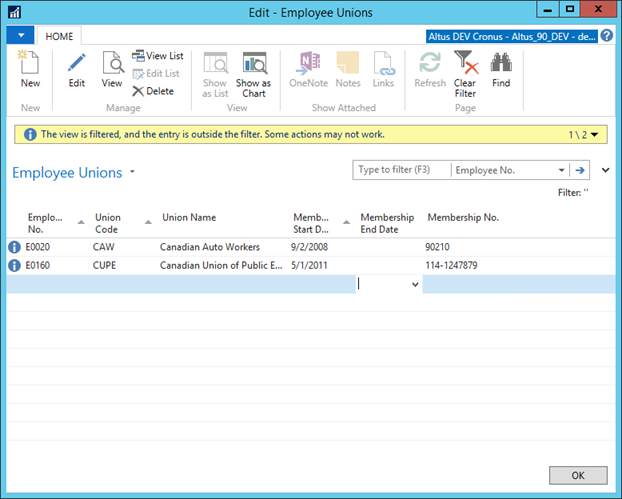
- On the Home Ribbon, click New.
A New – Employee Union Card opens.

- From the Employee No. drop-down, select the employee. Select Advanced to perform a search.
- The Union Code and Union Name fields are populated based on the union selected in the Collective Agreement Card.
- In the Membership No. field, enter the employee’s union membership number.
- From the Membership Start Date drop-down, select the date upon which the membership became/becomes effective.
- If the membership has a known end date, from the Membership End Date drop-down, select the date. (This field can be used at a later time to record the date upon which an employee ends membership. For example, is promoted to management, career change to require a move to a different collective agreement, and so on.)
- Click OK.
Recording Grievances
The Grievance Card is used to record any grievances and their associated details including the relationship to the collective agreement article(s) and sub section(s) cited as being a subject of the grievance.
In addition to creating the grievance ‘master’ record, the user can also track the resolution process and also show costs associated with the grievance. This only works if the AP transactions are coded appropriately with the Grievance Dimension Value that matches the Grievance No. assigned when the Grievance Master is first created.
To create a grievance record:
- From the Human Resources Management menu, select Collective Agreement Management > Lists > Grievances.
The Grievances page displays.
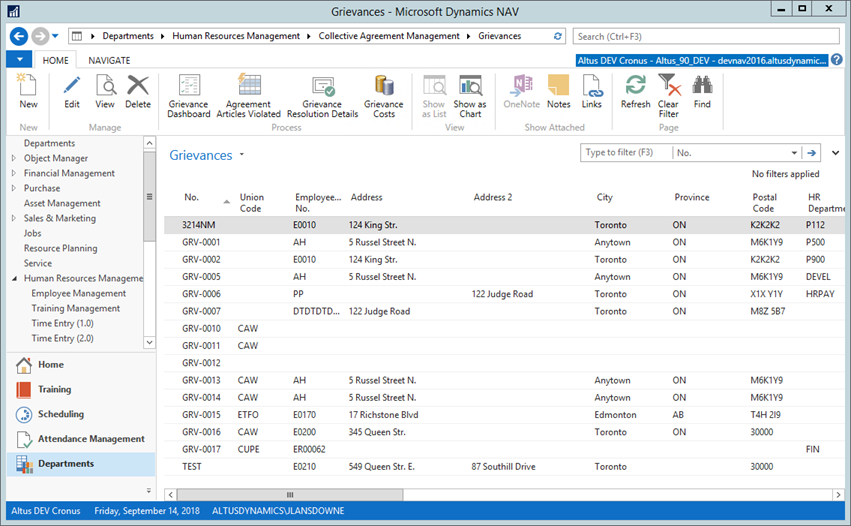
- On the Home Ribbon, click New.
A New - Grievance Card opens.
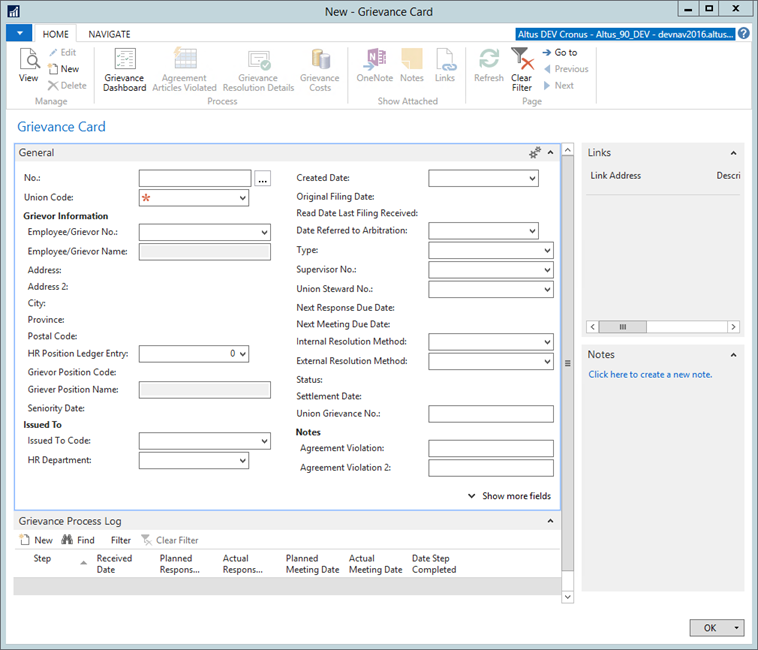
- The following table provides detail for the fields in the General FastTab of the Grievance card:
| Field | Description |
| No. | Displays the system-generated grievance number (defined in the Human Resources Setup). A new number is assigned when you tab out of the No. field NOTE: A Grievance Dimension Value is automatically created within the Grievance Dimension Code as defined in the Human Resources Setup form. This is accessible by the A/P System to link invoiced costs to a particular grievance and available for viewing on the Cost FastTab. |
| Union Code | Displays the union code. |
| Employee/Griever No. | Displays the employee number for the individual submitting the grievance. Enter the employee number. If you do not know the number, from the drop-down, select Advanced to open the Employee List. Select the employee (use the Filter fields to perform a search) and click OK. |
| Employee/Griever Name | Displays the employee’s name. This field is automatically populated when the Employee Number is selected. |
| Address/2, City, Province, Postal Code | Displays the employee’s address details. These fields are automatically populated when the Employee Number is selected. |
| HR Position Ledger Entry No. | Enables you to select an entry for the position of the employee at the time of the grievance. |
| Griever Position Code | Displays the employee’s position code. This field is automatically populated when the employee or Position Ledger Entry Number is selected. |
| Griever Position Name | Displays the employee’s position title. This field is automatically populated when the Employee Number is selected. |
| Seniority Date | Displays the employee’s seniority date. This field is automatically populated when the Employee Number is selected. |
| Issued to Code | Displays the employee code for the individual to which the grievance was issued, if applicable. From the drop-down, select Advanced to open the Employee List. Select the employee (use the Filter fields to perform a search) and click OK. |
| HR Department | Displays the department dimension value to which the griever belongs. Click the drop-down to open the Dimension Value List. Select the applicable dimension and click OK. |
| Created Date | Displays the grievance creation date. Enter the current date in this field. |
| Original Filing Date | Displays the date on which the grievance was originally filed/submitted. This field is automatically populated based on the date provided for the step selected in the Grievance Process Log. See, ‘Completing the Process Steps for Resolving the Grievance’ for details. |
| Read Date Last Filing | Displays the date on which the grievance was acknowledged. This field is automatically populated based on the date provided in the Received Date column for the step selected in the Grievance Process Log. See, ‘Completing the Process Steps for Resolving the Grievance’ for details. |
| Date Referred to Arbitration | Displays the date on which the grievance was sent to arbitration. If the grievance has been sent to arbitration, enter the date this process was completed. |
| Type | Displays the grievance type. Click the drop-down arrow to select the applicable option. |
| Supervisor No. | Displays the supervisor number of the employee submitting the grievance. From the drop-down, select Advanced to open the Employee List. Select the supervisor (use the Filter fields to perform a search) and click OK. |
| Supervisor Name | Displays the supervisor’s name. This field is automatically populated when the supervisor is selected in the previous field. |
| Union Steward No. | Displays the union steward number for the union to which the employee belongs. From the drop-down, select the steward. |
| Next Response Due Date | Displays the date on which the next union response is due. This field is automatically populated based on the date provided in the Planned Response Date column for the most recent step selected in the Grievance Process Log. See, ‘Completing the Process Steps for Resolving the Grievance’ for details. |
| Next Meeting Due Date | Displays the date on which the next meeting will take place. This field is automatically populated based on the date provided in the Planned Meeting Date column for the most recent step selected in the Grievance Process Log. See, ‘Completing the Process Steps for Resolving the Grievance’ for details. |
| Internal Resolution Method | Displays the method by which the grievance is being resolved internally. From the drop-down, select the appropriate method. |
| External Resolution Method | Displays the method by which the grievance is being resolved externally. From the drop-down, select the appropriate method. |
| Status | Displays the step in the grievance resolution process that the grievance is currently residing. This field is automatically populated based on the most recent step selected in the Grievance Process Log. See, ‘Completing the Process Steps for Resolving the Grievance’ for details. |
| Settlement Date | Displays the date upon which a settlement was reached. This field is auto-populated based on the most recent step selected in the Grievance Process Log. See, ‘Completing the Process Steps for Resolving the Grievance’ for details. |
| Union Grievance No. | Displays the grievance number assigned by the union. Enter the grievance number provided by the union representative. |
| Agreement Violation/2 | Text fields enabling you to enter/type the details for the grievance (collective agreement violation). |
Entering the Cost Information for a Grievance
When a grievance is launched against the organization, there are costs involved that need to be recorded and tracked through the process. Costs can be either automatically accumulated in the Invoiced/Actual Costs section, if you have set up a grievance dimension code, or they can be recorded manually in the Additional Grievance Cost section.
To enter the cost manually in the Additional Grievance Costs section:
- On the Grievance card, from the Home Ribbon click Grievance Costs.
The Grievance Costs page displays.
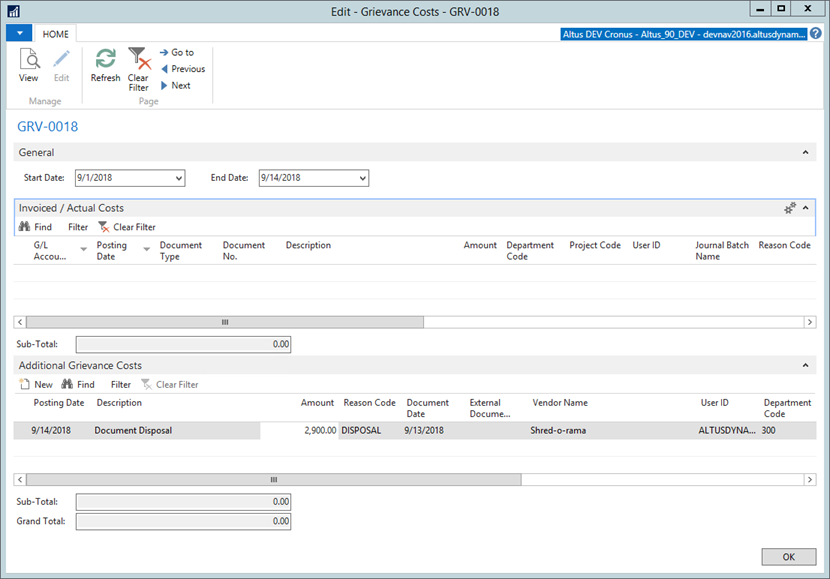
- In the Additional Grievances Costs section, enter the details for any additional costs outside the planned/budgeted accrued. Complete the following steps:
- In the Posting Date field and enter the current date (you can use the Calendar to select a date) or the fiscal period in which the cost was incurred.
- In the Description field, enter a brief description of the cost.
- In the Amount field, enter the dollar value for the additional cost, including all applicable taxes.
- From the Reason Code drop-down, select the applicable reason for accruing the cost.
- In the Document Date field, enter the date upon which the expense invoice or report was received.
- In the External Document No. field, enter the document number (if applicable) for the information/resource received, such as the vendor’s invoice no.
- In the Vendor Name field, enter the name of the company from which the goods or services were purchased.
- The User ID field is automatically populated with your system user ID.
- In the remaining series of Dimension fields, from the drop-downs select the applicable dimension codes for the cost.
- When you finish, click OK.
Or, to process the steps completed, see the next section, ‘Completing the Process Steps for Resolving the Grievance’.
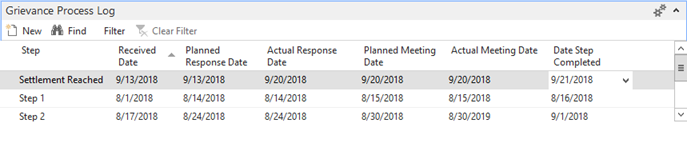
Completing the Process Steps for Resolving the Grievance
The Grievance Process Log is where the steps taken within the resolution process are recorded. Each time an action in the effort to resolve the grievance is completed, a new process step/line is added until the final resolution is reached or the grievance is sent to arbitration.
To add a process step:
- Open the appropriate Grievance Card.
- Expand the Grievance Process Log FastTab.
- Click New.
- From the Step drop-down, select the applicable step. The steps in the grievance resolution process are pre-defined based on the requirements supplied by your organization. Generally, grievances commence in the Step 1 stage as defined in most collective agreements.
- From the Received Date drop-down, select the date upon which the grievance was received. The date you enter here is inserted in the Read Date Last Filing field in the General FastTab.
- From the Planned Response Date drop-down, select the date by which Human Resources must respond to the grievance submission.
NOTE: To avoid an additional grievance filling, it is important to understand the terms/conditions of the collective agreement to ensure this date is within the allowable range following the filing of this grievance. - If a response has been made, from the Actual Response Date drop-down, select the date it was made. This field may need to be completed or updated at a later date.
- From the Planned Meeting Date drop-down, select the date upon which a meeting with Human Resources, Management, the Union representative, and the ‘griever’ is set.
- If the meeting occurred on a date different than what was set in the Planned Meeting Date field, from the Actual Meeting Date drop-down, select the actual date the meeting occurred.
- When all the activities in completing first step are achieved, from the Date Step Completed drop-down, select the completed date.
- To process additional steps, repeat steps 3 - 8.
- Click OK to close the Grievance Card.
Providing the Violation Details for a Grievance
For each grievance that is launched against the organization, the particular section(s) of the collective agreement that was violated needs to be recorded.
To add the collective agreement violation details:
- On the Grievance Card, from the Home Ribbon, click Agreement Articles Violated.
The Edit – Agreement Articles Violated page displays.
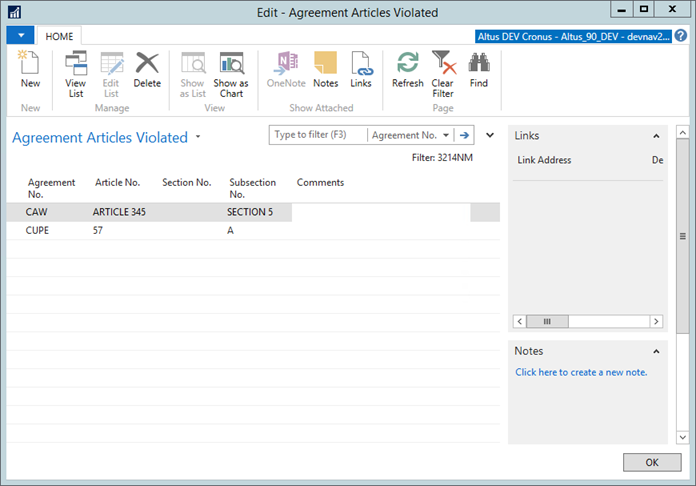
- On the Home Ribbon, click New.
- From the Agreement No. drop-down, select the collective agreement number (corresponding to the individual’s union) pertaining to the agreement that was violated.
NOTE: If many collective agreements exist in your organization, perform a search for the agreement number by select Advanced from the drop-down and using the Filter fields in the Collective Agreement Details List. - From the Article No. drop-down, select the record with the corresponding article number for the violation.
- From the Subsection No. drop-down, select the record with the corresponding subsection number for the violation.
- In the Comments field, enter the details for the section of the collective agreement that you selected (was violated).
- Repeat this procedure for any additional sections of the collective agreement that were violated.
- Click OK to close the page when you finish.
Recording the Grievance Resolution Details
Once a resolution is reached, you need to record the date and the resolution details that were agreed upon or arrived at within the Grievance Resolution Details page.
To record the resolution details:
- On the Grievance Card, from the Home Ribbon, click Grievance Resolution Details.
The Edit – Grievance Resolution Details page displays.
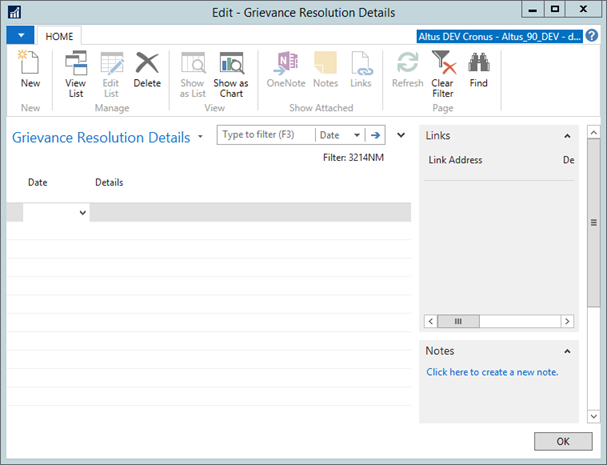
- From the Home Ribbon, click New.
- From the Date drop-down, select the date upon which the resolution was reached.
NOTE: This date is not connected to the ‘Settlement Reached’ step in the Grievance Process Log. That information must be updated separately. - In the Description field, enter a description of the resolution that was reached.
- Repeat this procedure for any additional resolution methods that were implemented.
- Click OK to close the page when you finish.
Entering Harassment Complaints
Recording and tracking a harassment complaint incident and the subsequent steps taken to resolve the issue is an important Human Resources responsibility. The Harassment Complaints functionality enables you to record and register important details for any type of harassment complaint, including adding specific comments, dates, and the final resolution achieved.
To create a harassment complaint record:
- From the Human Resources Management menu, select Collective Agreement Management > Lists > Harassment Complaints.
The Harassment Complaints List displays.
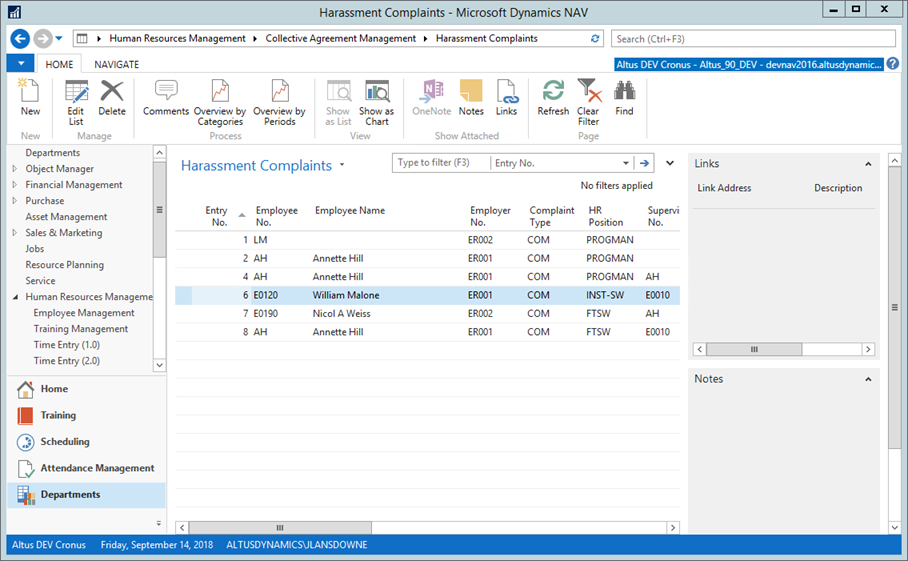
- On the Home Ribbon, click New.
- In the Entry No. column, press tab to add a system-generated entry number.
- From the Employee No. column, select the employee number for the employee making the harassment complaint. Perform a search for the employee by selecting Advanced from the drop-down and using the Filter fields in the Employee List page.
The Employee Name field is automatically populated. - From the Complaint Type drop-down, select the appropriate complaint type and click OK. If the complaint type the individual submitted is not available, you can add a new complaint type. See, ‘Adding Harassment Complaint Types’.
- From the HR Position drop-down, select the HR position the employee holds.
The Supervisor No. and Name fields are automatically populated with the employee’s primary manager’s number (based on the individual’s Employee card), but can be overwritten if the supervisor involved is not the default one on the Employee card. - From the Complaint Filed Date drop-down, select the date upon which the individual filed the harassment complaint.
- From the Status drop-down, select the stage in which the harassment complaint currently resides.
- In the Brief Summary of Complaint field, enter a description of the harassment complaint.
If a resolution has been reached and the investigation completed and closed, you need to record that information as well. For details, see ‘Updating and Closing Harassment Complaints’. - Once all the details for the complaint have been added, click OK to close the page. Or, if you want to add more detail, see ‘Providing Additional Comments for a Harassment Complaint’.
Providing Additional Comments for a Harassment Complaint
If you feel that more detail needs to be provided for a complaint you entered, you can append comments to the record with the additional information and comments you want to add.
To provide additional detail or comments:
- On the Harassment Complaints page, From the Home Ribbon, click Comments.
The Comment Sheet page displays with the Date column automatically defaulted to the current date.
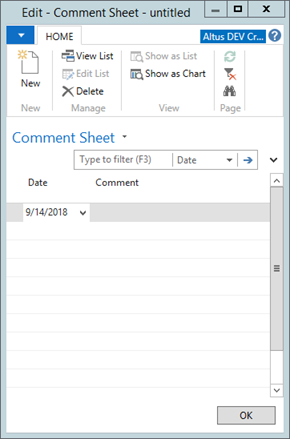
- In the Comment field, enter any information you feel pertinent to the complaint.
- For additional comments, on the Action Pane, click New.
- Click OK when you finish.
Updating and Closing Harassment Complaints
As the process to deal with and resolve the harassment complaint continues, you need to track the progress and update the complaint file as the status changes as well as provide the resolution details when the complaint is closed.
To update and/or close a harassment complaint:
- From the Human Resources Management menu, select Collective Agreement Management > Lists > Harassment Complaints.
The Harassment Complaints List displays. - Locate and select the complaint you want to work with.
- From the Home Ribbon, select Edit List.
The Edit page for the complaints is initiated. - From the Status drop-down, select the appropriate stage in which the harassment complaint has now progressed.
- From the Resolution Reached Date drop-down, select the date upon which a resolution was reached.
- If the investigation has been completed and closed, from the Compl. Investig. Closed Date drop-down, select the date upon which the investigation was completed.
- From the Resolution Method drop-down, select the method by which a resolution was reached. If the resolution method reached is not available, you can add a new resolution method. See, ‘Providing Harassment Resolution Methods’.
- In the Brief Descr. of Resolution field, enter the details for the resolution that was reached.
- Close the page when you finish updating and/or closing the complaint.
Reviewing Harassment Complaints by Category
You can view the harassment complaints filed by the specific complaint category. This is useful to track the types of complaints individuals lodge in specific time periods for determining where preventative measures need to be researched and applied.
To review harassment complaints by category:
- From the Human Resources Management menu, select Collective Agreement Management > Lists > Harassment Complaints.
The Harassment Complaints List displays. - On the Home Ribbon, click Overview by Categories.
The Harassment Overview by Type page displays.
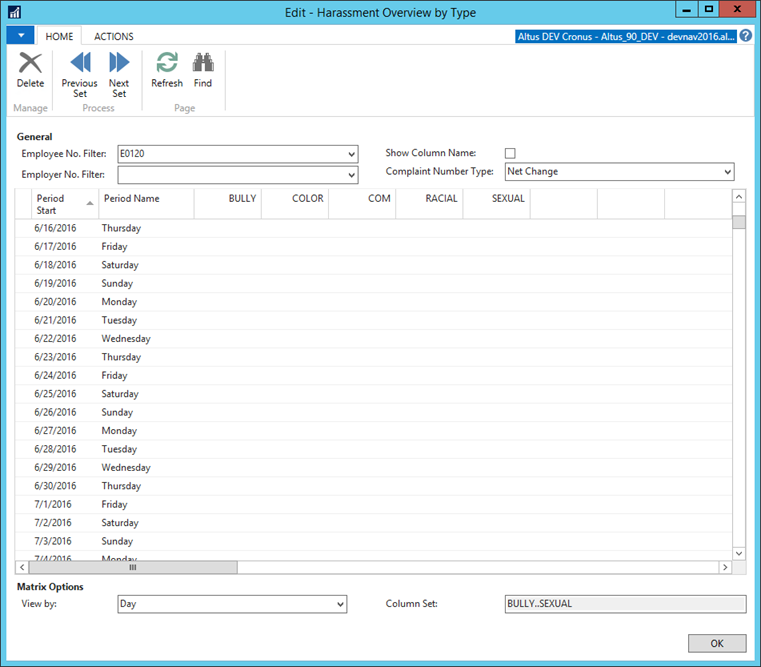
- To view a specific employee’s complaint filing record, click the Employee No. Filter drop-down to open the Employee List page and select a specific employee.
NOTE: The same logic applies to a filter entered in the Employer No. Filter field. - Click the Show Column Name check box to display the full column name details.
- From the Complaint Number Type drop-down, select how you want the complaints displayed (net change or by the balance at the current date).
- Using the Previous Set and Next Set buttons on the Action Pane, you can see other harassment ‘types’ that have been set up.
- In the Matrix Options section, from the View by drop-down, select the timeframe by which you want to display the complaints.
- Double-click on a value found for specific periods within the harassment types to open the details for the complaints for that type in that period.
The View – Harassment Complaints page opens. - Click Close to return to the Overview by Type page.
- Click OK when you finish your review.
Filtering Harassment Complaints by Period
You can filter the harassment complaints filed by a specific time period to get a snapshot of the frequency and costs associated with harassment complaints.
To filter harassment complaints by time period:
- From the Human Resources Management menu, select Collective Agreement Management > Lists > Harassment Complaints.
The Harassment Complaints List displays. - From the Home Ribbon, click Overview by Periods.
The Harassment Overview by Periods page opens.
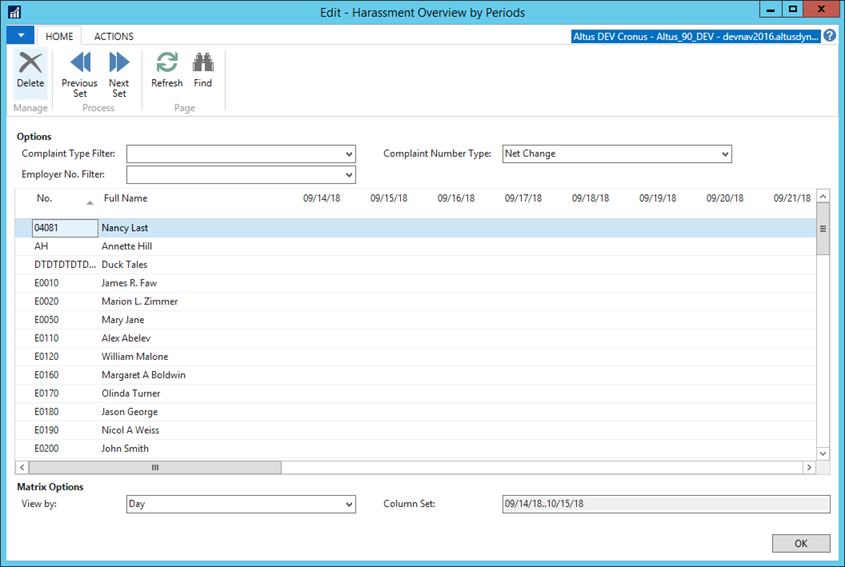
- From the Complaint Type Filter drop-down, select a complaint type (if you want to see results for all complaint types, leave this field blank).
NOTE: The same logic applies to a filter entered in the Employer No. Filter field. - From the Complaint Number Type drop-down, select how you want the complaints displayed (net change or by the balance at the current date).
- In the Matrix Options section, from the View by drop-down, select the timeframe by which you want to display the complaints.
- Double-click a value for a specific period to open the details for the complaints for that period.
The Edit – Harassment Complaints page opens. - Click OK to return to the Overview by Periods page.
- Click OK when you finish your review.
Viewing Grievance Statistics
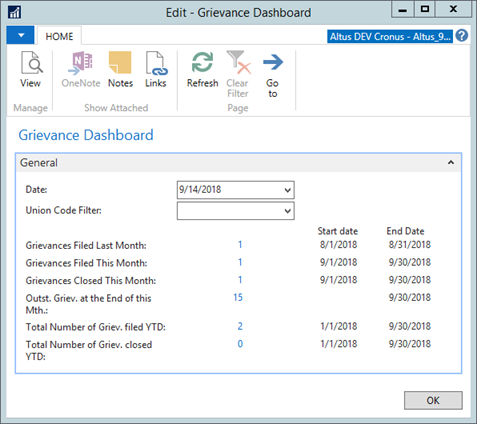
The Grievances Dashboard enables you to get a complete ‘Snapshot’ view of the grievance statistics for your organization. The statistics provided help you to determine the current status for grievances filed, so that the proper follow-up or action can be taken on those complaints that are yet to be resolved. The dashboard also provides critical Year to Date statistics that you can use to improve internal processes to expedite claims and avoid costly filings all together.
To view the grievances dashboard:
- From the Human Resources Management menu, select Collective Agreement Management > Reports and Analysis > Grievance Dashboard.
The Grievance Dashboard page opens. The Date field defaults to the current date.
- To see statistics for a different date, from the Date drop-down, select the date.
- Press tab to update the statistics in the dashboard.
- Click the number link for a corresponding statistic. For example, click the number link corresponding to Grievance Filed Last Month to display the Grievance List for the item you selected.
From the Grievance List, you can view the specific details for each grievance filed.