

The Actions and Navigate ribbon provide several options for working (adding, deleting, attaching information) with employee records. The following provides a description of the options available from these menus.
Using these functions on the Ribbon, you can display additional employee information and perform specific actions on an employee’s record.

In addition to the Ribbon, the Employee Details and Payroll Details panels are available. These two panels provide links to specific documents and information related to the employee.
The task and procedures related to the actions performed using Ribbon items, and panel links are included in the following sections.
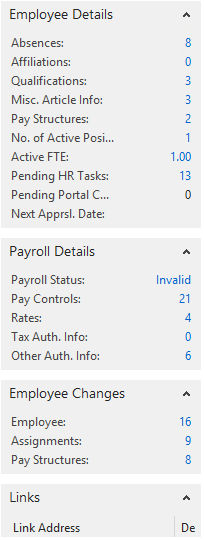
Attaching the Employee's Photo to the Employee Record
To attach a photo of the employee to the Employee Card:
- Open the relevant Employee Card.
- On the Home Ribbon, click Picture.
The Edit - Employee Picture page displays.
- Right-click in the Picture area and select Select Picture.
- Browse to the photo location and select the file (bmp, jpeg).
- Click Open.
The image is attached to the employee’s Employee card.
Creating and Tracking Communications with Employees
The Create Communication function enables you to create a communication record (either letter or email message) that is tracked in the employee’s Communication log. Additionally, these ‘communication’ documents can be integrated with the mail merge functionality (merge, print, fax, and email) in Microsoft Word.
To initiate a communication record:
- Open the relevant Employee Card.
- On the Actions Ribbon, click Create Communication.
This action launches a wizard, which takes you through the process of creating a ‘tracked’ communication with an employee.
NOTE: For detailed steps on using the Communication Tracking feature, see 'Working with Communication Tracking’.
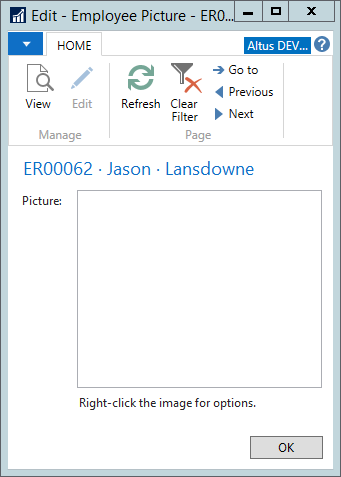
Viewing Communication Log Entries
All communications created and sent to employees using the Communication Tracking function are stored as log entries that you can review for follow up and confirmation purposes. For example, if the attempt to deliver the communication failed, this is recorded.
NOTE: The information in the Communication Log is read-only.
To view communication log entries:
- On the Employee Card, click the Navigate tab and then click Human Resources > Communication Log Entries.
The View - Communication Log Entries page opens. Each line represents a single communication record.
- Use the scroll bar to view the details for the entries.
- For failed delivery attempts, initiate a new communication record. See ‘Working with Communication Tracking’.
- Click Close to close the Communication Log.
Viewing and Updating the User EWA Card
The EWA Card information contains the employee’s portal access and security information. This information is required to create an account for the employee to use Employee Center. An EWA User Card can be created automatically through the processing of an HR Request.
For manual Employee Record creation, the generation of the EWA User Card is also handled manually. This is generally a task performed by the System Administrator. For further information on managing EWA users, you can reference the Employee Center Setup and Administration Guide.
Once that card is created, it can be accessed directly from the employee’s Employee card.
To access this employee’s EWA User Card:
- On the Employee Card, click the Navigate tab and then click EWA User Card.
The EWA User Card displays.

- Review or edit the information as required.
NOTE: Depending on your role and your organization’s policies, modifications to an EWA User account is handled by the System Administrator.
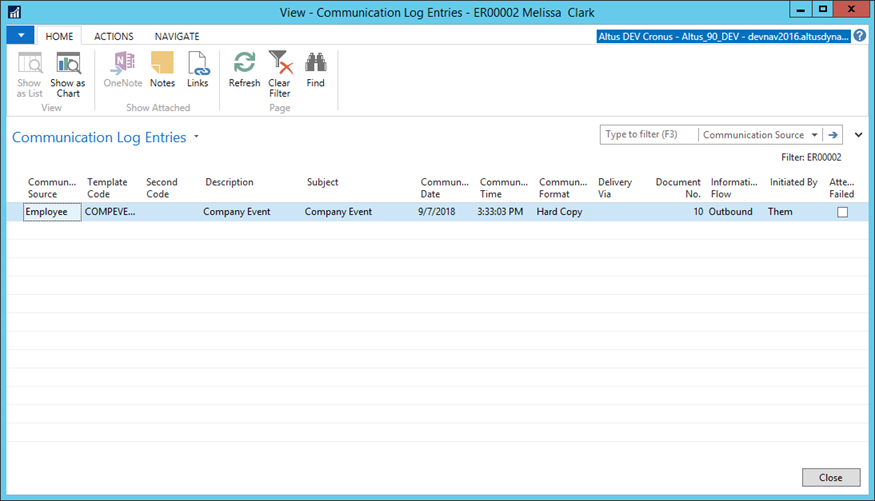
Creating and Updating an Expense Vendor Card
The Expense Vendor card enables you to connect a specific vendor to an employee record typically for expense processing purposes. Employees and vendors who are connected have their banking details automatically synchronized on the Employee Pay Distribution entry that has Use for Vendor Expenses = Yes.
The connection between the employees and vendor is automatically established in the HR Request processing based on the ‘Employee Type’ setting of the Create Employee Vendor = Yes entry.
Updating the Expense Vendor Card Information
To view or update the vendor already linked to an employee:
- On the Employee Card, click the Navigate tab and then click Expense Vendor Card.
The Expense Vendor Card displays.
NOTE: Vendor address information is copied to the Vendor card when the vendor is first created using an HR Request but is not updated if changes are made to the Employee card. This is to support the possibility that an employee may want to have a different address for Expense Payment processing than for Human Resources.
Important NOTE: Employee Pay Distribution information that has Use for Vendor Expenses = Yes then, the Vendor Bank Accounts are synchronized if changes are made to the Employee Pay Distribution record. However, if changes are made to the Vendor Bank Account, they will not update the employee banking information. If the employee wants a different bank account used for expense deposits (than payroll), it is not recommended to select the Use for Vendor Expense setting. Rather, create completely disconnected records.
Manually Creating an Expense Vendor Card
If the employee has already been created and the link between the two will be established manually, you can create the vendor and then link to the employee through the employee number.
To create an expense vendor card manually:
- On the Employee Card, click the Navigate tab and then click Expense Vendor Card.
The Expense Vendor Card displays. - In the Home Ribbon, click New.
A blank Vendor Card for the employee displays. - In the No. field, click the Assist button to select the numbering series to apply to this vendor record.
- Complete the remaining fields in the Vendor Card FastTabs as required.
Important NOTE: Employee Pay Distribution information that has Use for Vendor Expenses = Yes then, the Vendor Bank Accounts are synchronized if changes are made to the Employee Pay Distribution record. However, if changes are made to the Vendor Bank Account, they will not update the employee banking information. If the employee wants a different bank account used for expense deposits (than payroll), it is not recommended to select the Use for Vendor Expense setting. Rather, create completely disconnected records.
Managing Miscellaneous Articles
For each position in your organization, you set up the company items (miscellaneous articles) that an employee hired into a position is automatically designated to receive. This process facilitates the hiring and orientation process by ensuring each employee receives the required tools/articles for their position. As well, this also works as a tracking and recording system to manage company items and collect these items when an employee leaves the organization.
Misc. Articles can be assigned to an employee in the following ways:
- Automatically based on the processing of an HR Request for positions with Assigned Items defined for the position.
- Manually from within the Employee card.
Updating the Assigned Items Information
Using the Miscellaneous Articles function, you can review the automatically assigned items an employee requires and determine the dates upon which the items were assigned, received, and are due to be collected (requested and received).
Once employees are automatically assigned items based on the position requirements, you still need to update the records to indicate the receipt of the items and indicate whether the item is currently in use.
To update or create new assigned items details:
- On the Employee Card, click the Navigate tab and then click Human Resources > Misc. Article Information.
The Edit Misc. Article Information page displays.
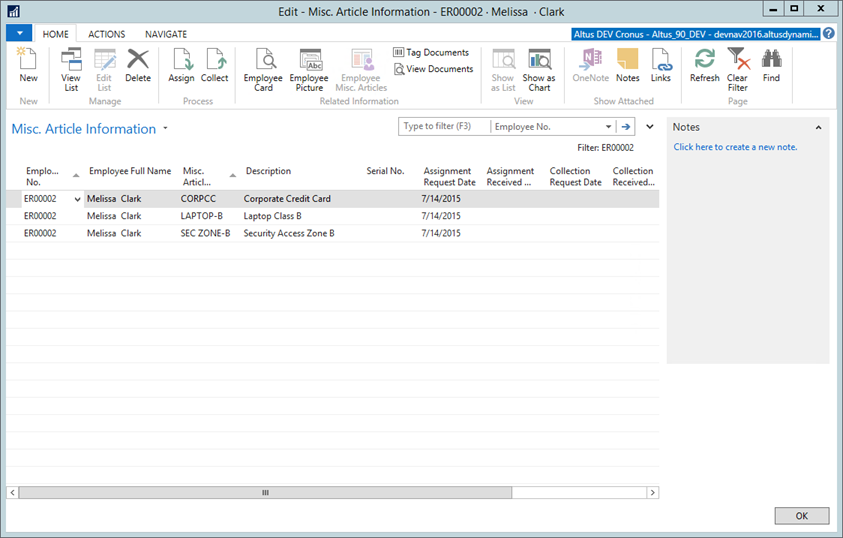
- To add a record, from the Ribbon, click New. A blank record is inserted for recording the item.
- From the Misc. Article Code drop-down, select the item you are assigning.
The Description field is automatically populated based on the code selected. - In the Serial Number field, enter the appropriate number (for example, if assigning a corporate credit card enter the card number), if applicable.
- From the Assignment Request Date drop-down, select the current date.
- From the Assignment Received Date drop-down, select the date the employee received the item. Leave blank if the employee is yet to receive.
- If you know the date upon which the employee is leaving the organization or no longer requires the item, from the Collection Request Date, select the date you want the request sent to the employee.
- If the item has already been provided to the employee and is currently in use (for example a company car, phone, or laptop), add a checkmark to the In Use field checkbox.
- Repeat steps 2-8 to assign all the required articles to the employee.
- Click OK to close the page.
Collecting Items from Employees
Once miscellaneous items are returned you need to record that the articles were received from the employee. This frees up the article again for re-assignment and also ensures that all the items provided to a terminated employee are collected.
To record collected items:
- On the Employee Card, click the Navigate tab and then click Human Resources > Misc. Article Information.
- From the Collection Received Date drop-down, select the date upon which the item was returned.
- Repeat the above step to record all the articles received from the employee.
- Click OK to close the page.
Assigning Confidential Information Codes to Employees
During the setup process, it is likely that confidential information codes for confidential information (such as company pension, stock option plan, salary, disciplinary, health and safety, layoff) were defined to relate to your employees. After confidential information codes are set up, they can be assigned to an employee’s record as required.
To assign confidential information codes to an employee:
- On the Employee Card, click the Navigate tab and then click Human Resources > Confidential Information.
The Confidential Information page for the employee opens.
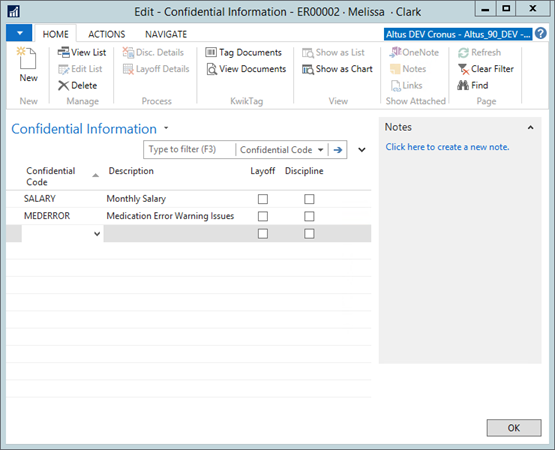
- On the Ribbon, click New.
- From the Confidential Code drop-down, select the code and click OK.
- Repeat for each confidential code that is relevant to the employee to register confidential information.
- For confidential codes that require layoff details, place a checkmark in the Layoff column and click the Layoff Details button to input the details for confidential codes.
Adding the Discipline Record Details
When a disciplinary action is taken against an employee, the details for the action need recorded as part of the employee’s confidential information.
To add a discipline record:
- On the Employee Card, click the Navigate tab and then click Human Resources > Confidential Information.
The Confidential Information page for the employee opens. - Select the line for the disciplinary action you want to update/provide details and add a checkmark to the Discipline checkbox.
- From the Home Ribbon, click Disc. Details.
The Edit – Confidential Info Details page displays.
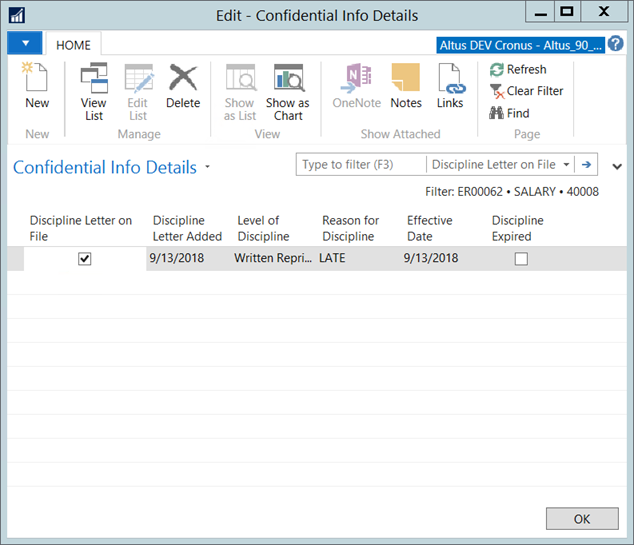
- If the employee received a formal discipline letter, add a checkmark to the Discipline Letter on File check box.
- From the Discipline Letter Added drop-down, select the date upon which the letter was added to the employee file.
- From the Level of Discipline drop-down, select the appropriate option.
- From the Reason for Discipline drop-down, select the reason for the discipline.
- From the Effective Date drop-down, select the date upon which the discipline action was taken.
- Click OK to close the page.
NOTE: When the disciplinary action expires, for example a suspension, the record needs to be updated to reflect the discipline has been completed. Select the Discipline Expired check box when this occurs.
Adding the Layoff Record Details
When an employee is ‘laid off’, the details for the layoff need recorded as part of the employee’s confidential information.
To add the layoff details:
- On the Employee Card, click the Navigate tab and then click Human Resources > Confidential Information.
The Confidential Information page for the employee opens. - Select the line for the layoff record and add a checkmark to the Layoff Details check box.
- On the Home Ribbon, click Layoff Details.
The Edit – Confidential Info Layoff Details page opens.
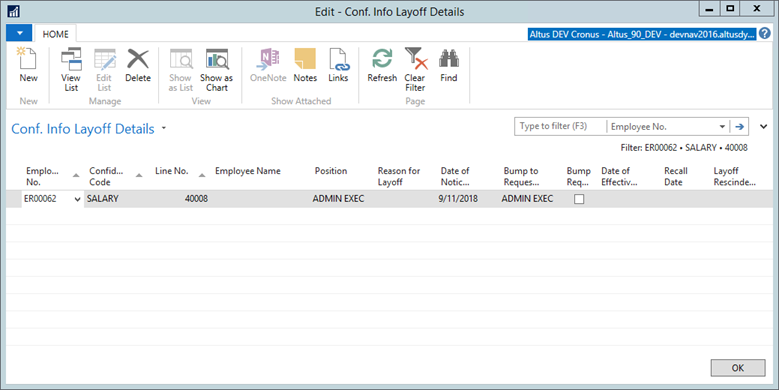
- Complete the following fields to provide the details for the layoff:
| Field | Details |
| Line No. | Displays the employee number. This field is automatically populated based on the information provided in the Employee Card. |
| Employee Name | Displays the employee’s name. |
| Position | Displays the code for the position assigned to the employee. This field is automatically populated based on the information provided in the Employee Card. |
| Reason for Layoff | Displays the reason/requirement for the layoff. |
| Date of Notice Period | Displays the date upon which the employee was given notice of the layoff. |
| Bump to Request Position | Displays the position to which the employee was moved based on. |
| Bump Request Approved | Indicates that the bump request has been approved. |
| Date of Effective Layoff | Displays the date upon which the layoff takes effect. |
| Recall Date | Displays the date upon which the employee will be or has been recalled to work. |
| Layoff Rescinded Date | Displays the date upon which the layoff was cancelled, if applicable. |
Working with Employee Appraisals
The Appraisals function enables you to track an employee’s appraisals; when they are due and who completed them. Appraisal entries can be automatically general by the system (through HR Requests) or added manually. The completion of an appraisal record can be done either from the Employee card by the HR Representative or, by the Manager over the Employee Portal.
The appraisal schedule for each employee is attached to the employee record. Providing an appraisal schedule ensures that appraisal dates are monitored and reviews are kept up to date. Upon completion of an appraisal, the status is updated establishing an appraisal history.
Viewing the Appraisal Schedule for an Employee
You can review the appraisal schedule for an employee to determine the next appraisal dates and to ensure the employee’s appraisals are being completed and recorded in a timely manner.
To view the employee appraisal schedule:
- On the Employee Card, click the Navigate tab and then click Human Resources > Appraisals.
The Employee Appraisals page displays. Each line in the Employee Appraisals page represents a separate appraisal event record.
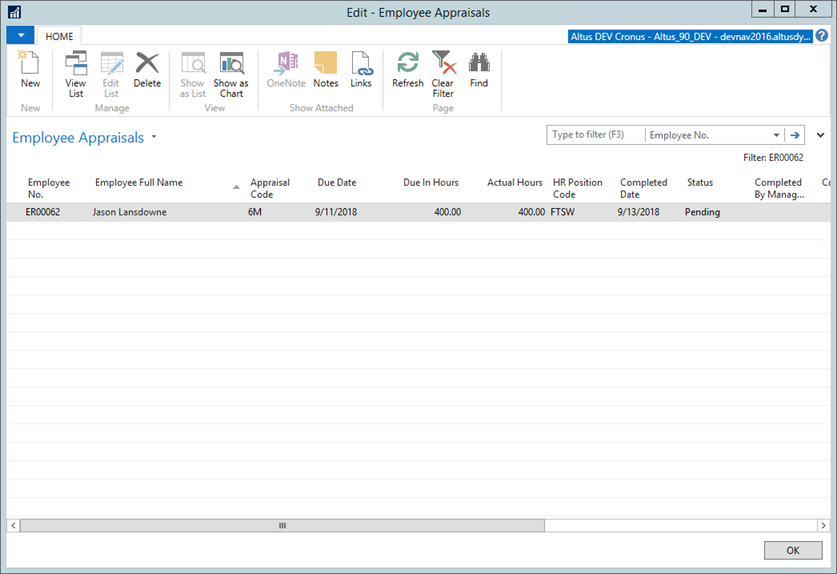
NOTE: The first appraisal record is created with the HR Request processing of a Hire type. Subsequent appraisals are generated automatically once the first appraisal is closed. The indication of the next appraisal is generated from the Generate/Update Appraisals Periodic Activity. This process is automatically run whenever a payroll journal is posted. - Use the scroll bar to view all the available fields.
- Click OK to close the page.
Adding an Appraisal Record for an Employee Manually
If not using Advanced Position Management, you can manually create an appraisal record for an employee.
To enter an appraisal schedule for an employee manually:
- On the Employee Card, click the Navigate tab and then click Human Resources > Appraisals.
The Employee Appraisals page displays. - On the Ribbon, click New.
A new record is inserted with the Employee No. field automatically populated and the Status field displaying Pending. - From the Appraisal Code drop-down, select the first/next appraisal required.
- From the Due Date drop-down, select the date by which the appraisal needs to be performed.
- If the appraisal is based on ‘hours worked’, in the Due in Hours field, enter the number of hours the employee must work before the appraisal can take place.
The Actual Hours field is calculated and updated with each pay period. Once the record is added, the Payroll processing functions accumulate and update these hours when payroll is posted. - From the HR Position Code drop-down, select the position for which the employee is receiving the review (if an employee fills more than one position, this is a critical step).
- Repeat steps 2 - 6 to insert any additional appraisal requirements for the employee.
Adding the Completion Details for the Appraisal
When you add an appraisal item for an employee, the Status field automatically displays ‘Pending’. Once the review is completed, you need to update the status, along with the completion details.
To update the appraisal information:
- On the Employee Card, click the Navigate tab and then click Human Resources > Appraisals.
The Employee Appraisals page displays. - From the Status drop-down, select Completed (if the appraisal was canceled, select Canceled).
- From the Completed Date drop-down, select the date upon which the review was completed.
- In the Completed By Manager No. click the Assist icon to open the Employee List page.
- In the Comments field, enter any comments pertinent to the appraisal.
- In the No. of Attachments field, click the number link.
- The View – HR Portal Attachments page opens. From here the following options are available:
- Open document. If documents relating to the appraisal were uploaded by the manager, etc., they display here. Select the document line. From the Actions menu, select Functions > Open File.
- Upload document. From the Actions menu, select Upload File. Locate and select the file.
- Delete document. Select the document line. From the Actions menu, select Functions > Delete.
- Click Close.
- From the Next Appraisal Code drop-down, select the applicable option.
- When finished, click OK to close the page.
Monitoring Employee Grievance Submissions
From the Employee card, you can access the Grievance List to determine if the employee has lodged any grievances and view the status and details for the grievance.
To view the grievance data for an employee:
- On the Employee Card, click the Navigate tab and then click Union > Grievances.
The Grievances List displays. The information displayed in the grievance list is read-only. The grievance details are updated through the Grievance Card and are automatically updated to each employee’s Employee Card.
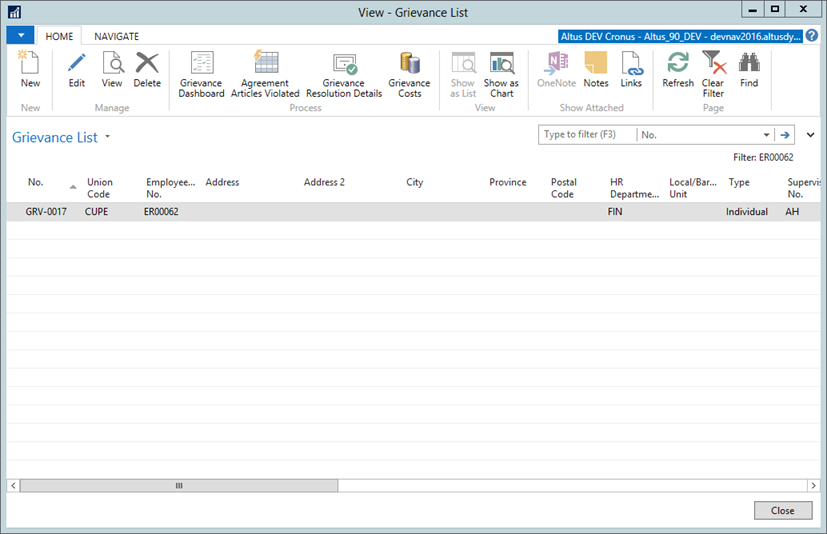
- Select the line for the grievance you want to review.
- From the Home Ribbon, click View.
The Grievance Card for the record you selected opens.
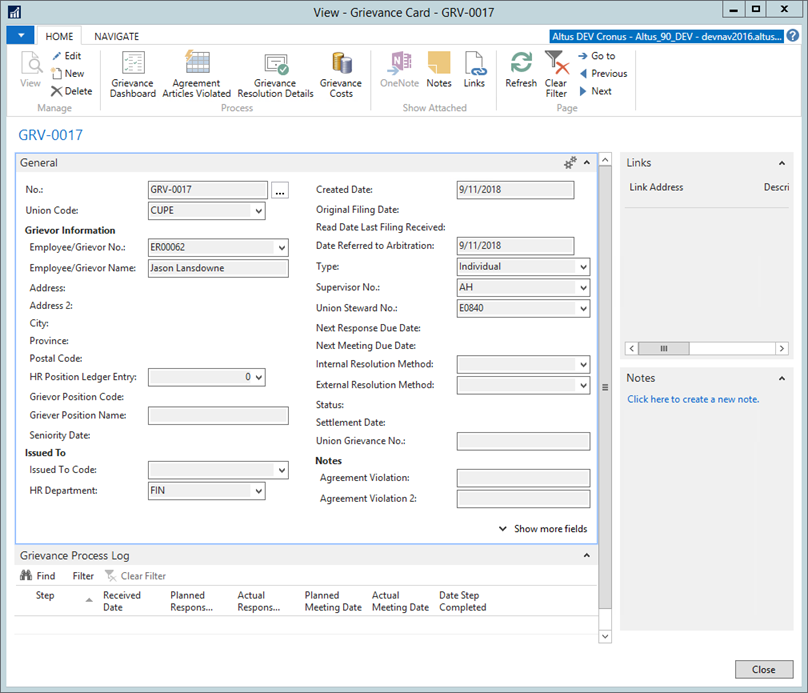
- Click Close when you finish reviewing the grievance details.
Creating a Grievance Record for the Employee
When an employee requests to lodge a grievance, you can create a record directly from the Employee Card.
To create a grievance record:
- On the Employee Card, click the Navigate tab and then click Union > Grievances.
- On the Ribbon, click New.
The New – Grievance Card opens. - Complete the fields as necessary.
- Click OK when finished.
Verifying Union Information
If the union has been set up on the HR Position, and the employee has been hired using and HR Request, the union record is created automatically for the employee. You can update the union details as required.
To update the union membership details:
- On the Employee Card, click the Navigate tab and then click Unions > Unions.
The Employee Unions page displays.
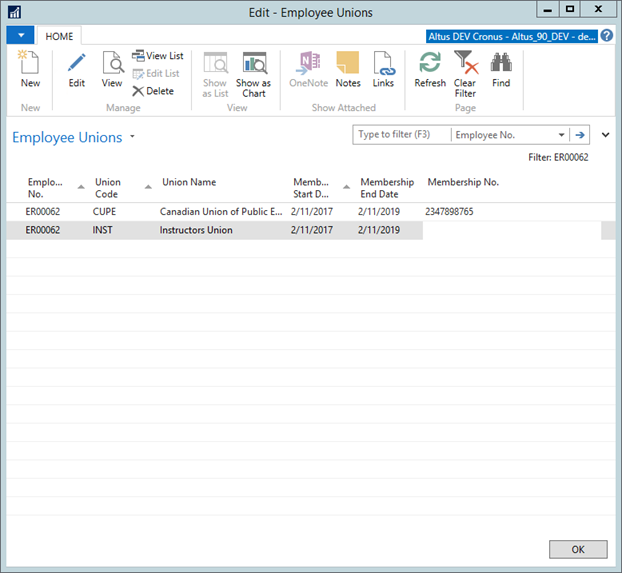
- Review the information to ensure the appropriate details are provided and update where required:
- From the Union Code drop-down, select the applicable union.
- In the Membership Start Date column, enter the date upon which the employee became a member of this union.
- In the Membership End Date column, enter the date upon which the employee’s membership expires/expired, if applicable.
- In the Membership No. column, enter the employee’s union membership number.
- When you finish updating the information, click Close.
Adding Union Data
You can manually add the union details for an employee from the Employee Record. For employees in more than one position, you may be required to add more than one union.
NOTE: If multiple unions per employee are not required, use the Union Code on the Employee Card that displays on the Position FastTab. Do not use this table.
To create the record manually:
- On the Employee Card, click the Navigate tab and then click Unions > Unions.
The Employee Unions page displays. - On the Ribbon, click New.
The New – Employee Union Card page displays. The Employee No. field is automatically populated based on the Employee Card.
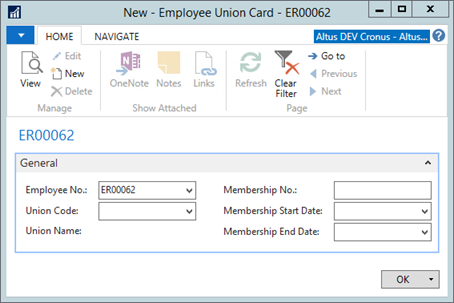
- From the Union Code drop-down, select the applicable union.
- In the Membership Start Date column, enter the date upon which the employee became a member of this union.
- In the Membership End Date column, enter the date upon which the employee’s membership expires/expired, if applicable.
- In the Membership No. column, enter the employee’s union membership number.
- Click OK.
The Employee Unions page re-opens with the new union data added. - Repeat steps 2 – 7 for any additional unions you need to record.
- When you finish, click Ok.
Managing HR Tasks for an Employee
HR Tasks ensure that newly hired employees provide the necessary information (SIN verification, and so on) as well as ensuring they receive all the appropriate items and registrations/enrollments (payroll controls, benefit plan, etc) required as part of the position. HR tasks enable the organization track the completion of tasks and assign ownership/responsibility for the tasks that need to be performed.
As tasks are completed, the status of the task is updated, which moves the process to the next step and in many instances, alerts the individual(s) responsible for completing the next task.
HR Tasks can be generated and assigned two ways:
- Automatically: through the processing of an HR Request. In this case, the HR Tasks are listed within the HR Tasks page where they can be updated and monitored for completion.
- Manually: HR Tasks can be created and assigned as part of the employee record set up and processing. Or, in the event a specific task (for special circumstances, and so on) needs to be assigned.
Assigning HR Tasks Manually
To assign HR tasks manually:
- On the Employee Card, click the Navigate tab and then click Human Resources > HR Tasks.
Employee HR Tasks page displays.
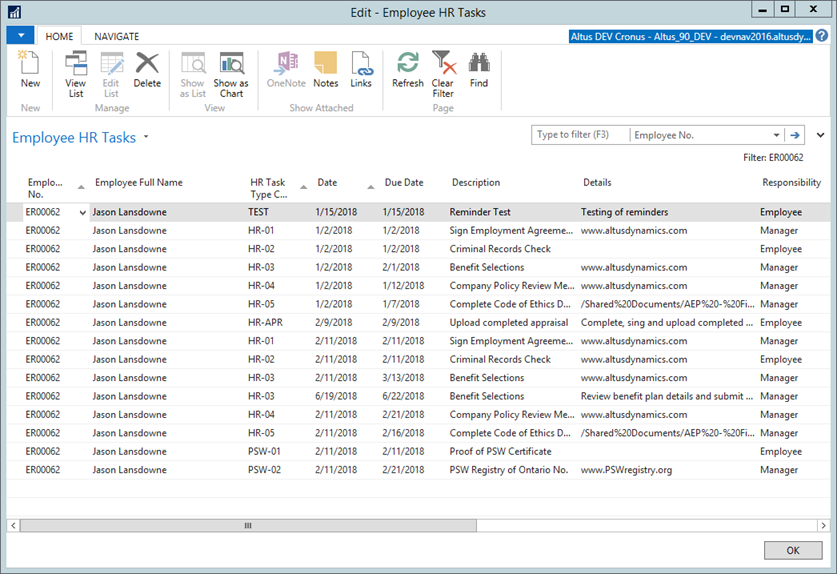
- From the HR Task Type Code drop-down, select the applicable task and press tab or enter.
- The Description, Details, and Responsibility columns are automatically updated based on the HR task type you selected.
- In the Date field, select the current date and press tab or enter.
The Due Date field is automatically populated based on the allotted timeframe attached to the task. - From the Created for HR Position Code drop-down, select the position to which this task relates. If the task is not related to a specific position, leave this field blank.
- On the Action Pane, click New to create additional tasks and repeat steps 2 - 5.
- Once all the required HR Tasks are added, click OK.
Updating the HR Task Status
As tasks are completed, it is important to record their completion by updating the status of the task.
To update the status of outstanding HR tasks:
- On the Employee Card, click the Navigate tab and then click Human Resources > HR Tasks.
Employee HR Tasks page displays.
- In the Completed column, click to add a check mark.
The Completed by EWA User ID and the Completed Date fields are filled in automatically. - If required, adjust the date (in the Completed Date field) to reflect the actual date the task was completed.
If supporting documents are required (or have been supplied) in relation to the HR Task, you can attach them to the task as reference or proof that the required documentation was provided. Additionally, if documents have been attached, you can view them to verify the required information was provided for the HR Task as well. - From the Navigate tab, click Attachment.
The View – HR Portal Attachments page displays.
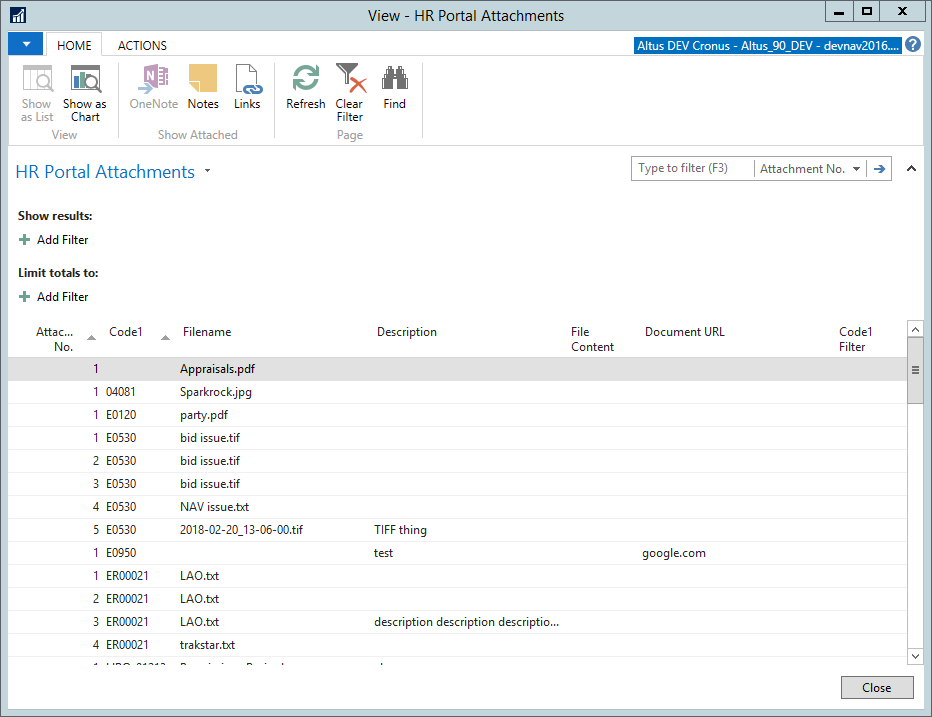
- From the Actions menu, select one of the following options:
- Open File – to view an attachment already uploaded.
- Upload File – to browse to the file/document and attach to the HR Task.
- Delete – to remove an attachment.
- Click Close.
The Employee HR Tasks page re-opens. - Repeat steps 2 – 6 to update any other tasks that are completed.
- When finished, click OK.
Viewing Employee Assignments
The Assignments page stores the current and past position information for the employee. This page displays the active position information for the employee in read-only format. If an employee has concurrent assignments, multiple positions are listed. This view can show all Position Ledger Entries for the employee recorded in the system. As an employee moves to a different position in the organization, the new position information is automatically added to the Employee card upon processing of an HR Request.
To review position information:
- Open the Employee Card.
- From the Home Ribbon, click Assignment.
The Assignments page displays.
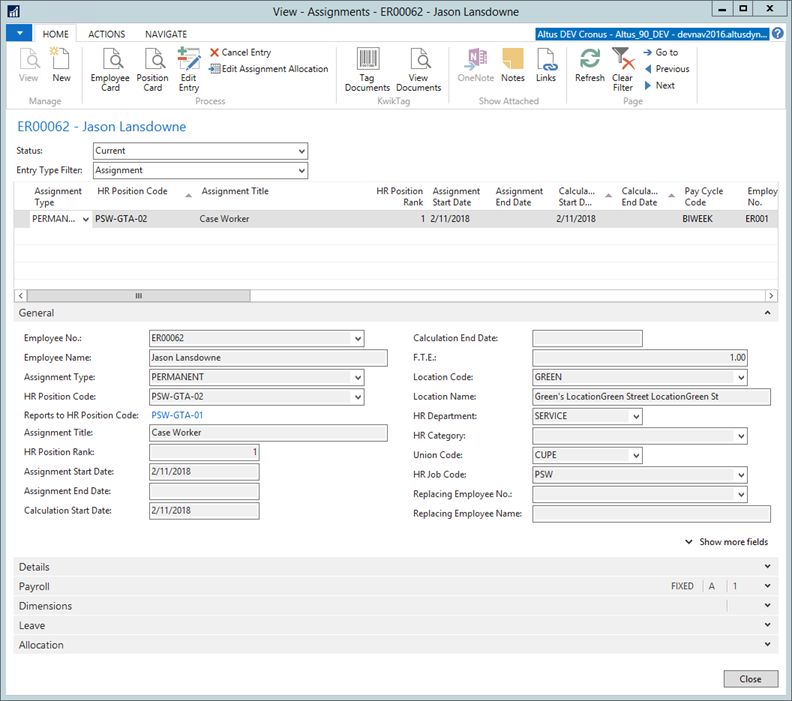
- You can customize the information displayed for positions using these filters:
- Status: Defaults to Current Position. To view position entries of a different status, from the drop-down, select the status you want; Positions To Date, Future, or All.
- Entry Type Filter: Defaults to Assignment. To view different entry types, from the drop-down, select the entry type for filtering the position entries; Budget, Cancelled, or All.
- To view additional details about a particular position, select the line corresponding to the position.
The FastTabs update to contain the details for the selected position. - For descriptions of the columns in the Position Details section, refer to the tables in the following sections:
Assignments Page General FastTab
| Field | Description |
| Employee No. | Displays the employee number. This field automatically updates based on the information provided in the Employee Card. |
| Employee Name | Displays the employee’s name. This field automatically updates based on the information provided in the Employee Card tab. |
| Assignment Type | Displays the category the assignment fall into: Full Time, Part Time, and so on. |
| HR Position Code | Displays the code for the position assigned to the employee. |
| Assignment Title | Displays the title the individual receives under this position. |
| HR Position Rank | Displays the ranking for this position as it relates to other positions currently active. |
| Assignment Start Date | Displays the date upon which the employee begins/began the assignment to this position. |
| Assignment End Date | Displays the date upon which the assignment to this position ends. |
| Calculation Start Date | Displays the date upon which the Displays the date upon which the current HR Position Ledger Entry will be used in payroll calculations. |
| Calculation End Date | Displays the date up to which the current assignments will be used in payroll calculations. |
| F.T.E | Displays the equivalency information for the position. |
| Location Code | Displays the code for the location to which this position belongs. |
| Location Name | Displays the location name. This field is automatically populated based on the Location Code field. |
| HR Department | Displays the department within the organization to which this position belongs. |
| HR Category | Displays the HR Category associated with this position. |
| Union Code | Displays the union code associated with this position. |
| HR Job Code | Displays the job code to which the position is connected. |
| Replacing Employee No. | Displays the employee number for the individual this employee is replacing, if applicable. |
| Replacing Employee Name | Displays the name of the employee being replaced. This field is automatically populated based on the Employee No. field. |
Assignments Page Details FastTab
| Field | Description |
| Assignment Start Reason Code | Displays the reason code for the start of the assignment. |
| Assignment Start Reason Description | Displays a description for the assignment start reason code. |
| Assignment End Reason Code | Displays the reason code for the end of the assignment. |
| Assignment End Reason Description | Displays a description for the assignment end reason code. |
| Seniority Date | Displays the title the individual receives under this position. |
| Seniority Group | Displays the seniority group to which the employee will belong once the seniority date is reached. |
| Probation Type | Displays the probation structure by which the probation time is calculated; Worked Hours, Elapsed Time. |
| Probation End Date (Elapsed) | Displays the end date for the probation period if the probation is calculated by elapsed time. |
| Probation Hours (Worked Hours) | Displays the end date for the probation if the probation is calculated by worked hours. |
| Next Progression Date | Displays the date when the next progression is set to start. |
| Progression Unit | Displays the ‘unit’ by which the progression is calculated or quantified. |
| HR Request No. | Displays the submitted HR Request number to assign the employee to the position. |
| HR Reason Code | Displays the submitted reason code the HR Request falls under. This field is automatically populated based on the HR Request selected. |
| Manager Comments | Displays any comments the employee’s manager has added regarding the position and the employee. This field is automatically populated based on the comments the manager entered on the HR Request. |
| Recruitment No. | Displays the recruitment number, which is a number associated with the recruitment process and is used to link a position to a recruitment activity. |
| Entry No. | Displays automatically calculated entry no. for the records. |
Assignments Page Payroll FastTab
| Field | Description |
| Employer No. | Displays the number/code of the employer. Use the drop-down list to select the employer. |
| Pay Cycle Code | Displays the pay cycle assigned to the position. |
| Pay Structure | Links the appropriate pay structure to this position. |
| Pay Step | Links the appropriate step code to this position. |
| Pay Grade | Links the appropriate pay grade code to this position. |
| Amount | Displays the wage associated with the position (full salary, or hourly wage, etc.). |
| Grid Status | Indicates whether this individual’s salary falls within the pay structure/step/grade for this position. |
| F.T.E | Displays the full time equivalency amount to which this employee is assigned to this position. |
| Pay Structure Amount | Displays the pay amount in the unit of measure established for the pay structure. This field is populated automatically. |
| Payroll Control Code | Displays the payroll control code for this assignment. |
| Hours/Week | Displays the hours per week agreement that the employee will fulfill in this position. |
| Hours/Day | Displays the hours per day agreement that the employee will fulfill in this position. |
| HR Position Hours/Week | Displays the number of hours in a work week defined for the position. This field updates automatically depending on the selection made in the HR Position Code field. Links to the HR Position List. |
| HR Position Hours/Day | Displays the number of hours in a work day defined for the position. This field updates automatically depending on the selection made in the HR Position Code field. Links to the HR Position List. |
| Work Period Code | Displays the work period code for this assignment. |
Assignments Page Dimensions FastTab
| Field | Description |
| Dimensions Codes 1-8 | Displays the dimension to which the employee’s position will be allocated. |
Assignments Page Leave FastTab
| Field | Description |
| Cause of Inactivity Code | Displays the code for the particular absence/reason for the leave. This field is automatically populated based on the HR Request. |
| Cause of Inactivity Desc. | Provides a description for the cause of inactivity code displayed in the previous field. |
| Leave Expected Return Date | If this entry represents a leave, this field displays the date upon which the employee is set to return to work/end of leave date. This field is automatically populated based on the HR Request. |
| Leave Comments | Displays the comments, if any, submitted by the employee’s manager/HR connected to the employee’s leave. |
| Leave Type | Links the appropriate pay grade code to this position. |
| Replacement Employee No. | Displays the employee number for the individual who is replacing this employee. |
| Replacement Employee Name | Displays the name of the individual replacing this employee. This field is automatically populated based on the Employee No. field. |
Position Information Stored on the Assignment Qualifications Page
To access the Assignment Qualifications page:
- On the Assignments page, from the Navigate tab click Assignment Qualifications.
The Assignment Qualifications page displays.
| Field | Description |
| HR Position Ledger Entry No. | Displays automatically calculated entry no. for the position ledger entry. |
| Employee No. | Displays the employee number. This field automatically updates based on the information provided in the Employee Card. |
| Employee Name | Displays the employee’s name. This field automatically updates based on the information provided in the Employee Card tab. |
| Qualification Code | Displays the code representing the qualification. |
| Qualification Description | Provides a description of the Qualification Code. |
| Employer No. | Displays the number/code of the employer. Click the drop-down list to select the employer. |
| HR Job Code | Displays the job code to which the position is connected. |
| HR Position Code | Displays the code for the position assigned to the employee. |
| Location Code | Displays the code for the location required for this assignment. |
| Location Name | Displays the name for the location referenced by the Location Code. |
| Assignment Title | Displays the title the individual receives under this position. |
| Created by HR Request No. | Displays the HR Request number for the request that generated this assignment. |
Working with Payroll Functions
From the Employee Card there are a number of payroll-related functions and options to display the payroll and payroll control information for an employee. Depending on your role, you may just need to review the payroll control and payment details for an employee, or you may be required to perform payroll-related duties.
The Payroll functions include:
- Setting or updating employee pay rates
- Adding employee payroll controls and tax information
- Reviewing employee statistics and payroll entries
- Updating/setting up payroll distribution methods
- Validating employees to generate payroll details
For more details about payroll configurations and calculations, please consult your Payroll documentation.
Viewing an Employee's Earning and Employer Expense Statistics
Earning, expense, and payroll control statistics are captured for each employee and can be viewed using the Statistics function. The total earnings, details for employer expenses, and controls data are broken down by quarter, year to date, and most recent, and prior year to date.
To view the pay statistics for an employee:
- On the HR Employee Card, from the Home Ribbon, click Statistics.
The Employee Statistics page displays.
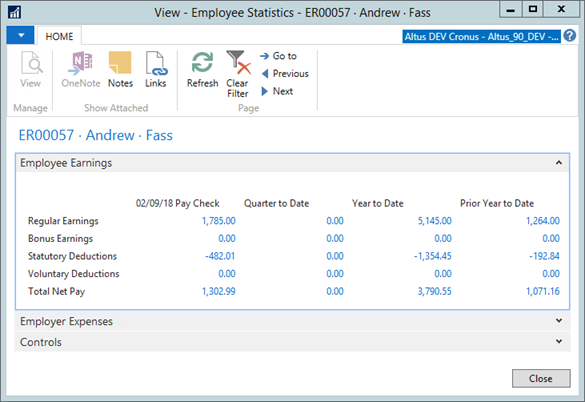
- Click the Expand arrows to display FastTabs not currently displaying.
- The amounts in the Employee Earnings and Employer Expenses FastTabs are hyperlinks. Click a hyperlink to display the Employee Ledger Entries page.
The ledger entries for the item you selected displays.
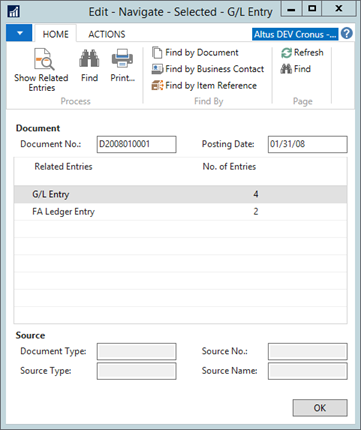
- On the Home Ribbon, click Navigate to see the specific details for each record.
The Edit – G/L Entry page displays.
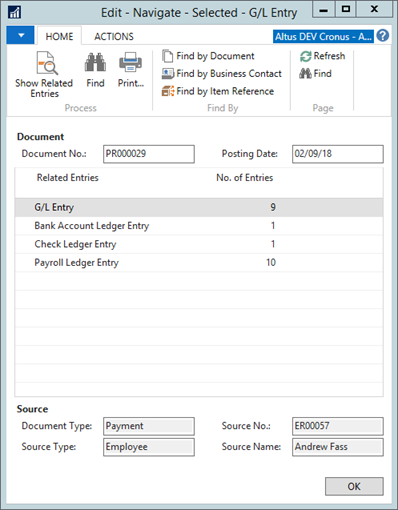
- In the Document No. field, select an entry.
- On the Home Ribbon, click Show Related Entries to display the details for the selected ledger entries. (Click Print to generate a report of the entries.)
The Ledger Entries page opens. From here, there are additional options for working with the ledger entries:- Reverse Transaction – enables you to reverse an entry transaction.
- Dimensions – enables you to view the dimensions attached to this employee.
- Comments/Attachments – enables you to view or add comments or document attachments to the entries.
- When finished click Close in each page to return to the Statistics page where you can display the details for additional employee earning and employer expenses.
- Click Close to return to the Employee Card.
Validating an Employee
Once all the details for an employee are entered in the Employee Card, you can confirm the information and ‘activate’ the employee record. This triggers the activation of the payroll controls and passes the payroll –related information for the employee to the Payroll department for processing.
NOTE: The functionality is based on the Employee Type. The Validation does not function unless you have an Employee Type specified on the Personal FastTab.
To validate an employee:
- From the HR Employee Card, on the Home Ribbon, click Validate Employee.
The Edit - Validate Employee page displays.
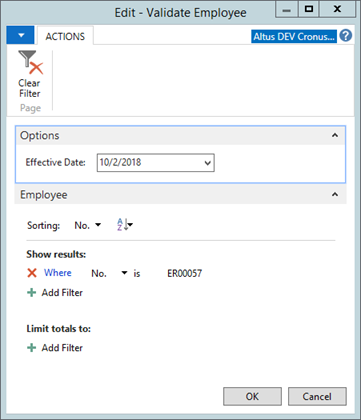
- On the Options FastTab, select the Effective Date for the validation to evaluate.
The default is the current date. - Click OK.
The Payroll Details panel is updated with the payroll status.
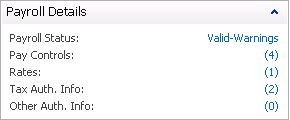
Resolving Validation Errors and Warning
The Payroll Details section indicates if errors or warnings exist after the employee validation process is run. When errors and/or warnings exist, they need to be resolved.
To resolve validation errors and warnings:
- Next to the Payroll Status field, click the Valid-Warnings hyperlink to view the details of any error or warning messages.
The View – Payroll Errors page displays.
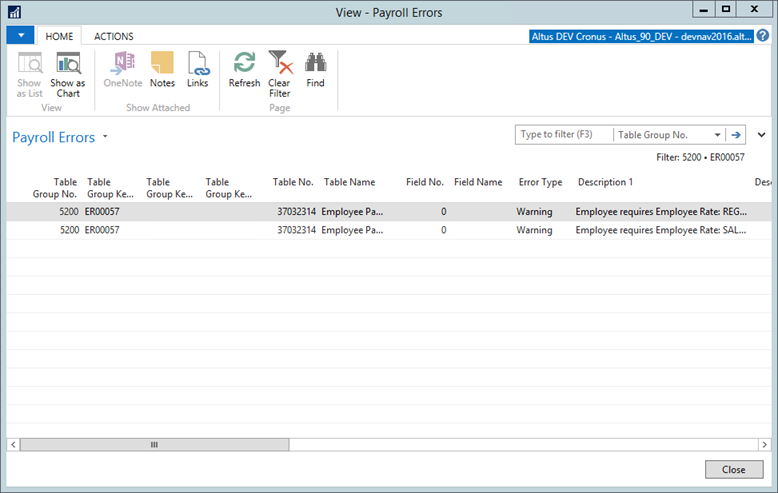
- View the details of each error or warning.
- Click Close.
Correct each of the warnings in the appropriate section of the Employee Card set up and re-run the validation until all errors are cleared and warnings are resolved.
Managing Employee Pay Distribution
Employees can allocate their pay to different banking accounts and institutions. For example, an employee can have an account specifically for vendor expenses. When an employee provides the pay distribution details, you need to create a record for each banking institution or account and enter the appropriate information. This is updated through payroll processing to ensure the distributions.
To define employee pay distributions:
- From the HR Employee Card, on the Home Ribbon, click Pay Distribution.
The Employee Pay Distribution page displays.
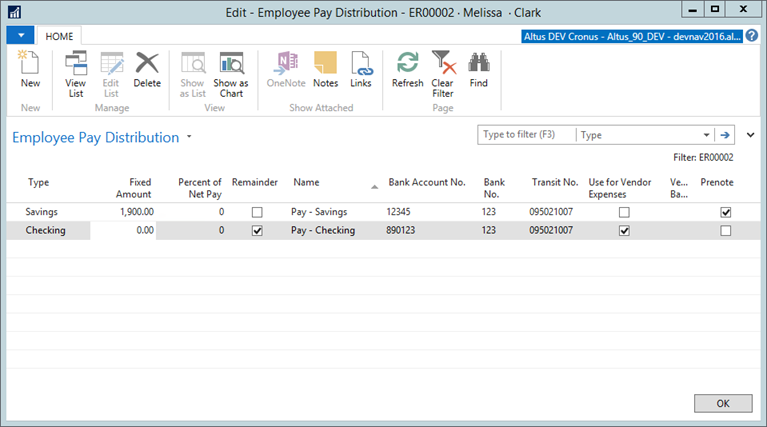
- To add a new record, on the Home Ribbon, click New.
- From the Type drop-down, select where the funds will go (Pay Check, Savings, or Checking).
- If a specific amount is to be distributed, in the Fixed Amount field, enter the dollar amount.
- If a percentage of the net pay is to be distributed, in the Percent of Net Pay field, enter the percentage amount.
- To set the remainder of the pay to this account, select the Remainder check box.
- In the next fields, provide the banking information:
- In the Name field, enter the name of the banking institution.
- In the Bank Account No. field, enter the employee’s bank account number.
- In the Bank No. field, enter the number for the banking institution.
- In the Transit No. field, enter the transit number for the bank.
- To allocate this set amount for vendor expenses, click the Use for Vendor Expenses check box.
- Select the Prenote check box if you want to send a Prenote (deposit instructions only) to the bank. (This is a Payroll function. Contact your Payroll representative if you have any questions.)
A checkmark is automatically entered in this field when an entry is made or a change is made to either the Bank Account No. or the Transit No. field.
NOTE: NAV automatically removes the checkmark from the Prenote field after a successful transmission to the bank. You can manually add the checkmark to this field. It is recommended that you DO NOT manually remove the checkmark from this field. A Prenote run needs to me made to the bank to ensure all transmitted information is correct and that the transmit file is acceptable to the bank. - Repeat steps 2 – 9 to add more accounts for pay distribution.
- When finished, click OK.
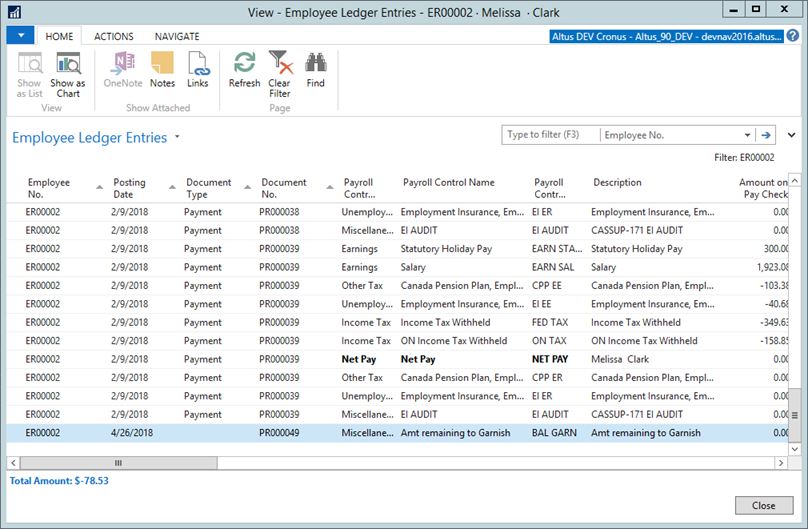
Viewing Employee Ledger Entries
The Ledger Entries function enables you to see the year to date earnings, deductions, contributions, payment parameters (pay cycle, etc.) posted by payroll for an employee.
This information is based on the HR position, benefit enrollment, tax, and other authority information that is pre-defined for the employee.
To view the ledger entries for an employee:
- On the Home Ribbon, click Ledger Entries.
The Employee Ledger Entries page displays.
- Scroll through the columns to view the information for each ledger entry.
- To view a ledger entry in more detail, select the appropriate row and from the Navigate Ribbon, click Navigate.
The Navigate page opens providing more information for the ledger entry. From here you can view the entries in detail.
- On the Home Ribbon, click Show Related Entries. (Click Print to generate a report of the entries.)
The ledger entries page opens. From here, there are additional options for working with the entries:- Reverse Transaction – enables you to reverse an entry transaction.
- Dimensions – enables you to view the dimensions attached to this employee.
- Comments/Attachments – enables you to view or add comments or document attachments to the entries.
- When you finish, keep clicking Close until you return to the Employee Card.
Viewing Payment Breakdown with the Payroll Check Ledger
The Payroll Check Ledger enables you to see the checks that have been created for an employee. From this page, you can view the specific breakdown (deductions, contributions, and so on) for a payment.
To see the pay check details for an employee:
- From the HR Employees page, on the Home Ribbon, click Payroll Check Ledger.
The Payroll Check Ledger page displays.
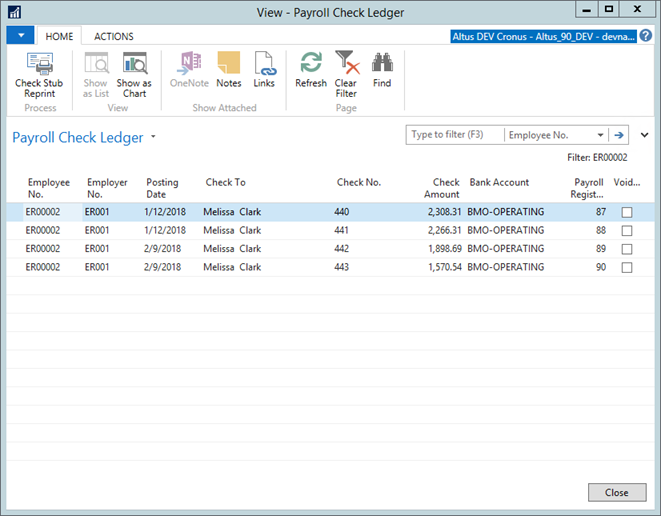
- Scroll through the columns to view the information for each pay check ledger entry.
To view the payment breakdown for a check in more detail, select the line corresponding to the payment. - On the Actions Ribbon, click Details.
The Payroll Check Ledger Details page opens providing the details for the individual pay check.
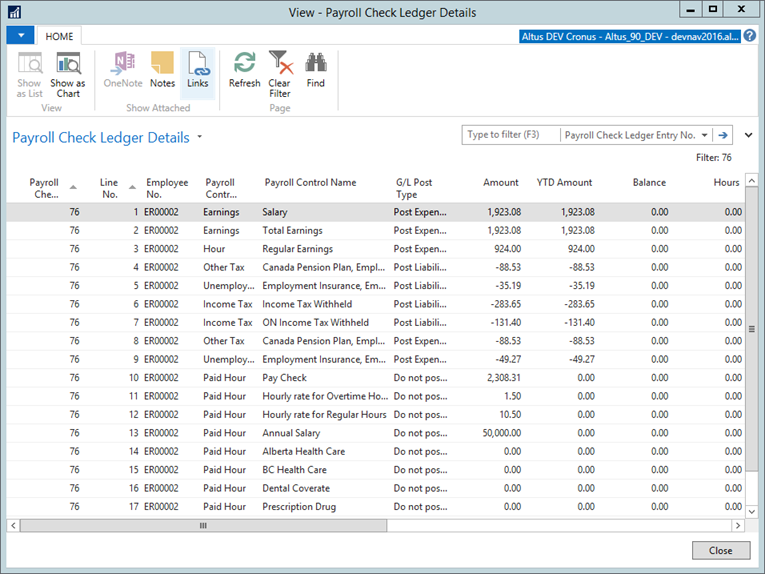
- Click Close.
- To reprint the pay stub, on the Action Ribbon, click Check Stub Reprint.
The Edit – Payroll Check Stub page opens.
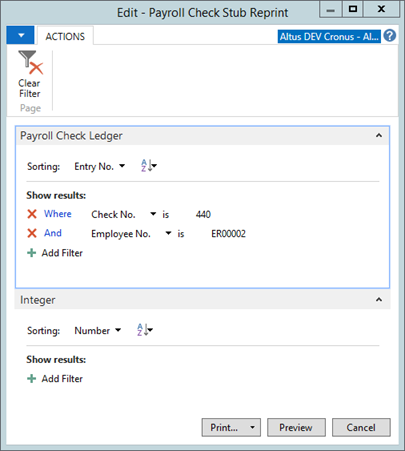
- Select the filters as desired, and then click Print (select PDF from the Print drop-down to create an electronic version for emailing, and so on).
NOTE: Click Preview to view the check stub before printing. - In the Print dialog, click Print.
The pay stub is reprinted. - Click Close to return to the Employee Card.
Generating a Record of Employment from the Employee Card
When an employee goes on leave or is terminated, a Record of Employment must be generated.
To generate an ROE for an employee:
- On the HR Employee Card, click the Navigate tab and then click Payroll > Records of Employment.
The Employee Records of Employment page displays.
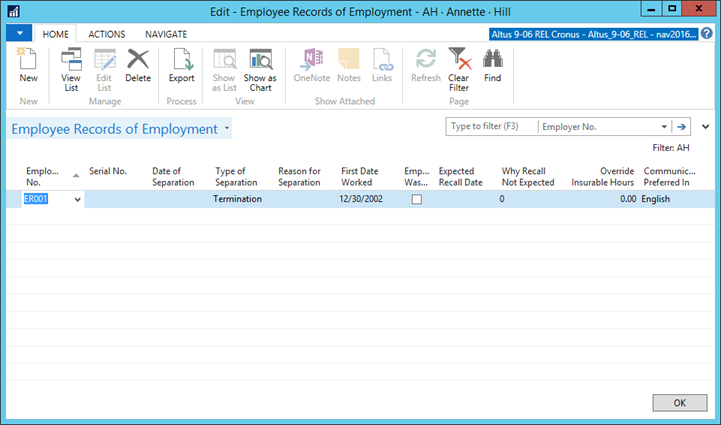
- On the Home Ribbon, click New. A new record is inserted.
- Use the following table to complete the details for the Record of Employment:
| Field | Description |
| Employer No. | Displays the employer number applicable to this employee. |
| Serial No. | Displays an auto-generated number for the ROE. Used by the CRA for tax purposes. |
| Date of Separation | From the drop-down, select the date upon which the employee’s relationship with the organization ended. |
| Type of Separation | From the drop-down, select the option applicable to this employee’s situation. |
| Reason for Separation | From the drop-down, select the reason for separation. |
| First Date Worked | Displays the date upon which the employee first started working within the organization. This field is auto-populated based on the employee record. |
| Employee Was Salaried | Select this check box if this is a salaried employee. |
| Expected Recall Date | If this is a lay-off or contract end situation and the employee will be called back to work, enter the expected date of return. |
| Why Recall Not Expected | If the employee will not be recalled, from the drop-down, select the applicable reason. |
| Override Insurable Hours | Displays the number of insurable hours required to override insurable hours. |
| Communication Preferred In | Displays the language that the employee prefers to communicate with. |
- When finished entering the ROE details, click OK.
Records of Employment “ROE” can be generated from the original HR Request for an employee that has been terminated or is inactive due to a ‘leave’.
Adding Detail Lined to the ROE
The Detail Lines option enables you to update the payment history for an employee by adding entries that were not recorded. You can also load details lines from the last pay and review/edit the data.
To add detail lines to the ROE:
- From the Navigate Ribbon, click Detail Lines.
Setting Up Allocations for an Employee
If an employee’s costs are to be allocated across multiple dimension combinations relatively consistently each pay period, you can define the allocation in the Employee Allocations page.
To set up allocations:
- HR Employee Card, click the Navigate tab and then click Payroll > Allocation.
The Edit - Employee Allocations page displays.
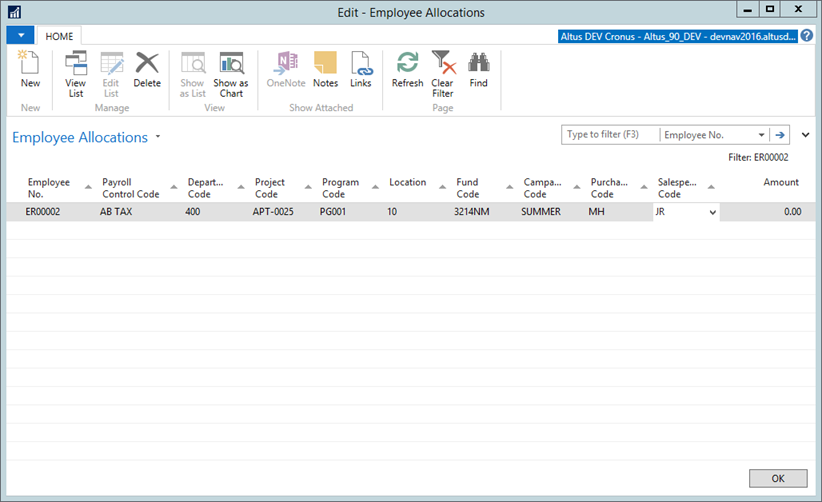
- From the Payroll Control Code drop-down, select the appropriate code.
- In the remaining fields, enter the appropriate Dimension codes for the allocation.
- In the Amount field, enter the amount for the allocation.
NOTES:
- The system treats the total of the amount in all the lines as 100% and considers the amount in each of the lines as a percentage of that total. If you are working with percentages, make sure the total adds up to 100%.
- The allocations are loaded into the Payroll Journal using the Load Employee Allocation function.
- Repeat steps 2 – 4 to set up any additional allocations.
- Click OK to close the Employee Allocations page.
Understanding Payroll Controls in NAV
Although payroll controls are managed through the Payroll Department, as Human Resources representative, it is a good practice to understand how the payroll controls work and how they are applied to employees and positions. Under some circumstances, you may be required to update the payroll controls for an employee.
Every piece of payroll information tracked by NAV is kept using a payroll control, whether that information is hours worked, pay earned, taxes withheld, payroll taxes paid by the employer, weeks worked, vacation earned or taken, or net pay. Payroll controls determine what kind of payroll information is kept, how it is categorized, how it appears on forms required by the government and on cheques, and how it is posted to the general ledger.
When payroll is processed, the application is triggered to cycle through each employee, one at a time. For each employee, all the payroll controls are executed. The payroll controls are essentially mini-programs that can calculate amounts, appearing in the calculation order and on the employee’s card. Each payroll control creates a line in the payroll journal. Once all the payroll controls for the first employee are executed, the process is executed for the next employee and continues until all employees are processed.
Updating Payroll Controls
If the employee has been previously set up with payroll controls for positions where position-specific controls should be used, you need to reset these employee records to use the appropriate position-specific controls rather than the payroll controls previously defined to the employee individually.
NOTE: Each time an employee has a position change (annual increment, position change, extension, and so on) a new HR Ledger Entry is created. All position-specific payroll controls automatically stop and must be added back to the employees file with the new position entry.
Employee-defined Payroll Controls can be revised and updated using one of the following three methods:
- Within the Employee Card.
- Using the Attach Control Group function.
- Using an HR Request.
Updating the Payroll Controls within the Employee Card
To update the ‘Employee’ Payroll Control within the Employee Card:
- From the HR Employee Card, click the Navigate tab and then click Payroll > Pay Controls.
The Edit - Employee Payroll Controls page displays.
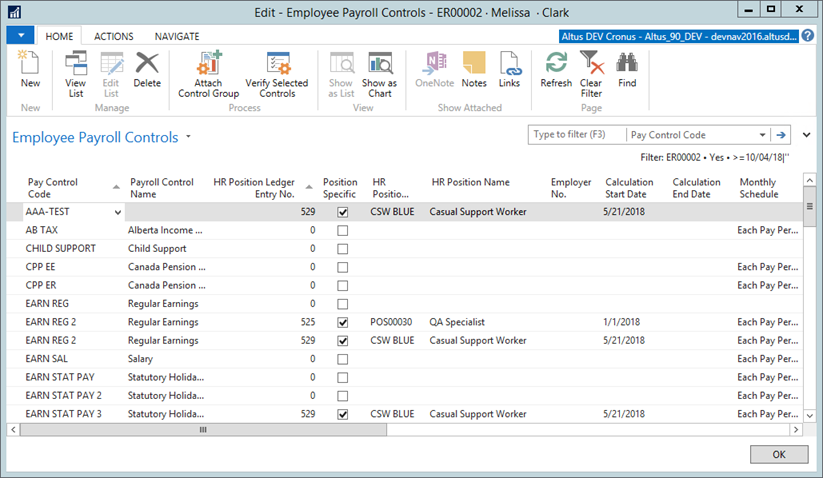
- In the Pay Control Code column, find the Employee Payroll Control record(s) requiring an update.
- In the HR Position Ledger Entry No. field, enter the number to which the control should apply.
- Press tab.
A warning message displays. - Click Yes to proceed with the change.
- Click Yes again to rename the record.
- In the Calculation Start Date column, edit the calculation start date, if it should be different than the defaults from the original position.
- In the Calculation End Date column, edit the calculation end date, if it should be different than the defaults from the original position.
- Click OK.
NOTE:
A second set of dates has been added to the HR Position Ledger Entries. These dates are now used on all calculations and generally default from the Assignment Start and End Dates. The calculation dates can be overwritten if the calculation dates need to vary from the assignment dates.
Updating the Payroll Control Using the 'Attach Control Group' Function
To update payroll controls using the Attach Control Group function:
- On the HR Employee Card, click the Navigate tab and then click Payroll > Pay Controls.
The Edit - Employee Payroll Controls page displays.
- Delete all of the existing payroll controls:
- Select the first control and hold down the shift key and scroll to the bottom of the list.
- From the Actions menu, choose Delete.
- In the confirmation page, click Yes.
- The payroll controls attached to the employee are deleted.
- On the Home Ribbon, click Attach Control Group.
The Edit - Attach Ctrl. Grp. To Emp. page displays.
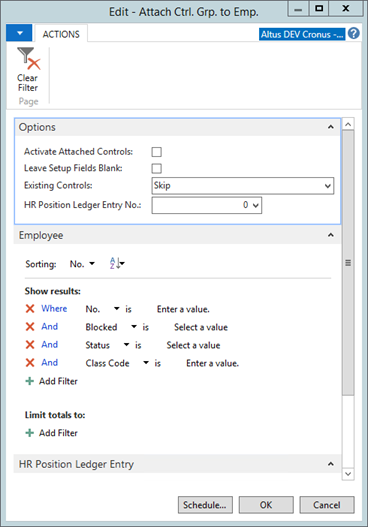
- Click the Expand icon to display the Payroll Control Group FastTab.
- Select the appropriate payroll control group.
- In the Options section, in the HR Position Ledger Entry No. field, enter the ledger entry number to apply to the employee.

- Click OK.
The payroll controls attached to the group you selected are assigned to the employee.
Updating the Payroll Controls Using an HR Request
To update payroll controls by submitting an HR Request:
- Create an HR Request with a reason code that has a Process Type (Leave, Details Change, etc.) that attaches Payroll Controls to the employee.
- Process the request and review the entries.
The records have automatically been updated based on the HR Request.
For detailed steps, see ‘Creating an HR Request’.
Adding Comments to the Employee's Record
You can add information as comments to a Comment Sheet for an employee. This information is stored with the employee record.
To add comments/notes to the employee’s record:
- On the HR Employee Card, click the Navigate tab and then click Employee.
The Comment Sheet page displays.
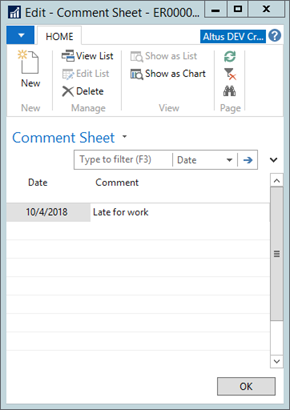
The current date is automatically inserted in the first available row. - In the Comments field, enter the information you want to append to the employee’s card.
- Click OK when finished.
Adding Dimensions
Adding Dimensions to the employee means that by default all the employee costs will be allocated to the dimensions selected. Dimensions can be set or overwritten in Time Entry, Scheduling Entries, on Position Ledger Entry Assignments or through specific Payroll controls.
NOTE: The Dimension fields available depend upon your organization’s specific implementation. For information on Dimensions, refer to your G/L (General Ledger) documents for details.
Providing Alternative Addresses
To store additional addresses for the employee:
- On the HR Employee Card, click the Navigate tab and then click Alternative Addresses.
The Edit - Alternative Addresses page displays.
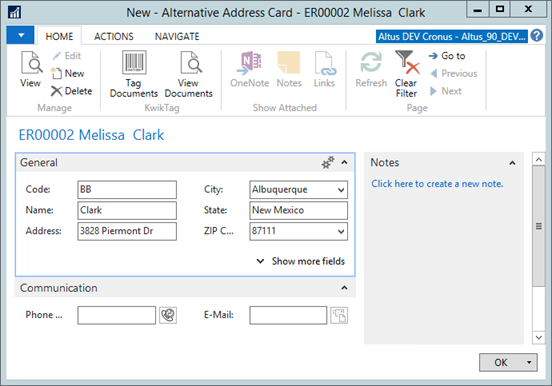
- From the Home Ribbon, click New.
The New - Alternative Addresses page displays. - Provide the address and contact details for the employee’s alternate address.
- Click OK when finished.
Getting Directions from the Online Map
The Online Map enables you to quickly get directions to or view an employee’s address on an online map.
To select an online map for the employee:
- On the HR Employee Card, click the Navigate tab and then click Online Map.
Your default browser opens displaying a map of the current address.
Viewing the Fixed Assets
Specific assets can be linked to employees.
To view the fixed assets under the responsibility of this employee:
- On the HR Employee Card, click the Navigate ribbon and then click Human Resources > Fixed Assets.
The Fixed Asset List page opens displaying all assets with this employee’s employee number entered in the Responsible Employee field on the Asset card.