

Position Management offers a number of powerful functions that make employee recruitment and employee compensation easy to manage and track. Additionally, Position Management enables you to track:
- Positions
- Position History
- Budget FTEs
There are some set up steps required for the Position Management functions that must be completed before you can begin defining the jobs and positions that you’ll then assign to new recruits and existing employees.
Once you set up the initial data for Position Management (job criteria, reason codes, and job functions), you can connect this data to the relevant jobs and positions in your organization. From there, positions are assigned to employees streamlining and simplifying the entire employee recruitment and employee compensation process.
Note: Some of the setup functions within Position Management Setup are also duplicated in the Human Resources Management Setup. To perform the setup procedures for the following, click the links to display the applicable Human Resources Management Setup sections:
- Adding Applicable Unions
- Setting Up HR Task Types
- Defining Miscellaneous Article Types
- Assigning Miscellaneous Article Items
Creating HR Job Criteria
The HR Job Criteria option enables you to define the types of skills, qualifications, and challenges that a specific position requires. The job criteria relate to the compensation an employee receives when hired to a position, so it is important that the job criteria required for the position is clearly defined.
To create the required HR Job Criteria:
- In the Search field, type HR Job Criteria and select the page from the drop-down list.
The HR Job Criteria page displays.
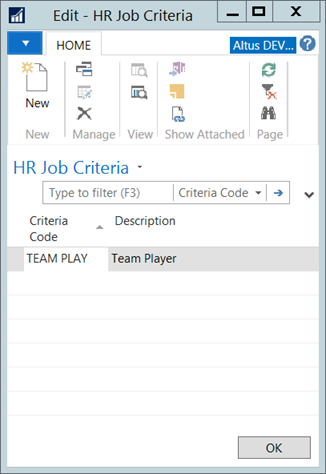
- On the Home Ribbon, click New. A new record is inserted.
- In the Code column, enter a unique code for the job criteria.
- In the Description column, provide an explanation for the code.
- When you finish defining your required job criteria, click OK to close the page.
Defining HR Reason Codes
Reason Codes are attached to the employee’s history via an HR Request and HR Position Ledger Entries. They are used to categorize the type of transaction and the action that is performed when the HR Request is processed (for example, Hire, Assignment change, or Termination). Reason codes enable the Human Resources department to maintain complete status records for an employee and track the individual’s progression or changes throughout their entire tenure with the organization.
These reason codes also link with a background process, which depending on the selected option performs one or multiple updates.
A sample list of reason codes is displayed below, depending on your processes and organization’s needs, this list can be expanded upon.
| Field | Field |
| Hire | Creates new employee record and assigns the employee to a position. |
| Assignment Changes | Closes current assignment and opens new Position Assignment. |
| Details Changes | Changes items such as pay rate, FTE on the current position. |
| Notification | Creates a Notification entry to be viewed by Manager, Payroll, HR, the employee. |
| Notification -MGR | Creates a notification directed from HR to the employee’s Manager. |
| Ont-time Payment | Creates an entry for payroll to process a onetime payment using a selected Payroll Control (Bonus request). |
| Termination | Starts the employee termination workflow. |
| Payroll Entry | Changes the payroll details for the position. |
To define a reason code:
- In the Search field, type HR Reason Codes and select the page from the drop-down list.
HR Reason Codes page displays.

- In the Home Ribbon, click New. A new record is inserted.
- In the Code column, enter a unique code for the ‘reason’ (for example, Hire, Change, Termination).
- In the Description column, provide a detailed explanation for the code.
- In the Instructions column, enter the details for when the reason code should be applied.
- In the Process Type column, select the process type that applies to the reason code.
- If portal access is required to apply this reason code, add a checkmark to the Portal Access check box.
- If action is required on the part of human resources, add a checkmark to the HR Action Required column.
- If action is required on the part of payroll, add a checkmark to the Payroll Action Required column.
- If manager approval is required to apply this reason code, add a checkmark to the Manager Approval if Delegate column.
- When you finish defining your required reason codes, click OK to close the page.
Adding HR Functions
HR Functions refer to the automated processes that can be performed by the application when an HR Request is processed.
Note: Typically, the HR functions used by your organization are pre-programmed into the system and this list of functions and their corresponding Function IDs are imported at the time of application set up and implementation. Meaning, for the most part, the HR functions you need are pre-populated for you. Generally, additional HR Functions would only be added after that, if specifically instructed by a developer and the specific function ID provided.
To add an HR function:
- In the Search field, enter HR Functions, and select the page from the drop-down list.
The HR Functions page displays.
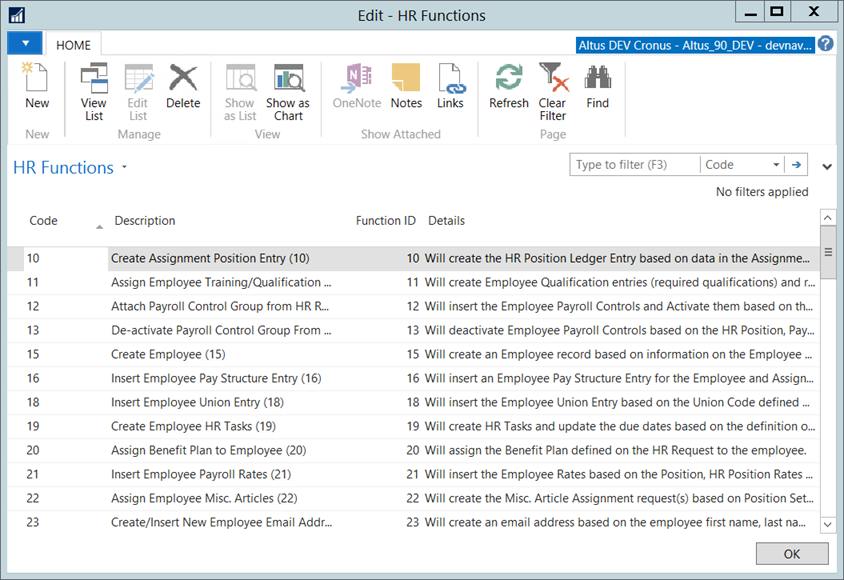
- In the Home Ribbon, click New. A new record is inserted. In the Code column, enter a unique code for the HR function (for example, 001CreateEmp, and so on).
- In the Description column, provide a detailed explanation for the code.
- In the Function ID column, enter the Function No. that corresponds with the desired process. For a list of the current supported processes and their function IDs, contact your consultant or support.
- When you finish defining all the required HR functions (tasks) related to any and all positions, click OK to close the page.
Understanding HR Functions
The following table provides a list of HR Functions that would typically be connected with the most commonly used reason codes to assist you in understanding how HR Functions are attached to Reason Codes.
The Function IDs are unique numbers used to distinguish each Reason Code and HR function combination.
Note: The following provides a ‘sample’ of typical HR Functions and Reason Codes. The HR functions used by your organization may be slightly different. For the most part, the HR functions you need are pre-populated for you during implementation; however, additional HR Functions can be added, if specifically instructed by a developer and the specific function ID is provided. Contact your system administrator for details.
| HR Reason Codes | HR Function | Function ID |
| HIRE | Create employee record | 15 |
| Create position entry | 10 | |
| Create employee pay structure entry | 16 | |
| Create employee HR tasks | 19 | |
| Assign benefit plan | 20 | |
| Assign employee miscellaneous articles | 22 | |
| Assign employee training/qualifications | 11 | |
| Insert employee payroll controls | 12 | |
| Deactivate payroll controls | 13 | |
| Insert payroll entry | 14 | |
| Insert employee rates | 21 | |
| Insert employee other authorities | 17 | |
| Insert employee union | 18 | |
| Assign termination date to employee | 30 | |
| Close HR position entry upon termination | 31 | |
| Collect Misc. Articles from employee | 32 | |
| Copy Position ledger entry | 33 | |
| Change Access End date pm AEP user when employee terminated | 34 | |
| Validate Payroll Status | 35 | |
| Insert ROE entry (must be after Functions 36 or 37) | 38 | |
| Details Change | Close position | 31 |
| Copy position ledger entry | 33 | |
| Create employee pay structure entry | 16 | |
| Assignment Change | Close position | 31 |
| Create position entry | 10 | |
| Create employee pay structure entry | 16 | |
| Insert employee payroll controls | 12 | |
| Deactivate payroll controls | 13 | |
| Insert employee rates | 21 | |
| Insert employee other authorities | 17 | |
| Insert employee tax authorities | 42 | |
| Insert employee union | 18 | |
| Create employee HR tasks | 19 | |
| Assign benefit plan | 20 | |
| Assign employee miscellaneous articles | 22 | |
| Assign employee training/qualifications | 11 | |
| Termination | Assign termination date to employee | 30 |
| Close HR position entry when terminated | 31 | |
| Insert termination position entry | 36 | |
| Collect miscellaneous articles from employee | 32 | |
| Change access End Date on AEP user when employee is terminated | 34 | |
| Insert ROE entry (must be after Functions 36 or 37) | 38 | |
| Payroll Entry | Insert payroll entry | 14 |
| Termination and Rehire | Close HR position entry when terminated | 31 |
| Insert termination position entry | 36 | |
| Insert ROE entry (must be after Functions 36 or 37) | 38 | |
| Insert re-hire | 41 | |
| Create employee pay structure entry | 16 | |
| Insert employee payroll controls | 12 |
Assigning HR Process Functions to Reason Codes
There are a number of activities/functions that need to be performed for any given reason code. For each reason code, you need to assign the appropriate functions that need to be performed and the order in which the activities must be completed.
For example, a ‘Hire’ requires that you create the employee record, create a position entry for the hire, attach a pay structure, etc.
To assign process functions to reason codes:
- In the Search field, type HR Reason Codes and select the page from the drop-down list.
The HR Reason Codes page displays.
- On the Ribbon, click HR Process Function.
The HR Process Functions page opens.
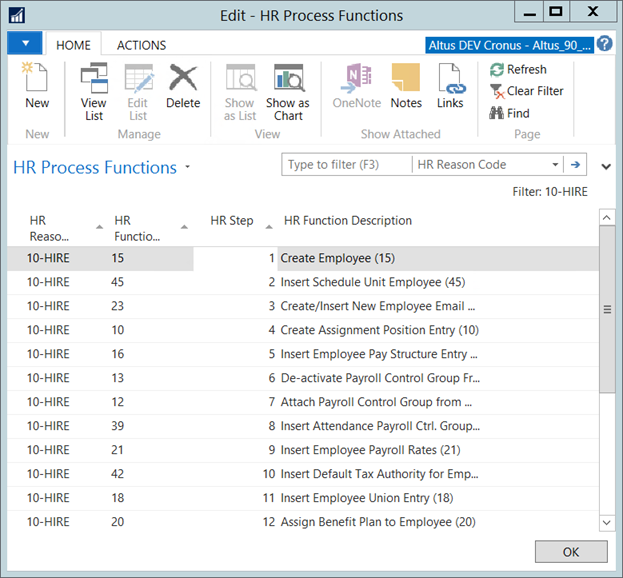
- On the Ribbon, click New. A new record is inserted.
- From the HR Reason Code drop-down, select the reason code.
- From the HR Function Code drop-down, select the appropriate HR function (task) associated with the reason code.
- The HR Function Description column is automatically populated based on the HR Function code.
- In the HR Step field, enter the step in the process (hire, termination, etc.) that this task needs to be completed.
- When you finish assigning the required process functions for the reason code, click OK.