

The Pay Structures table enables you to specify a pay rate or pay rate range for each unique combination of pay grade and step within your organization. Depending on the different pay scales used within your organization, you can define as many pay scales as required.
There are two types of pay structures, which are based upon the type of grid: fixed and band. A fixed pay structure grid is where you specify a single pay amount for each combination of grade and step. There is a single pay rate associated with a specific grade/step combination and the employee may be paid that exact amount or they may be under or over that exact amount.
| Grade Step | Step | Amount |
| Grade A | Step 1 | $6. |
| Grade A | Step 2 | $6.25 |
| Grade A | Step 3 | $7.00 |
| Grade B | Step 1 | $6.75 |
| Grade B | Step 2 | $7.15 |
| Grade B | Step 3 | $7.85 |
A band pay structure grid is where you specify a lower and upper limit for each combination of grade and step. An employee may be paid any amount within the range and be considered “normal” or they may be paid “below” the lower limit rate or “above” the upper limit rate.
| Grade Step | Step | Lower Amount | Upper Amount |
| Grade A | Step 1 | $6.00 | $8.25 |
| Grade A | Step 2 | $7.15 | $10.85 |
| Grade A | Step 3 | $9.45 | $12.75 |
| Grade B | Step 1 | $8.00 | $10.35 |
| Grade B | Step 2 | $9.75 | $12.95 |
| Grade B | Step 3 | $11.85 | $15.00 |
Under each defined pay structure, you can define an unlimited number of grid header records. This enables your organization to retain the history of the grid and grid detail lines over time. This enables your organization to maintain a history of the rates at a particular given point in time and also can support retroactive calculations, if required.
Each payment structure contains a combination of pay grades and pay steps. You need to set up your pay grades and steps first and then you can create your payment structures and assign specific pay grids (combination of pay grades and steps) to each payment structure.
Defining Pay Structures for Your Organization
Before you can assign a specific pay structure to an HR job and position, you need to set up the pay structures for your organization. Then, once this is defined, you can easily manage pay grades for hourly, salaried, contract, etc. jobs. Providing the appropriate parameters associated with a pay structure enables you to attach the pay structure to the HR Position, which you then attach to each applicable employee to initiate automatic calculation of earnings, etc.
To create a pay structure:
- In the Search field, type Pay Structures and select the page from the drop-down list.
The Pay Structures page displays.
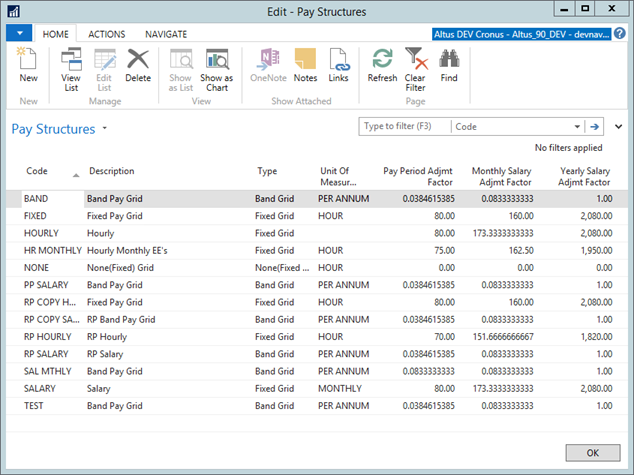
- In the Ribbon, click New. A new record is inserted.
- In the Code field, enter a code for the pay structure (for example, hourly, salary, contract, and so on).
- In the Description field, provide an explanation for the pay structure.
- In the Type field, select a pay grid – None (Fixed Amount), Fixed, or Band.
- In the Unit of Measure Code field, select the applicable unit of measure.
Note: For assistance in determining the adjustment factors (Pay Period, Monthly Salary, and Yearly Salary, see Understanding Adjustment Factors for Pay Structures. - In the Pay Period Adjmt Factor field, specify a factor to be used to convert the amount in the grid to the pay period amount.
- In the Monthly Salary Adjmt Factor field, specify a factor to be used to convert the amount in the grid to the monthly salary amount.
- In the Yearly Salary Adjmt Factor field, specify a factor to be used to convert the amount in the grid to the yearly salary amount.
TIP: To save time, you can copy a pay structure and revise where needed. Select the pay structure and from the Actions menu, select Copy. - When you finish defining your required pay structures, click OK to close the page.
Understanding Adjustment Factors for Pay Structures
The adjustment factors are used to calculate the Pay Period, Monthly and Annual amounts that are displayed on the HR request Payroll sections. Set up examples follow below.
For example, if your pay periods are semi monthly, and your pay structures are defined as annual amounts, the Pay Period Adjmt Factor will be 0.41667 (1/24). If you pay periods are monthly and your pay structures are monthly amounts the pay period adjustment factor will be 1.
Annual Pay Structure Unit Amount
| Annual Adjmt Factor | Formula | Monthly Adjmt Factor | Formula | Pay Period Adjmt Factor | Formula | |
| Bi-weekly | 1 | 1 | 0.083333333 | 1/12 | 0.038461538 | 1/26 |
|---|---|---|---|---|---|---|
| Semi-monthly | 1 | 1 | 0.083333333 | 1/12 | 0.041666667 | 1/24 |
| Monthly | 1 | 1 | 0.083333333 | 1/12 | 0.083333333 | 1/12 |
| Bi-Weekly | 1950 | 1950 | 162.5 | 1950/12 | 75 | 1950/26 |
| Semi-monthly | 1950 | 1950 | 162.5 | 1950/12 | 81.25 | 1950/24 |
| Monthly | 1950 | 1950 | 162.5 | 1950/12 | 162.5 | 1950/12 |
Hourly Pay Structure Unit Amount
Note: This pay structure amount assumes 1950 hrs/year.
| Annual Adjmt Factor | Formula | Monthly Adjmt Factor | Formula | Pay Period Adjmt Factor | Formula | |
| Bi-weekly | 1 | 1 | 0.083333333 | 1/12 | 0.038461538 | 1/26 |
|---|---|---|---|---|---|---|
| Semi-Monthly | 1 | 1 | 0.083333333 | 1/12 | 0.041666667 | 1/24 |
| Monthly | 1 | 1 | 0.083333333 | 1/12 | 0.083333333 | 1/12 |
| Bi-weekly | 1950 | 1950 | 162.5 | 1950/12 | 75 | 1950/26 |
| Semi-Monthly | 1950 | 1950 | 162.5 | 1950/12 | 81.25 | 1950/24 |
| Monthly | 1950 | 1950 | 162.5 | 1950/12 | 162.5 | 1950/12 |
Copying Pay Structures
You can copy existing pay structures to save time and make pay structure management more efficient.
To copy a pay structure:
- In the Search field, type Pay Structures and select the page from the drop-down list.
The Pay Structures page displays.
- Select the pay structure you want to duplicate.
- In the Ribbon, click the Actions tab and then click Copy Structure.
The Copy Pay Structure page displays.
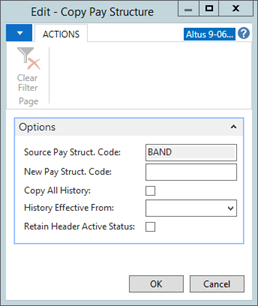
- The Source Pay Struct. Code field is automatically populated with the name of the pay structure you are copying.
- In the New Pay Struct. Code field, enter the name for the new pay structure.
- To copy all the history for this pay structure, add a checkmark to the Copy All History checkbox.
- To just copy specific history, from the History Effective From drop-down, select the date from which you want to copy the pay structure history. (If you selected the Copy All History check box, this option is unavailable.)
- If you want the grid header to remain active, add a checkmark to the Retain Header Active Status check box.
- Click OK. The new pay structure is added to the Pay Structure page.
- Make changes or fill in additional date to the newly added pay structure as required.
Setting Up the Grid Headers
Under each defined pay structure, your organization is able to define an unlimited number of grid header records. This allows you to retain the history of the grid and grid detail lines over time.
To set up grid headers:
- In the Pay Structures page, click the Navigate tab and then click Grids.
The Pay Structures Grid Headers page displays.
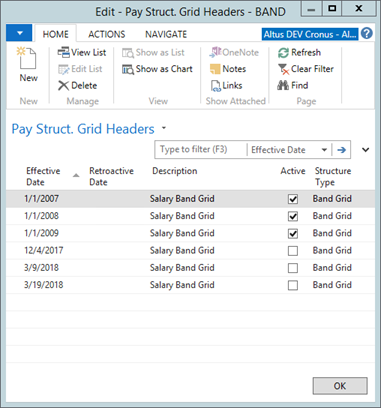
- In the Ribbon, click New. A new record is inserted.
- In the Effective Date column, enter the date upon which the new grid takes effect.
- In the Description column, enter a description for the pay structure grid.
- In the Active column, click to add a check mark if the grid header is active.
- In the Structure Type column, from the drop-down, select the structure type for the grid header.
- Click OK to close the page.
Maintaining Grid Details
You can view the grid details for a selected grid header.
- In the Pay Structures Grid Headers page, on the Ribbon click the Navigate tab and then click Details.
The Grid Header Details page displays.
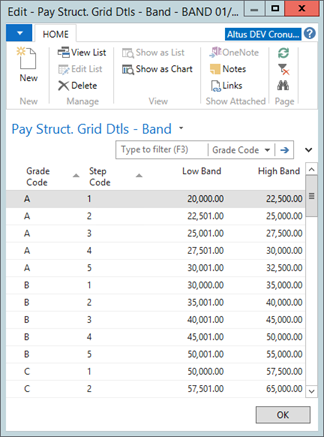
- In the Ribbon, click New. A new record is inserted.
- From the Grade Code drop-down, select the pay grade code.
- From the Step Code drop-down, select the step code.
- In the Fixed Amount field, enter the appropriate compensation amount for the grid header.
- Click OK to close the page when you finish.
Copying Grid Headers
You can copy existing grid header structures to save time and make grid header creation more efficient.
To copy a grid header:
- In the Grid Headers page, on the Ribbon click the Actions tab and then click Copy Header.
The Copy Pay Structure Header page displays.
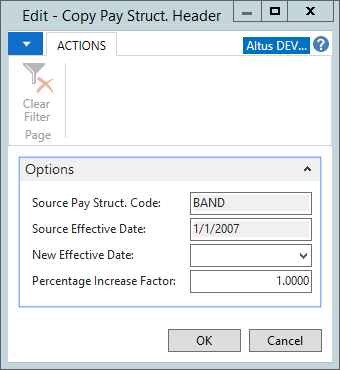
- The Source Pay Struct. Code and Source Effective Date fields are automatically populated with the code and date of the copied pay structure.
- In the New Effective Dates field, enter the date for the new pay structure to take effect.
- Click OK. The new pay structure is added to the Pay Structure Grid Headers page.
- Make any changes to the newly added structure as required.
Activating a Grid
Depending on the current requirements, you can activate or deactivate grids as needed.
To activate a grid:
- In the Pay Structure Grid Headers page, select the pay structure grid you want to activate.
- From the Ribbon, click the Actions tab and then click Activate Header.
The Activate Grid Header page displays.
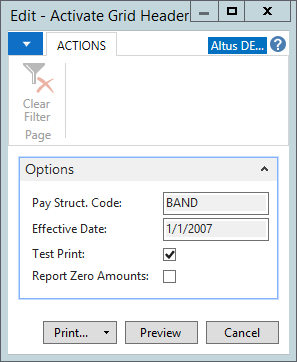
- Click either Print or Preview to active the grid.
NOTE: A grid can be deactivated only if not used in Employee Pay Structure records.
Deactivating a Grid
To deactivate a grid:
- In the Pay Structure Grid Headers page, select the pay structure grid you want to deactivate.
- From the Ribbon, click the Actions tab and then click Deactivate Header.
A confirmation window opens. - Click Yes.
The Pay Structures Grid Headers page re-opens. The header you deactivated no longer has a check mark in the Active field.
Setting Up Pay Grades
The details of the pay grades are already defined based on the requirements pre-supplied by your organization. All that is required is that you add the pay grades applicable to the required positions within your organization. For each position, you need to assign the number of pay grades it contains.
Setting the pay grades associated with each position facilitates the employment process and payroll set up because it enables your organization to determine a fixed framework of salary ranges and/or hourly payment ranges. When creating a position using the Position card, you then assign an appropriate pay grade to the position. The appropriate pay framework for a general position and specific job is then automatically assigned.
To set up pay grades:
- In the Search field, type Pay Grades and select the page from the drop-down list.
The Pay Grades page displays.
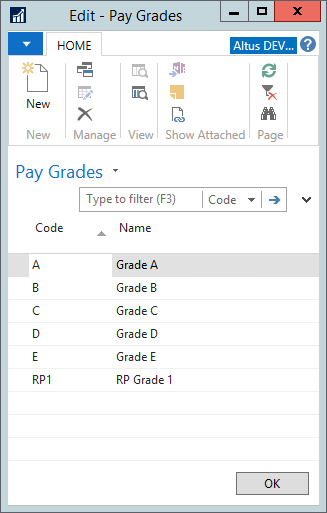
- On the Ribbon, click New. A new record is inserted.
- In the Code column, enter a code for the pay grade (for example, GR1, GR2, etc.).
- In the Name column, provide an explanation for the pay grade.
- When you finish defining your required pay grades, click OK to close the page.
Adding Pay Steps
The specific amounts of the pay steps are already defined based on the requirements pre-supplied by your organization. All that is required is that you add the pay steps applicable to the required pay grades within your organization. For each pay grade, you need to assign the number of pay steps it contains. When creating a position using the Position card, you then assign an appropriate pay step to the position. The appropriate pay framework for a general position and specific job is then automatically assigned.
To add up pay steps:
- In the Search field, enter Pay Steps and select the page from the drop-down list.
The Pay Steps page displays.
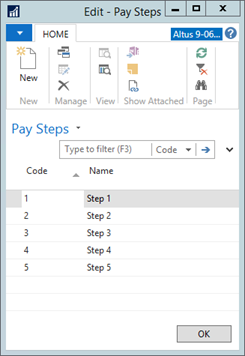
- On the Ribbon, click New. A new record is inserted.
- In the Code column, enter a code for the pay step (for example, ST1, ST2, etc.).
- In the Name column, provide an explanation for the pay step.
- When you finish defining your required pay steps, click OK to close the page.