

Before you can begin using the Attendance Management Integration tools to manage and track scheduling, some initial setup steps need to be performed.
Completing the Attendance Management Setup
The Attendance Management Setup window contains options for linking to your existing attendance management solution (AESOP) and for pulling in your absence data.
To provide the necessary information for integration:
1. From the Navigation Pane, select Departments >Human Resources Management > Attendance Management & Integration.
2. Under Setup, select Attendance Mgmt. Setup.
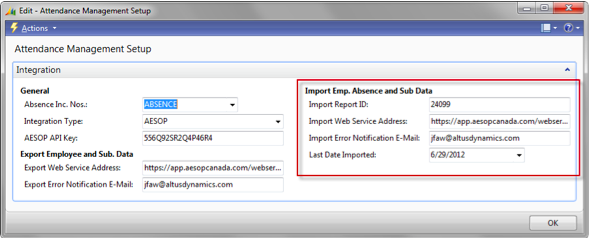
The Attendance Management Setup window opens.
3. From the Actions menu, select New.
4. Complete the fields within the setup window. Use the following table for assistance.
|
Field Name |
Details |
|---|---|
|
General Section |
|
|
Absence Inc. Nos. |
From the drop-down, select the number series to be used for numbering absence incidents. To define a numbering series:
|
|
Integration Type |
From the drop-down, select AESOP. |
|
AESOP API Key |
Obtain this value from AESOP. |
|
Export Employee Sub Data Section |
|
|
Export Web Service Address |
Obtain this value from AESOP. |
|
Export Error Notification E-Mail |
Enter the email address for the user who will receive the notification of errors encountered during the integration process. |
|
Import Emp. Absence and Sub Data Section |
|
|
Import Report ID |
Enter the Report ID for the AESOP Report that has been set up for the Web Services Export. |
|
Import Web Service Address |
Obtain this information from AESOP. |
|
Import Error Notification E-Mail |
Enter the email address of the person who will receive the notification of errors encountered during the scheduled import process. |
|
Last Date Imported |
This field is updated automatically and data on or prior to this date will not be included. |
5. Click OK to close the setup window.
Updating the Applicable Jobs for the Attendance Management Integration
For any HR Jobs containing employees or substitutes that will be integrated with AESOP, you need to locate each job and update the job record with the appropriate ‘linking’ information to ensure the integration process runs smoothly.
To update HR Job records with AESOP integration information:
1. From the Navigation Pane, select Departments >Human Resources Management > Attendance Management & Integration.
2. Under Setup, select Attendance Mgmt. Setup.
The View – HR Job List displays.
3. Locate and select the job record you need to update for attendance management integration.
4. From the Actions menu, select View.
The HR Job Setup window opens.
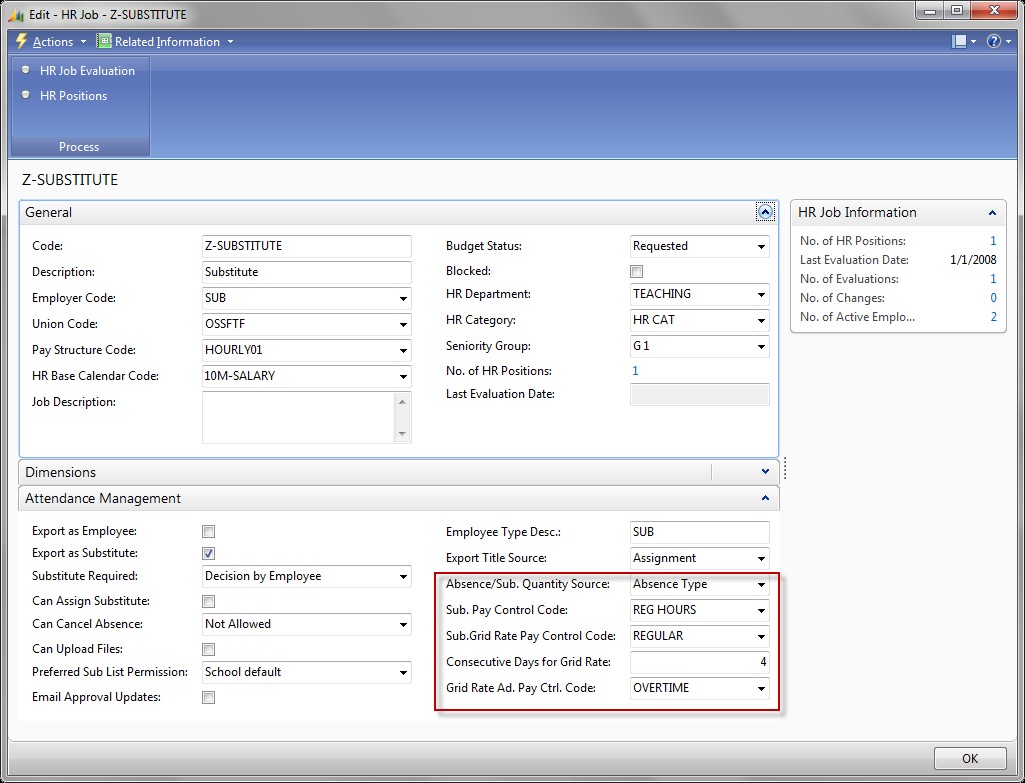
5. Complete the Attendance Management fields. Use the following table for assistance.
IMPORTANT NOTE: Values matched with AESOP must match exactly with the master data set up in AESOP.
| Field Name | Details |
|---|---|
| Attendance Management Fast Tab | |
| Export as Employee | Click to insert a check mark if Employees with an Assignment with this Job are to be exported as Employees. |
| Export as Substitute | Click to insert a check mark if Substitutes with an Assignment with this Job are to be exported as Substitutes. |
| Substitute Required | Enter the appropriate selection for this AESOP setting. |
| Can Assign Substitute | Enter the appropriate selection for this AESOP setting. |
| Can Cancel Absence | Enter the appropriate selection for this AESOP setting. |
| Can Upload Files | Enter the appropriate selection for this AESOP setting. |
| Preferred Sub List Permission | Enter the appropriate selection for this AESOP setting. |
| Email Approval Updates | Enter the appropriate selection for this AESOP setting. |
| Employee Type Desc. | Enter the code for the Employee Type to which the Employees/Subs within this Job will be mapped. |
| Export Title Source |
From the drop-down, select from where (Assignment or Assignment Qualification) the title should be pulled:
|
| Absence/Sub. Quantity Source |
When retrieving pay and absence data from AESOP, this field determines how the quantity will be used for employees within this HR Job.
|
| Sub. Pay Control Code | From the drop-down, select the Payroll control to be used on the Substitute entry that is created in the Payroll Journal line for regular time. |
| Sub. Grid Rate Pay Control Code | From the drop-down, select the Payroll control to be used on the Substitute entry that is created in the Payroll Journal line for time that has met the ‘consecutive days’ condition. |
| Consecutive Days for Grid Rate | Enter the number of consecutive days to apply the Payroll control used on the Substitute entry. |
| Grid Rate Ad. Pay Ctrl. Code | From the drop-down, select the Payroll control to be used on the Substitute entry that is created in the Payroll Journal line for time that was processed in the previous pay period as “Regular” but has since met the consecutive days condition so the incremental pay applies. This Payroll Control should represent the incremental amount to be paid. |
Adding the Cause of Absence Data for Attendance Management
The cause of absence information that is recorded and stored for employee/substitute absences must also be updated to include the information for integrating with AESOP and Sparkrock.
To integrate cause of absence data with attendance management:
1. From the Navigation Pane, select Departments >Human Resources Management > Attendance Management & Integration.
2. Under Setup, select Causes of Absence.
The Edit – Causes of Absence window opens.

3. Complete the relevant Cause of Absence Code fields. Use the following table for assistance.
IMPORTANT NOTE: Values matched with AESOP must match exactly with the master data set up in AESOP.
| Field Name | Details |
|---|---|
| NOTE: The mapping may be different if the employee has an FTE of less than 1 or equal to 1. | |
| Full Day Quantity 1 FTE | Enter the Quantity to use when the Absence Type is “Full Day” and the FTE for the Absent Employee is 1. |
| Full Day Quantity < 1FTE | Enter the Quantity to use when the Absence Type is “Full Day” and the FTE for the Absent Employee is less than 1. |
| Half Day AM Quantity 1 FTE | Enter the Quantity to use when the Absence Type is “Half Day AM” and the FTE for the Absent Employee is 1. |
| Half Day AM Quantity < 1 FTE | Enter the Quantity to use when the Absence Type is “Half Day AM” and the FTE for the Absent Employee is less than 1. |
| Half Day PM Quantity 1 FTE | Enter the Quantity to use when the Absence Type is “Half Day PM” and the FTE for the Absent Employee is 1. |
| Half Day PM Quantity < 1FTE | Enter the Quantity to use when the Absence Type is “Half Day PM” and the FTE for the Absent Employee is less than 1. |
4. When you finish, click OK to close the Causes of Absence window.
Qualification Setup
Qualifications are connected to attendance through the Attendance Skill. For any qualifications you want exported to the Attendance Management solution, you need to indicate the export and also provide the Attendance Skill ID.
To link qualifications to AESOP:
1. From the Navigation Pane, select Departments >Human Resources Management > Attendance Management & Integration.
2. Under Setup, select Causes of Absence.
The Edit – Causes of Absence window opens.
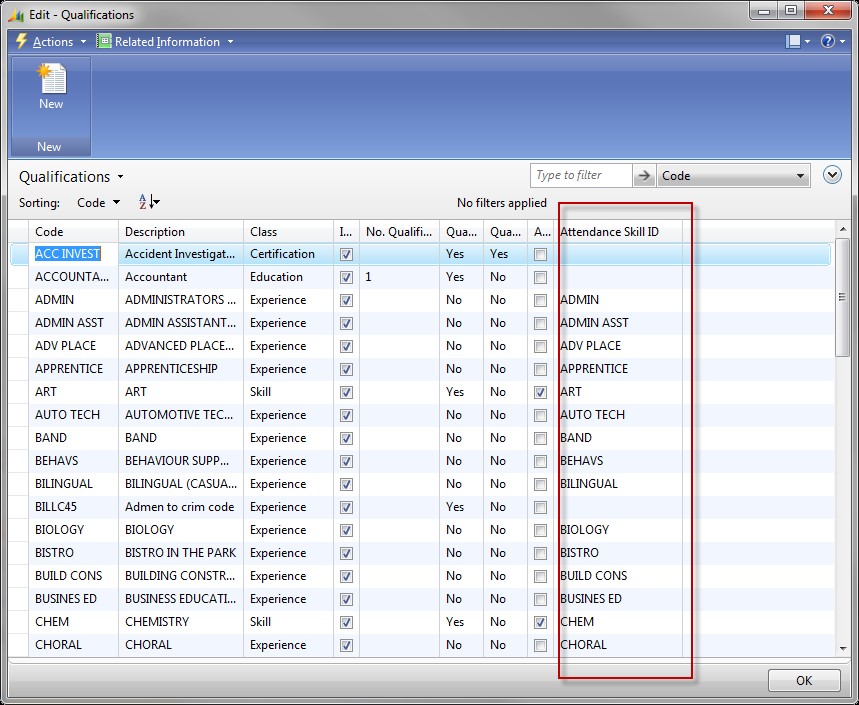
3. Locate the qualification that you want exported.
4. Click to add a check mark to the Attendance Skill Export check box.
5. In the Attendance Skill ID field, enter the ID.
NOTES:
- This ID must match exactly what is set up in the Attendance Management system.
- Values that are matched with AESOP must match exactly with the master data set up in AESOP.
6. Repeat steps 3 -5 or all the qualifications you want to export.
7. When you finish, click OK to close the Qualifications window.
Linking Locations to the Attendance Management Tool
Employees are matched to their location and this also needs to be linked within attendance management. For integration with the Attendance Management system, you need to insert the ‘Attendance Management ID’ on the Location Card.
To add the Attendance Management ID to the Location Card:
1. From the Navigation Pane, select Departments > Purchase > Setup.
2. Under Lists, select Locations.
The Locations List displays.
3. Select the location you want to update with the attendance management data.
4. From the Actions menu, select Edit.
The Location Card for the selected location opens.
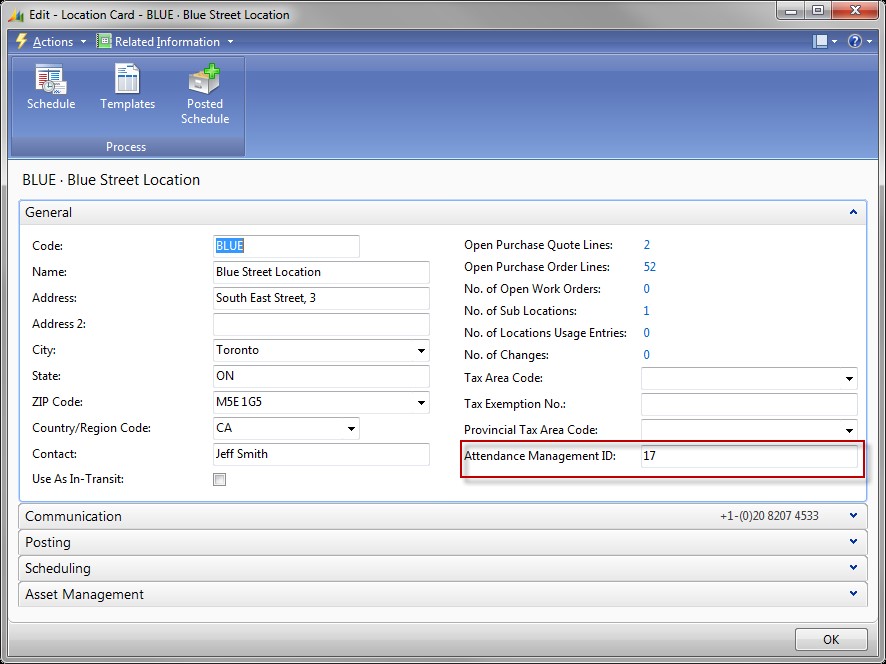
5. In the Attendance Management ID field, enter the Attendance Management ID.
NOTES:
- This ID must match exactly what is set up in the Attendance Management system.
- Values that are matched with AESOP must match exactly with the master data set up in AESOP.
6. Click OK to close the Location Card.
7. Repeat steps 3 – 6 for all the locations you need to update.
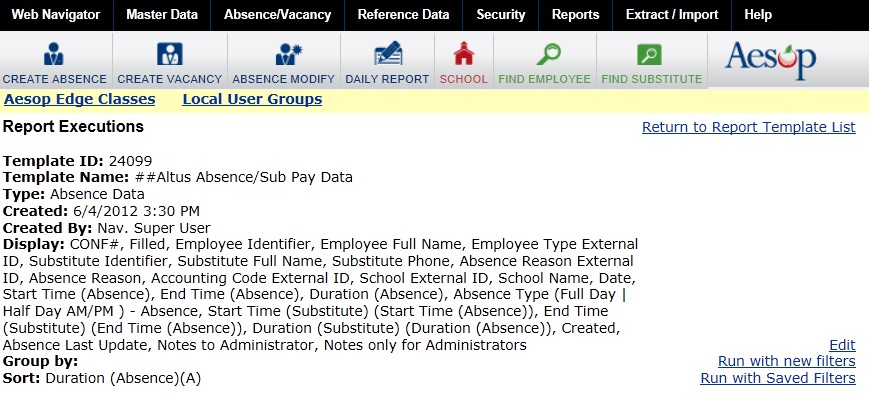
Creating an Export Web Services Report in AESOP
A report needs to be set up in AESOP to support the export web service calls from the Altus solution.
NOTE: The report must be set up exactly the same as the settings included in this section.
To create the Export Web Services Report in AESOP:
1. Launch AESOP.
2. Select Reports.
In the Report Executions page, set up the report.
NOTE: For additional support, please contact AESOP support or visit their website: www.aesopcanada.com
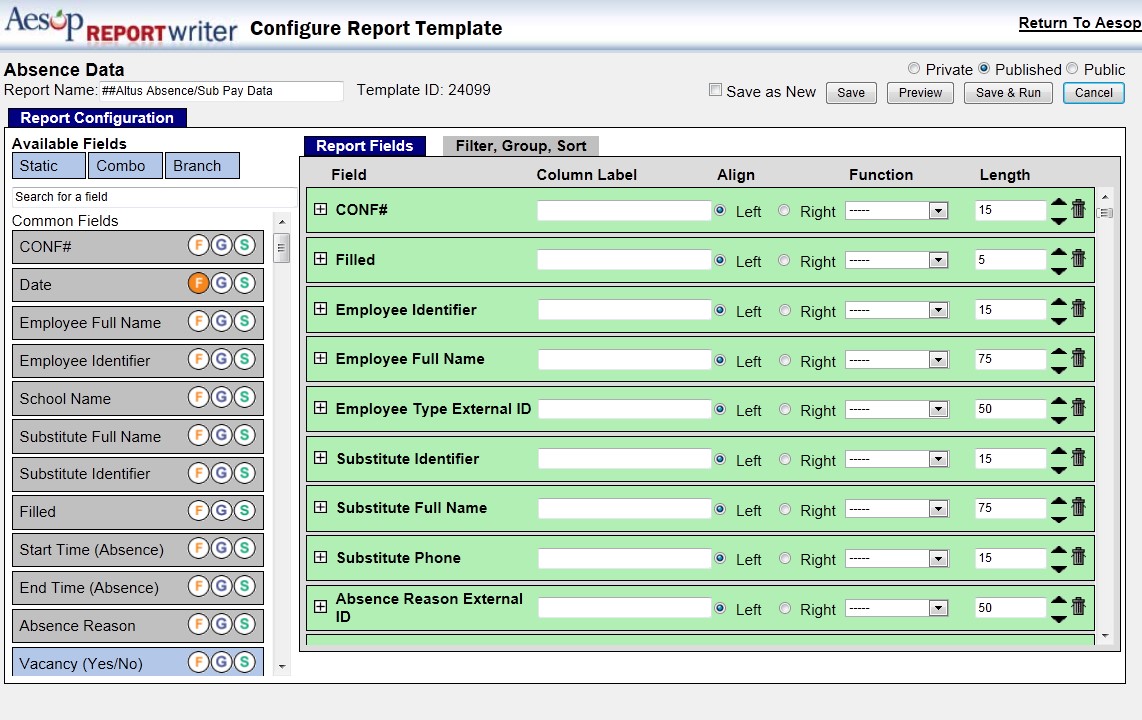
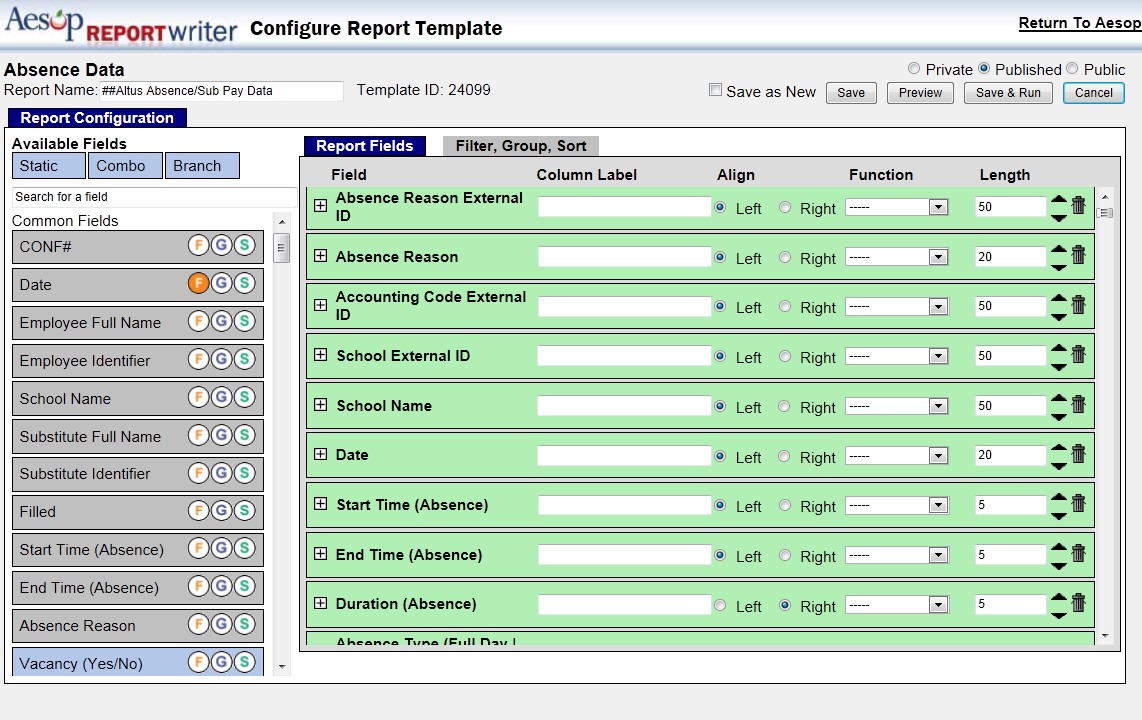
4. In the Report Fields tab, complete the following fields and settings.
NOTE: You must enter the data exactly the same as in the following:
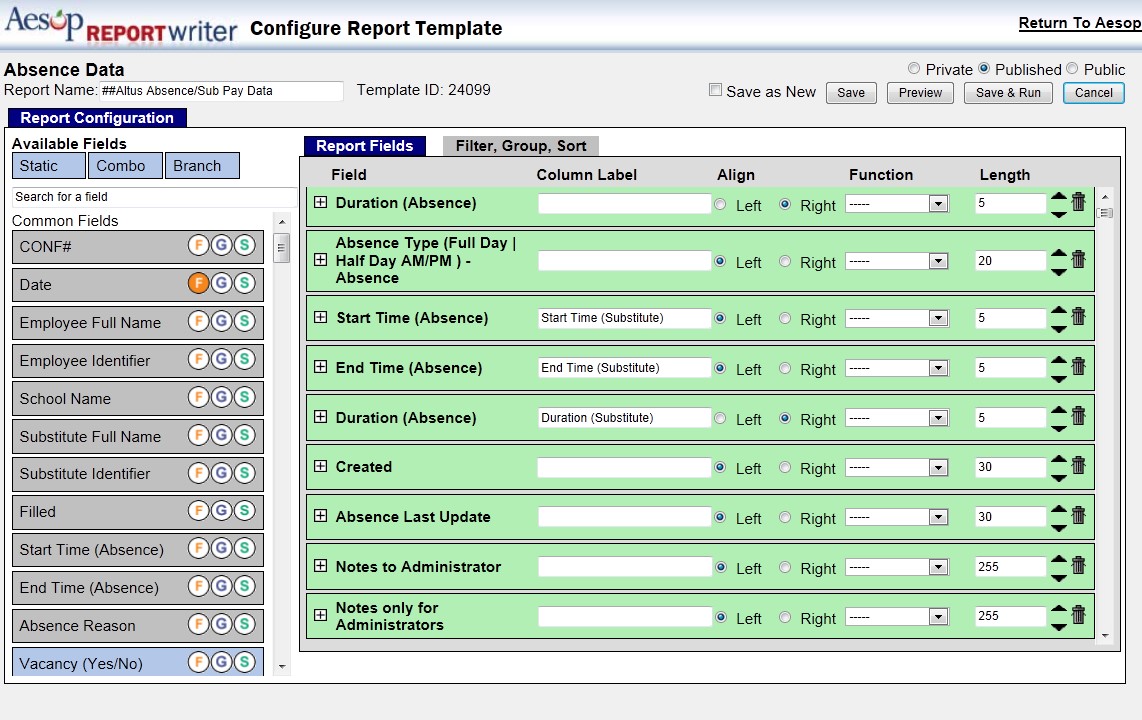
5. When you finish, click the Save button.