

Absence Confirmation is useful in conjunction with Absence Management and can be utilized when Absence Management is configured and in use. Use Absence Confirmation to enable users on Employee Center to confirm whether they have taken time off or not. In addition, managers confirm if they agree with what an employee that reports to them has submitted for absence.
Configuring Absence Confirmation
To configure absence confirmation:
- In the Search field, type Attendance Plan and then select the object from the drop-down list.
The Attendance Plan window displays. - Expand the General FastTab.

- Complete the fields in the Confirmation section. The following table provides a detailed explanation of these fields:
| Column Name | Description |
| Attend. Conf. Cycle Code | This field is the pay cycle code to define the frequency and the periods in which the absence confirmation process needs to be used. |
| Attend. Conf. Term Code | This field is the pay cycle term to define the frequency and the periods in which the absence confirmation process needs to be used. |
| Emp. Reminder Frequency | Enter the date formula that defines the frequency with which employees will be sent reminder emails to confirm their attendance for the period. For example, 1D means the employee will receive confirmation reminders 1 day after the cycle ends. |
| Manager Reminder Frequency | Enter the date formula that defines the frequency with which managers will be sent reminder emails to confirm their attendance for the period. For example, 1D means the manager will receive confirmation reminders 1 day after the cycle ends. |
Suspending Confirmation Requests
At times it is necessary to suspend confirmation requests that employees would normally continue to receive. For example, circumstances that may require this setup could be when employees go on leave of absence, maternity leave, or when employees are terminated.
To suspend confirmation requests:
- In the Search field, type HR Employees and then select the object from the drop-down list.
The HR Employees window displays. - Select the employee for whom you wish to suspend confirmation requests.
- From the Ribbon, click Time Attendance.
The Employee Time Attendance card displays. - Expand the Absence Confirmation FastTab.

- Add a check mark to the Suspend Conf. Requests checkbox, if you want to suspend the email notifications sent to the employee.
NOTE: It is possible to automate this step by adding an HR Function to do this. See Attaching an Attendance Plan to an HR Request for further details. - In the Attendance Conf. Approver field, specify a person who will approve whether the absence information provided is correct or not in Absence Confirmation on Employee Center. If left blank then the Absence Confirmation is auto approved.
- Click OK to save your changes.
Automating Confirmation Requests with a Job Queue
It is possible to automate the processing of confirmation requests by configuring Job Queue entries.
To automate the process of confirmation requests:
NOTE: NAS Server needs to be installed and functional for Job Queue entries to work.
- In the Search field, type Job Queue Entries and then select the object from the drop-down list.
The Job Queue Entries window displays. - From the Ribbon, click New.
The New Job Queue Entry Card window displays. - In the Object Type to Run field of the General FastTab, select Codeunit.
- In the Object ID to Run field, enter 23032860 (TS Confirm. Reminder Process).
- Type a Description. For example: Absence Confirmation.
- Enter a value in the Priority field.
- Expand the Recurrence FastTab.
- In the Starting Time field, specify when the job queue should start running.
- In the Ending Time field, specify when the job queue should finish running.
- In the No. of Minutes between Runs field, specify how many minutes to wait between job queue runs.
NOTE: The No. of Minutes between Runs should be greater than the minutes between Staring Time and Ending Time to ensure the process is run only once. - On the ribbon, click on Set Status to Ready to activate the Job Queue.
Setting Pay Cycle Period Email Dates
You may need to verify or edit dates when employees and approvers receive email notifications for Pay Cycle Period confirmation records.
To view and edit notification dates on pay cycle periods:
- In the Search field, type Pay Cycles.
The Pay Cycles window displays. - From the Ribbon, click the Navigate tab and then click Terms.
The Pay Cycle Terms window displays. - From the Ribbon, click the Navigate tab and then click Pay Cycle Periods.
The Pay Cycle Periods window displays.
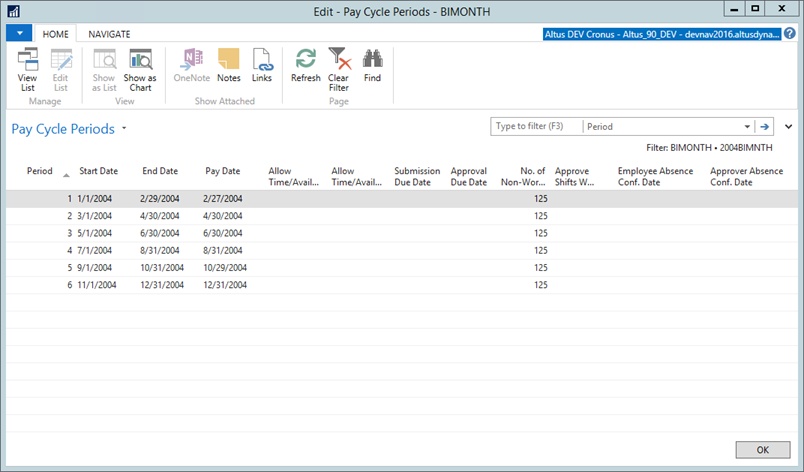
- In the Employee Absence Conf. Dates field, specify the date at which absence confirmation records will be created for the pay cycle period and term and an email sent to the employees.
- In the Approver Absence Conf. Date field, specify the date on which an email will be sent to the approvers to confirm employee's attendance.
- View or edit the dates in the and the for the specific pay cycle period you wish to view/edit.
- Click OK to save your changes.
Configuring Employee Center Email Notifications
Users will need to configure the text for email notifications that will show up in Employee Center.
To configure Email notification text:
- In the Search field, type HR Setup.
The HR Setup card displays. - Click to expand the Attendance Plans FastTab.
- Add the text you wish to have display in each of the possible types of absence confirmation emails that may be sent. The following table provides a detailed explanation of the fields in the Absence Confirmation section:
| Field Name | Details |
| Emp. Absence Conf. Email Body | This is the body of the absence confirmation email sent to the employee. |
| Emp. Absence Conf. No Entries | This is the message that is displayed to the Employee Center users when the employee does not have any absence entries for the period. |
| Emp. Absence Conf. w. Entries | This is the message that is displayed to the Employee Center users when the employee has absence entries for the period. |
| Appr. Absence Conf. Email Body | This is the body of the absence confirmation email sent to the employee absence confirmation approver. |
- Click OK to save your changes.
Adding the HR Function to Termination
You can add an HR Function to suspend employees from absence confirmation has been created. You need to add it as a process function to Termination.
To suspend employees from absence confirmation via an HR Function, follow the steps in Setting Up HR Functions - Organization Specific Data. In this case, you will be setting up process function 47.
Manually Processing Email Confirmations
It is possible to manually send emails confirmations. If users would like to process email confirmations manually the following setup needs to be configured.
To manually send confirmation emails:
- In the Search field, type Absence Confirmation Entries and select the object from the drop-down list.
The Absence Confirmation Entries window displays.
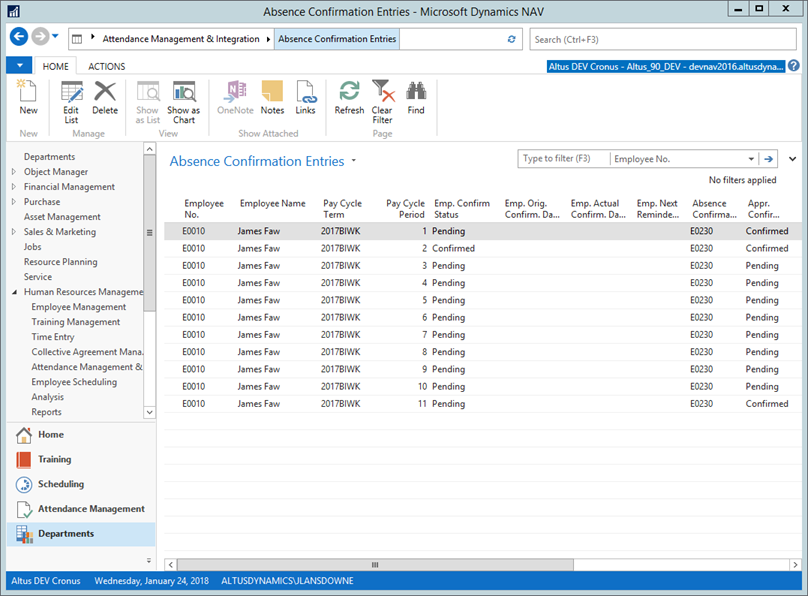
- From the Ribbon, click the Action tab and then click Absence Confirmation Process.
- Confirm that you wish to proceed by clicking Yes in the communication box.