

Once you have completed the causes of absence, categories, and all other details, they can set up the Attendance Plans. Attendance Plans are sets of cause of absences with entitlement and sequence details that are connected to a position and assigned to an employee. Attendance Plans can be as general or specific as preferred, but finding a balance between these two will ensure that when a new employee is hired, few details will need editing in order to set up the employee correctly.
Setting up a new Attendance Plan
The first step in setting up a new attendance plan is to create the Causes of Absences categories:
- In the Search field, type Causes of Absences and select the object from the drop-down list.
The Causes of Absence page displays. - From the Ribbon, click New.
The Cause of Absence Card displays. - From the Type drop-down list, select Category.
To set up a new Attendance Plan:
- In the Search field, type Attendance Plans and select the object from the drop-down list.
The Attendance Plan page displays. - From the Ribbon, click New.
The New Attendance Plan card displays.
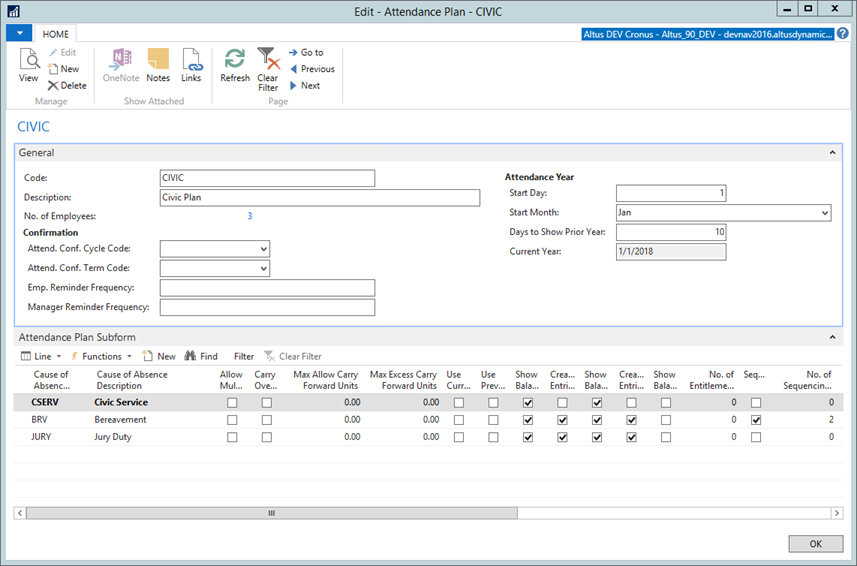
- In the Code field, type a unique code for the attendance plan. This code appears in the drop-down selector on the Employee Time Attendance card, and on Absence Requests in Employee Center.
- In the Description field, type a description for the Attendance Plan.
- The No. of Employees field is a counter that acts as a link to the list of employees who will use this plan.
Note: Steps #6 to #8 are optional and only applicable if you are using attendance confirmations. If this section is left blank, then attendance details for employees will reflect their entire time in service. - In the Attend. Conf. Cycle Code field, enter the pay cycle used for employees.
- In the Attend. Conf. Term Code field, enter the pay cycle term used for employees.
- Use the Emp. Reminder Frequency and the Manager Reminder Frequency fields to enter the frequency at which reminder emails are sent to Employees and Managers. For example, if you want reminders sent every two days, enter 2D.
- In the Attendance Year section, specify the start date for displaying current year attendance balance details:
- In the Start Day field, enter the day that starts the current attendance year.
- In the Start Month field, enter the month that starts the current attendance year.
- In the Days to Show Prior Year field, specify how many days in the prior year that you want to display. This field enables you to set up a period in which you can see previous and current year entries until the carry-forward process is completed. If this field is set to 0, then only the entries from the current year are displayed.
- The Current Year field is a display-only field that shows the attendance year as calculated from the above fields.
- To attach employees to this plan, see Attaching Attendance plans to Employees.
Creating Attendance Plan Details
Attendance plan lines refer to the lines on the attendance plan subform related to the causes of absence that are available for employees with this plan.
Note: Before you can create your attendance plan details, you must first create your cause of absence categories. For more information, see Creating the Causes of Absence.
To add lines to an attendance plan:
- Insert a row for each Cause of Absence category you would like used on this plan.
- To add the entry type lines related to a specific category, select the category to which you wish to add the entries.
- On the Attendance Plan page, click Functions and then click Get Lines.
The entry lines related to that particular category are added below the category. - You are able to change any of the details necessary for this specific plan by adding or removing checkmarks in the columns.
NOTE: Lines of the Attendance Plan are similar to the Cause of Absence fields and values will be defaulted from the Cause of Absence to the Attendance Plan. Change any of the details necessary for this specific plan. - The following table provides a detailed explanation of the columns in the Attendance Plan Subform FastTab:
| Column Name | Details |
| Cause of Absence Code | Enter the Cause of Absence Code to be inserted into the plan. NOTE: A category cause of absence appears in bold to allow you to easily identify the structure of the plan lines. |
| Cause of Absence Description | Displays the description for the Cause of Absence. |
| Allow Multiple Entitlements | Add a checkmark if multiple entitlements are allowed. |
| Carry Over Allowed | Select this field if carry-over of any portion of the remaining balance of the Cause of Absence is allowed during the year-end carry-over process. |
| Max Allow Carry Forward Units | If carry-over is allowed, enter the maximum number of carry-over units allowed. If there is no maximum, leave this field at zero. |
| Max Excess Carry Forward Units | If carry-over is allowed, enter the maximum number of excess units that can be carried forward. |
| Use Current Year Entitlement | Add a checkmark in this field if current year entitlement is to be used as a part of the calculation of the carry-over amount (for example, vacation). |
| Use Previous Year Entitlement | Add a checkmark in this field if next year entitlement is to be used as a part of the calculation of the carry-over amount (for example, vacation). |
| Show Balances - Employee | This setting determines if this code will be displayed on Employee Center where balances are shown. Turn this on for all balances where you want the employee to see the balance. It is typically turned off for something like bereavement where balances are not usually displayed. |
| Create Entries - Employee | This setting determines if this code will be available for the employee to enter a request. In some cases, you may want employees to see balances but not make entries for a particular code. |
| Show Balances - Manager | This setting determines if this code will be displayed on Manager Employee Center where balances are shown. Turn this on for all balances where you want the manager to see a balance. |
| Create Entries - Manager | This setting determines if this code will be available for the manager to enter a request. In some cases, you may want managers to see balances but not make entries for a particular code. |
| Show Balance Conv. to Days | Add a checkmark in this field if the balance is calculated in hours but you would like the balance converted to days on Employee Center for Employees and Managers. |
| No. of Entitlement Entries | This field displays the number of entitlement entries created for this value. |
| Sequencing | Add a checkmark in this field if sequencing of balances is allowed for this value. For example, turn this on if this is a "Current Year Vacation" type code, but when entering a vacation request, you want the balances to be consumed from the "Vacation - Carry Over" balance before consuming current year vacation. |
| No. of Sequencing Entries | This field displays the number of sequencing entries created for this value. |
| Default Absence Entitlements | Add a checkmark in this field if sequencing of balances is allowed for this value. For example, turn this on if this is a "Current Year Vacation" type code, but when entering a vacation request you want the balances to be consumed from the "Vacation - Carry Over" balance before consuming current year vacation. |
| No. of Entitlement Units | If entitlements are calculated based on fixed units, enter the unit quantity for each entitlement. For example, if there are four sick days per year, enter "4" in this field if the Cause of Absence has been set up for Days. |
| Unit of Measure Code | This field displays the unit of measure the Cause of Absence has been set up for. |
| Annual Maximum | Enter the maximum number of units that can be processed as an entitlement for the current entitlement year. If the value is zero, then the entitlement to be granted within the entitlement year is unlimited. |
| Maximum Balance | Enter the number of units which the sum of all the Cause of Absence entries overall cannot exceed. For example, if there is a maximum annual entitlement of 10 units and a maximum balance of 25, then in the 3rd year only 5 units would be calculated for entitlements. |
| Partial Period Pro-Rated | Select this field if the units are to be pro-rated for a portion of the entitlement year where an employee either starts work during the year or is on a contract that ends before the end of the entitlement year. The entitlement is pro-rated then based on the portion of the year deemed as the entitlement period. |
| Pro-Rated by FTE | Select this field if the calculated entitlement units are to be pro-rated by the aggregate active assignment FTE for part-time employees with an F.T.E of less than 1.0. |
| Delayed Activation Days | If entitlements are to be calculated and applied to employee records but are not to be visible of consumed by either an employee or a manager through an Absence Requisition, and so on, for a defined delay period enter the number of days representing that delay. When used, neither the Cause of Absence code nor any of its values will be visible to the employee or manager until they have completed work for the number of days specified in this field without a non-personal absence. This is used for entitlements that may only be available after an employee has been working for a specified period of time, but are granted and recorded from date of hire. |
| Use Schedule Quantity | If this option is checked, the system checks the schedule to determine how much time off is needed. If the Use Schedule Quantity checkbox is not checked, the absence request will be populated with the hours based on the assignment of the employee. |
Defining Plan Entitlements
If entitlements are calculated based on thresholds such as years of service, use the Entitlements table to define these thresholds.
Note: The Entitlement threshold is configured on the cause of absence code that has the Calculate Entitlement checked and is type Entry. It should not be configured on other Entry types in the same category.
To define plan entitlements:
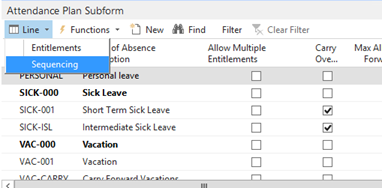
- While in the Attendance Plan page, click the Line drop-down list and then click Entitlements.
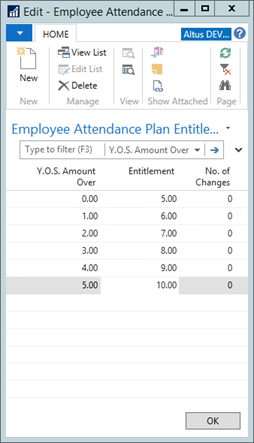
The Attendance Plan Entitlements table displays.
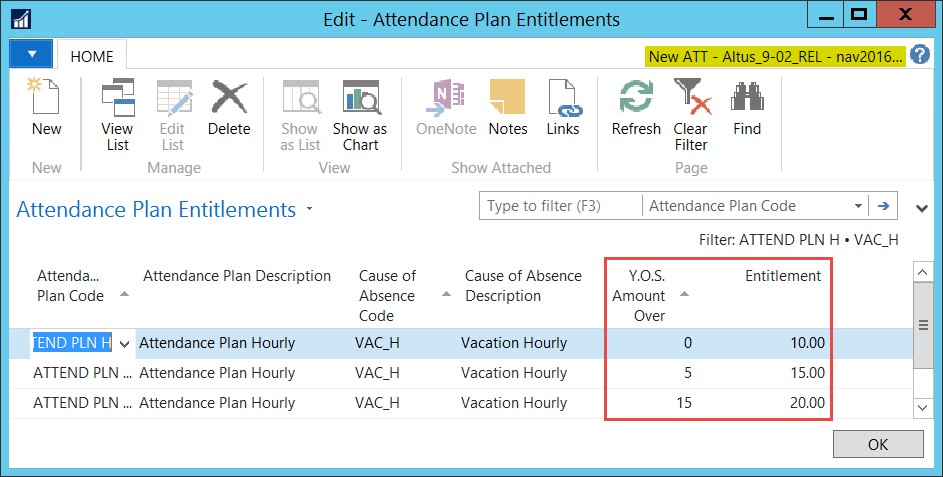
- Specify a value for the Y.O.S. Amount Over (Years of Services threshold) column:
- If the entitlement starts immediately, leave the Y.O.S. Amount Over column value at 0.
- If the entitlement goes up after 5 years, enter 5 in the Y.O.S. Amount Over column.
- Specify a value for the Entitlement column.
NOTE: The Entitlement amount respects the unit of measure so that if you have selected Hours as the unit of measure, the amount of time in this column is displayed in hours. - Enter the entitlement amount that will be given when the amount over is reached. The years of service are calculated by comparing the Years of Service Calc. date on the Entitlement worksheet against the Vacation Credit Date on the Employee Card. In the example above, if the employee has less than five years of service they are entitled to 10 days of vacation. Anything above five years of service is entitled to 15 days of vacation. Anything above 15 years of service is entitled to 20 days of vacation.
NOTE: When applying the attendance plan to the employee through an HR Request or manual setup, the values from the Plan Header, Lines, and Entitlements will be applied/updated on the Employee's record but you are able to edit the applied details. - The following table provides a detailed explanation of the columns in the Attendance Plan Entitlements table of the Attendance Plan page.
| Field Name | Description |
| Attendance Plan Code | This column displays the attendance plan code. |
| Attendance Plan Description | This column displays a description of the attendance plan code. |
| Cause of Absence Code | This column displays the cause of absence code. |
| Cause of Absence Description | This column displays a description of the cause of absence code. |
| Y.O.S Amount Over | Integer (like tax bracket) - This will be used for tracking years of service thresholds where the entitlement will increase. E.g. For 0-8 years, this value would be "8". For 9-12 years, this value would be 12. |
| Entitlements | Decimal - This is the value of the entitlement. For example, "20" for 20 days. NOTE: The Entitlement amount respects the unit of measure so that if you have selected Hours as the unit of measure, the amount in this column is displayed in hours. |
Defining Plan Sequencing
Sequencing is used when the organization has policies or agreements where certain absence entitlements need to be used before others. For example, if Vacation Carry Over is to be consumed before Vacation Current Year, then you can set up sequencing between them so that the Carry Over will be consumed before the current year. The sequencing can also include top up settings where entitlements that may drive a pay reduction can be topped up by other entitlements. This might be used, for example, when sick time with a pay reduction to 75% can be topped up with vacation time for full pay.
Note: Sequencing only belongs on the main Cause of Absence Entry type. Do not setup sequencing on every Entry type. This is the Absence that will be selected in the Employee Center / Attendance and Requests.
To define plan sequencing:
- From the Attendance Plan page, click the Line drop-down and click Sequencing.
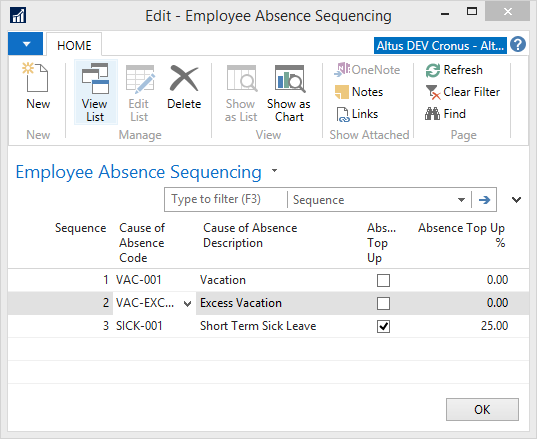
- The Absence Sequencing table displays.
- Add the appropriate sequencing to use for consuming entitlements. For example:
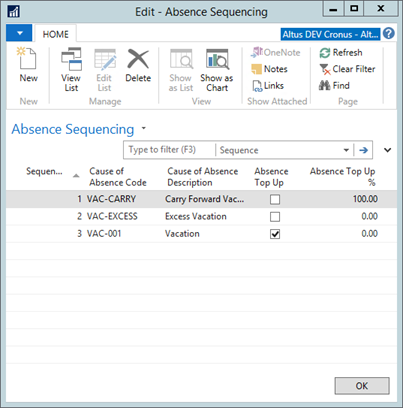
NOTE: The Absence Top Up % is typically only used for sick leave where there is a pay reduction. On the line representing the reduced pay amount, enter the percent that is required to top up from others. For example, if there is a 75% pay short term sick leave, enter 25% in this value as the Causes of Absence listed after it will be consumed at 25% to top up each unit of this one. - When you are finished, click OK to save your changes.
- The following table provides a detailed explanation of the columns in the Absence Sequencing table of the Attendance Play page:
| Column Name | Description |
| Sequence | The value in this column determines the order in which the sequencing will be applied to available balances. |
| Cause of Absence Code | This column displays the code that will be used in the sequence. |
| Cause of Absence Description | This column displays a brief description of the code. |
| Absence Top Up | Enter a value in this column if this code could be topped up with other values. |
| Absence Top Up % | Enter the percent from other values that should be topped up in this column. For example, if short term sickness is paid out at 75%, enter 35% as the amount of vacation or other balances that will be used to top up the 75% |
Attaching Attendance Plans to Employees
There are two ways to add attendance plans to employees. You can edit the Attendance Plan on the Time and Attendance section on the HR Employee Card. Otherwise, you can attach an attendance plan when creating an HR Request for Hire, Assignment Change, or Details Change. With this second method, the Attendance Plan is typically defaulted on the position and then changed on the HR Request only if necessary.
Maintaining Attendance Plans on the Employee Time/Attendance Settings
One of the methods for adding a plan to an employee is to maintain the plan setting direction on the Time/Attendance page for the HR Employee Card.
To add an employee to an attendance plan from the HR Employee Card:
- In the Search field, type HR Employees and then select the object from the drop-down.
The HR Employees page displays. - Select the employee that you want to add to the Attendance Plan and from the Ribbon click Edit.
The HR Employee Card displays. - From the Ribbon, click Time Attendance.
The Employee Time Attendance page displays. - Select the Attendance Plan Code you wish to apply to this employee and the Attendance Plan Description field will automatically populate.
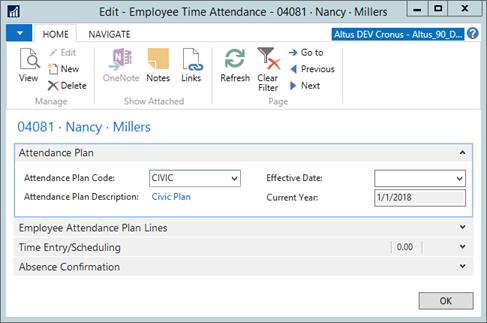
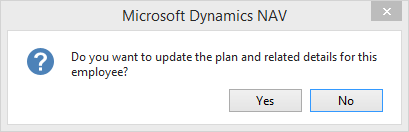
- Click Yes to confirm that you want to update the plan and related details for the employee.
- Enter the Effective Date if none has been specified or if a new effective date is required for attendance purposes.
Understanding the Employee Attendance Plan Details
This section provides you with a combined view that shows both the balances as well as the employee specific settings related to the plan. The balances are updated when entitlements are calculated or when absences are recorded and the settings are defaulted from the plan with the options to override if there are employee specific settings.
If an employee already has balances and history for a particular cause of absence and the plan is changed, the system will re-assign the balances and history to the same cause of absence in the new plan. If that cause of absence code does not exist in the new plan, the historical cause of absence code will be kept on the employee's record even though the new plan does not contain it. This allows the employee to still view and use the remaining balance. If some transfer is required from an old plan to a new plan, these adjustments must be made manually using the Absence Registration for adjusting the entries. Once the balance on a cause of absence is zero, the line will disappear from the employee's record if it does not belong in the new (now current) plan.
To view and edit attendance plan details:
- From the HR Employee Card, in the Ribbon, click Time Attendance.
The Employee Time Attendance page displays.
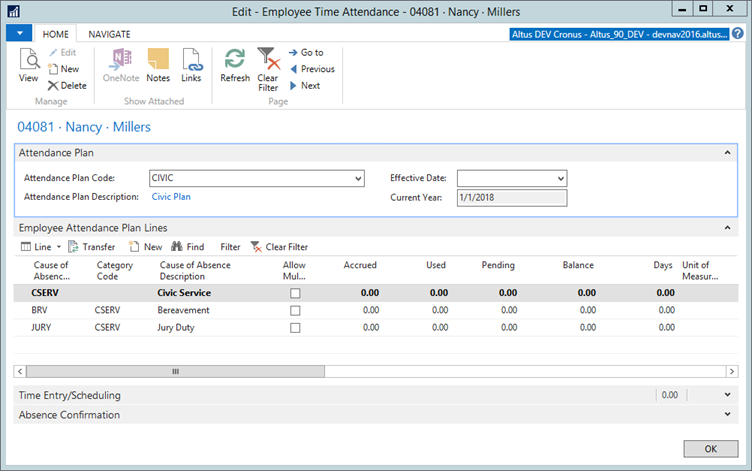
- View or edit according to your needs. The following table provides a detailed explanation of the columns in the Employee Attendance Plan Lines:
| Column | Description |
| Cause of Absence Code | The cause of absence code that is part of the plan. NOTE: A category cause of absence appears in bold to allow you to easily identify the structure of the plan lines. |
| Cause of Absence Description | Displays the description for the cause of absence. |
| Allow Multiple Entitlements | Allows an employee to have an entitlement calculated regardless if other entitlements have already been processed for that year. |
| Accrued | Shows the total amount accrued for this cause of absence or category. Accruals are done through the entitlement calculations or through adjustments to the Absence Registration table. |
| Scheduled | Shows the total amount of time on the schedule for this cause of absence or category. |
| Used | Shows the total amount used or already on an absence requests for this cause of absence or category. |
| Balance | Shows the remaining balances for this cause of absence or category. The balance is the Accrued minus Scheduled and Used. |
| Unit of Measure Code | This field displays the unit of measure the cause of absence has been set up for. |
| Carry Over Allowed | Select this field if carry-over of any portion of the remaining balance of the cause of absence is allowed during the year-end carry-over process. NOTE: This value will be defaulted from the plan. Only change it if this employee has an exception. |
| Max Allow Carry Forward Units | If carry-over is allowed, enter the maximum number of carry-over units allowed. If there is no maximum, leave this field at zero. NOTE: This value will be defaulted from the plan. Only change it if this employee has an exception. |
| Max Excess Carry Forward Units | If carry-over is allowed, enter the maximum number of excess units that can be carried forward. This is used when there is a maximum amount of carry forward. Anything in excess of the max carry forward can be set up to move to Excess. You can limit how much is in this bucket. For example: an employee had 20 days left at the end of the year. They can only carry forward 10 days. The remaining 10 days go into the employee’s Excess bucket. This could be used if the policy is to pay out any excess (hide the excess from Employee Center users, but allow Payroll to pay it out). NOTE: This value will be defaulted from the plan. Only change it if this employee has an exception. |
| Use Current Year Entitlement | Place a checkmark in this field if Current Year entitlement is to be used as a part of the calculation of the carry over amount (for example, vacation). NOTE: This value will be defaulted from the plan. Only change it if this employee has an exception. |
| No. of Entitlement Entries | This field displays the number of entitlement entries created for this value. |
| Sequencing | This field will display if there are sequencing entries. |
| No. of Sequencing Entries | This field displays the number of sequencing entries created for this value. |
| No. of Changes | This field will display the number of changes made to this line. NOTE: Change Log must be turned on for this table in order for the changes to be collected. |
| Annual Maximum | Enter the maximum number of units that can be processed as an entitlement for the current entitlement year. If the value is zero then the entitlement to be granted within the entitlement year is unlimited. NOTE: This value will be defaulted from the plan. Only change it if this employee has an exception. |
| Maximum Balance | Enter the number of units which the sum of all the COA entries overall cannot exceed. For example, if there is a maximum annual entitlement of 10 units, and a Maximum Balance of 25, then in the 3rd year only five units would be calculated for entitlement. NOTE: This value will be defaulted from the plan. Only change it if this employee has an exception. |
| Partial Period Pro-Rated | Select this field if the units are to be pro-rated for a portion of the entitlement year where an employee either starts work during the year or is on a contract that ends before the end of the entitlement year. The entitlement is then calculated based on the years of service plus any portion of the year that would have been deemed as the entitlement period. For example, in a company where the Years of Service chart says 1yr=10 days, 2yr=15 days if an employee is hired Oct 1st, 2014, by April 1st 2016, they will have worked 1.5 years. If this flag is turned on, when the entitlements calculate they will say the employee gets 12.5 days. NOTE: This value will be defaulted from the plan. Only change it when this employee has an exception |
| Pro-Rated by FTE | Select this field if the calculated entitlement units are to be pro-rated by the aggregate “active” assignment FTE for part-time employees with an F.T.E. of less than 1.0. NOTE: This value will be defaulted from the plan. Only change it if this employee has an exception. |
| Show Balances - Employee | This setting determines if this code will be displayed on Employee Center where balances are shown. Turn this on for all balances where you want the employee to see a balance. It is typically turned off for something like Bereavement where balances are not usually displayed. NOTE: This value will be defaulted from the plan. Only change it if this employee has an exception. |
| Create Entries - Employee | This setting determines if this code will be available for the Employee to enter a request. In some cases, you may want employees to see balances but not make entries for a particular code. In other cases, you may not want employees to see balances, but you may want to allow them to put in an absence (for example, Bereavement). NOTE: This value will be defaulted from the plan. Only change it if this employee has an exception. |
| Show Balances - Manager | This setting determines if this code will be displayed on Manager Employee Center where balances are shown. Turn this on for all balances where you want the manager to see a balance. NOTE: This value will be defaulted from the plan. Only change it if this employee has an exception. |
| Create Entries - Manager | This setting determines if this code will be available for the Manager to enter a request on behalf of an employee. In some cases, you may want a manager to see balances but not make entries for a particular code. NOTE: This value will be defaulted from the plan. Only change it if this employee has an exception. |
| COA Entitlement Type | This field displays the Entitlement Type specified on the COA Code. |
| Calculate Entitlement | This field displays “Yes” or “No” depending on the settings on the COA Code. |
| Activation Days | This field displays the number of days in which the employee must wait to receive access to their entitlement. The four fields above representing the showing of balances or creation of entries default to false when the attendance plan is first attached. When the employee has worked the specified number of consecutive activation days without a non-personal absence, there is a process that will activate the four fields and allow the employee and the manager to have access. NOTE: If the employee takes a non-personal day within the activation day period, then the activation period restarts its count to the number of activation days before providing access. |
Working with Delayed Activation
Organizations may need to set up entitlements to calculate and record but at the same time restrict employees and managers from viewing and consuming entitlements in Employee Center, until meeting a specified requirement (number of days). Delayed Activation is the ability to record entitlements while restricting viewing and/or consumption.
To set up delayed activation:
- In the Search field, type HR Employees and select the object from the drop-down.
The HR Employees list displays. - Select the employee and from the Ribbon click Time Attendance.
The Employee Time Attendance page displays. - In the Delayed Activation Days column, specify the number of working days that must have passed since the entitlement was granted without a non-personal absence for the employee to be able to see the entitlement balance or consume from it.
- The following boolean flags control the ability for the manager or employee to be able to see or create entries against the specified Cause(s) of Absence:
- Show Balances – Employee
- Create Entries – Employee
- Show Balances – Manager
- Create Entries – Manager
Note: When delayed activation days are involved, the value for these fields is defaulted to False. When the attendance plan is subsequently attached to an employee, the value for these fields remains as False.
There are two distinct processes that can be configured/used in the system to either automatically or manually turn these settings to True if/when the employee has satisfied the delayed activation requirement (number of days).
Manually Setting Delayed Activation to True
To manually run the process to change the flags to True:
- In the Search field, type in Manual Att. Delayed Activation.
- This will launch a report request page that can filter on any value on the Employee Attendance Line (such as Employee No.). When the report is run with those filters in place, the system will evaluate if the delayed activation requirements have been satisfied for employees within the filter. If they have been satisfied, the system will change the value of the four boolean flags (mentioned above) to True allowing the employee and the manager to both see and consume from the entitlement.
Automatically Setting Delayed Activation to True
The manual process is often used during setup and configuration to ensure that the solution is performing as designed. However, once performance has been confirmed, the solution also enables you to schedule the system to evaluate this condition for all appropriate employees (such as on a nightly basis).
To automatically set Delayed Activation to True:
- This is accomplished through the setup of a job queue entry. Follow the steps outlined in Enabling the Automatic Processing of Confirmation Requests.
- In this case, you will need to select codeunit 23032871 and Att. Delated Activ. Process in the appropriate fields.
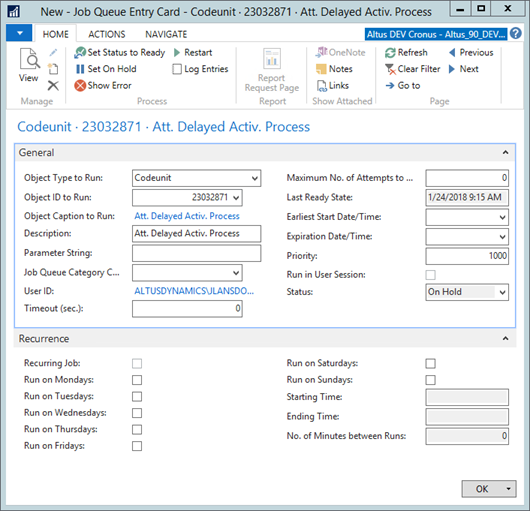
- When the job queue is scheduled, the system will check and update the status of the four flags if it determines that the requirements have been met.
NOTE: Delayed Activation Days only applies to Causes of Absence/Attendance Plan Entries that have an entitlement calculation of type fixed.
Working with Employee Entitlements
This section shows line specific details for entitlement for each Cause of Absence code. Use this page to edit these details if there are employee specific changes that should be applied to the employee.
To edit employee specific entitlement details:
- From the Employee Time Attendance card, scroll down or expand the Employee Attendance Plan Lines.
- Click on the Line and select Entitlements to view Employee Attendance Plan Entitlements. Alternatively, you can drill down on No. of Entitlement Entries.
- The Employee Attendance Plan Entitlements card displays. Click edit to add the specifics for this employee.
- Click OK to save your changes.
- The following table provides a detailed explanation of the columns in the Employee Attendance Plan Entitlements page:
| Field Name | Description |
| Y.O.S Amount Over | Integer (like tax bracket) – This will be used for tracking years of service thresholds where the entitlement will increase. For example, for 0-8 years, this value would be “8”. For 9-12 years, this value would be “12.” |
| Entitlements | Decimal – This is the value of the entitlement. For example, “20” for 20 days. NOTE: This respects the unit of measure either in hours or days. |
| No. of Changes | This field displays the number of changes made to this line. NOTE: Change Log must be turned on for this table in order for the changes to be collected. |
Working with Employee Sequences
This section shows line specific details for sequencing for each Cause of Absence code. Use this page to edit these details if there are employee specific changes that should be applied to the employee.
To edit employee specific sequence details:
- From the Employee Time Attendance card, scroll down or expand the Employee Attendance Plan lines.
- Click on the Line and select Sequencing to view Employee Absence Sequencing.
The Employee Absence Sequencing card displays. - Click edit to add the specifics for this employee.
- Click OK to save your changes.
NOTE: Only update the attendance sequence values when the Cause of Absence Code is first set up for the employee. After that, do not update the sequence. - The following table provides a detailed explanation of the columns in the Employee Absence Sequencing page:
| Column Name | Description |
| Sequence | The value in this column determines the order in which the sequencing will be applied to available balances. |
| Cause of Absence Code | This column displays the code that will be used in the sequence. |
| Cause of Absence Description | This column displays a brief description of the code. |
| Absence Top Up | Enter a value in this column if this code could be topped up with other values. |
| Absence Top Up % | Enter the percent from other values that should be topped up in this column. For example, If short term sickness is paid out at 75%, enter 25% as the amount of vacation or other balances that will be used to top up the 75%. |
Attaching an Attendance Plan to an HR Request
HR Administrators may choose to automate the process of assigning Attendance Plans to the employees together with processing an HR Request. This is usually done for process types Hire, Assignment Change, or Details Change.
Setting Up HR Functions — Standard Data
If your organization uses the standard HR reason codes setup that come with the system, the setup of the HR functions can be done as follows:
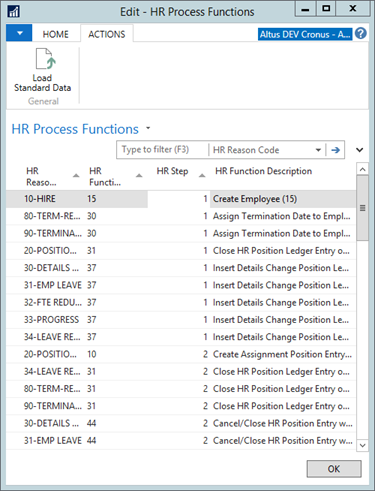
- In the Search field, type HR Process Functions and then select the object from the drop-down list.
The HR Process Functions page displays. - In the HR Process Functions page, select the Actions tab and then click Load Standard Data to have your setup updated with the new HR functions related to Absence Management.
Setting Up HR Functions — Organization Specific Data
If an organization’s HR Reason Codes and their process steps are organization specific, the setup of the HR Function and adding it to the HR Reason Code can be done manually as follows:
- In the Search field, type HR Functions and select the object from the drop-down list.
The HR Functions page displays.
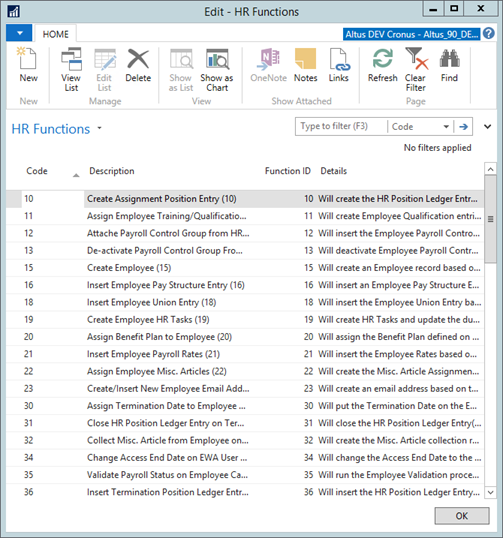
- From the Ribbon, click New.
- In the Code column, enter the next available number from the list.
- In the Description column, enter Insert Attendance Plan (46).
- In the Function ID column, enter 46.
- In the Details column, type: Will insert Attendance Plan lines if an Attendance Plan code is selected on the HR Request.
- Click OK to save your changes.
NOTE: Loading the standard data is the same process for Suspend Notification emails (47) as is described here for Insert Attendance Plan (46).
Adding HR Functions to HR Reason Codes
The next step will be to add the HR Function to the relevant HR Reason Codes. These are usually with type Hire or Assignment Change.
- In the Search field, type HR Reason Codes and then select the object from the drop-down list.
- From the Ribbon, click the Navigate tab.
- From the Ribbon, click HR Process Functions.
The HR Process Functions page displays.
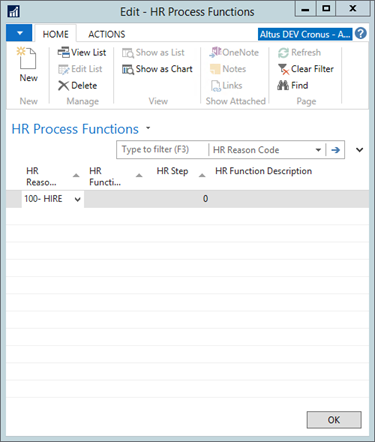
- From the Ribbon, click New.
- In the HR Reason Code column, choose a reason code (usually either Hire or Assignment Change).
- Complete the HR Function Code, the HR Step column, and the HR Function Description columns according to the new processes you have created in either of the ways in the sections above.
- Click OK to save your changes.
Once this is configured along with assigning the Attendance Plan to the Position (See Maintaining the Default Attendance Plan on an HR Position) the processing of the HR Request will automatically add or update the attendance plan assigned to the employee.
If the employee exists in the database (that is, the Employee No. field on the HR Request is blank, and the Attendance Plan selected in the HR Request is the same as that already associated with the employee), no change should occur. However, if the attendance plan is different, the Employee Time Attendance page will display the Cause of Absences that are:
- included in the new Attendance Plan being applied.
- from any other plan that has a 0 balance for the subject employee.
- from an updated Attendance Plan.
- from an updated effective date.
Maintaining the Default Attendance Plan on an HR Position
When position is selected, you need to enter the attendance plan in the HR Position Card. This automates entry on the HR Request as well as reduces room for errors.
To verify that an Attendance Plan has defaulted to an HR Position Card:
- In the Search field, type HR Positions, and select the object from the drop-down list.
The HR Position list displays. - Select the position you want to link to an attendance plan by clicking on it in the list.
The HR Position Card for that particular position displays.
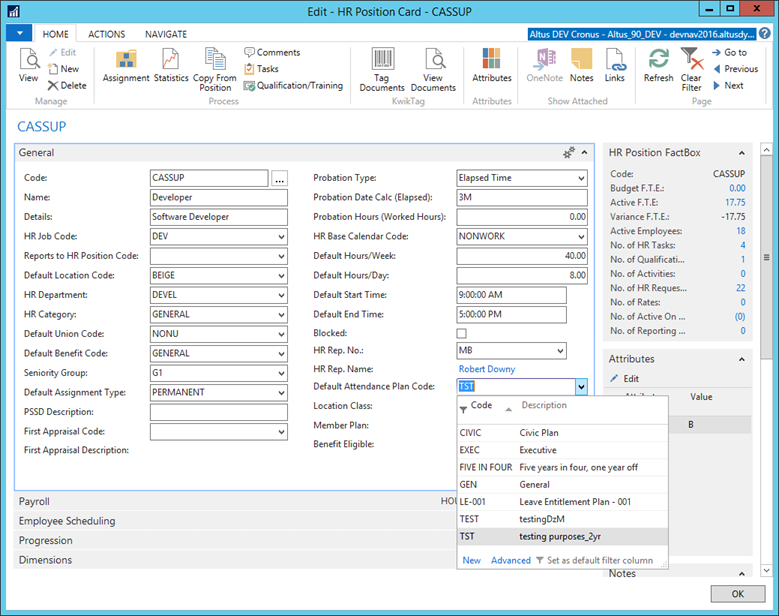
- From the Default Attendance Plan Code drop down, select the plan you wish to attach to this particular position.
- Click OK to save.
Once this is completed and saved, your organization will have the Attendance Plan on the HR Position configured so that the attendance plans will be automatically added to employees.
Configuring HR Setup
You need to confirm some configuration details on the HR Setup card.
Editing the Attendance Plans
It is necessary to configure the Attendance Plans FastTab of the HR Setup page.
To configure the Attendance Plans in the HR Setup page:
- In the Search field, type Altus HR Setup and then select the object from the drop-down list.
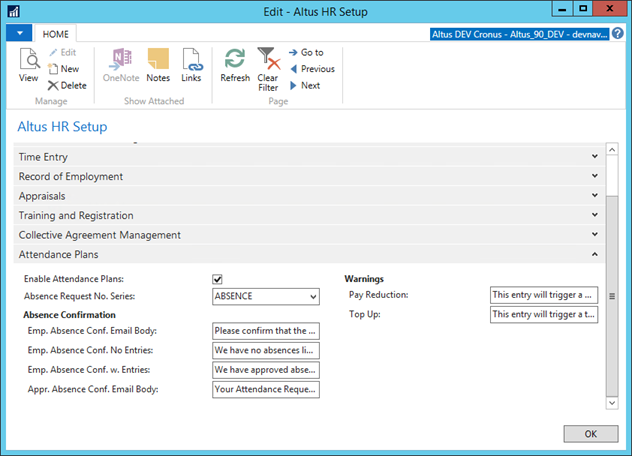
The Altus HR Setup page displays. - Expand the Attendance Plans FastTab.
- The following table provides a detailed explanation of the fields in Attendance Plans fast tab:
| Field Name | Description |
| Enable Attendance Plans | When checked Attendance Plans will be used and the Employee Time/Attendance page will display Attendance Plan information (plan and plan details). |
| Absence Request No. Series | Select the number series to be used for Absence Requests. The number series needs to be configured first before you can select it on this screen. |
| Warnings | |
| Pay Reduction | Enter a user-defined warning when pay reduction is in place. This warning is displayed on the Absence Request. When left blank, the system will use a standard text to display the warning. |
| Top Up | Enter a user-defined warning when top up is in place. This warning is displayed on the Absence Request. When left blank, the system will use standard text to display the warning. |
| Absence Confirmation | This relates to the absence confirmation process. Please refer to Configuring Employee Center Email Notifications under the Absence Confirmation section for more details. |
Editing the EWA Setup
You may want calculation details be shown to employees and/or managers on Employee Center.
When Show Calculation Details is checked, it displays the calculation details section of Absence Request on Employee Center. This section displays how sequencing has been used to consume the amount of absence the employee has requested.
To view calculations details on Employee Center:
- In the Altus HR Setup page, expand the EWA Setup FastTab.
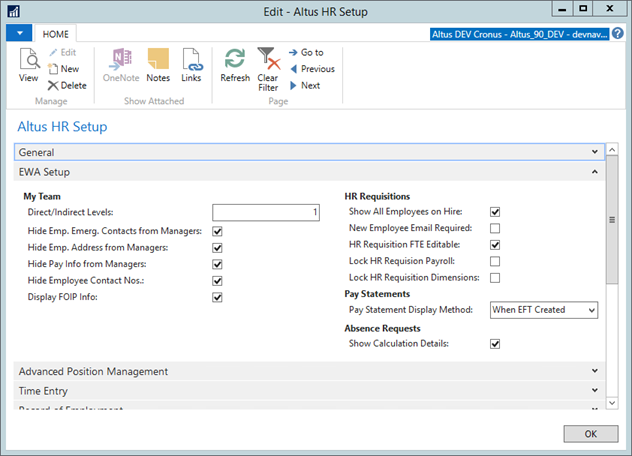
- To view calculation details on Employee Center, add a checkmark to the Show Calculation Details field.
- Click OK to save your changes.
Configuring the HR Calendar
The working days are set on the Altus HR Setup page's, Non-Working HR Calendar Code field. Anything specified as a non-working day in that calendar will not be used (the same as weekends) in the calculation of elapsed days for Absence Requests. To do this:
- In the Search field, type HR Base Calendars and select the page from the drop-down list.
The HR Base Calendar List displays.
- Select the calendar that you want to configure working days for.
The HR Base Calendar Card displays.

- Expand the Lines FastTab.
- For each non-working day in the calendar, add a checkmark to the Nonworking check box.
- Click OK when finished.