

The following flow diagram illustrates the process to follow when creating and working with Purchase Orders:

Performing Periodic Activities
The following activities are part of the Purchasing process, but do not need to be performed each time a Purchase Order is created. They are performed periodically. (The exact timing is based on the internal processes of the organization):
- Closing Purchase Orders: this activity can be performed as part of an organization’s regular review process (see, ‘Closing Purchase Orders’)
- Updating Commitment Entries: this activity is generally performed monthly or annually depending on an organization’s processes (see, ‘Updating Commitment Entries’)
About Purchase Orders
There are three methods for creating a Purchase Order:
- from the Purchase Order List (without a Purchase Request)
- from a Purchase Request
- from a Quote (see, ‘Accepting a Quote and Converting it to a Purchase Order’)
Creating a Purchase Order without a Purchase Request
Purchase Orders can be initiated without a Purchase Request. For example, Purchasing staff may be requested verbally from management, etc. to order an item(s).
To create a Purchase Order without a Purchase Request:
1. In the Search field, enter Purchase Orders.
The Purchase Orders List displays.
2. On the Ribbon, click New.
A New – Purchase Order window opens.
NOTE: A Purchase Order number is assigned automatically
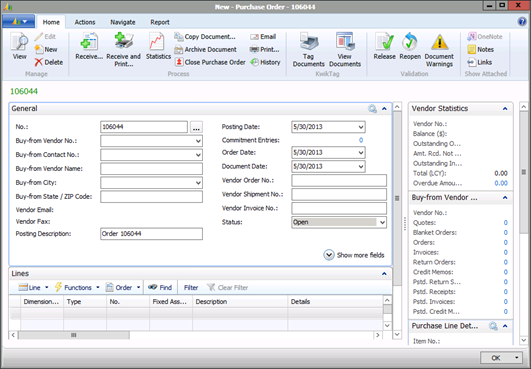
3. In the General Fast Tab, complete the required fields to provide the necessary details for the purchase order. (Many of the fields in the remaining Fast Tabs are auto-populated based on the data entered in the General Fast Tab.)
4. In the Lines Fast Tab, provide the details for the purchase item(s).
5. Review the remaining tabs and add any additional details required.
6. If the Purchase Order is ready to send to the vendor, on the Ribbon, click Release.
The Purchase Order is released and the Status field displays ‘Released’. See, ‘Releasing a Purchase Order’ for further details.
7. Click OK.
The Purchase Order is added to the Purchase Order List.
Generating a Purchase Order from a Purchase Request
Once you determine that you have all the required information or that you’ve added/changed the request as needed, you can create the Purchase Order.
The Purchase Order can be created from the Purchase Request directly or from a quote submitted by a vendor and approved as part of a tender process. See, ‘Accepting a Quote and Converting to a Purchase Order’.
To generate a Purchase Order from a Purchase Request:
1. In the Request Card for the purchase request, make sure the Status field in the request header indicates ‘Approved’ or ‘In Progress’.
2. Under the request lines section, find the Action column.
3. Select the line items for creating the Purchase Order using one of the following two methods:
Method One
- If all lines of the request are verified as complete and ready to be processed, you can update the line Action column to ‘Create Purchase Order’ for all the lines at once. (This method is useful and efficient when the request contains several line items.)
- On the Ribbon, click Set Blank Action to.
- The Set Blank Action window opens.
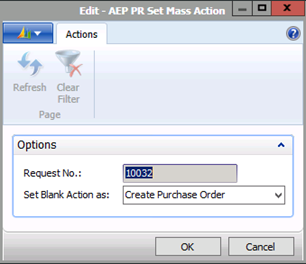
- The Set Blank Action as field, defaults to Create Purchase Order.
- Click OK.
- The Action column for all the lines is updated to Create Purchase Order.
Method Two
- If you are only processing part of a request for specific line items or the request only contains a couple of lines, you can initiate a Purchase Order for the line items individually.
- In the Action column for the request line you want to convert to a Purchase Order, select Create Purchase Order from the drop-down menu.
- Repeat for each of the line items for which you want to create a Purchase Order.
1. On the Ribbon, click Create Purchase Order.
A confirmation window opens indicating the Purchase Order(s) number created.
2. Click Yes to open the Purchase Order(s).
NOTE: Click No if you do not want to view the Purchase Order at this time. To view Purchase Orders, in the Search field, enter Purchase Orders to open the
Purchase Orders List.
The newly generated Purchase Order opens.
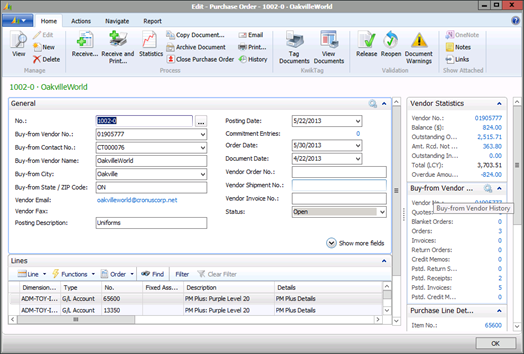
NOTES:
- Depending on the status of the ‘Synchronize PO Numbering’ setting, the number assigned to the Purchase Order is either the same number as the Purchase Request or a new number series established for Purchase Orders.
- The Posting Description field (in the General Fast Tab) and the Ship-to Contact field (in the Shipping Fast Tab) are automatically populated based on the Description field and the Shipping Reference field (respectively) on the Purchase Request.
Adding Lines to a Purchase Order
Once a Purchase Order is created, you can add more request lines (if required) using the Add to Purchase Order action available on the Purchase Request lines.
To add lines to a purchase order:
1. Open a Purchase Request Card.
2. Locate the line you want to add.
3. In the Purchase Order No. column, use the drop-down to locate the Purchase Order to which the lines are being added.
4. From the Action column drop-down, select Add to Purchase Order.
This action enables you to add lines from other purchase requests to the Purchase Order.
5. On the Ribbon, select Create Purchase Order.
A line is added to the existing Purchase Order.
Editing a Generated Purchase Order
Once the Purchase Order is created, the purchaser needs to review the contents to confirm the following:
General Fast Tab:
- the vendor information
Lines Fast Tab
- quantity
- unit cost
- vendor item numbers, etc.
Shipping Fast Tab:
- shipping information (for example, the location and the ship-to contact)
- the order addresses, if applicable
Comments Fast Tab:
- that the external comments (if any) that come from the Purchase Request (and can be printed on the Purchase Order) are relevant/appropriate.
It is likely more changes will need to be performed, like adding additional text comment lines or changing the line type on the line (if required by your processes).
See the following sections for details.
Adding Comments to a Purchase Order
There are two types of comments that can be added to a purchase line:
- insert comment that will not be displayed on the lines of the Purchase Order (can be viewed internally by Purchasing and AP staff).
- insert comments directly on the order line(s) that can appear on the printed Purchase Order.
To add comments that will not be displayed on the purchase order line:
- Select the line to which you want to add a comment.
- Click the Line icon (graph image) and select Comments.
- In the Edit – Comment Sheet window, under the Comment column, enter the text.
- Click OK.
To insert a comment manually (directly in the line):
- Select the line to which you want to add a comment or, create a new line (by clicking below the already existing lines)
- In the Description or Details field (depending on which column you display on the printed form) enter the text for the comment relating to this line item.
Adding Comment Lines Using Standard Text Codes
Standard Text codes are used to maintain consistency in wording, reduce errors, and save time.
To enter a standard text code:
1. In an empty row, under the No. column, click the drop-down arrow to select a standard text code. (Or, if you know the code, simply type it in the field.)
2. Press tab or enter.
The Description and Details fields are populated based on the standard text code selected/entered.
NOTE: See, ‘Setting up Standard Text Codes’ on how to create the code.
Changing a Line Type
You can change the line type on a Purchase Document created from a Request. The Change Line Type function enables the change of a line type without losing the details from the source Purchase Request Line such as, the dimensions, description, and amount.
For example, a Purchase Request that has been created for an Expense Type (G/L Account) and needs to be converted to a Fixed Asset on the Purchase Order.
NOTE: The change can only be performed on lines that have not yet been received.
To change a line type:
1. Select the line for which you want to change the line type.
2. Click the Functions icon (lightning bolt) and select Change Line Type.
The Edit – Change Line Type window opens.
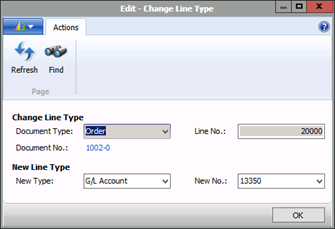
3. From the New Type drop-down, select the applicable option.
4. From the New No. drop-down, select the item/fixed asset number to use on the line.
5. Click OK.
The line is updated to reflect the change you made.
Archiving Purchase Orders
Purchase Orders remain in the system until the order has been archived, closed, or deleted.
The Archive Document function creates an archived copy of the current Purchase Order, but the Purchase Order can still be seen in the Purchase Order List. You can archive the Purchase Order as many times as needed to keep a history of the revisions made to the Purchase Order.
To archive a Purchase Order:
1. On the Ribbon, click Archive Document.
A confirmation window opens.
2. Click Yes.
Another confirmation message opens indicating the document was archived.
3. Click OK.
Releasing a Purchase Order
Once the Purchase Order is complete, there is a Statistics option available for reviewing financial information (to verify amounts, etc.) before releasing and sending the Purchase Order to the selected vendor.
The statistics includes the tax break down and the total costs and total price for the order.
Viewing Purchase Order Statistics
To view Purchase Order statistics:
1. On the Ribbon, click Statistics.
The Statistics window opens.
2. Review the details.
3. Click OK when done.
Releasing Purchase Orders
When ready, release the Purchase Order and send to the selected vendor.
NOTE: It’s a good idea to review the Purchase Order a final time before releasing it. Once you release an order, no further changes can be made unless you re-open it.
To prepare the Purchase Order for transmission:
1. Click the Actions menu tab.
2. On the Ribbon, click Release.
The Status field updates to display Released.
Printing and Sending the Purchase Order to the Vendor
Once the Purchase Order is released, it can be sent to the vendor.
Transmit the Purchase Order using one of the following methods:
1. Option One: To automatically e-mail, refer to the ‘NAV - Email Management Setup and User Guide’ available on the client portal.
2. Option Two: On the Ribbon, click Print.
- The Print window opens.
- Select the filters, if required.
- Click the Print button and select an option to:
- Print a hard copy for faxing or filing
- Save as pdf for emailing
Closing Purchase Orders
Once a Purchase Order is no longer required, you can close it. The close function archives the Purchase Order and deletes/removes it from the Purchase Order List.
NOTE: To close a Purchase Order, the Quantity Received should be equal to the Quantity Invoiced.
To close a Purchase Order:
1. On the Ribbon, click Close Purchase Order.
A confirmation window opens.
2. Click OK.
The Purchase Order is archived and removed from the Purchase Order List.
Updating Commitment Entries
A function exists for rolling (transferring) opens commitments a new date (updated commitment entries). This can be done monthly as part of the month end closing process or annually as part of transferring the commitments to the new fiscal year.
NOTE: For details on commitments, refer to the ‘Budget Verification Setup’ guide.
To update commitment entries:
1. In the Search field, enter Update Commitment Entries.
The Edit – PO Roll Forward window opens.
2. Under Options, from the New Posting Date drop-down, select the date to which the commitments are to be transferred.
3. In the Purchase Header section, use the filtering options to identify the Purchase Orders to be affected.
4. Click OK.
The appropriate Purchase Orders are identified and re-opened, the original Posting Date updated with the New Posting Date, and then the Purchase Order is re-released to
update the commitments.
NOTE: If the Purchase Order was in the ‘Open’ status, the document does not get automatically released as part of this process.
Processing Receipts
The next stage in the procurement process is the processing of receipts. As items, goods, and/or services are received (based on a purchase order) this needs to be recorded.
There are two different methods for processing receipts:
- Option 1: through the Employee Portal – refer to the ‘Purchase Orders and Receiving Portal User Guide’ for details
- Option 2: through NAV (see below for details)
Depending on what has been ‘received’, you have two options for processing receipts:
- Receiving the complete order
- Receiving a partial order
Receiving a Complete Order
To process receipt of items in NAV:
1. In the Search field, enter Purchase Orders.
2. In the Purchase Orders List, locate and select the Purchase Order you want.
3. On the Ribbon, click Receive (or Receive and Print to print a record of the receipt).
NOTE: If the Disable PO Posting check box (in the Purchase & Payables Setup window) is not selected, there is a Post and Post and Print button instead of a Receive and Receive and Print button. You need to either select Post or Post and Print.
A confirmation window opens displaying three options:
- Receive
- Invoice
- Receive and Invoice
Click the radio button next to the option you want.
Click OK.
4. Click OK.
A progress window opens displaying the Purchase Order number and indicates the Posting Lines posted as they are being processed.
5. When the process completes, click OK.
Receiving a Partial Order
To process receipt of items:
1. In the Search field, enter Purchase Orders.
2. In the Purchase Orders List, locate and select the Purchase Order you want.
3. On the Ribbon, select View.
The Purchase Order Card for the selected Purchase Order opens.
4. In the Lines section, select the line for the item/goods you want to receive.
5. On the Action Pane, click Receive (or Receive and Print to print a record of the receipt).
NOTE: If the Disable PO Posting check box (in the Purchase & Payables Setup window) is not selected, there is a Post and Post and Print button instead of a Receive
and Receive and Print button. You need to either select Post or Post and Print.
A confirmation window opens displaying three options:
- Receive
- Invoice
- Receive and Invoice
Click the radio button next to the option you want.
Click OK.
6. A confirmation window opens.
7. Click OK.
A progress window opens displaying the Purchase Order number and indicates the line being posted as it is being processed.
8. When the process completes, click OK.
Viewing the History for a Purchase Order or Quote
The history in terms of the actions, iterations, and processing of a Purchase Order or a Quote is all maintained, enabling the full lifecycle of a particular Purchase Order or Quote to be reviewed, if required.
A history for the quote tenders might be required for auditing purposes or for Purchase Order it might be useful to have information what has occurred previously. The archive enables you to track what has been done.
The history for a Purchase Order is stored as Purchase Order Archives. For quotes, the items are stored in Purchase Quote Archives. When the archive list (for either a purchase order or a quote) is opened, the full list of archived purchase orders or quotes (depending on the selection) displays.
Option One:
To view a Purchase Order or Quote document history:
1. From the Purchase menu, select the History.
2. Under History, select the option you want (Purchase Quote Archives or Purchase Order Archives).
The Archive List for the selected document type opens.
3. Select the document you want.
4. On the Ribbon, select View to see the full details for the selected document.
Option Two:
To view a Purchase Order or Quote document history linked to a current purchase document:
1. Open the Purchase Order or Purchase Quote for which you want to view the history of the document.
2. On the Ribbon, History.
The History window opens.
3. View additional details by selecting an option from the Document Type drop-down.
4. Click OK to close the window.