

All purchase requests that are approved need to be reviewed by the Purchasing department to ensure that all the required information is provided and that the request is valid. Once you review the request, there are a number of actions you can perform for processing the request (creating a quote, consuming from inventory, creating a purchase order), depending on the requirements for the particular request.
Viewing Purchase Request Details
For each request in the Request Inbox there is a Request Card that contains all the details for each line of the request.
To view the purchase request details:
1. In the Request Inbox, select the line representing the request you want to view in detail.
2. On the Ribbon, click Card.
The Request Card for the request you selected opens.
3. Review the information provided by the requestor, make any required updates, or request additional information, if applicable.
The following table provides information for the fields and task functions in the Request Card:
General Fast Tab
| Field Name | Details |
|---|---|
| No. | Displays the purchase request number assigned. |
| Type | Displays the type of request (purchase, expense, or payment). For purchase requests the type is automatically displayed as ‘Purchase’. You should not have to change this selection |
| Description | Displays a description for the request. If no description exists, you can enter a brief description in the text box provided. |
| Comments | When this check box is selected, it indicates that comments have been added to the request. Expand the Comments Fast Tab to view the comments |
| Status | Displays the current status of the purchase request. For details on changing the status, see ‘Overriding the status on a Request’. |
| Request Date | Displays the date the request was submitted. This field is non-editable. |
| Request by AEP User | Displays the user code for the individual who submitted the request. This field is non-editable. |
| Requested Receipt Date | Displays the date the purchase item is required. This field is non-editable. |
| Location Code | Displays the location for which the item is being purchased and shipped. You can change the location, if required. Select the location from the drop-down. |
| Shipping Reference | Displays the Shipping Contact reference entered on the Purchase Request on the portal. |
| Shipping Method Code | Displays the shipment method selected for this request. This field is non-editable. |
Comments Fast Tab
| Field Name | Details |
|---|---|
| Internal Comment | Displays the internal comments entered by the requestor. |
| External Comment | Displays the external comments entered by the requestor via the portal. This field is usually used to provide instructions/comments to the vendor as the text entered here can be printed on the Purchase Order. |
| Denial Comments | Used by approvers to provide an explanation to the requestor for why the purchase request has been denied. |
Using the Purchase Request Card Functions
At the top of the Purchase Request Card there are a series of (Action Pane) buttons and menus linking to functions that perform specific actions or display additional details for the request. Many of the options are the same as the functions within the Request Inbox and duplicated in the Purchase Request Card for ease of use and to expedite the process (for details see, ‘Using the Fact Box to Review Request Details’).
The following table provides the details for the task-related functions available from within the Purchase Request Card.
| Field Name | Details |
|---|---|
| New Vendor | See ‘Creating a New Vendor’ for details. |
| Create Quote | Enables you to create a quote as a request for tender based on the request. See ‘Creating a Request for Tender’ for details. |
| Create Purchase Order | Enables you to create the Purchase Order. See ‘Creating a Purchase Order’ for details. |
| Re-Open | See, ‘Re-Opening a Request’ for details. |
| Re-Open and Email | See, ‘Re-Opening and Emailing a Request’ for details. |
| Cancel | See, ‘Cancelling a Request’ for details. Cancelled requests can be re-opened, if required. |
| Set Blank Action to | Enables you to choose a line action that will be applied to all the lines in the document (for example, Create Purchase Order, or Add to Purchase Order). See, ‘Creating a Purchase Order’ for details. |
Verifying the Request Lines Within a Purchase Request
The request lines of a purchase request contain many fields that provide specific information for the line item. Some of these fields are editable for making changes or providing more detail to a request line, if required.
Much of the information is supplied by the individual who submitted the request (mandatory fields ensure the request is submitted with important/required details); however, the requester may have entered the information incorrectly. The buyer needs to verify the details provided and make changes where necessary.
To verify the request lines:
1. In the Request Card for the purchase request scroll through the fields for the lines to verify the information provided.
2. From the drop-down lists, or in the text fields, enter additional details or modify existing selections as required.
Once the request is reviewed and is ready for processing, there are two options for moving forward with the request document:
- Begin the tender process and convert the request to a quote to send to vendors for their bids.
- Create a purchase order and send to the selected vendor.
Accepting a New Vendor Request
When the individual who submitted the request, also requests a new vendor, Purchasing or Accounts Payable needs to review the information to determine if this vendor is acceptable and to ensure that the vendor does not already exists in the database.
To accept a suggested new vendor:
1. From the Purchase Request Card, in the Fact Box, click the No. of New Vendors link.
The View – Purchase Request Custom Vendor window opens.
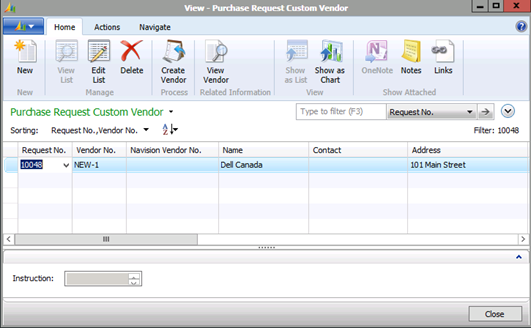
2. From the drop-down in the Navision Vendor No. column, select Advanced.
3. In the Vendor List window, perform a search for the vendor.
4. Based on the results of the search, do one of the following:
- If the vendor exists, select the vendor and use this vendor for the request.
- If the vendor does not exist, on the Ribbon, click Create Vendor.
The Create New Vendor window opens.
- From the No. Series drop-down, select the numbering series for vendors.
- Click OK.
The vendor record is added.
NOTE: You need to go to the Vendor Card and fill in the remaining details related to setting up a vendor (for example, taxation, currency, payment method, or terms).
Overriding the Status on a Request
Generally, a Purchase Request is created and approved in the portal. However, depending on the organization’s policies, Purchasers have the ability to override or change the status of a request from ‘Open’ to ‘Approved’ within NAV.
To override the status on a purchase request:
1. From the Request Inbox, locate the purchase request with the ‘Open’ status and select Card.
2. In the Header section of the Request Card, from the Status drop-down, select Approved. (all individual lines statuses will be updated.)
NOTES:
- You may not change the status of purchase requests with the status of ‘In-Progress’, or ‘Completed’.
- To re-open or approve a request, users need to have the Employee Portal Admin check box selected in their user profiles (In the Search field, enter User Setup).
- Approval is linked to internal processes and procedures that stipulate under what circumstances users can override the regular approval process.
3. Click OK to update the request status to the system.
Re-Opening a Request
If Purchasing requires modifications to a request that is in status ‘Approved’, the document can be
re-opened.
To re-open a request:
1. In the Request Inbox, select (highlight) the request you want to re-open.
2. On the Ribbon, select Re-Open.
3. In the Confirmation window, click Yes.
The request status changes to ‘Open’ enabling you or the requestor to make the required changes.
NOTE: To re-open a request, you need to have the Employee Portal Admin check box selected in your user profile (In the Search field, enter User Setup).
Re-Opening and Emailing a Request
If a request is missing key information, you can re-open it and trigger a system-generated email message to be sent to the requestor as notification that the document has been re-opened.
To re-open and email a request:
1. In the Request Inbox, select (highlight) the request you want to re-open.
2. On the Ribbon, click Re-Open and Email.
3. In the Confirmation window, click Yes.
4. The request status changes to ‘Open’ and an email notification is sent to the requester.
Cancelling a Request
If upon reviewing a request, you determine it is a duplicate or problems occurred with processing, you can cancel the request.
To cancel a request:
1. In the Request Inbox, select (highlight) the request you want to re-open.
2. On the Ribbon, click Cancel.
The request is cancelled.
NOTE: This action can be performed from the Request Card as well, following the ‘Overriding Status on a Request’ steps.
Generating a Purchase Request Analysis Report
The Purchase Request Analysis report provides information on one or more purchase requests. It shows all related documents and lines within the selected request(s) lifecycle. When generating this report, users can set parameters (filters and options) to define the content further to display only the information required.
To generate a Purchase Request Analysis report:
1. In the Search field, enter Purchase Request Analysis.
The Edit – Purchase Request Lines Analysis window opens.
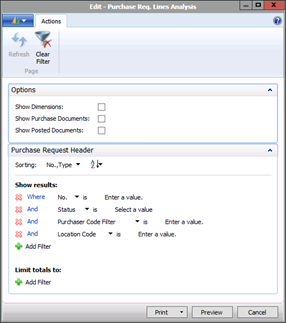
2. In the Options section, click to select the check boxes for the elements/data you want to display in the report.
3. In the Purchase Request Header section, set filters to determine the exact content/results returned.
4. From the Print drop-down, select Print or Print > PDF depending on whether you want a hardcopy version of the report or an electronic version (PDF). Or, select an export option (Microsoft Word or Excel.)