

Purchasing staff is responsible for processing Purchase Requests submitted over the portal. The Request Inbox is where these purchase requests are stored. The following sections provide the steps for viewing and processing submitted purchase requests.
Viewing the Request Inbox for Purchase Requests
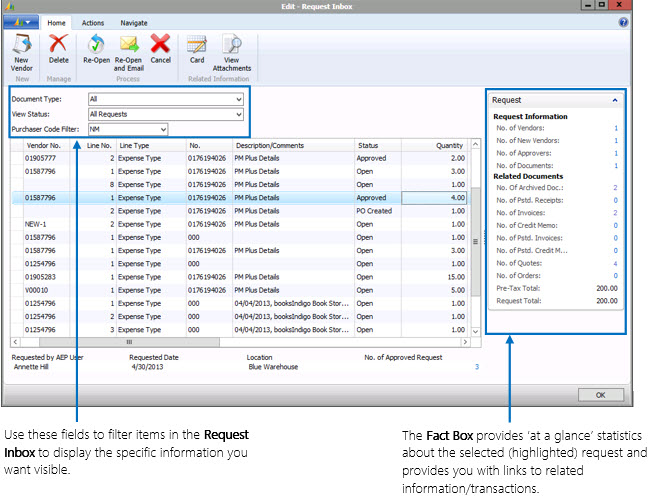
The Request Inbox contains all the Purchase Requests created over the portal. Depending on your account settings, you can view all the created requests or just those assigned to you.
To display the Request Inbox:
1. In the Search field, enter Request Inbox.
2. Select any option.
The Request Inbox opens.
Filtering Your Inbox View
A number of filtering options exist to enable you to configure your view of the Request Inbox. This way you can display only the information you require, which makes sorting through and processing the requests easier and more efficient.
To filter the Inbox view:
1. From the Document Type drop-down, select the type of request you want to view (default is All).
The Document Type drop-down contains the following request types:
- All
- Purchase
- Payment
- Expense
2. From the View Status drop-down, select the request status you want to view (default is All Requests).
The following provides a description of the status types:
- Open: indicates the order is in the system, but not submitted (it can still be edited, cancelled, deleted, or is on hold).
- Pending Approvals: indicates the request has been submitted for approval.
- Approved: indicates the assigned approver(s) approved the purchase and the order processing can now begin.
- Approved/PO/PI Created: this status enables you to see both the Approved and Purchase Order/Purchase Invoice created lines at once.
- PO Created: indicates a Purchase Order has been created for the request.
- Committed: indicates the order was processed. The funds for the purchase will be consumed by the order (committed). The commitment is triggered upon the release of the Purchase Order.
NOTE: Budget Verification Setup needs to be configured for generating commitment entries.
- PI Created: indicates a vendor request line has been converted to a Purchase Invoice. For Purchase Requests this means the Purchase Invoice is linked to Receipt Lines for further processing. For Payment and Expense Requests it means the request is converted to a Purchase Invoice.
- Completed: indicates the order was placed, items received, and the invoice posted in Accounts Payable.
- Cancelled: indicates the request no longer requires processing.
3. From the Purchaser Code Filter drop-down, select the buyer assigned to the request.
NOTE: Depending on your User Setup, you may be able to view requests submitted to individuals other than yourself. You can select the individual and see the requests submitted to that person. If you are restricted to viewing only requests submitted to you, the drop-down is not enabled and your Purchaser Code displays in the field.
The items in the Request Inbox are refreshed to display the requests based on the filters applied.
Using the Fact Box to Review Request Details
The Fact Box to the right of the request lines is a dynamic section that changes and updates based on the request line that is selected (highlighted). The information displayed for a request enables you to get a quick synopsis of the request details/history and enables you to open a specific item from the list to review in more detail or to create an item (new vendor, attach a document, attach a quote, etc.).
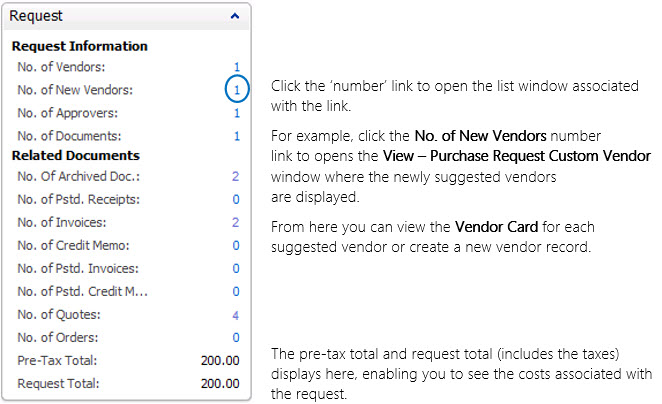
The Fact Box information is useful for quickly understanding the scope of the request and determining whether a request contains the appropriate documents and background information. The links here also enable you to reference existing documents, access additional information, view vendors, or approvers.
Using the Request Inbox Functions
The menus at the top of the Request Inbox link to functions/options to perform specific actions or display additional details for the selected (highlighted) request.
The most commonly used items (tasks) appear on the Ribbon as buttons. Using these functions, you can display the Request Card for requests, view the purchase lines in detail, re-open requests, and create vendors.
As an example, the Home menu enables you to access the Request Card for a request. The Navigate menu enables you to display the Purchase Orders or the Purchase Invoice created for a request. Additionally, you can see the receipt of items details, the posted invoices, and even any attachments.
Take a moment to look through the menus to determine the options and functions available to you.