

For Purchasing staff to work with the Purchase Requests sent over Employee Center, some initial setup steps need to be completed. The appropriate access rights and the required permissions related to users are defined on the User Setup page. Additionally, there are some tender process functions and purchasing related setup options that need to be initiated before users can create quotes for and accept quotes from vendors, as well as create purchase orders.
Finally, for Purchasing staff to work with the resulting purchase orders (releasing, sending to vendors, receiving items/services, and so on), some additional setup steps need to be completed in NAV to assign the appropriate access rights and apply the required permission settings to those users.
Once these setup steps are performed, the Purchasing (buyers) staff can access and use the various procurement functions.
About Purchase Request Setup
The Purchase Request setup involves configuring users for processing the information coming from the portal to NAV. The following sections cover the configuration processes that need to be completed for enabling access and functionality for Purchase Requests.
Enabling Purchase Request Processing Functionality for Users
The User Setup page enables administrators to add the required users and provide each user with the options they need for viewing and processing purchase requests.
To define the user options for requests.
- In the Search field, type User Setup and select the page from the drop-down list.
The User Setup List displays.
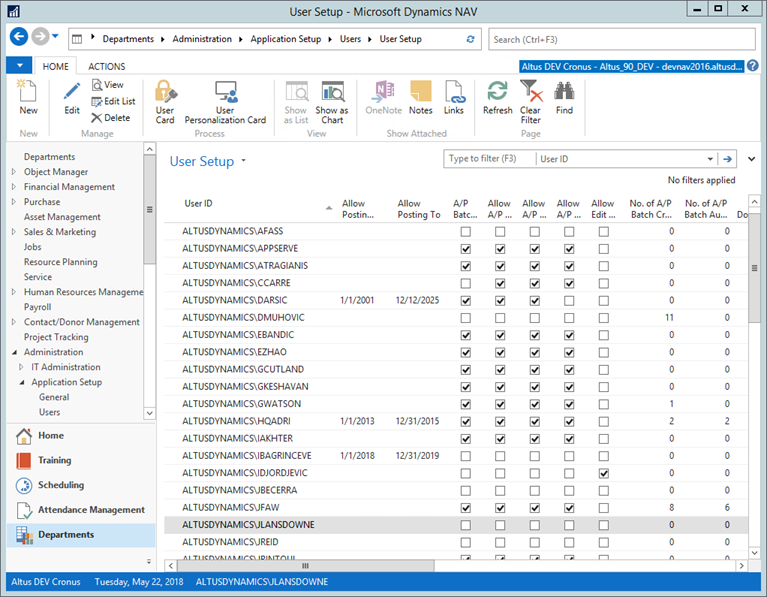
- In the User ID column, confirm that the required users display.
NOTE: If the user does not exist, you need to add the user first. - Use the following table to complete the required fields to provide users with the appropriate access.
| Field Name | Details | Where Used |
| Allow Posting From | Date activation (what's earliest and latest they can post) | |
| Allow Posting To | ||
| A/P Batch Admin | ||
| Allow A/P Batch Creation | ||
| Allow A/P Batch Auditing | ||
| Allow A/P Batch Deletion | ||
| Allow Edit User Name | Add a checkmark to this check box to allow users to edit their user name. | |
| No. of A/P Batch Created | ||
| No. of Documents Created | Specifies the number of documents created by this user. | |
| Register Time | ||
| Sales Resp. Ctr. Filter | ||
| Purchase Resp. Ctr. Filter | ||
| Service Resp. Ctr. Filter | ||
| Time Sheet Admin | Grants editing access | |
| Allow Payroll Calc. Trace | ||
| Purchaser Code | ||
| Employee Portal Admin | What does this do specifically? | |
| Unrestricted View of Requests | ||
| View Vendor SIN | When enabled, this displays the vendor SIN (used for contractors). (What page does this correspond to?) | |
| Allow Edit T4A | ||
| Edit Commitm. Eff Date | ||
| Allow Changing Payroll Validation Status | ||
| Payroll Jnl Release/Re-Open | When enabled, users are able to release and re-open payroll journals. | |
|
Purchaser Code |
Used to identify the purchaser. Applying a purchaser code is useful if you have central purchasing and want to allocate vendors or items to specific individuals to do the buying or to monitor other purchasing activities. Click the drop-down arrow to assign the purchaser code for the user ID selected. This enables a user to filter the Request Inbox for specific users to view the requests they are responsible for processing and enables managers, etc. to monitor the status of requests submitted to individuals for which they are responsible. |
In NAV - enabling the user to filter the Request Inbox to begin the steps for processing the requests. |
|
Employee Portal Admin |
Click to add a checkmark in this column to enable the user with the rights to override the status of a Purchase Request (for example, change the status from Open to Approved). |
Request Card |
|
Unrestricted View of Requests |
Click to add a checkmark in this column to provide the user with an unrestricted view of the purchase/payment/expense requests in the Request Inbox. A checkmark indicates that this user can view the requests submitted to all users, not just the individual’s specific Purchaser Code. |
Request Inbox |
NOTE: Depending on your organization’s specific conventions, you may be unfamiliar with the NAV terminology. In NAV, ‘Purchaser’ refers to what many organizations refer to as ‘Buyer’.
Enabling the Re-Open and Email Document Link
When Purchasing staff detects errors or omissions in a submitted request, they need the ability to re-open the request and send email notification back to the requester that the document has been re-opened.
To enable users to receive an email link of the re-opened document:
- In the Search field, enter EWA Setup and select the EWA Setup page from the drop-down list.
The EWA Setup page displays. - Expand the General FastTab.
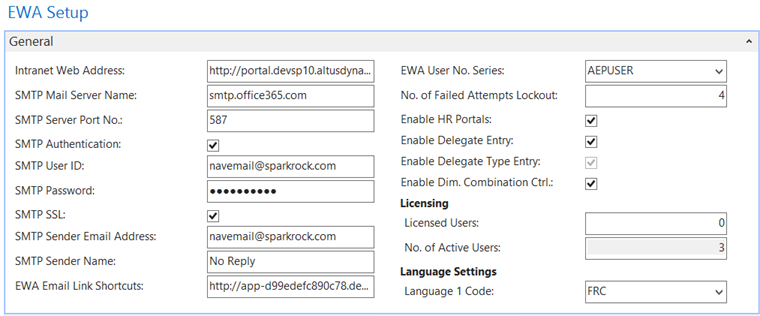
- Ensure that the Intranet Web Address field contains the Employee Center link plus the following: _layouts/AltusEmpPortals/FinRequest.aspx?p=FIN_REQ_Pur&d=1&rid
Creating Purchaser Codes
If the purchaser code you require does not exist, you can create additional purchaser codes to assign to Purchasing staff.
To create a purchaser code:
- In the Search field, type Purchasers and select the page from the drop-down list.
The Purchasers page displays. - From the Ribbon, click New.
The New – Salesperson/Purchaser Card opens.
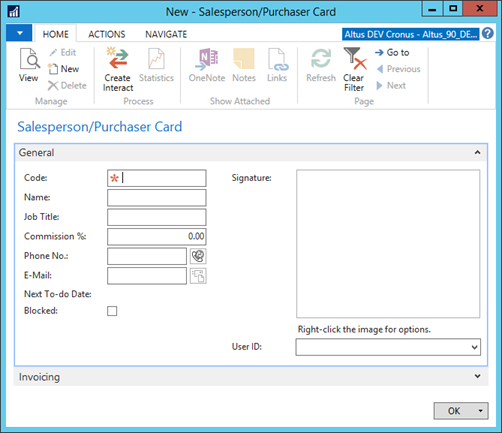
- Under the General FastTab, do the following:
- In the Code field, enter a unique coder for this purchaser.
- In the Name field, provide the individual’s full name.
- Provide the necessary contact details, if applicable.
- Click OK.
The newly created purchaser code is added to the Purchasers list.
Setting up Locations
If your organization has more than one site, you can set up different locations to have orders shipped to a specific location that is not your main address (billing address). This might be a department within your organization or a separate physical location.
You can manage locations through the Locations List.
To set up locations:
- In the Search field, type Locations and select the page from the drop-down list.
The Locations List displays. - On the Ribbon, click New.
The New – Location Card page opens.
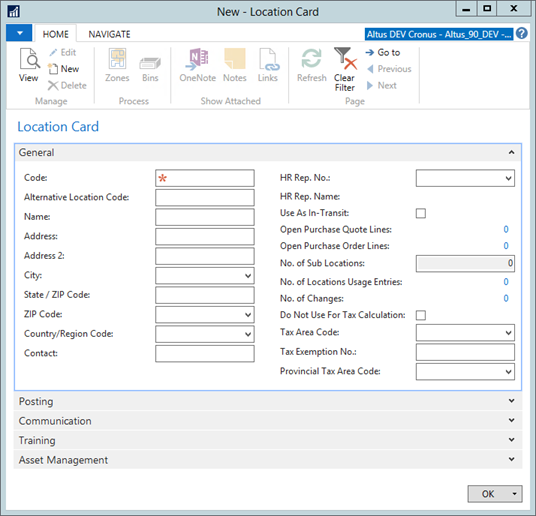
- In the Code field, enter a code for the location you are creating. This field is required.
- If required, enter information in the remaining fields and FastTabs.
- When you finish, click OK to close the page.
- Repeat steps 1 – 3 to set up any additional locations you need.
Updating Vendor Records with the Required Procurement Details
When new vendors are set up, they need to have procurement-specific information added to their records. There are certain fields that the Purchasing staff should complete relating specifically to purchasing.
NOTE: This also applies to the Miscellaneous Vendor used for creating quotes/request for tender.
To add the required purchasing information to the Vendor Card:
- In the Search field, type Vendors and select the page from the drop-down list.
- Locate the new vendor record and open the Vendor Card (double-click the vendor line).
- Use the following table to complete the fields for enabling the procurement process:
| Name | Details |
| General FastTab | |
|
Purchaser Code |
Displays the purchaser assigned to this particular vendor. From the drop-down, select the applicable ‘buyer’. (Selecting an option for this field is not required.) NOTE: Depending on your organization’s specific conventions, you may be unfamiliar with the NAV terminology. In NAV, ‘Purchaser’ refers to what many organizations refer to as ‘Buyer’. |
| Invoicing FastTab | |
|
Tax Liable |
Indicates if the company has federal or provincial taxes on the purchase invoices. Select this check box if this is valid. |
|
Tax Area Code |
Indicates the tax area code applicable to this vendor. From the drop-down select the appropriate option. |
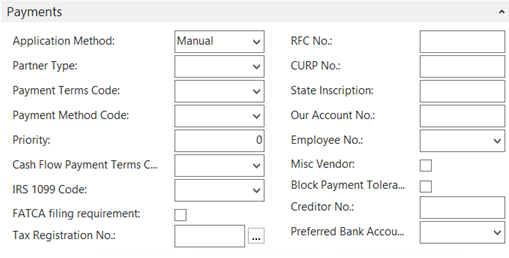
| Payments FastTab | |
|
Payment Terms Code |
Displays the payment terms for this vendor. From the drop-down, select the terms that apply to this vendor (for example, Net 30 - net 30 days). |
| Payment Method Code |
Displays the method is used to submit payment (for example, bank transfer or cheque). Select the applicable method from the drop-down.
|
| Receiving FastTab | |
|
Location Code |
Indicates the location code to be used on purchase orders. From the drop-down select the default location for the vendor, if applicable. (Selecting an option for this field is not required.) |
|
Shipping Method Code |
Indicates the default method used by the vendor when shipping items to your organization. (Selecting an option for this field is not required.) |
|
Shipping Agent Code |
Displays the default shipping agent the vendor normally uses to send your orders. For example, Purolator, own truck, and so on. (Selecting an option for this field is not required.) |
Setting up Alternate Order Addresses for Vendors
Alternate locations/addresses may be required during the procurement process. Alternate addresses are usually used for vendors that have multiple shipment locations and one billing location. For example, you can select the shipment location closest to the location receiving the items while maintaining the same billing address.
To set up alternate order addresses for a vendor:
- In the Search field, type Vendors and select the page from the drop-down list.
The Vendors list displays. - From the Vendors list, open the Vendor Card (double-click the vendor line) for the vendor to which you want to attach and alternate address.
The Vendor Card displays. - Click the Navigate menu tab and from the Ribbon, click Order Addresses.
The Order Address List displays. - On the Ribbon, click New.
The New Order Address page displays.
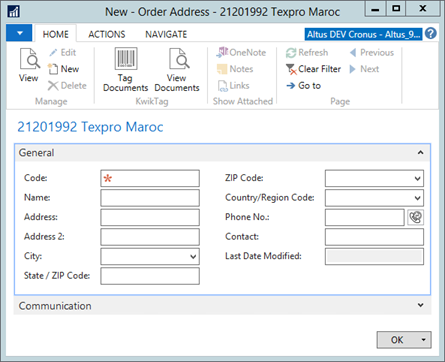
- In the Code field, enter a code relating to the location of this particular shipment center.
- Complete the General and Communication FastTabs to provide the necessary address and contact information.
- Click OK.
- Repeat this process for any additional alternate addresses you need to add for this vendor.
Defining Request for Quote (Tender) Options
To initiate the tender process functions, some setup and configuration steps need to be performed.
Creating a Miscellaneous Quote Vendor for Requests without an Assigned vendor
If a purchase request is submitted without a vendor attached, the request can still be used to generate a quote. This is achieved by creating a ‘quote vendor’ and marking this as a miscellaneous vendor.
To set up a miscellaneous vendor:
- Begin the process of creating a new vendor. (In the Search field, enter Vendors. Select Vendors to open the Vendors List. On the Ribbon, click New.)
- In the Name field, enter a generic name for the Quote Vendor.
This vendor can have a name ‘Quote Vendor’ and can be used when the vendor is unknown and the vendor address needs to be typed in manually. Making this vendor the default allows for faster conversion of purchase request lines into a quote when the vendor is not an existing one and the purchase request lines were not assigned to a vendor. - Click the Expand icon to display the Payments FastTab.
- Click to select the Misc. Vendor checkbox.
- 5. Assign the related default values (for example, Payment Terms Code, Payment Method Code, etc.), if applicable.
- Click OK.
NOTE: Once a Quote Vendor is set up, you can make this the default vendor to use specifically for the Tendering process. This is done through the Purchases & Payables Setup page. See the next section, ‘Selecting the Quote Options in the Purchases & Payables Setup’.
Selecting the Quote Options in the Purchases & Payables Setup
To enable the quote process:
- In the Search field, type Purchases & Payables Setup and select the page from the drop-down list.
The Purchases & Payables Setup page displays. - Expand the General FastTab.
- Add a checkmark to the Archive Quotes and Orders check box.
This selection enables the archiving of all the quotes from a tender process when the accepted quote is converted into a purchase order. - From the Default Quote Vendor drop-down, select the generic ‘quote vendor’ created as a miscellaneous vendor.
- In the Days Expiry Date field, enter the number days that will be used to calculate the Expiry Date on the actual quote.
- Expand the Numbering FastTab.
- In the Quote Nos. drop-down, select the appropriate quote numbering option (series).
- In the Tender Nos. drop-down, select the appropriate tender numbering option (series).
The number series are used to track all tenders and quotes that are linked together. Selecting these options ensures that all quotes, generated from the same purchase request and sent to multiple vendors, contain the same quote number. - Click OK to close the Purchases & Payables Setup page.
Enabling Commitment Entries
Commitment Entries for Purchase Orders are enabled through the Purchase & Payables Setup page.
To enable commitment entries:
- In the Search field, enter Purchases & Payables Setup and select the page from the drop-down list.
The Purchases & Payables Setup page displays. - Expand the General FastTab.
- Under the General FastTab, under the Commitments heading, select the Create Commitment Entries check box.
- Click OK.
Disabling Commitment Entries on Individual G/L Accounts
You can also disable or exclude commitment entries on individual G/L accounts.
NOTE: Commitment entries are generated upon releasing a Purchase Order.
To exclude individual G/L accounts:
- In the Search field, enter Chart of Accounts and select the page from the drop-down list.
The Chart of Accounts page displays. - Select the account.
- On the Ribbon, click Edit.
The G/L Account Card for the selected account opens. - Add a checkmark to the Disable Commitment Entries check box.
Associating Items with a Commitments G/L Account
If you are using Items, each item should be associated with a Commitments G/L Account.
To associate items with a commitments G/L account:
- In the Search Field, enter Items and select the page from the drop-down list.
The Items List displays. - Select the item that you want to associate with a Commitments G/L account.
- On the Ribbon, click Edit.
The Item Card displays. - From the Commitment G/L Account drop-down, select the account.
If the account is linked to a Budget Category Code, the value will be defaulted on the screen based on the selection you made. - Click OK.
NOTE: For clients that are using Employee Portals Budget Verification, Purchase Request G/L Budgets and G/L Accounts Budget Categories need to be configured. For more information, please refer to ‘Budget Verification Setup Guide’.
Defining Purchase Order and Receiving Options
Within the Purchases & Payables Setup page you can select settings to determine how purchase orders are generated and received. The following sections outline the available options and provide the steps for initiating the ‘controls’ you want to define within your organization.
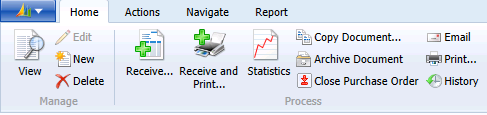
Disabling Purchase Order Posting
In large organizations with separate Purchasing and Accounts Payable departments, the option to disable PO posting is a useful setting. When enabled, the Purchasing Department can only generate receipts.
The link between the Purchase Invoice and the Receipt, and the posting of the invoice needs to be done by Accounts Payable personnel.
To disable PO Posting:
- In the Search field, enter Purchases & Payables Setup and select the page from the drop-down list.
The Purchases & Payables Setup page displays. - On the General FastTab, add a checkmark to the Disable PO Posting check box.
When Purchasing staff open a purchase order, the Ribbon now displays two buttons: Receive or Receive and Print
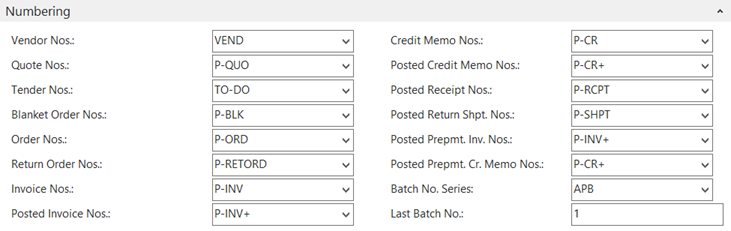
Defining Numbering Series for Purchase Documents
The Numbering FastTab on the Purchasing & Payables Setup page contains options for defining the numbering series related to purchasing. You need to ensure the appropriate purchasing numbering series used by your organization are selected.
To define the required purchase order numbering series:
- In the Search field, enter Purchases & Payables Setup and select the page from the drop-down list.
The Purchases & Payables Setup page displays. - Expand the Numbering FastTab.
- From the available drop-downs, select the appropriate numbering series option for the following:
- Order Nos.
- Return Order Nos.
- Posted Receipt Nos.
- Posted Return Shpt. Nos.
-
Click OK.
NOTES:
- If the Synchronize PO Numbering check box is selected in the EWA Setup page (In the Search field, enter EWA Setup), then the Purchase Order number is the same as the Purchase Request number. If not selected, the Purchase Order number is generated from the number series.
- In previous versions, this was handled through Enable Purchase Order Printing. If you have the Enable Purchase Order Printing check box selected, ensure that you also select the Synchronize PO Numbering check box.
Setting Up Standard Text Codes
You can define some standard text strings and assign specific codes to them. These codes can then be inserted into Quotes and Purchase Orders for entering default text as lines in the respective document.
To set up standard text codes:
- In the Search field, enter Standard Text Codes and select the page from the drop-down list.
The Standard Text Codes page displays. - On the Ribbon, click New.
The New – Standard Text Codes page opens with a new record is inserted in the list.
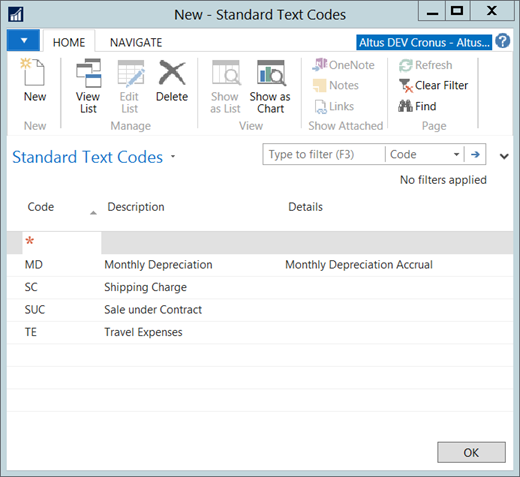
- In the Code field, enter a code to represent the standard text you are creating.
- In the Description field, enter a short description for the code.
- In the Details field, enter the specific text that will be inserted (displayed) in the Details column of the quote or purchase order line.
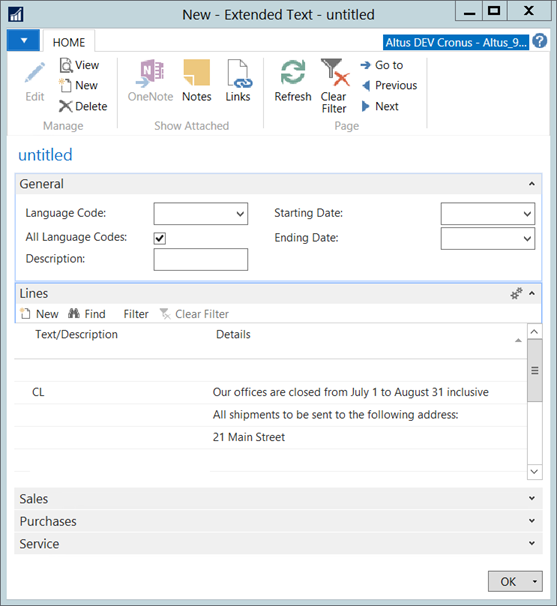
- To enable your code to display across multiple lines, do the following:
NOTE: If the record already exists, select the record first.
- Click the Navigate menu tab.
- On the Ribbon, click Extended Texts.
- The Extended Texts page opens.
- On the Ribbon, click New.
- Click to select the All Language Codes check box.
- In the Text/Description field, enter a brief description. Populating this column is optional. The value is transferred to the Description column of the purchase document. All lines added in the Extended Text page are inserted after the line coming from the Standard Text Code.
- In the Details fields, enter all the lines of text you require. The value is transferred to the Details column of the purchase document.
For example, in the following image, line one is populated from the Standard Test Code. Lines two and three are populated based on the values entered in the Extended
Text for that code.
Defining Online Receipt Settings
When a Purchase Order is marked as released, an online purchase receipt can be created. You can define some of the content of the purchase receipt and enable email notification in the event the automatic posting of the receipt fails (prerequisite: NAS Server installation and Job Queue configuration).
NOTE: The SMTP Mail Setup needs to be configured before you can use this functionality. In the Search field, enter STMP Mail Setup.
To define the purchase receipt options:
- In the Search field, enter EWA Receipt Setup and select the page from the drop-down list.
The EWA Receipt Setup page displays.
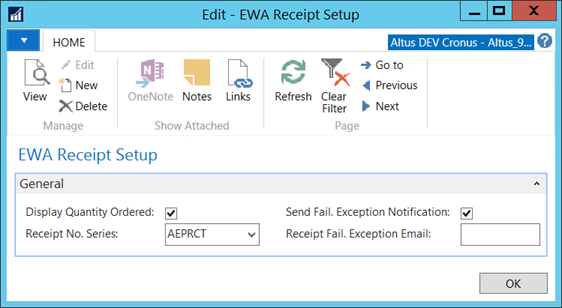
- Add a checkmark to the Display Quantity Ordered check box if you want to quantity to appear on the receipt invoice.
- From the Receipt No. Series drop-down list, select the appropriate numbering series for EWA receipts.
- If you want a user to be notified that the receipt generation failed, click to select the Send Fail. Exception Notification check box.
- In the Receipt Fail. Exception Email text box, enter the email address for the mail box to which to send the receipt generation failure notification.
- Click OK.
Setting Purchase Invoice Payment Tolerance
You can configure the Sparkrock solution to automatically notify you if the Direct Unit Cost is overridden and the new amount exceeds the Purchase Order Amount.
To configure the purchase invoice payment tolerance:
- In the Search field, type Purchases & Payables Setup and select the page from the drop-down list.
The Purchases & Payables Setup page displays. - Expand the General FastTab.
- In the Purch. Invoice Tolerance % field, specify how much (as a percentage) the P.O. Direct Unit Cost (located on the purchase invoice) can exceed the Purchase Order amount before alerting users.
- In the Purch. Invoice Tolerance Amt. field, specify how much (as an amount) the P.O. Direct Unit Cost (located on the purchase invoice) can exceed the Purchase Order amount before alerting users.
- Click OK.