

Within an organization, Approvers are given the authority to approve the procurement of goods and services. These approvals are for Purchase Requisitions, Payment Requests, or Expense Claims. These Approvers are typically responsible for approving items within a department, for amounts within a specified dollar amount (threshold).
In the Sparkrock solution, Approvers are stored by dimension. The solution supports two types of Approvers: Budget and Amount.
- Budget Approvers are only required to approve when an amount exceeds its budget.
- Amount Approvers work by approving Purchase Requisitions, Payment Requests, and Expense Claims based on a specified budget threshold. You can configure the approval sequence to require multiple approvals, depending on amount.
Budget Approvers
Budget Approvers are configured to only receive notification and be required to approve when an amount exceeds its budgeted allowance. The Budget Approvers are set up within the following two (2) tables in NAV: Threshold Approvers List and Approval Threshold. The configuration of a Budget Approver is as follows: (1) Amount Threshold is always set to 0.00, and, (2) Approval Sequence is '0'.
The Budget Approver can see the Budget tab for a specific request within the request and/or go the Financial Analysis to view the standings of the budget. If the Budget Approver spots an issue, this should be further investigated with Accounting, since only NAV users can revise the budget.
Amount Approvers
Although it depends on the Organization, it is common for the approvals process to require multiple Approvers depending on the total dollar amount. For example, a Manager may be configured to approve items up to $100, a Supervisor may be configured to approve items up to $500, and a VP may have the ability to approve items over $500. The following table summarizes these thresholds:
| Role | Approval Sequence | Approval Threshold Amount |
| Manager | 1 | $0.01 |
| Supervisor | 2 | $100 |
| VP | 3 | $500+ |
How Amount approvals are handled depends on how the Approval Levels field is configured on the EWA Setup page:
Purchase & Payment Requests
- All Levels Approve: When set to All Levels Approve, all levels must approve the Purchase Requisition or Payment Request (in sequence). Using the example Approvers in the table above, a Purchase Invoice for $900 would require approvals from the Manager, then Supervisor, and finally the VP. While a Payment Request for $400 would require approval from the Manager and then the Supervisor.
- Last Level Approves: When set to Last Level Approves, only the highest applicable Approver must approve the Purchase Requisition or Payment Request. Using the example Approvers in the table above, a Purchase Invoice for $900 would only require approval from the VP.
Note: If you have a Budget and Amount Approver configured, then both must approve. This is true even if the Approval Levels field is set to Last Level Approves.
Expense Claims
It is now possible to select from a combination of approval methods to which configure Expense Claims with. You can either have a Manager or Budget (Amount) Approver or a combination of both Manager Approval and Budget (Amount) Approval in the same approval process, instead of requiring you to choose only one or the other. The four (4) options are listed below:
- Manager: Manager approval only (setup on the EWA User card under Expense Approver EWA User field).
- Budget Category: Budget (Amount) approval only (configured in the Approval Threshold tables).
- Manager - Budget Category: This approval sequence is a combination of Manager and Budget Approver with Manager as being the first to approve ahead of Budget Approver(s).
- Budget Category - Manager: This approval sequence is a combination of Budget Approver and Manager with Budget Approver(s) as being the first to approve ahead of Manager.
Approval Threshold Configuration
There are several ways to complete the configuration of Threshold Approvals:
- Directly into NAV within each Page: Threshold Approvers and Approval Threshold (depending on the volume of Approvers, if it is high either of the below two (2) methods should be followed)
- Configuration Package with Tables 23020515 and 23020514
- Copy and paste the rows in Excel for both Threshold Approvers (Table 23020515) and Approval Threshold (23020514), complete the setup and then past the rows in the respective tables
Setting Up Threshold Approvers
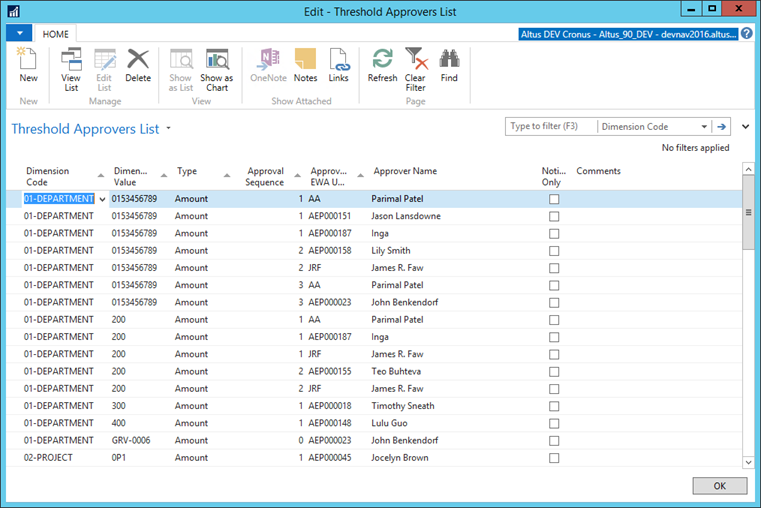
The first step in configuring approval thresholds is to add the Approver to the Threshold Approvers List:
- In the Search field, type Threshold Approvers and select the page from the drop-down list.
The Threshold Approvers List displays. This page displays a list of all configured Approvers, organized by Dimension Code. - From the Ribbon, click New.
A new row is added to the page. - Complete the following fields:
- Dimension Code: Choose the Dimension Code to which you want to add an Approver.
- Dimension Value: Choose the Dimension Value to which you want to add an Approver.
- Type: Choose either Amount or Budget.
- Approval Sequence: Choose the order in which the approval should occur. Values of one and greater are reserved for Amount Approvers, and a value of zero indicates a Budget Approver. (Note: Alternate Approvers must follow the same sequence as the Default Approver for the respective dimension code and value)
- Approval EWA User: The ID of the Approver.
- Comments: (optional) Add any relevant comments for this dimension.
- Click OK.
Setting Up Approval Thresholds for Dimension Values
- In the Search field, type Approval Threshold and select the page from the drop-down list.
The Approval Threshold List displays. This page displays a list of all configured Approvers, organized by Dimension Code, Approval Sequence, Amount Threshold and the Default Approver. - Add the list of thresholds to the Approval Threshold table.
- In the Default Approver field, select the appropriate Approver from the list. (You must set up the Approvers before you select the default. Refer to the section above Setting Up Threshold Approvers for more information.)
- Click OK when finished.

Override Approvals between Dimension Values
In the event that a transaction has two or more dimension values with approval settings, by default, all approvals must be completed before the transaction is approved. If this condition is NOT wanted, a dimension value can be set to override the approvals of any other values on a transaction.
To set up a dimension value to override the approvals of other values on a transaction:
- Open the Departments menu.
- From the Departments menu, select Application Setup > Financial Management > Dimensions.
The Dimensions page displays. - Select the dimension where approvals are going to be overridden.
- From the Ribbon click on the Navigate tab and select Dimension Values.
The Dimension Values page displays.
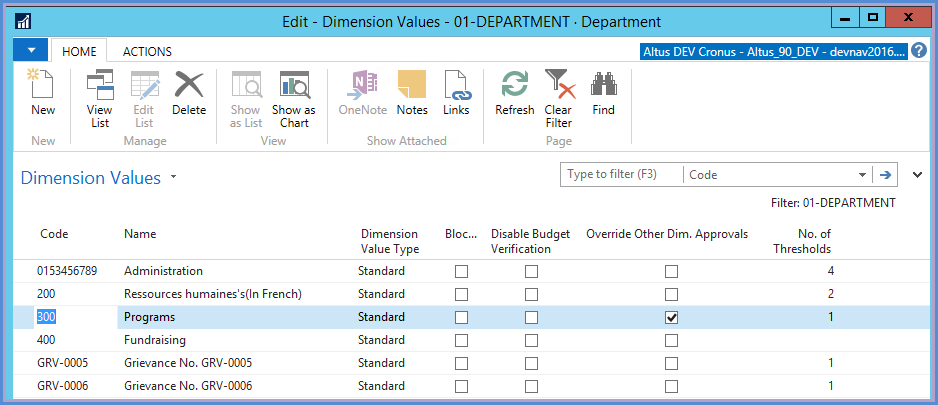
- Add a checkmark to the Override Other Dim. Approvals column for the dimension value that currently manages the approvals.
Note: If this field is checked, all other dimension approvals are disregarded and only thresholds and Approvers on this value are used.
Disabling Budget Checking/Verification on Dimension Values
If a dimension value is selected on a transaction, the system performs a budget check by that dimension. You can suspend checking to remove this condition for a specific value.
To suspend budget checking:
- Open the Departments menu and browse to Application Setup > Financial Management > Dimensions.
The Dimensions page opens. - Click the Dimension where the budget checking is going to be suspended.
- From the Ribbon click on the Navigate tab and select Dimension Values.
The Dimension Values page displays.
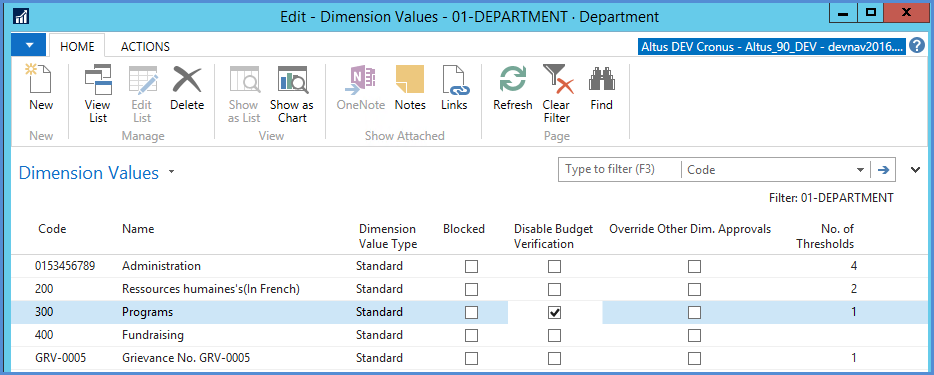
- Add a checkmark to the Disable Budget Verification column for the dimension value that you do NOT want a budget check performed.
- To disable budget checking for all Dimension Values navigate to the Actions tab from the Ribbon and click on Disable All Budget Verification. All dimension values are updated.
- To enable budget checking for all Dimension Values navigate to the Actions tab from the Ribbon and click on Enable All Budget Verification. All dimension values are updated.
Note: If Disable Budget Verification is checked, this dimension value is ignored for budget checking purposes and any budget lines with either a blank or another value for this dimension are included in the calculation of the budget amount for the transaction.
