

Submitted purchase requisitions, payment requests, and expense claims can be approved by searching for the request in the Finance Approval list.
Approving Purchase Requisitions and Expense Claims
When a request is submitted for approval, the status of the request instantly changes from Open to Pending Approval. Submitted requisitions or requests, automatically appear in the Finance Approvals (one of the Finance & Purchasing options on the menu bar). Users who are approvers can quickly link to these requests and review directly from Employee Center.
To approve a purchase requisition, payment request, or expense claim:
- Log in to the Employee Center web page.
- Click on Finance Approvals from the Menu Bar.
The Finance Approvals list displays.
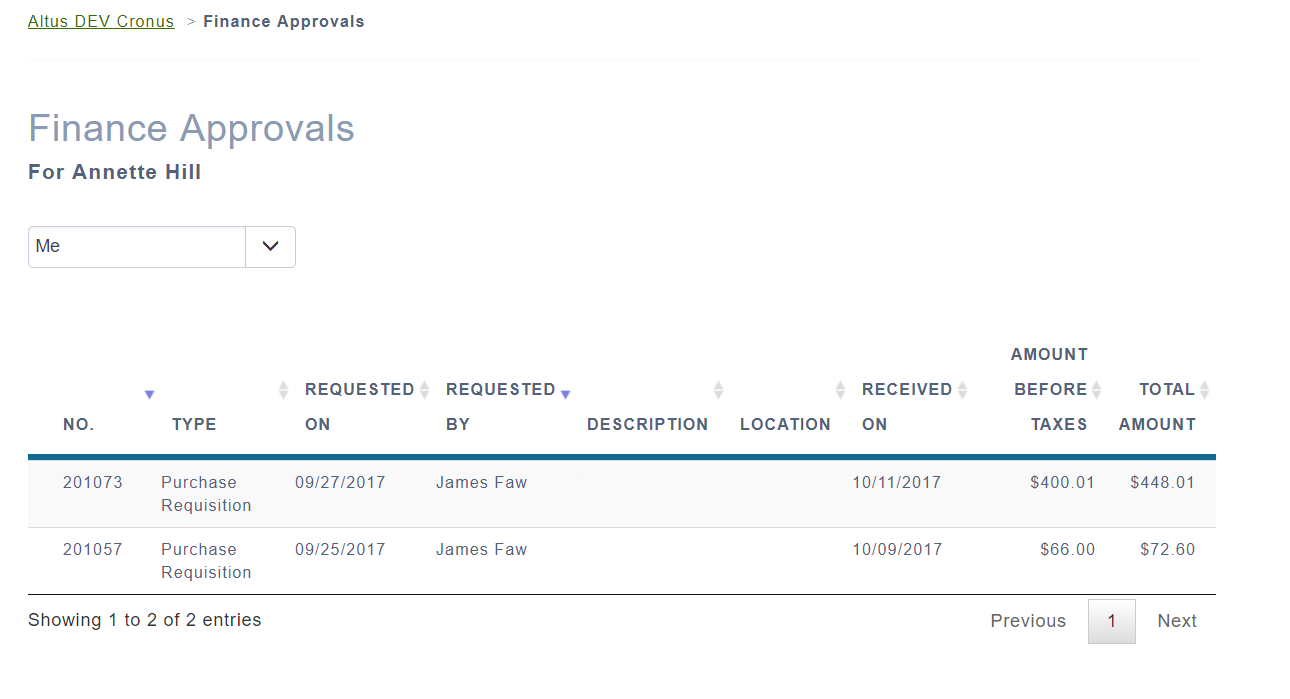
- If Delegates Management functionality is activated, a drop-down list displays the list of your delegators.
- Click on a specific delegator to see the list of requests you are authorized to approve on their behalf. For more information on delegation management, please refer to the Requisitions Processed by Delegates section in this user guide.
- Click the expense item that you want to review in more detail.
- Once you are satisfied, click Approve (located at the top of the page).

- In the confirm message box, click Yes (or No to stop the process).
The Finance Approvals list re-opens and the item approved is no longer in the list. - To approve additional requests, repeat steps 2-7.
Denying Finance Approvals
After reviewing a requisition/request users who are approvers may determine more information is required or that the requisition/request is not valid and needs modifications. Users can deny the requisition/request and send it back to the individual who submitted it originally. Denying a requisition/request essentially re-opens it to enable the individual who submitted it to provide more detail.
To deny a requisition or request:
- Click on Finance Approvals from the Menu Bar.
- Locate the item you want to deny. Hover over the right side of the requisition/request to expose the hidden menu (a blue circle with three dots) and click View.
- Review the details for the requisition or request.
- Once you are certain it is the correct item, click Deny, at the top of the page.

A message box opens indicating you need to provide denial comments.
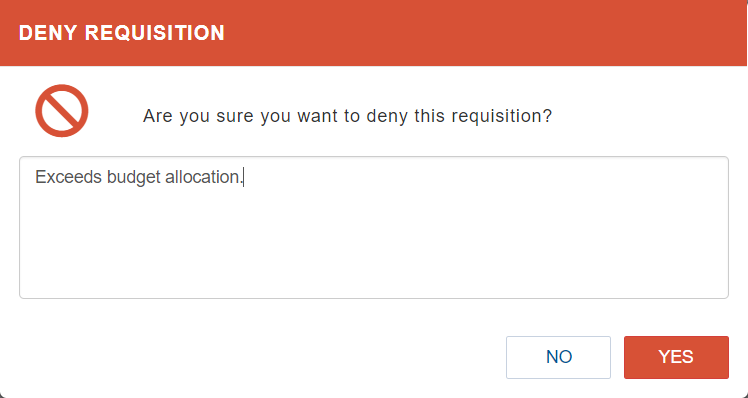
- Enter the details for why the request is being denied.
- Click Save or click the X to stop the denial process.
- In the confirmation message that opens, click Yes.
- The Request Approvals list re-opens. Denied requests are no longer visible in the Finance Approvals list. These display as open in the open Purchase Requisitions, Payment Requests, or Expense Claims list. Users can view the denial comment under Comments in the Details tab.