

There are several ways to create Purchase Requisitions. A requisition can be made as a copy of an existing Purchase Requisition, as a copy of a template, or as a new requisition. Copying existing requisitions can often save time if the requisition is similar to one that was previously made. Alternatively, using templates saves time as they already contain the relevant information.
However, when requisitions are made as copies of existing requisitions or templates, there are some changes that need to be made before they are submitted for approval.
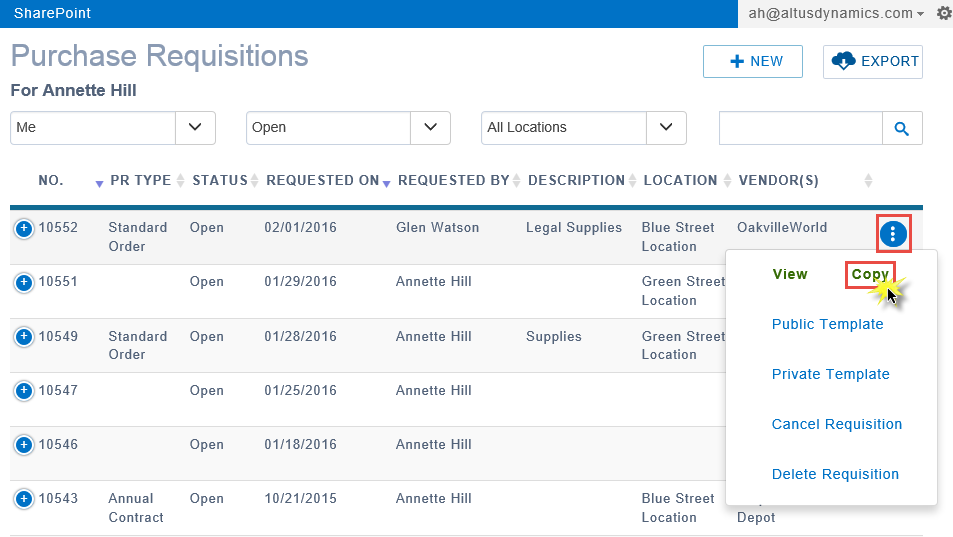
Copying from Another Purchase Requisition
To make a copy of an existing Purchase Requisition:
- In the Purchase Requisition list, find the requisition you wish to copy. See Finding and Viewing an Existing Appeal for instructions on how to locate existing requisitions.
- Hover over the right side of the requisition, click on the floating menu, and click Copy.
The copied Purchase Requisition window opens with the Details tab expanded. A new purchase requisition number is automatically assigned to the copied requisition. - Click Edit.
The fields in the Details tab become available (activated) for you to update the information applicable to the new purchase requisition.
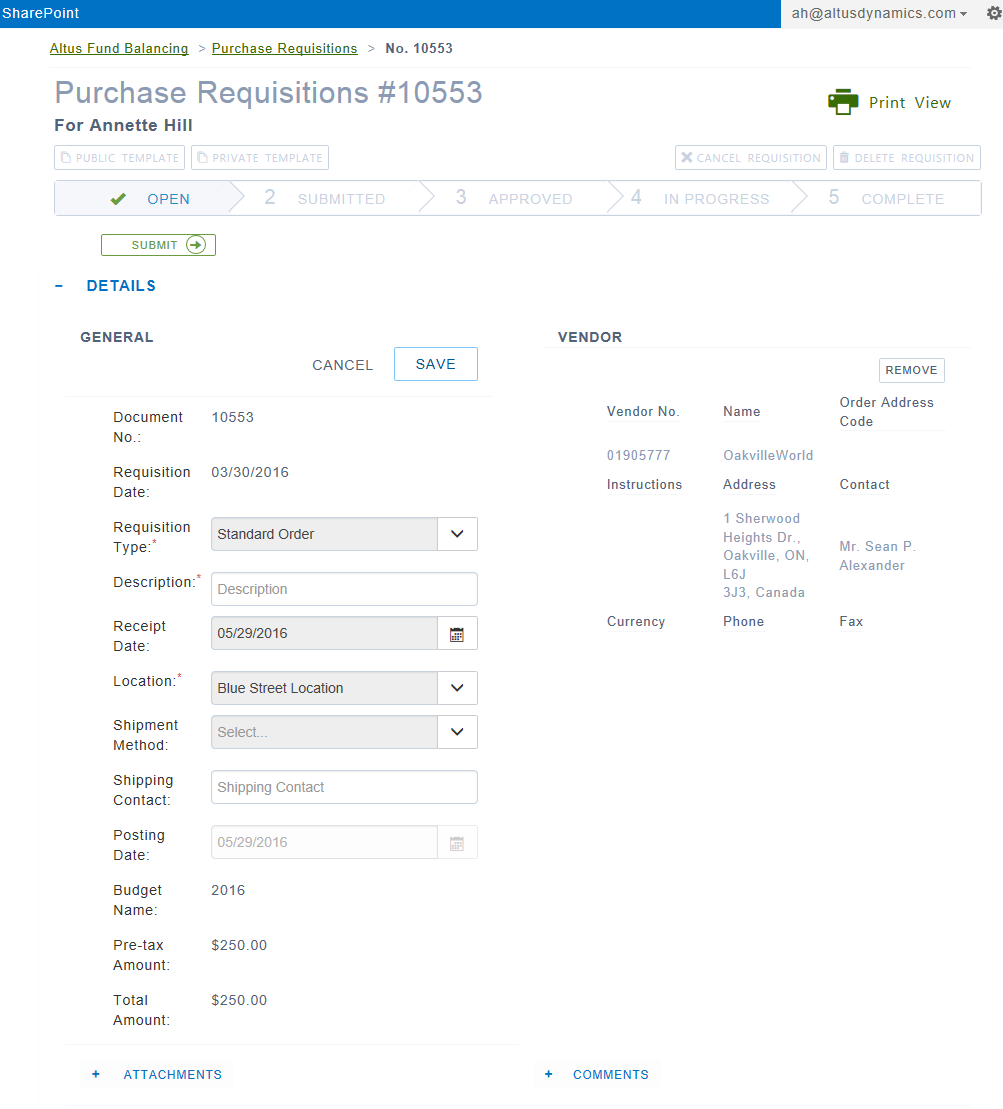
NOTE: Fields marked with a red asterisk indicate that completing the field is mandatory.
- In the Description field, enter a description for the new requisition.
NOTE: This description is included in all email communications concerning this requisition. - In the Receipt Date field, enter an appropriate date on which this requisition should be received. Alternatively, click the Calendar icon to select a date.
- From the Location drop-down, select the appropriate location for the order to be shipped. If you have a default location set up for your users, this value is defaulted here.
- From the Shipment Method drop-down, select the appropriate method by which the order needs to be sent. This information is transferred to the Purchasing Order.
- In the Shipping Contact field, enter the name of the individual (could be your name or the person/department for whom you are creating the requisition) to receive the shipment and to use as a contact if the Purchasing department or the vendor require further details, etc.
The Posting Date field automatically reflects the same date as the Receipt Date entered/selected (or a formula based on your particular system setup/configuration).
NOTE: Depending on your system configuration, the Posting Date field may be editable for the end user. The Posting Date field is used to determine the fiscal year and the budget used to drive budget calculations. - Click Save at the top of the Details tab.
The following message displays at the top of the screen:

- If it is necessary, make changes to the lines in this requisition. See Editing Purchase Requisition Lines for details.
Updating the Vendors Attached to the Requisition
Depending on the details for the newly created purchase requisition, users may need to update the vendor information attached to the requisition. Users can either remove a vendor not required or add a new one.
NOTE: Depending on the system configuration, adding multiple vendors may not be available. The purchase requisitions can be configured not to allow multiple vendors.
Removing a Vendor
To remove a vendor from the requisition:
- In the Vendor section, click Remove.

A confirmation message opens. - Click YES.
The vendor is removed and the next vendor (if more than one is attached to the requisition) displays.
Adding a Vendor
For details on adding a new vendor to as purchase requisition, see Selecting a Vendor.
Creating a New Purchase Requisition
To create a new Purchase Requisition:
- In the Purchase Requisition list, click New in the upper right-hand corner.

- The Purchase Requisition page opens enabling you to add the required details for the new purchase requisition (a purchase requisition number is automatically assigned). Each requisition includes information that is organized by tabs on the page that can be collapsed or expanded. The default view for the Purchase Requisition page is to display with the Details tab expanded.
The General section of the Details tab has several fields to complete. See Entering General Information about a Purchase Requisition next for information about completing each field in the General section. - When you finish completing the required fields, click Save in the upper right-hand corner of the General section to update your changes.
Entering General Information about a Purchase Requisition
The following table provides a description for each of the fields in the General section of the Details tab.
| Field Name | Description |
| Document No. | This field is an automatically generated consecutive number. |
| Requisition Date * | This field is automatically generated and defaults to the date when the Purchase Requisition is created. |
| Requisition Type * | This field displays the type of requisition. Users can choose from three options: Annual Contract, Service Contract or Standard Order. This field is required. |
| Description * | This field contains a brief description for the Purchase Requisition. The description is included in the approval email to help the approver understand the requisition. This field is required. |
| Receipt Date | This field records the date on which the Purchase Requisition needs to be received. NOTE: Depending on the setup, this field may be pre-set to default to a prescribed amount of time after the Requisition Date. However, users may alter this date manually or by using the Calendar picker. |
| Location * | This field defaults to the user’s primary location, but it can be changed. From the drop-down menu, select the appropriate location for the Purchase Requisition. NOTE: If a default location is set up/configured for you (your user account), that location is displayed. This field is required. |
| Shipment Method | This field displays the appropriate shipment method which can be selected from the drop-down menu. Users may utilize this field if they want to provide the purchasing department with instructions for how the items should be shipped. |
| Shipping Contact | This field contains the name of the contact person who will receive the shipment (also in case the Purchasing department or the vendor require further details). Users enter the name of the individual (it could be the user’s own name or the person or department for whom the user is entering the order) who will receive the shipment. |
| Posting Date | The Posting Date field automatically reflects the same date as the Receipt Date entered/selected or a formula based in the setup of the system and is the accounting date used for budget checking. NOTE: Depending on your system setup/configuration, this field may be editable. |
| Budget Name | This field displays the budget name that corresponds to the Posting Date selected above. |
| Pre-Tax Amount | This field displays the cost of items or expenses included in the Purchase Requisition before taxes are calculated. (You must add the items – either by Expense or Inventory before this field is populated.) NOTE: Depending on your system setup/configuration, this field may be editable. |
| Total Amount | This column displays the total cost of items or expenses including taxes. (You must add the items – either by Expense or Inventory before this field is populated.) |
Selecting a Vendor
Vendors can be added to Purchase Requisitions so that expense types or items can be tied to vendors directly. Typically vendors are selected only if users want to propose a specific vendor for the Purchasing department to use for certain expense types or items.
To select a vendor for a Purchase Requisition:
- Expand the Details tab in the Purchase Requisition page. To the right of the Vendor section, click Select Vendor.

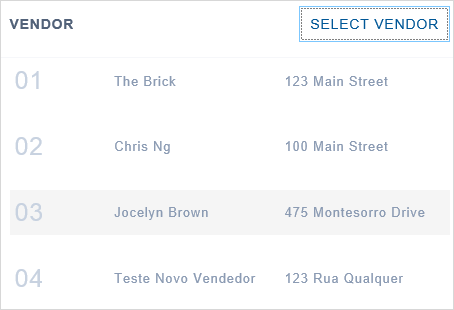
This list of vendors appears:

- If the vendor you want appears in the list, click Select in the last column.
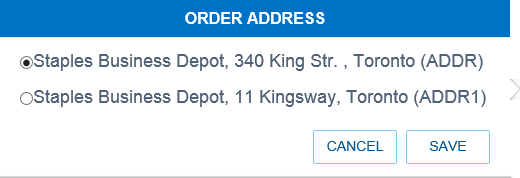
NOTE: If more than one address/location exists for the selected vendor, the following window opens where you can select the appropriate address:
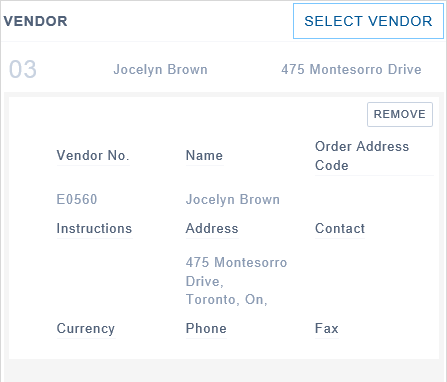
The Details tab re-opens displaying the newly added vendor in the Vendor section:

NOTE: If you are unable to find the vendor you want, you may need to search for an existing vendor or create a new vendor. See the following sections for more details.
Searching for Existing Vendors
To search for an existing vendor:
- In the Purchase Requisition page, locate and click Select Vendor from the Details tab.
The list of vendors drops down over the Purchase Requisition page. - Click in the Search field at the top of the page and enter the vendor name (or keywords/text) for the vendor you want to find.
- Some vendors are used more frequently than others. Add a check to the Previously Requested Vendors Only field in order ot view only vendors you have previously selected. When the search process completes, the content in the Vendor screen displays only rows that match your search.
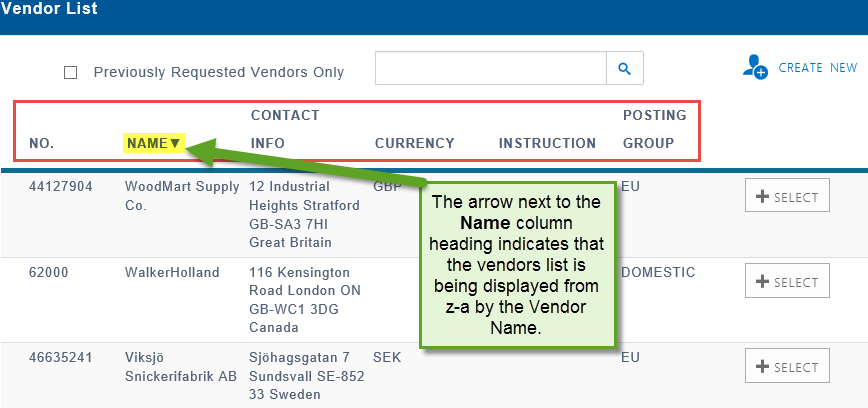
- Alternatively, you can select by which column the vendors will be listed and the order in which the list of vendors will be displayed by clicking on the column heading.
- Locate the vendor you want in the list of search results and click +Select in the last column of the row.
The Vendors section now displays the selected vendor.
Adding a New Vendor to the List
Users may need to propose a new vendor to be used by the organization, or they may be unable to find the vendor they are looking for. In this case users can add the vendor to the list of available vendors.
To add a new vendor to the list:
- In the Purchase Requisition page, click Select Vendor found in the Details tab.
The list of vendors displays. - Click Create New in the top right-hand corner of the page.
A New Vendor card displays:

- Enter the vendor's contact details in the fields provided.
NOTE: a red asterisk next to the field name indicates required information. - Click Save to save the new vendor information. The new vendor request is submitted to the Purchasing Department and the following message displays:

A Vendor Number is automatically assigned once the vendor request is reviewed and approved by Purchasing or Accounts Payable. Once the vendor is approved and added to the permanent vendor records, you can search for and select it in the Add Vendor page. If required, a representative from the Purchasing department will contact you for more information or if the vendor is not approved.
Selecting More than One Vendor for a Purchase Requisition
If a Purchase Requisition is for expense types and/or items that should be purchased from different vendors, it is helpful for the Purchasing department if the requisition includes all the suggested vendors.
To add more than one vendor to a Purchase Requisition:
- In the Purchase Requisition page, click Select Vendor from the Details tab.
The list of vendors appears. - Locate the vendor by paging through the list using the Search feature. See Searching for Existing Vendors for more information.
- Click +Select in the last column of the row.
The Purchase Requisition page re-opens. - Repeat steps 1-3 for each additional vendor you want to add.
NOTE: Multiple vendors appear as a list in the Vendor section of the Details tab. To view each vendor, click the vendor and the information expands on the page as shown below:
NOTE: This option depends on the setup of the organization. The purchase requisitions can be configured not to allow multiple vendors.
Adding an Attachment to a Purchase Requisition
Including file attachments (quotes, etc.) related to the purchase requisition that contain additional information about a Purchase Requisition can be useful for the purchaser or ‘buyer’.
To add an attachment to a Purchase Requisition:
- Expand the Details tab in the Purchase Requisition page.
- Click Attachments located under the General information.
The Attachments information expands.
NOTE: The attachments functionality defaults to uploading a link. However, you can opt to upload a file. - Add a description to the Description field, copy and paste the link into the http:// field and click Upload.
The following confirmation message appears: The link is successfully uploaded. - If you want to upload a file, change the file in the first field.
- Add a description to the Description field.
- Click Browse and find the file you wish to attach and click Upload.
The following confirmation message appears: The file is successfully uploaded.
The link or file is added to the Attachments section. - To view the link, click the Browse link. To view a file, click the View icon.
- To remove the file or link from the purchase requisition, click the Delete icon.
Adding Comments to a Purchase Requisition
Including comments with additional information about a Purchase Requisition can be useful for the purchaser or ‘buyer’. Additionally, specific instructions or information to the vendor can potentially expedite an order or ensure no errors occur in delivery, etc.
To add comments to a Purchase Requisition:
- Expand the Details tab in the Purchase Requisition page.
- Click Comments located under the Vendor information.

- In the Internal Comments or External Comments fields, type the text to be added to the requisition.
- Click Save to save your comments.
The comments are added and a confirmation line: Comments are successfully updated, appears at the top of the page.
NOTES:
- Internal comments are comments/instructions for the approver or Purchasing/Payables department.
- External comments are comments/instructions for the vendor. If you use the Enable Purchase Order Printing feature, the external comments print on the Purchase Order document generated from the print view button of the purchase requisition when the requisition is printed from the portal.
Adding Purchase Requisition Lines
Each item or expense type that is added to a Purchase Requisition is called a ‘line’ and appears as an entry in the Items section of the Purchase Requisition page. Users can view details about each line by expanding the Items tab in the Purchase Requisition.
Expense types are non-inventory items and may be set up as G/L Accounts, products, services or any other type of expense.
Inventory items are used only for items that an organization tracks in its inventory.
To add an entry to the purchase requisition, users must select from a list of pre-defined Expense or Inventory items. Once an item is added, users can make changes to the requisition line to enter specific details for the requested item.
There is no limit to the number of expense or inventory item lines that users can add to a purchase requisition.
Viewing the Expense Types List
A list of pre-defined expense types can be viewed when users click the Expense button from the Items tab.
To view the list of Expense types:
- Click Expenses.
The Expense page displays. - To narrow the choices to a specific type of expense, select a category from the Category drop-down.
- You can use the Search box to search the expense types, typing alpha or numeric values.
- You can select the column and direction by which you want the expense types sorted by clicking the column until the arrow displays in the direction you wish to view the items.
NOTE: A column with an arrow beside it indicates the user has chosen to display the data by that column and in the direction in which the arrow is pointing. The expense types default to sorting by the Code from smallest to largest. - To see the guidelines for purchasing a particular item, add a checkmark to the Show Guidelines check box. A Guidelines column displays next to the Description column with details for purchasing each item/expense.
- The following table provides a detailed explanation of the columns in the Expense list:
| Column Name | Details |
| Code | This column displays the reference number attributed to the expense type when it was created. |
| Description | This column contains a description of the expense type. |
| Category | This column displays the expense category for the item. |
| Amount | This column displays the unit cost of the expense type. |
| Unit of Measure | This column displays the unit of measure the expense type uses (where applicable). |
| Vendor Name | This column displays the vendor name associated with the expense. |
| Vendor/ISBN No. | This column displays the vendor or ISBN number. |
| More Info | This column displays a link when the line has a reference to a web link for additional information. Click on the link to view that page with additional information. |
Viewing the Inventory Items List
You can view the list of inventory items is located in the Inventory button of the Item page.
NOTE: The Inventory button may be configured as a different name.
To view the inventory items list:
- Click the Inventory button from the Items tab.
The Inventory page displays.

- Choose an option from the Category drop-down to select from a specific category of items.
- Choose an option from the Product Group drop-down in order to select from a specific product group of items.
- You can select the column and direction by which you want the inventory types sorted by clicking the column until an arrow displays in the direction you wish to view the items.
NOTE: A column with an arrow beside it indicates the user has chosen to display the data by that column and in the direction in which the arrow is pointing. The inventory types default to sorting by the Item No. from smallest to largest. - To view only previously requested items, add a check to the box beside Previously Requested Items Only. The list is reduced to show you only the items that you selected for previous Purchase Requisitions.
- The following table provides a detailed explanation of the columns in the Inventory list:
| Column Name | Description |
| Item No. | This field displays the reference number attributed to the item when it was created. |
| Description | This column contains a description of the inventory type. |
| Category | This column displays the category to which the item belongs. |
| Product Group | This column displays the product group to which the item belongs. |
| Unit Amount | This column displays the cost of one item. |
| Unit of Measure | This column displays the unit of measure the item uses (where applicable). |
| Quantity On Hand | This column displays the amount of the item still on hand as recorded in inventory. |
| Purchaser | This column displays the purchaser's name. |
| Purchaser Details | This column displays the contact details for the purchaser. |
Selecting an Expense Type or Inventory Item
To select an expense type for a Purchase Requisition:
- In the Purchase Requisition page, click the Expenses button or the Inventory button. The Expense Type list or Inventory Item list appears.
- Locate the expense type or inventory item you want by paging through the list or using search or refining options. For details, see Viewing the Expense Types List and Viewing the Inventory Items List.
- Click +Select in the last column of the row.
The Items tab now displays with the expense type or inventory item added in Edit mode, enabling you to provide and modify the information in the fields. - When you have updated the information, click Save.
Working with a Purchase Requisition's Line Details
Once users add an expense type or inventory item, they can change or add more information and specify quantities.
To work with the Entry Details:
- If you need to change the expense type or Item number currently displayed, enter the expense type number in the Expense Type No. or Item No. field, or click the Search icon. You will return to the Expenses or Inventory list to select a different item.
- In the Quantity field for the inventory item or expense type, enter the number of products you require.
NOTE: This is a required field. - In the Unit Cost field (required), update the cost for the product (if necessary) by entering the correct number.
NOTE: A user's personal settings determine the options available in the drop-down menus. In some cases, the fields are auto-filled based on the user's profile/security settings. - Click Save in the bottom-right hand corner to save your changes. To reject the changes, click Cancel.
The entry is updated to reflect your changes and a Saved Successfully message appears at the top.
NOTE: If the line saves with a yellow shade, this indicates a warning that something is wrong with the line. A line will receive a warning when the GL account No. or Dimension combination or Vendor is either empty or invalid. Warnings need to be resolved before users can change the status of the requisition and submit. - The following table provides a detailed explanation for the expense and inventory item fields in edit mode:
| Field Name | Details |
| Expense Type or Item No. | This field displays the reference number that corresponds to the expense type or inventory number. |
| Description | This field displays the description of the expense type or inventory item. |
| Ext. Cost | This field displays the extended or total cost base on the quantity and the unit cost. |
| Account No. | This field displays the G/L account number that corresponds to the account name and budget category under which the item will be purchased. |
| Quantity * | This field displays the quantity required of this expense type or inventory item. This field is required and must contain a value. |
| Tax Area | This field displays the tax area. Users select the appropriate tax area from the Tax Area drop-down menu. Since administration sets up a default tax area, users should only override when necessary. This field is hidden for non-Canadian implementations of the portal. NOTE: This field defaults to a value for each inventory item or expense type but can be overwritten. |
| Purchaser Code | This field displays the purchase code for the individual who is making the purchase requisition. |
| Unit Cost * | This field displays the unit cost of the expense type or inventory item. NOTE: This field defaults to the unit cost entered when the expense type or inventory item was created, as such the value may have changed and need to be updated. |
| GST/HST Exp. | This field displays the portion of your GST/HST that is expensed along with the cost of the expense type. This field is included in budget checking. |
| Comb. Code | This field contains a list of pre-established combinations of dimensions. If you select one of these, it automatically populates the dimensions below (Categorization section) with the values set up for that combination. NOTE: If G/L Account has already been selected, this field only lists combinations set up for that G/L Account. |
| Vendor Item No. | This field displays the number for this expense type or inventory item (e. g. a catalogue number). NOTE: Some expense types may be set to require this value. If that is the case, users receive an error if they do not enter a value. |
| GST/HST Rec. | This field lists the portion of GST/HST recoverable on the cost of the expense type. This field is not included in budget checking. |
| Fixed Asset Review | A check in this box flags this entry for review by Purchasing for possible setup as a fixed asset. |
| Vendor | This field displays the vendor for this expense type or inventory item. NOTE: The vendors in this list correspond with the vendors that you added to the Purchase Requisition. To add a vendor to this list, see Selecting a Vendor. If you would rather Purchasing decide what vendor to use, leave this field blank. |
| PST Exp. | This field displays the portion of your PST that is expensed along with the cost of the expense type. This field is included in budget checking. |
| Details | Enter a detailed description of the products or services you are requesting here. |
| PST Rec. | This field lists the portion of PST recoverable on the cost of the expense type. This field is not included in budget checking. |
| Categorization | The dimensions displayed in this section represent the dimension set up by your organization. Contact your project leader to learn the details for using these fields. |
Editing Purchase Requisition Lines
A Purchase Requisition’s lines can be changed at any time before the requisition is submitted for approval.
To edit a Purchase Requisition’s lines:
- Hover over the Expense or Inventory line in the Items tab.
The Edit, Copy, and Delete buttons display.

- Click Edit.
The line expands and fields that make up the main line become editable.
NOTES:
- A user's personal settings determine the options available in the drop-down menus. In some cases, the fields are auto-filled based on the user's profile/security settings.
- The options selected in the Categorization section are directly tied to the Comb. Code (dimensions codes) selected. If a user selected a different Comb. Code, the fields in the Categorization section automatically update.
- Make the necessary changes to the lines. See Working with a Purchase Requisition's Line Details for more information about these fields.
NOTE: The Quantity and Unit Cost field must have a value. - To save your changes, click Save at the bottom right-hand corner of the page. The changes will be updated and edit mode will be closed.
- To remove a line from a requisition, click Delete when you hover over the line.
NOTE: If you receive a warning (indicated when the line saves with a yellow shade), you need to resolve the warning before you can change the status of the requisition and submit. A line will receive a warning when the GL account No. or Dimension combination or Vendor is either empty or invalid.
Understanding the Budget Status
When created, each expense type or inventory item is assigned a budget category for budget checking purposes. Once expense/inventory lines are added, the budget tab displays the details pertinent to a basic budget check.
To view the budget details of a Purchase Requisition:
- Expand the Budget tab in the Purchase Requisition page.
The Budget tab opens:
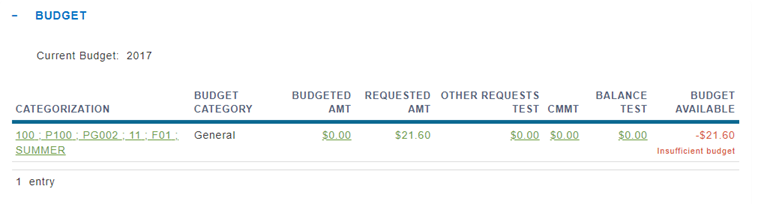
- The following table provides a detailed explanation of the columns in the Budget tab:
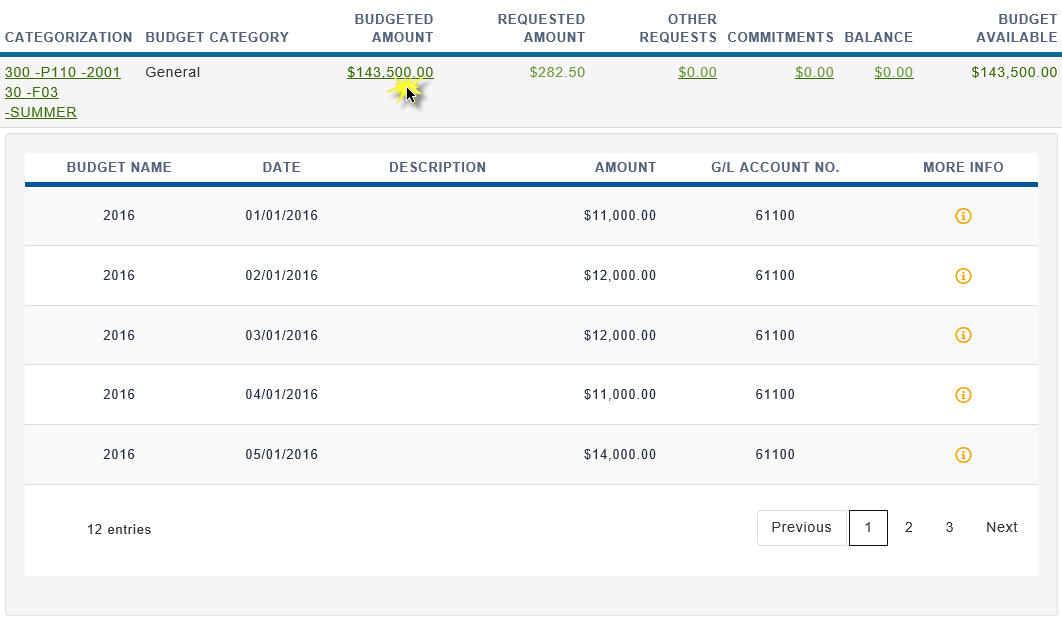
| Field | Details |
| Categorization | This section displays each of the Dimension Codes and Dimensions Values assigned to the lines. By clicking, further categorizations will pop over. See Viewing the Details for the Budget Status for further details. NOTE: This page summarizes and groups like lines together. If there are multiple lines assigned to the same dimensions and Budget Categories, these lines are summarized together. Only dimensions that are included in the budget verification are displayed. |
| Budget Category | This section displays the Budget Category (grouping of accounts) associated with the line(s). |
| Budgeted Amount | This section displays the total available budget for this categorization. Users can click to display all the line details that make up this budgeted amount. See Viewing the Details for the Budget Status for further details. |
| Requested Amount | This section displays the total amount of the request lines with this categorization. NOTE: This amount includes the portions of the taxes that are to be expensed, such as PST and a portion of the GST/HST. |
| Other Requests | This section displays the amount of any other existing (submitted but not yet committed or posted) requests. Click to view other requisitions. See Viewing the Details for the Budget Status for further details. |
| Commitments | This section displays the total amount of other commitments (released purchase orders) currently recorded. Click to view the other commitments. See Viewing the Details for the Budget Status for further details. |
| Balance | This section displays the total amount spent against this categorization. Click to view lines that make up the balance. See Viewing the Details of a Budget Status for further details. |
| Budget Available | This section displays the budget available (Budget Available = Balance - Commitments - Other Requests - Requested Amount). |
NOTE: The columns displayed on the Budget tab have configurable captions. Even if the column names do not correspond directly, the order is always the same.
Viewing the Details for the Budget Status
Users are able to drill down on additional details for the budget. When the Budget tab is expanded, users will notice that Categorization, Budgeted Amount, Other Requests, Commitments, and Balance are all underlined.
Categorization Details in the Budget Tab
To view Categorization details in the Budget tab, click the underlined summary under the Categorization column of the line for which you wish to view categorization details. Categorization details pop over the table.

Other Drill Down in the Budget Tab
To drill down for a row:
- Click any of the underlined Budgeted Amount, Other Requests, Commitments, or Balance Details on the line for which you wish to drill down. The information displays below the line in question.
- Click any of the underlined Budgeted Amount, Other Requests, Commitments, or Balance Details again to collapse the additional details.
Selecting an Alternate Approver
The Approvers assigned to review and approve the purchase requisitions users create and submit are listed in the Approvers tab. Users can select alternate (delegate) approvers (for example, if the approver generally responsible for the requisitions is unavailable, etc.) from here.
To select a different Approver:
- Click to expand the Approver tab.

- Click the Edit icon.
A drop-down list becomes available in the To Be Approved By column.

- Select an alternate approver from the drop-down list.
- Click Save to save the new approver or Cancel to keep the previous approver.
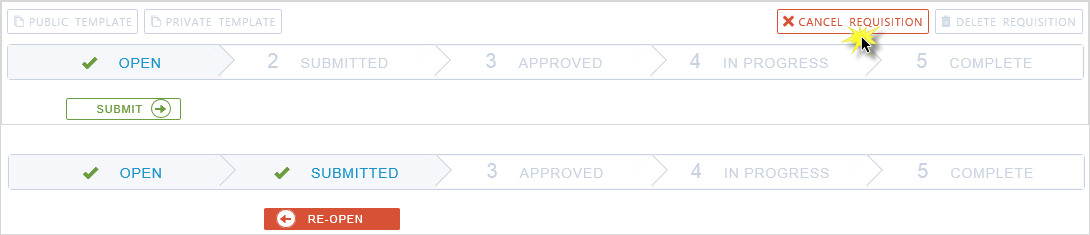
Submitting a Purchase Requisition
When created, a Purchase Requisition’s status defaults to Open. However, this status can be changed to Pending Approval or the requisition can be cancelled, or deleted.
To submit a Purchase Requisition:
- Locate the particular Requisition you wish to submit from the Purchase Requisitions list. For help with searching for a particular requisition, see Using the Filter Options to Refine the Purchase Requisitions List.
- The Purchase Requisition displays and you will see the status bar across the top of the page.

- Click Submit.
NOTE: At this point, users will receive an error message if there are any lines that contain errors. All errors must be corrected before submission. - A confirmation message box opens. Click Yes to confirm you want to submit the requisition for approval or No to stop the change in status.
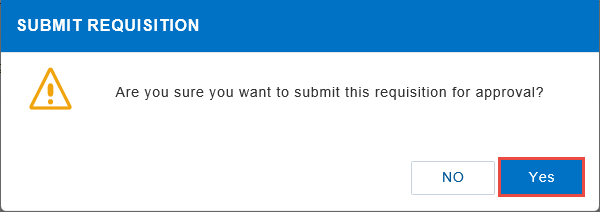
- The status bar now displays with a check in Submitted as well as Open and a Re-Open button displays below Submitted. The requisition is submitted to the Purchasing department for processing.

Re-Opening a Purchase Requisition
Users may need to re-open a Purchase Requisition to make an adjustment to it.
To Re-Open a Purchase Requisition:
- In the Purchase Requisition List, select Pending Approval instead of Open for the status, then click View from the floating menu.
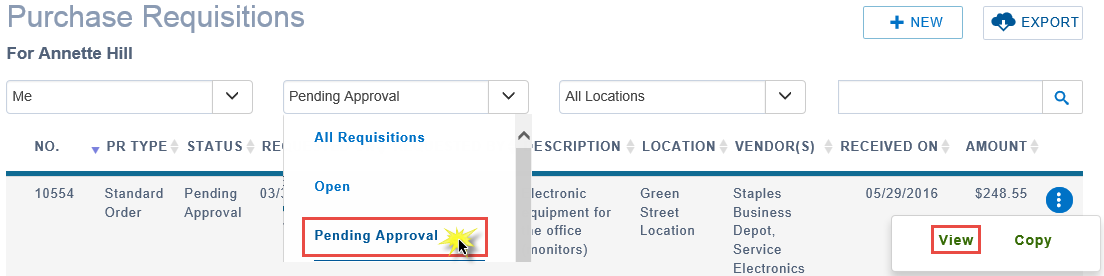
- The Purchase Requisition displays. Click Re-Open.

- A Re-Open message box appears. Click Yes.
The Purchase Requisition re-opens so you make the necessary changes
Cancelling or Deleting a Requisition
A requisition with a status of Open or Pending Approval can be cancelled or deleted.
NOTE: The Cancel Requisition or Delete Requisition button is only available before users have submitted a requisition. A requisition with the status of Pending Approval will need to be re-opened before cancelling.
To cancel a requisition:
- Locate the requisition by following steps outlined in Finding and Viewing an Existing Appeal.
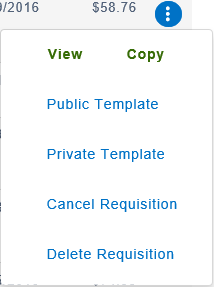
- Click Cancel Requisition or Delete Requisition from the floating menu in the far right of the row for the requisition or request you wish to cancel or delete.
- Alternatively, you may need to click on View from the floating menu in order to be sure you have located the correct Purchase Requisition. The Purchase Requisition displays, so you can review the details and ensure you have the item you wish to cancel.
- Click Cancel Requisition or Delete Requisition in the top right if the Requisition is Open. If it is Submitted, click Re-Open, then click Cancel.
- A confirmation message opens. Click Yes.
NOTES:
- Users may wish to cancel a purchase requisition. Selecting Cancel Requisition keeps it in the list of requisitions, but it will no longer be active. Users will no longer be able to activate this requisition.
- Users may wish to delete a purchase requisition. Selecting Delete Requisition cancels and removes the Purchase Requisition from the list of requisitions.