

Do you need to import images to either the Item or the Expense type tables? Lets walk through your options for doing this in NAV.
Overview
You can import images either individually or in a batch to both the Item and Expense Type tables. Supported image formats are:
• BMP
• EMF
• GIF
• ICO
• JPG/JPEG
• PNG
• TIFF
• WMF
When you import images, the files from the specified staging directory are uploaded to the Picture field. The maximum size of an imported image is up to 1400 pixels in height or width. Images that are larger than this are automatically resized, keeping the existing aspect ratio.
Importing and Exporting Individual Images
You can import or export images individually to/from the Item and Expense Type tables.
- Open the Item or Expense Type table.
- Select the line where you want to import or export images.
- In the Picture FactBox, do one of the following:
- Click Import and browse to an image that you want to upload, and then click Open.
- Click Export to open or save an image. When exporting, browse to a destination location for the image.
- Click Delete to remove the image.
Mass Importing Images
Before you import your images, name them according to the Primary Key (No. field) to which they correspond. For example, to upload a JPG image to Item No. 1000, name the image 1000.jpg.
Once you have named your images, copy them to a staging directory on the NAV server.
- In the Search field, type Mass Import Images and select the page from the list, or browse to to Departments > Administration > Application Setup > General> Mass Import Images.
The Mass Import Images dialog box displays.
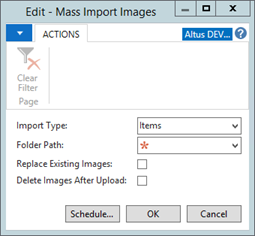
- In the Import Type drop-down list, choose the type of file you want to import. Can be either Items or Expense Types.
- From the Folder Path drop-down list, click to browse to the location of the images that you want to import.
- Add a checkmark to the Replace Existing Images checkbox if you want to overwrite existing files that are associated with the same primary key.
- Add a checkmark to the Delete Images After Upload checkbox to have the system remove uploaded images from the staging directory when the batch reports complete.
- Click OK.
Scheduling Image Imports
You can choose to schedule an image import for a particular day and/or time. To do this:
- From the Mass Import Images dialog box, click Schedule.
The Schedule a Report dialog box displays. - Use the Earliest Start Date/Time and Expiration Date/Time fields to specify when you want to run the import and what time the import request should time out.
- Click OK.
- Create a job queue in NAV to schedule the task.