

Overview
Often, users need to purchase certain items (or expense types) where they need to include characteristics (for example, size, color, style, and so on) when ordering from the vendor. In the Sparkrock solution, these characteristics are called Options.
Options give purchasing departments a more effective way to manage catalog items. Prior to the Option functionality, if the article being requested offered similar but unique versions, such as size or color, with the same unit cost, a unique expense type record had to be configured to allow the Employee Center user to select the desired article version.
Unlike attributes, options are transactional. This means that while attributes provide additional information, options require selection(s) during the transaction process. Using Options, you can enter the characteristics of the item (or expense type) at the time of purchase with the limitation that the types and values that can be selected have been previously established.
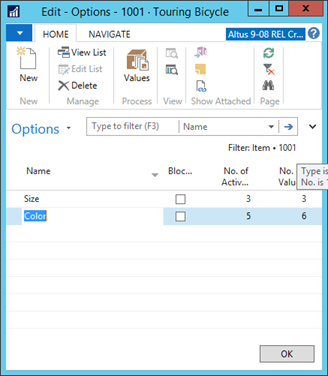
For example, a bicycle might have the options Size, Color, and Style defined. In addition, each of those options may have the following defined values:
- Size
- Small
- Medium
- Large
- Color
- Black
- White
- Red
- Style
- Racing
- Mountain
- Street
Note: Options for Items are currently supported for Microsoft Dynamics NAV, but not Employee Center. Options are not supported for Expense Claims on Employee Center.
Processing Overview
During the creation of purchase and payment requests, Employee Center displays additional fields at the point where you select the expense type or updates the request line. The expense type option value can be selected at two different points in the requisition workflow: First, when creating the request line and selecting an expense type record, if that expense type has available options, those options are displayed, and you can select the desired value for the option. For example, the option size would have option values Small, Medium and Large. Default option values can be assigned to the expense type to allow selecting the expense type without selecting the option value. Once the request line is populated with the expense type, the option fields are displayed, and you can select the option value at that point.
Once the request is converted into a purchase order or purchase invoice, the option displays on the PO line and PI line, where the number of options is displayed in the FactBox to the right. Option values are also displayed on the purchase invoice function of Get Receipts Lines and Get PO Lines.
For a purchase order created in NAV only, the option value is only available when the expense type has also been selected on the PO line. The same requirement to select a value for all options applies. For customers implementing options after going live, any in-process requests using an expense type which has been modified to add options, will need to have option values assigned to support further processing. The same issue applies to in-process PO’s and purchase invoices.
Creating New Options and Option Values
- Open either the Items or Expense Types page.
- Select the item or expense type that you want to create new options for.
- From the Home ribbon, click Options.
The Options page displays with a list options that are defined for this item or expense type.
- To create a new option for this item or expense type, click New.
A new empty line appears on the page. - In the Name field, give the option a descriptive name.
- Next, add the required option values to each option. In the Home ribbon, click Values.
The Option Values page displays.
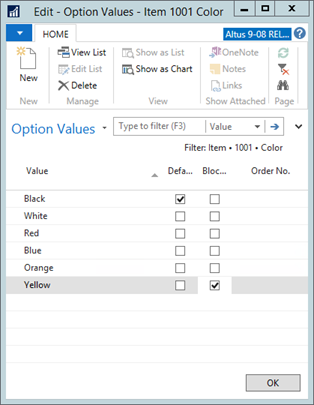
- To create a new value for the chosen option, click New in the Home ribbon.
A new empty line appears on the page. - In the Value field, give the option a descriptive name.
- (Optionally) To set an option value as the default, add a checkmark to the Default check box.
- (Optionally) In the Order No. field, specify the order in which you want the option value to appear. If you leave this field blank then the option values display in the order in which they are defined.
- Repeat steps 4-8 for each option and option value that you want to create.
- Click OK.
Editing Existing Options
- Open either the Items or Expense Types page.
- Select the item or expense type with options that you want to edit, and from the Ribbon click Edit.
The Edit Item Card displays. - From the Ribbon, click Options.
The Options page displays with a list options that are defined for this item or expense type. - In the Name field, edit the option name as required.
- To edit this option's values, from the Ribbon click Values.
- To delete an option value, select it and from the Ribbon click Delete.
- To rename an option value, in the Value field, type the new name.
- Click OK.
Blocking Options
If an option or option value is no longer available, you can block this option and make it unavailable. To do this:
- Open either the Options or Option Values page.
- Add a checkmark to the Blocked check box.
- Click OK.
Options Tables
Options are stored on the Options table (# 23020165). It has the following fields:
- Type – select Expense Type.
- No. – the code for the expense type having an option to be configured.
- Name – the code and or description of the option. This field size is 50 characters.
- Blocked – indicates if the option is currently blocked.
Option values are stored on the Option Value table (# 23020166). It has the following fields:
- Type – select Expense Type.
- No. – the code for the expense type having an option to be configured.
- Option Name – the description of the option (field size 50 characters), from table 23020165.
- Value – the code and or description of the option value (field size 50 characters).
Note: is no relationship defined among or across the options and option values, other than a value is assigned to one option only, meaning all combinations of options and option values are assumed to be available and are not pre-defined. - Order No. – display sort order number.
- Default – indicates if the option value is the default selection.
- Blocked – indicates if the option is currently blocked.