

The Financial Analysis View enables users to display a complete breakdown of budgets (departmental, etc.), expenses, and/or revenue information for their organization. The information within each view is organized as line items.
To view financial data:
- Log in to Employee Center.
- From the Financing & Purchasing menu, click Financial Analysis.
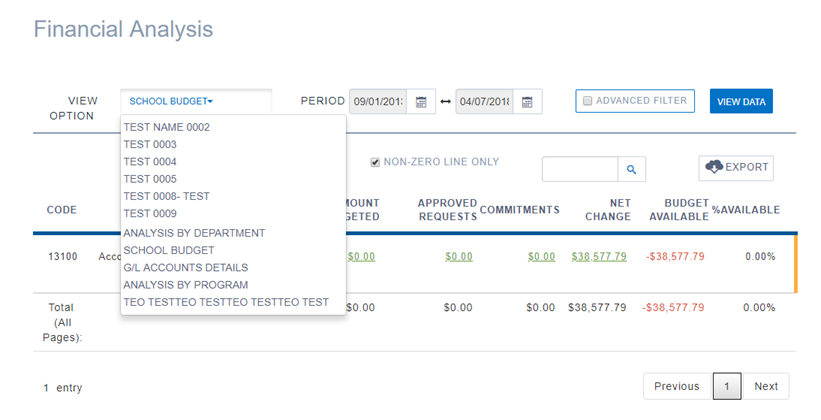
The Financial Analysis window displays. - From the View Option field, click the drop-down menu and select the view for the data you want to see.
- Click View Data.
The Financial Analysis View displays a table with all the line items for the particular view.
NOTE: The views and data available is based on the user and their specific security profile, as well as the organization’s configurations.
- There are a number of options available from here for displaying data and viewing additional details. For more information, see Displaying the Budget Status for a Row and Expanding a Row to Reveal Additional Details for steps and instructions.
The following table provides a detailed explanation of the fields in the Financial Analysis list:
| Column Name | Field |
| Non-Zero Lines Only | By default all views automatically suppress any lines with zero in all of the columns. To view the details for the suppressed lines, uncheck the Non-Zero Lines Only checkbox. |
 |
This is a search field. |
| G/L Account No. or Dimension Code | This column shows either a G/L account number or the dimension code, depending on how the view is configured. |
| G/L Account Name or Dimension Name | This column shows either a G/L account name or the dimension name, depending on how the view is configured. |
| Budget | This column displays the total budget for the row (G/L Account No. or Dimension Code). NOTE: On setup, the administrator can overwrite the column headers for this view. The column name may vary by view. |
| Approved Requests | This column displays the total value of all Approved Requests linked to the row (G/L Account No. or Dimension Code). NOTE: On setup, the administrator can overwrite the column headers for this view. The column name may vary by view. |
| Commitments | This column displays the total value of all Commitment entries linked to the row (G/L Account No. or Dimension Code). NOTE: On setup, the administrator can overwrite the column headers for this view. The column name may vary by view. |
| Net Change | This column displays the total value of all transactions posted against this account in the General Ledger. NOTE: On setup, the administrator can overwrite the column headers for this view. The column name may vary by view. |
| Available Budget | This column computes what is left in the budget for this row (G/L Account No. or Dimension Code) according to Budget minus Approved Requests minus Net Change. NOTE: On setup, the administrator can overwrite the column headers for this view. The column name may vary by view. |
| % Available | This field computes the amount in the Available column as a percentage of the budget. NOTE: On setup, the administrator can overwrite the column headers for this view. The column name may vary by view. |
 |
The boarder of the table displays the budget status based on the following:
|
Using the Period, Filter, and Search Options to Manipulate the Data in a View
Beyond selecting a View Option, you are able to filter, search, sort and select period options, enabling them to refine the data that is displayed in the view.
Defining Period Filters
All views have a default start and end period defined by the administrator. You can change the period filters if you want to view data for period ranges outside of the default settings.
To Change the period for the data:
- Once you have selected a view, click on the Calendar icon in order to select the particular period of the data you wish to view.
The date selection Calendar displays.
NOTE: Every time you select a new View Option, the period returns to the default start and end period set up by the administrator. This is typically either the fiscal year or the current month or period/quarter. As such, it is best to select the View Option before changing the Period.
- Select the start and end date for the period you wish to view. Conversely, you can enter the date manually.
- Click View Data and the data will display.
Working with Dimension Filters
The Financial Analysis Views support applying additional filters to the Dimension values displayed. This functionality enables you to retrieve the specific data you want.
To apply dimension filters to a view:
- Place a check in the Advanced Filter field.
A new section containing Dimensions and More Options displays on the screen.
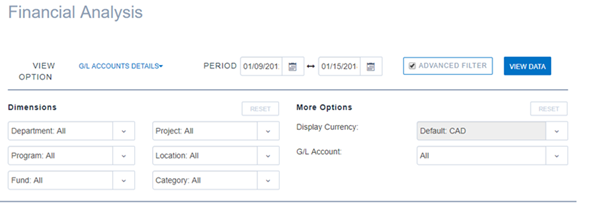
- Click the drop-down menu for one of the Dimension fields. A list of all available dimension values for that particular dimension displays.
NOTE: The Dimension filters options available to users are based on their organization's particular configuration and set up parameters. - Repeat step 2 for every Dimension field you want to filter.
- At any time you may return to the default settings by clicking Reset.
- When you have finished selecting the dimension filters, click View Data.
The data displays.
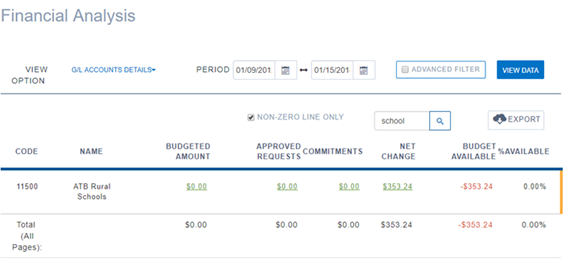
Finding Data Using the Search Field
Searching is available in the Financial Analysis main view as well as when users drill down in Budgeted Amount, Approved Requests, Commitments, and Net Change.
To perform a search for specific items or data:
- Place your cursor in the Search field.
- Type a search term and then click the Search icon.
Once you initiate the search, the data in the view is reduced to display only rows that match the text in your search.
NOTE: Searching performs non case-sensitive queries in multiple fields simultaneously. In this case, all fields containing the search content will be displayed.
- You can reverse the search results by deleting the search terms.
- The following table provides a list of fields searched in each section:
| View Name | Field |
| Financial Analysis Main View | Code, Name (G/L Account No., G/L Account Name) |
| When users drill down in Budget Amount, Approved Requests, Commitments, or Net Change, a second search field appears. The following are the columns searched when users click on the underlined values. NOTE: The column names displayed to users may vary based on their organization's particular configuration. Administrators can overwrite or rename the column headers. |
|
| Budgeted Amount | Budget Name, Description, Amount, and G/L Account No. |
| Approved Requests | Requisition No., Requisition Description, Description and Comments |
| Commitments | Requisition No., Requisition Description, Posting Date, Description and Comments. |
| Net Change | Document No., Description, Account No., and Vendor. |
Sorting the Data Within a View
Sorting is available for any columns in any of the pages.
To sort the data by a specific column:
- Click the column header once to sort in ascending order.
The screen is refreshed and an arrow icon displays next to the column name to indicate the data is sorted based on that column and indicating the order in which it is sorted.

- Click the column header again to sort in descending order.
- Click the column header again and the screen returns to the default display and there will no longer be a triangle on any of the columns.