

Overview
Expense claims consist of one or more eligible expenses. These expenses can either be imported (for example, from a credit card) or created manually.
You can use one of two methods when entering and submitting expense claims:
- Start by adding expenses: with this method, you first create a list of expenses on the Expenses tab, group them together into a claim, and then submit the claim for approval.
- Start by creating an expense claim: with this method, you first create an expense claim on the Claims tab, import/add expenses to that claim, and then submit it for approval. For more information, see Preparing and Submitting Expense Claims.
From the Expenses & Claims page you can work with your own expenses, as well as those of anyone that has configured you as a delegate. Use the Delegates drop-down to view who's expenses you can see and work with.
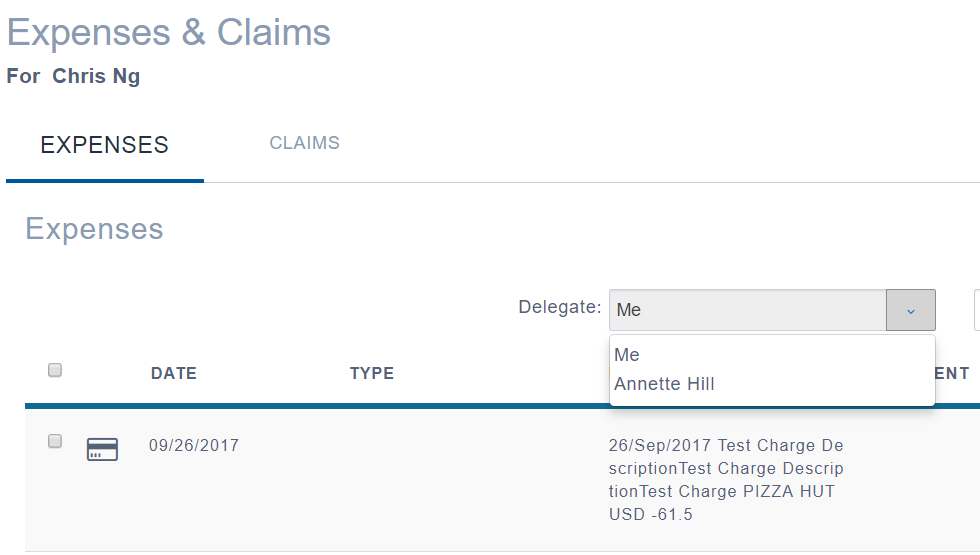
For more information, see Managing Delegates.
Creating Expenses
To create expenses:
- Log in to the Employee Center web page.
- From the Menu Bar, click on Finance and Purchasing.
The Finance & Purchasing menu drops down, displaying all the links to which you have access. - Click Expenses & Claims.
The Expenses & Claims page opens. Alternately, you can click New from the Finance & Purchasing menu to go directly to the New Expense page. - Click New. You will be presented with new screen with serial number and your name assigned to the expense item.
The New Expenses page opens. - In the Type field, either enter the expense type or click the Search view and select an expense from the list.
- Once selected, enter the following expense details in the New screen:
- Details: Enter a brief expense description. This field is automatically populated based on the expense type you select.
- Date: Enter the expense date. This field defaults to the current date.
- Cost: Enter the expense amount and currency (if applicable).
Each expense type may have a minimum and/or maximum allowable amount. For example, a per diem may require expense amounts greater than zero but less than $100. - Quantity: Enter the quantity and unit of measure, if applicable. Depending on the expense type, the unit of measure may be automatically selected. For example, when submitting mileage the unit of measure defaults to Kilometer.
If a quantity is not quantifiable, use 1. - Purchase Location: Select the sales tax jurisdiction where the expense was incurred from the drop-down list box. If sales taxes do not apply to this expense, select Exempt from the drop-down list.
This field defaults to your primary location, but it can be changed.- Note: This field may not be visible, depending on your system configuration.
- G/L Account: This field is automatically populated if combination code is used with G/L, otherwise select G/L.
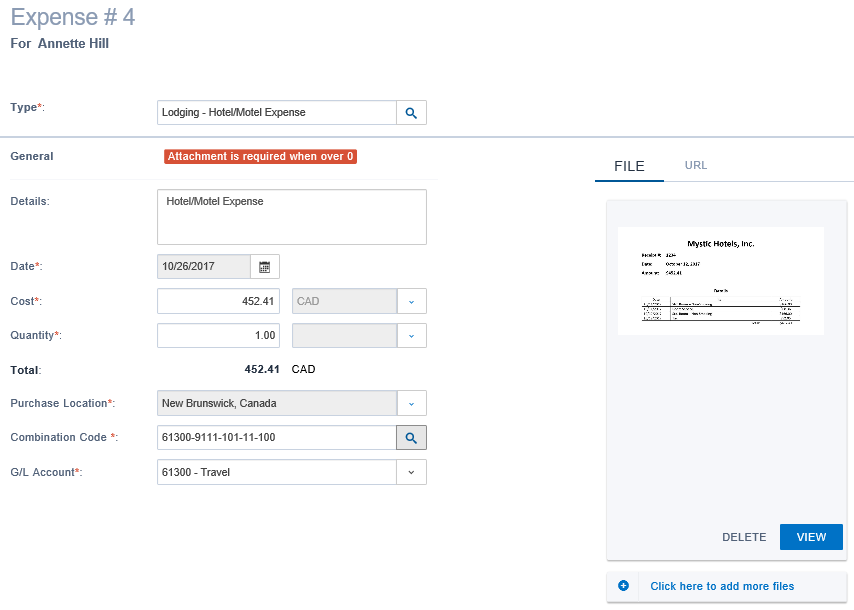
- An expense may require an attachment (receipt), depending on the expense type and amount. Attach your receipts to the expense by doing one of the following:
- To attach an image file (one of .jpg, .png, or .pdf), click in the file area and then browsing to your receipt. Alternately, you can drag and drop your receipt into the file area. To add more than one file, select the Click Here to Add More Files link.
- To attach a URL, type the URL and then click Save. You may also type an optional description into the Description field.
- Click Save.
The new expense is created and appears in the list of expenses. Repeat this process for each expense that you want to create.
Working with Credit and Purchasing Card Expenses
Expense claims consist of one or more eligible expenses. These expenses can either be imported (for example, from a credit card) or created manually. Imported expenses appear with a credit card icon beside the entry.
Note: Many of the fields for imported credit card expenses are not editable.

Imported expenses are usually incomplete and require action before they can be added to expense reports. For example, it may require an expense type or purchase location.
To update an imported expense:
- Double-click the expense.
- Complete the missing fields and then click Save. See Creating Expenses for more information.
Splitting Credit Card Expense Lines
Depending on the expense type, a credit card expense may exceed the budgeted maximum amount. Amounts exceeding this limit must be split, with employees responsible for the overage amount.
To process a split line, to allow one credit card or cash expense item to be coded to two different expense types and combination codes, open the expense item BEFORE adding the expense to a claim. To open the expense item select the credit card line by placing the cursor anywhere on the line other than the checkbox in the left column. A single mouse click will open the expense.
To split a credit card expense:
- Open the credit card expense that you want to split.
- Click Split Line.
The Split Line dialog box appears. - In the Split Line Amount field, type the amount of the expense that is personal.
- Click Save.
The current expense amount is changed to the value specified in the Split Line Amount field, and a new expense is created with the outstanding expense amount. - Open the new expense and add the checkmark to the Personal Amount check box.
Warning messages
The following table describes the warning messages that may appear when importing expenses:
| Warning Message | Description |
| Attachment Required | This expense type requires a receipt. |
| Attachment Required Over $ | This expense type requires a receipt when the value exceeds a specified amount. |
| Insufficient Funds | The expense amount exceeds the budgeted amount. |
| Invalid Dimension Combination | The user has selected an invalid category, based on the category code. |
| Maximum allowable amount of [$] in effect | The expense amount exceeds the selected account's allowable maximum. |
| Amount above allowable amount of [$]. | The expense amount exceeds the selected account's allowable maximum. |
Distance (Mileage)
If your Sparkrock solution is configured to calculate mileage, you can enter start and end locations and have distances calculated automatically. In this case, specify the following additional details when filling out your expense:
- From Location: The location where you started your trip.
- To Location: The location where you finished your trip.
- Round Trip: Add a checkmark to this check box to indicate that a round trip journey.
When you enter these values, the journey distance is automatically calculated.
Overriding Taxes
Taxes are automatically calculated based on the value specified in the Purchase Location field. You may want to override these values when the tax on the receipt does not match the automatically calculated tax.
To override sales tax amounts:
- Expand the More category.
- In the Taxes section, enter the override amount(s).