

This section focuses on payment journals and in particular paying purchase invoices, automatic selection of invoices for payment and payment discounts, as well as check writing.
Manually Paying Purchase Invoices
Note: Sparkrock does not recommend creating checks or EFT payments manually. Sparkrock recommends using Suggest Vendor Payments instead. You should only use this method for manual payments (that is, recording a payment that did not come out of NAV), or if you are creating a check/EFT with no A/P invoice.
When there are outstanding invoices in the Vendor Ledger Entries which are ready for payment, these must be settled. The payment journal is used to issue checks to vendors. The payment journal behaves just like the cash receipt journal does in Sales & Receivables. Vendors are entered, and their invoices are found to apply payments to.
To manually pay a purchase invoice:
- Open Microsoft Dynamics NAV 2016.
- In the Search field, type Payment Journals and select the page from the drop-down list.
The Payment Journals list displays.
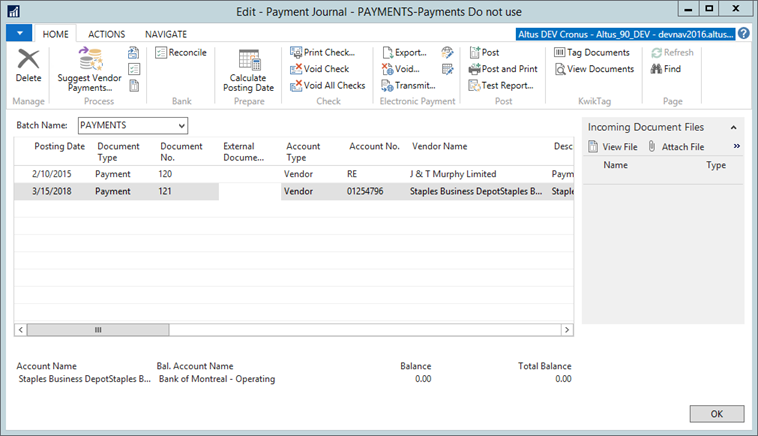
- From the Payment Journals list, select the one of Payment Journals. In Payment Journal page, enter the payment of an invoice in a payment journal just as in the general journal. The only difference is that the payment journal allows access to the Suggest Vendor Payment batch job.
- Enter Posting Date. This date is used to determine the posting date for the Payment Journal.
- Select Document Type Payment unless it is a refund to customer.
- Enter Document No.(mandatory) and External Document No. (optional)
- Select Account Type Vendor.
- Select Account No. (vendor number). Vendor Name, Description, and Currency Code will be auto-filled upon selection.
- Drop down Applies-to Doc. Type and select Invoice.
- Drop down Applies-to Doc. No. and select the one of invoices which you want to pay. Amount, Applies-to Doc. No. and Applied (Yes/No) are auto-filled. If you need to pay multiple invoices, click Apply Entries in Home tab. This will bring Apply Vendor Entries page and you can select multiple invoices from there.
- Select Bank Account in Bal. Account Type.
- Select Bank Account in Bal. Account No.
- Select Payment Type in Bank Payment Type. It will require additional procedure when selecting Computer Check or Electronic Payment.
- Approval may require in order to post Payment Journal which is depending on the General Journal Templates setup.
- Click Post or Post and Print. Confirm Yes.
- Columns in the Payment Journal card are:
| FastTab | Description |
| Posting Date | The date on which the entry will be posted. The posting date will be copied to entries when posting occurs. |
| Document Type | Payment should be the type, unless paying a customer which should be refund. |
| Document No | Created by the program in the Document No. field. |
| External Document No. | External document number, like a vendor invoice number. |
| Account Type |
|
| Account No. | Vendor No. (when Account Type is vendor). |
| Vendor Name | Vendor name populated once the vendor account number is selected. |
| Description | Payment line description. |
| Currency Code | Payment currency code. |
| Payment Method | Specifies the payment method. |
| Payment Reference | Identifies the purchase invoice payment. |
| Creditor No. | Identifies the creditor. |
| Amount | Amount of the entry. Leave blank if NAV should calculate the amount from invoices or documents applied to. This field must contain a negative value. Credit Amount can also be used. |
| Balance Account Type | Bank Account. |
| Bal. Account No. | The bank account that the deposit is going into. |
| Applied (Yes/No) | Indicates if current payment line is applied against posted invoices. |
| Remittance Filename | Name for the EFT remittance file. |
| Remittance Email | Email associated with the remittance. |
| Remittance Sent | Indicates if the remittance has been sent. |
| Applies-to Doc. Type | Leave blank and use the Actions > Functions > Apply Entries to apply the payments against open invoices. |
| Applies-to Doc No. | The document number to which this payment applies. |
| Applies-to Doc. Due Date | Displays the due date from the journal line's Applies-to Doc. |
| Bank Payment | Specifies the bank payment method. Can be one of:
|
| Source Type | Specifies the payment source. May be one of:
|
| Source No. | Indicates where the entry originated. |
| Exported to Payment File | Specifies if the payment has been exported to a payment file. |
| Total Exported Amount | Total value (in dollars) of the exported amount. |
| Has Payment Export Error | Indicates if an error occurred during export. For example, there is a limit on the number of lines that can be exported in one file. |
Applying Payments to Invoices
To apply the payment to invoices:
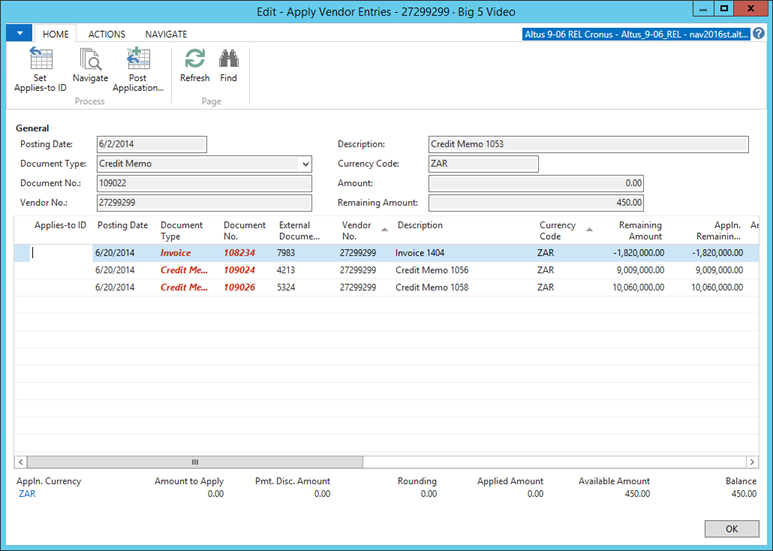
- From the Ribbon, click the Actions menu and then click Apply Entries.
The Apply Vendor Entries card displays.
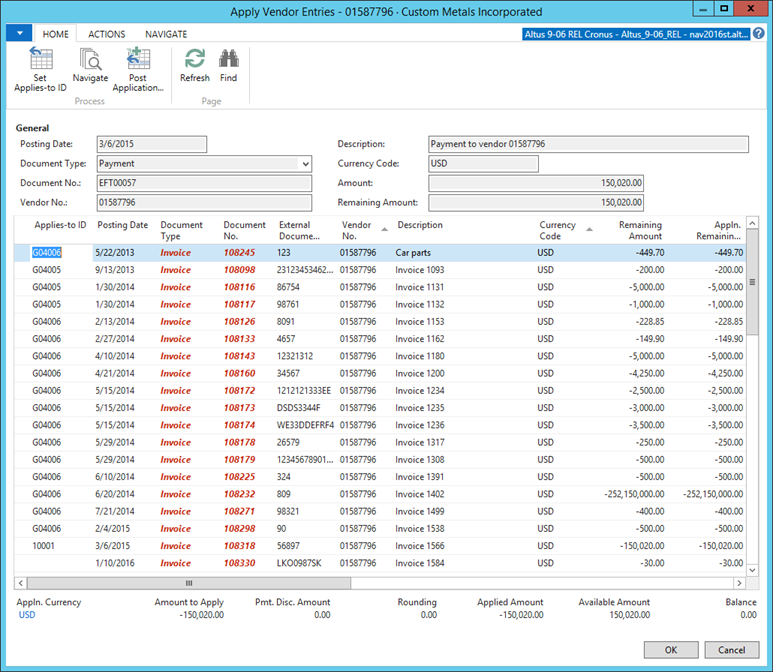
- Select the invoice to be paid and from the Navigate tab, click Set Applies-to ID (Shift + F11).
The Applies to ID is populated as the document no. of the payment journal line. Once all the entries for the vendor are applied, the amount should match the amount of the check. - Click OK to return back to the Payments Journal.
Printing Computer Checks
- From the Ribbon, click Print Check. The Options FastTab requires the correct bank account and the last check number.
NOTE: If the General Journal Template's Approval Required field is True, then computer checks cannot be processed unless approved by Approver.
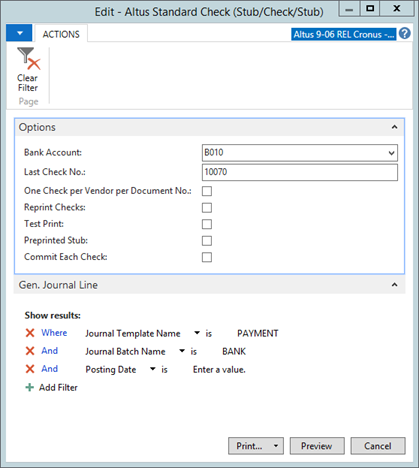
- Expand the Options FastTab.
- Choose the bank account number for the check from the Bank Account drop-down list.
- In the Last Check No.will be auto field based on Last Check No. field in Bank Card
- If you want to print only one check per vendor for each document number, add a checkmark to the One Check per Vendor per Document No. checkbox. This means that if ten invoices are being paid, only one check will be printed.
- If a previous print job was cancelled and you want to try to reprint, add a check mark to the Reprint Checks checkbox.
- To perform a test print on blank paper before printing on check forms, add a checkmark to the Test Print checkbox.
- If using check stock with a preprinted stub, add a checkmark to the Preprinted Stub checkbox
- Add a checkmark to the Commit Each Check checkbox if the program must commit to the database for each check rather than at the completion of the print job. This can avoid discrepancies between the data and check stock in case of printer error on networks where the print job is cached.
Note: If Computer Check was selected in the payment journal lines, the system will print the checks onto printer, if Manual Check, no checks will print. - Click Print.
Suggesting Vendor Payments
Rather than selecting individual vendors for payment, the system can suggest vendors due for payment, based on payment terms, and so on. NAV can also use the information on vendors and outstanding entries, to suggest which checks are to be printed based on the filters set and the invoices outstanding. For example the system can suggest all payments due for today.
To suggest vendor payments:
- Open the Payment Journal. In the Search field, type Payment Journals and select the page from the drop-down list.
- The Payment Journals card displays.
- From the Batch Name drop-down list, select Payments.
- From the Ribbon, click Suggest Vendor Payments.
The Suggest Vendor Payments page displays.
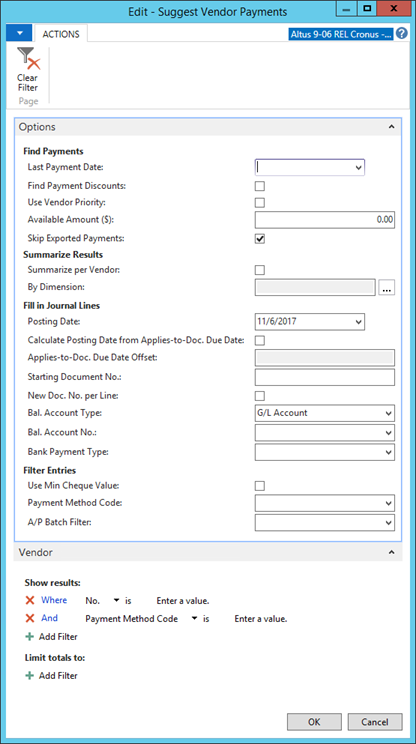
- From the Last Payment Date drop-down, enter the last due date that can appear on the vendor ledger entries to be included in the batch job. Only entries that have a due date or a payment discount date either before or on this date will be included.
- In the Find Payment Discounts check box, add a checkmark to include vendor ledger entries for which there may be a payment discount.
- In the Use Vendor Priority check box, add a checkmark to use the contents of the Priority field on the vendor cards to determine in which order vendor entries will be suggested for payment by the batch job. The program always prioritizes vendors for payment suggestions if there is an available amount in the field below.
- In the Available Amount field, enter the maximum amount available for payments. The batch job will then create a payment suggestion on the basis of this amount and the prioritization of the vendors that is defined in the Priority field on the vendor cards. It will include only vendor entries that can be paid fully (can be fully applied to).
- In the Available Amount ($) check box, add a checkmark to prevent inserting journal lines for payments that have already been exported.
- In the Skip Exported Payments check box, add a checkmark to prevent inserting journal lines for payments that have already been exported.
- In the Summarize Per Vendor check box, add a checkmark to make one line per vendor in which the vendor has ledger entries. The program will then use the Applies-to ID field when the journal lines are posted to apply the lines to vendor ledger entries.
Note: If you have vendors in multiple currencies, you should do a separate payment run for each currency. If you have miscellaneous vendors, put those in a separate check run where the Summarize Per Vendor is not checked. - Leave the By Dimension field blank.
- In the Posting Date field, enter the date that will appear as the check date or processing date for the EFT.
- In the Calculate Posting Date from Applies-to-Doc. Due Date check box, specify if the purchase invoice due date will be used as a basis to calculate the payment posting date.
- The Starting Document No. field is automatically populated with the next available number in the number series for the journal batch that is linked to the payment journal. When the batch job is run, this is the document number that appears on the first payment journal line. The document number will be incremented by one on each of the following journal lines.
- In the New Doc. No. per Line checkbox, add a check mark in the check box if the program must fill in the payment journal lines with consecutive document numbers, starting with the document number specified in the field above.
- In the Bal. Account Type field, select either G/L Account or Bank Account. If you are printing checks this should always be Bank Account.
- In the Bal. Account No. field, select the bank account from which you want to write the checks.
- In the Bank Payment Type field, select either Manual or Computer Checks.
- In the Use Min Cheque Value check box, add a checkmark to use a minimum check value.
- In the Payment Method Code field, provide the code representing the method of payment. Alternatively, you can also use the Vendor payment method (recommended).
- IN the A/P Batch Filter field, specify a batch to filter vendor payments.
- Select OK to run the job. The system auto-populates the payment journal which can be added to, modified or deleted from. Once the Payment Journal contains the information necessary, follow the same steps for printing checks as the manual process above.
Unapplied Checks
There may be times when checks are sent but don’t refer to any particular invoice(s) such as a deposit, but it is necessary to record the check and reconcile the amount later.
In order to do this, fill in the info as above, enter the check amount in the amount field and post the transaction. The system will record it and leave the status as open until it gets applied to a transaction. For more information, see Applying Posted Transactions.
Applying Posted Transactions
There may be situations where there are unapplied amounts on a vendors account. When it is finally determined which documents it applies to, it is necessary to apply the documents to clear the transactions.
To apply posted transactions:
- Open Microsoft Dynamics NAV.
- From the Search box, type Vendors and select the page from the drop-down list.
The Vendors page displays. - From the Ribbon, click the Navigate tab and then click Ledger Entries.
All open transactions are those that have not had transactions applied against them. - Select the payment amount to balance, click the Actions tab, and then click Apply Entries.
The Apply Vendor Entries page displays.
- Select the transactions to apply to and click the Set Applies-to ID.
- Once required invoices/credit memos are applied to current payment line, from the Ribbon, click Post Application.
Voiding a Posted Check (Financially void a Check)
Use the following procedure to void a posted check:
- In the Search Field, type Bank Accounts and select the page from the drop-down list.
The Bank Accounts page displays. - Select the Bank Account from which the check was written.
- From the Ribbon, click the Navigate menu, and then click Check Ledger Entries.
- Select the check that you want to void.
- From the Ribbon, click the Navigate menu, and then click Void Check.
The Confirm Financial Void page displays.
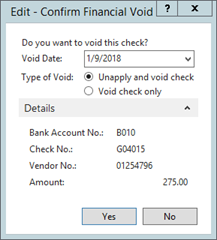
- There are two fields that can be modified:
- Void Date defaults to the date of the original check. However, it can be changed any date after that as well.
- Type of Void defaults to Unapply and Void Check. In the case of an A/P check, Unapply and Void Check includes voiding the check, reopening the invoices by un-applying the check, and creating the journal entries to reestablish the cash balance and the accounts payable balance. In the case of a payroll check, this includes reversing the entire payroll entry, including the employer paid expenses, so that corrections can be made to original calculations and the check rerun.
- Click Yes to void the posted check.
EFT Payments
Capturing the Transaction in the Payment Journal
The Payment Journal is the journal that captures transactions that will be processed. When processing EFT transactions, you can select filtering options to ensure the batch process only captures items flagged as EFT based on the vendor configuration you set up. To capture vendor payment transactions:
- In the Search field, enter Payment Journals and select the page from the drop-down list.
The Payment Journal displays. - From the Ribbon, click Suggest Vendor Payments.
The Suggest Vendor Payments page displays.

- Complete the following fields as well as steps 1 to 16 from Suggest Vendor Payment
- Bal. Account Type = Bank Account Name
- Bal. Account No = Bank Account Number
- Bank Payment Type = Electronic Payment
- Payment Method Code = EFT
- Click OK.
- EFT journal(s) will be generated. It may requires the Approval from approver.
- From the Ribbon, click Export.
The Export Electronic Payments page displays.
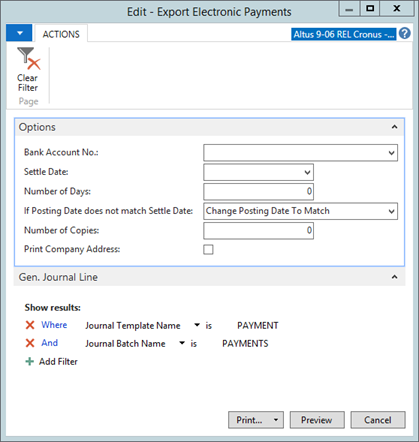
- In the Options FastTab, enter or confirm the following:
- Bank Account No.: This defaults to bank number last used. Verify that this is the correct account to use for these transactions. If not, select a different bank account.
- Settle Date: The date displayed is the date that will be set in the bank transfer file to make the bank payment transfer. Select a date from the drop-down calendar. Verify that this date matches the posting date.
- Number of Days: This field specifies how far back you want to preview.
- If Posting Date does not match Settle Date: This field enables you to set the action you want if there is a discrepancy between the posting date in the journal and the settlement date selected. You can select to change the posting date or to ignore entries where the date does not match.
- Number of Copies: Enter the number of additional copies you want to generate.
- Print Company Address: Click to add a check mark if you want the company address to display on the remittance document.
- In the Gen. Journal Line FastTab, add any filters as required.
- Click Print and select PDF. If you do not want to print the file with all remittance letters on paper, you can save it as a PDF if you want to have an electronic copy of the file. This process generates two outputs:
- A flat file to be used to upload to the bank the EFT information.
- The remittance advice PDF document that will be emailed to the vendor.
Uploading the File to the Bank
Once you have the export file prepared, you transmit the file to the bank for processing. After the file is transmitted to the bank, you get a notification from the bank indicating that the process completed without errors.
To upload the export file to the bank, follow the instructions provided by your financial institution. If you receive an error or notice that something prevented the file from transmitting successfully, you can void the transmission and try again.
Voiding the Payment Transmission Process in the Event of an Error
Should anything go wrong with the electronic file sent to the bank, the full payment process can be reversed by voiding the batch. The EFT process only voids full batches and not item by item.
To void the payment process:
- Access the Payment Journal. In the Search field, type Payment Journal and then select the page from the drop-down list.
The Payment Journal displays. - Click the Navigate menu tab.
- From the Ribbon, click Electronic Payments > Void.
The Void/Transmit Electronic Payments page displays.
![]()
- From the Bank Account No. drop-down menu, select the bank to which you originally transmitted the export file containing the electronic payment details. The E-Pay Operation field displays Void by default. Leave this option as selected.
- Click OK.
The void process begins. This process deletes (voids) the batch. Once the void is complete, you can attempt to re-transmit the payment to the bank.
Sending the Remittance Advice to the Vendor
Once you transmit the payment to your banking institution and you receive notification that the file transmitted to the bank without error, you can notify the vendor that the payment has been made by sending the remittance advice.
To send the remittance advice to the vendor:
- Access the Payment Journal. In the Search field, type Payment Journal and then select the page from the drop-down list.
The Payment Journal displays. - Click the Navigate menu tab.
- On the Ribbon, click Electronic Payments > Email Remittances. The email remittance is sent to the vendor.
Transmitting the Payment to the Payment Journal
Once the bank confirms that the file is without errors, you need to indicate that the process was successful by transmitting the file in the Payment Journal.
To transmit the export file:
- Access the Payment Journal. In the Search field, type Payment Journal and then select the page from the drop-down list.
The Payment Journal displays. - Click the Navigate menu tab.
- On the Ribbon, click Electronic Payments > Transmit.
The Void/Transmit Electronic Payments page displays.
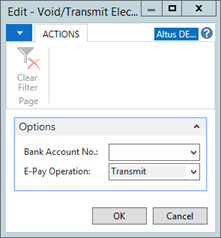
- From the Bank Account No. drop-down menu, select the bank to which you want to transmit the export file containing the electronic payment details.
- The E-Pay Operation field displays Transmit by default. Leave this option as selected.
- Click OK.
The transmit process begins. This process moves the generated file from the export directory to the export/transfer directory.
You cannot post a payment journal before you perform the transmit process. Also, you cannot delete or void payments after the file has been transmitted. The transmission locks the entries in the Payment Journal and the only available action is to post them.
Posting the Payment to the General Ledger
Now that the payment has been transmitted you can select an option to flag the items in the journal as transmitted. Flagging items as transmitted then enables you to complete the next step, which is to post the payment to the Payment Journal. You have two options:
- Post the payment
- Post the payment and print a copy as a report
To post the payment to the general ledger:
- Access the Payment Journal. In the Search field, type Payment Journal and then select the page from the drop-down list.
The Payment Journal displays. - Click the Actions menu tab.
- On the Ribbon, click Post or Post and Print.
A confirmation message page opens. - Click Yes to complete the posting process.
A window opens to show the processing. When complete, another confirmation window opens. - Click OK.
Payment Discounts
There are different ways to set up a payment discount for an invoice.
- If the payment discount is known at the time entering the invoice, an existing payment term can be selected or enter a new payment term for the invoice can be entered.
- If the payment discount is not agreed until the time the invoice is paid, then it must be handled differently. In this case, the payment can be reduced without negotiating a payment discount.
Payment Discounts known at time of Invoicing
The first method for recording the payment discount for an invoice is by setting the relevant payment term in the Payment Terms field on the Invoicing FastTab when creating the invoice. The program will always use the payment term from the vendor card as a default.
Payment Terms are setup in the Payment Terms page.
- Access the Payment Terms page. In the Search field, type Payment Terms and then select the page from the drop-down list.
The Payment Terms page displays.
- The payment discount possible for an invoice or credit memo is recorded on the vendor ledger entry. The original payment discount amount at the time the invoice or credit memo was posted is recorded in the Original Pmt. Disc. Possible field and the Remaining Pmt. Disc. Possible field. The Original Pmt. Disc. Possible field cannot be changed.
Payment Discounts Known at Time of Invoicing
To change the amount of the payment discount at any time before the vendor ledger entry has been fully applied:
- Access the Vendor Ledger Entires page. In the Search field, type Vendor Ledger Entires and select the page from the drop-down list.
- From the Ribbon, click Edit List.
The Edit Vendor Entries page displays. - Change the amount in the Remaining Pmt. Disc. Possible field.
Payment Discounts only Known at Time of Payment
When the vendor agrees to reduce the payment amount and the difference as a discount, modify the open vendor ledger entry. Only the following fields are editable: Due Date, Pmt. Discount Date and Remaining Pmt. Disc. Possible. The payment discount possible amount is in the currency of the invoice.
Applying Vendor Ledger Entries with Payment Discount Amounts
When applying credit memos, payments and refunds, the program checks the Pmt. Discount Date field of the applied vendor ledger entry or entries. If the posting date of the application is the same or earlier than the Pmt. Discount Date of the applied entry, a discount amount will be calculated if the applied entry is fully applied.