

Cash Management in Microsoft Dynamics NAV is used to manage your company's bank accounts. One of the main features of Cash Management is the Bank Account Card, which contains all your company's bank details. On the Bank Account Card, you can perform the following:
- Processing payments received from customers
- Processing payments to vendors
- Voiding posted checks (referred to as financial voiding)
Bank Account Overview
For each transaction made in NAV using a bank account, the system will post an entry in the bank account ledger.
The bank account posting group assigned to each bank account enables the program to post the related G/L entries with the transaction.
In addition, if you make a manual or computer check payments, the system posts an entry to the check ledger to record the check transaction and the current status of the check.
Each bank account has its own card that contains information, such as the following:
- Name, address, and contact information
- Account numbers
- Posting specifications
- International banking
- Wire transfers
Bank Account Page
To access the Bank Accounts page:
- In the Search field, type Bank Accounts and select the page from the drop-down list. Or, navigate to Departments > Financial Management > Cash Management > Lists > Bank Accounts.
The Bank Accounts page displays.
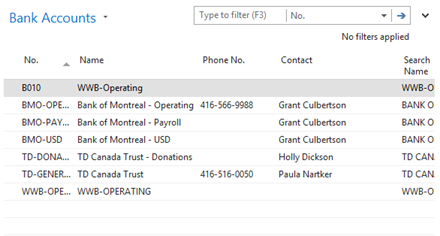
- Double-click on the bank account to see the Bank Account card.
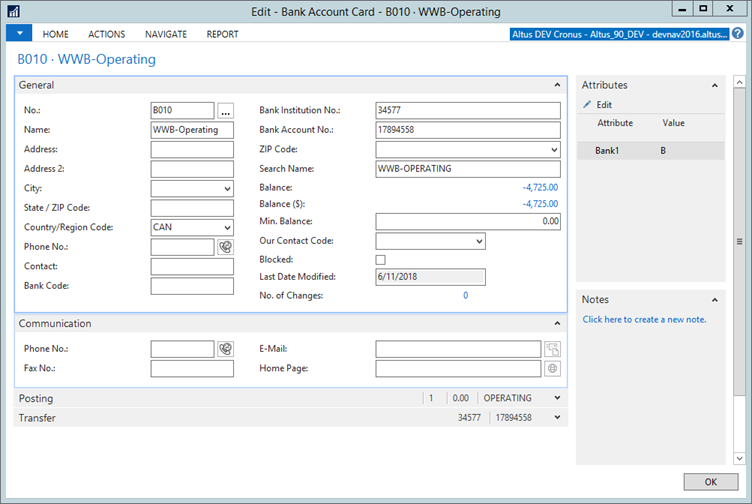
General FastTab
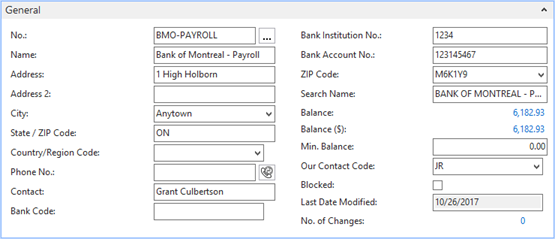
The General FastTab contains all the general information about the bank where the account is held such as the:
- Name
- Address
- Main contact person at the bank
- Search name
In addition to this information, the General FastTab includes the following fields:
| Field | Description |
| No. | A unique identifier to represent the bank account. This field is not used to specify the bank account number. |
| Bank Code | The bank code. |
| Bank Branch No. | The alphanumeric code used to represent the bank branch number for the bank account. All banks have a number series that specifies the branch of the bank the account was opened. |
| Bank Account No. | The bank account number that is used by the bank. |
| Balance and Balance (LCY) | These fields are flow fields that calculate the current bank balance based on the bank ledger entries. |
| Min. Balance | The minimum balance the bank account can have. The amount is in the currency of the bank account and can be positive or negative. |
| Our Contact Code | The contact person in your company, responsible for the bank account. In the program, this must be someone set up in the Salespeople/ Purchasers page. |
| Blocked | If selected, prevents the bank account from being used in transactions. |
Communication FastTab

The Communication FastTab contains the following information:
- Telephone and fax numbers
- Home page addresses for the bank
Posting FastTab
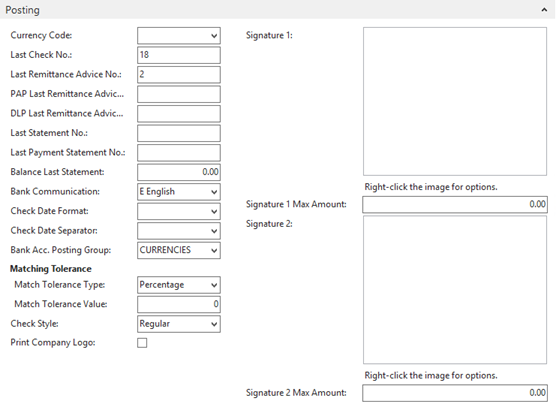
The Posting FastTab contains the following fields:
| Field | Description |
| Currency Code | The currency for the bank account. Be aware that check can only be made for payments in the currency of the bank account.
|
| Last Check No. | If using checks, specify the last check number that is used. The program updates this number every time a new check is created. |
| Last Remittance Advice No. |
This field is used to setup Remittance Advice number sequence. Enter the starting point for the serial number to be used as the Remittance Advice document number. This number will be used to populate the Bank Ledger and check Ledger entries. |
| PAP Last Remittance Advice No. | Enter the starting point for the serial number to be used as the Pre-authorized Payment Remittance Advice document number. (This field is used to setup PAP Remittance Advice number sequence and will be used to populate the Bank Ledger and check Ledger entries.) |
| DLP Last Remittance Advice No. | Enter the starting point for the serial number to be used as the Deferred Leave Plan Remittance Advice document number. (This field is used to setup DLP Remittance Advice number sequence and will be used to populate the Bank Ledger and check Ledger entries.) |
| Last Statement No. | The statement number of the last Bank Account Statement reconciled in the program. |
| Last Payment Statement No. | Specifies the last payment statement number. |
| Balance Last Statement | The statement ending balance of the last Bank Account Statement reconciled in the program. |
| Bank Communication | Specifies the language used to commnicate with your bank. This field should be always English. |
| Check Date Format | The format to be used on the checks. For example, MM DD YYYY. |
| Check Date Separator | Code to separate the date on a check (normally ‘blank’) – normally ‘-‘ – Canadian check standards. |
| Bank Acc. Posting Group | The posting group assigned to this bank account. Microsoft Dynamics NAV 2016 uses this to post the related G/L entries for each transaction by using the bank account. |
| Match Tolerance Type | Determines the type of matching tolerance used. Either Percentage or Amount. |
| Match Tolerance Value | When using match tolerance, this value determines the the system will match transactions that are within a certain tolerance. |
| Check Style | Either Regular or Pre-printed. |
| Print Company Logo | Add a checkmark to this check box to include your company logo. |
| Signature 1 | The signature of the first signing authority. |
| Signature 1 Max Amount | The maximum amount for the first signing authority. |
| Signature 2 | The signature of the second signing authority. |
| Signature 2 Max Amount | The maximum amount for the second signing authority. |
Transfer FastTab
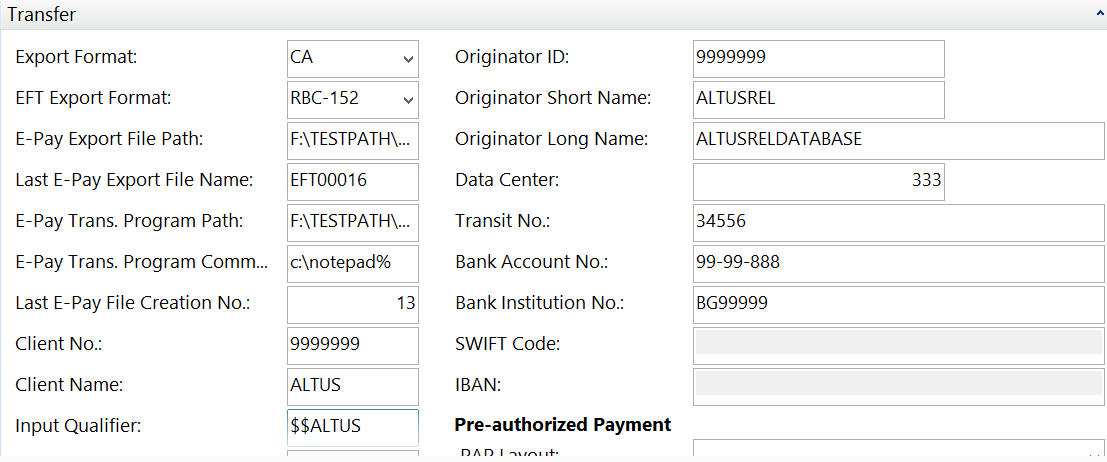
The Transfer FastTab contains the following fields needed to make transfers to and from the bank account:
| Field | Description |
| Bank Branch No. | Defaults from the General FastTab. |
| Bank Account No. | Defaults from the General FastTab. |
| Transit No. | Defaults from the Posting FastTab |
| SWIFT Code | The international bank identifier code assigned to the bank. SWIFT Codes are typically used in automatic payment transactions. |
| IBAN | The bank account's International Bank Account Number (IBAN). The program checks whether the IBAN entered has the correct format and length. |
Bank Account Card Ribbon


The Bank Account Card includes the following options on the ribbon:
| Option | Description |
| Cash Receipt Journal | Use to register and post payments from customers. |
| Payment Journals | Use to register and post payments to vendors. |
| Statistics | Displays the current balance for the account in the bank account currency and LCY and comparative figures from prior periods. |
| Statements | Displays the reconciled Bank Account Statements for this bank account. |
| Bank Account Reconciliation | Displays the Bank Acc. Reconciliation list, which is described later. |
| List | Displays a list of all bank accounts in the system. |
| Detail Trial Balance | Displays options to print a detail trial balance for bank accounts. |
| Check Details | Displays options to print a detailed trial balance for selected checks. |
| Statistics | Same function as on Ribbon. |
| Comments | Displays or enters any detailed comments that relates to this bank account. |
| Dimensions | Displays or enters default dimensions for this bank account. |
| Balance | Displays the Bank Account Balance page; it shows the balance or net change in the bank account in the bank account currency and LCY over time. |
| Statements | Same function as on the Ribbon. |
| Ledger Entries | Displays bank account ledger entries for this bank account. |
| Check Ledger Entries | Displays only the check ledger entries for this bank account. Use this option to financially void checks, as described in Financially Voiding Checks. |
| Contact | Displays the company contact card for this bank account. When creating a new bank account, the system also creates and links a Company contact card to the bank account. |
| Online Map | Displays information about what map to display in the online map. The online map is set up in the Online Map Parameter Setup page. |
Creating a Bank Account
To create a bank account, follow these steps:
- Go to Departments > Financial Management > Cash Management > Bank Accounts > New.
- In the No. field, enter a unique identifier for the bank account.
- In the Name field, enter the name of the bank.
- In the Address field, enter the address of the bank.
- In the Post Code field, click the drop-down list and select the bank account's postal code. The City field should be automatically populated.
- In the Country/Region Code field, click the drop-down list and select the country/region where the bank account is located.
- In the Phone No. field, enter the bank's telephone number.
- In the Contact field, enter the name of the contact person in the bank.
- In the Bank Branch No. field, enter the bank's branch number.
- In the Bank Account No. field, enter the bank account number.
- In the Our Contact Code field, click the drop-down list and select the person responsible in the company.
- On the Communication FastTab, complete the information in the fields.
- In the Currency Code field, click the drop-down list and select the bank account's currency.
- Complete the Last Check No., Last Statement No., and Balance Last Statement fields.
- In the Bank Account Posting Group field, click the drop-down list and select the appropriate posting group for this bank.
- Complete the Transit No., SWIFT Code, and IBAN fields.
- Click OK.