

Overview
A dimension is data added to an entry so that entries with similar characteristics can be grouped and easily retrieved for analysis purposes. Dimensions can be used throughout Microsoft Dynamics NAV on entries in journals, documents, and budgets.
The term dimension is used to describe how analysis occurs. An example of two-dimensional analysis, is sales (first dimension) for every area (second dimension). When using more than two dimensions for creating an entry, a more complex analysis is achieved, such as sale for every sale, campaign for every customer, and group for each area.
Users must allocate adequate time when setting up the dimensions structure, since it is the basis for all the benefits the Dimensions functionality offers.
The dimensions structure must be determined in combination with the chart of accounts and posting group structure. Additionally, using dimensions and simplifying the chart of accounts provides a better analysis of financial information.
The aspects of defining and setting up dimensions include:
- Dimension Values
- Dimension Combinations
- Default Dimensions
- Default Dimension Priority
Dimension and Dimension Values
Each dimension can have an unlimited series of dimension values that are subunits of that dimension. For example, a dimension called Department can have the dimension values Sales, Administration, and so on, as department names.
Dimensions and dimension values are user-defined and unlimited, which means dimensions are tailored for each company.
Using the Dimensions Page
To access the Dimensions page:
- In the Search field, type and then select Dimensions.
The Dimensions page displays.
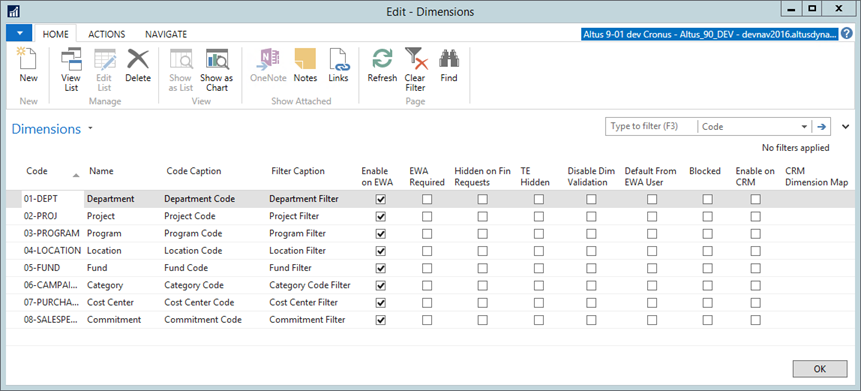
Note: There are two hidden fields in the Dimension page: Map-to IC Dimension Code and Consolidation Code; these are used for multi-company operations. - To configure the values for a particular dimension:
- Select the dimension.
- From the Ribbon, click Navigate and then click Dimension Values.
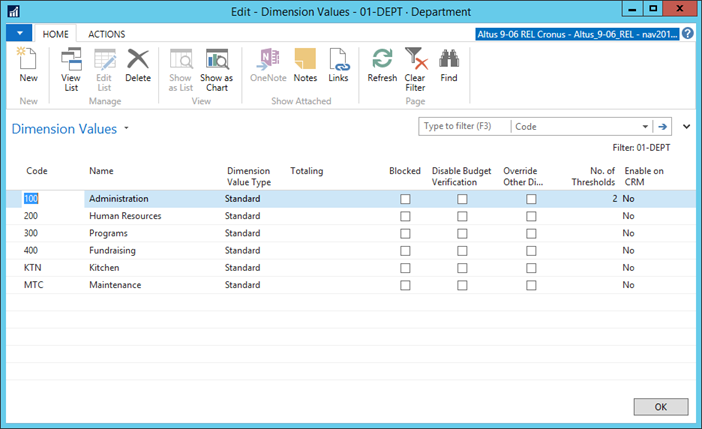
The Dimension Values page displays.
- Add or remove the desired dimension values and then click OK.
- To set default dimensions by account:
- From the Ribbon, click the Navigate tab and then click Account Type Default Dim.
The Account Type Default Dim. page displays. - Add a line for each new default dimension that you want to set up.
- Click OK to return to the Dimensions page.
- From the Ribbon, click the Navigate tab and then click Account Type Default Dim.
- To add or edit dimension translations:
- From the Ribbon, click the Navigate tab and then click Translations.
The Dimension Translations page displays.
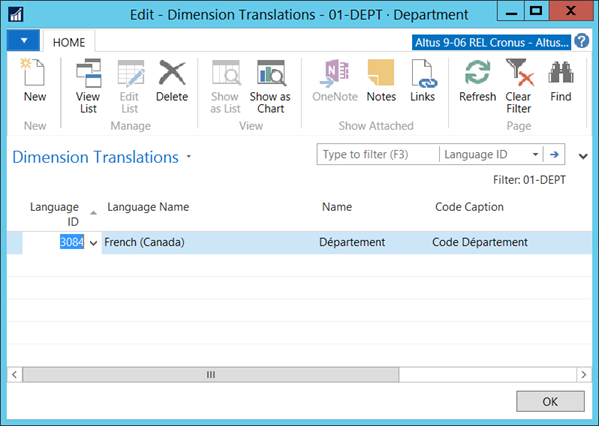
- Edit the desired translation or click New to add a new translation line to the page.
- Click OK when finished to return to the Dimensions page.
- From the Ribbon, click the Navigate tab and then click Translations.
Dimension Values
A dimension value:
- Is a subset within a dimension.
- Is used on ledger entries.
- Can have an infinite number of values, with unique value codes within a dimension.
Dimensions and dimension values make it possible to:
- Gain an accurate picture of a company's activities.
- Analyze relationships between dimensions and dimension values.
Users can create a hierarchical relationship between dimension values so that Microsoft Dynamics NAV will consider some dimension values as subsets of another dimension value. This relationship is achieved using dimension value types.
Dimension values are set up in the Dimension Values page, which is located by navigating to the Dimensions page and then clicking Navigate > Dimension Values.
The Dimension Values page contains the fields shown in the following table:
| Option | Description |
| Code | Unique code for the dimension value. |
| Name | Descriptive name for the dimension value. |
| Dimension Value Type | Determines the manner in which a Dimension Value is used when posted. The options are:
|
| Totaling | Identifies a dimension value interval or a list of dimension values, used to total the entries for the dimension values displayed in the field to give a total balance. |
| Blocked | Used to block the posting of journals containing specific dimension values. |
| Disable Budget Verification | Add a checkmark to this option to exempt this dimension value from the budget verification process. |
| Override other Dim. Approvals | Add a checkmark to this option to override other dimension approvals. |
| No. of Thresholds | Specifies the number of approval thresholds. |
| Enable on CRM | Specifies if this dimension value is enabled on CRM. |
The Dimension Value Type and Totaling fields together create the hierarchical relationship in dimension values. The Dimension Value Type options are shown in the following table:
| Option | Description |
| Standard | Used for standard posting of dimension values. |
| Heading | Heading for a group of dimension values. |
| Total | Used to total a series of balances on dimension values that do not immediately precede the Total dimension value. |
| Begin-Total | Marker for the beginning of a series of dimension values to be totaled and ends with an End-Total dimension value type. |
| End-Total | Total of a series of dimension values that starts with the dimension value type Begin-Total. |
| Note: One can only post to dimensions values set up with Standard or Begin-Total value types. | |
The Totaling field is completed based on the selection made in the Dimension Value Types field:
- If the dimension value type is Standard, Heading, or Begin-Total, the Totaling field must be blank.
- If Total is selected, the Totaling field must be manually populated to indicate which dimension values will be totaled.
- If End-Total is selected, the Totaling field is automatically populated when the Indent Dimension Values function is run.
The Indent Dimension Values function:
- Indents all dimension values between a Begin-Total and the matching End-Total by one level.
- Totals all dimension values within the same range and updates the Totaling field for each End-Total.
- Access the Indent Dimension Values function from the Dimension Values page by clicking the Actions > Indent Dimension Values.
NOTE: For dimension values of the End-Total type, one can manually fill in the Totaling field. It is, however, recommended to use the Indent Dimension Values function to populate the field.
Setting up a Dimension with Dimension Values
Steps to set up a dimension with dimension values not used with multi-company operations:
- In the Search field, type and then select Dimensions or go to Departments > Administration > Application Setup > Financial Management > Dimensions and then click Dimensions.
The Dimensions page displays.
- From the Ribbon, click New.
- In the Code field, type a unique identifier.
- Update the Name, Code Caption, Filter Caption, and Description fields as needed.
- On the Ribbon, click the Navigate tab and then click Dimension Values.
- In the Code field, type a unique code for this value.
- In the Name field, type a short description for this value.
- If a dimension value hierarchy is required:
- Change the Dimension Value Type as needed.
- Update the Totaling field if selecting the Dimension Value.
- Specify a value for the remaining Dimension options as needed.
- Click New and repeat steps 6-9 to set up additional dimension values.
- Click OK when finished.
Dimension Types
There are three types of dimensions in Microsoft Dynamics NAV:
- Global
- Shortcut
- Budget (not handled currently by the Sparkrock solution)
Global and shortcut dimensions are specified in the General Ledger Setup page and budget dimensions are specified in the G/L Budget Names page.
When a dimension is selected as a global, shortcut, or budget dimension, Microsoft Dynamics NAV automatically renames all fields that use that dimension type with the Code Caption specified for the selected dimension in the Dimension page.
Global Dimensions
Global dimensions are the most used and important dimensions because of their availability throughout Microsoft Dynamics NAV. Two dimensions can be specified as global dimensions.
Global dimensions can be used as filters for:
- G/L entries
- Reports
- Account schedules
- Batch jobs
Both global dimensions are also available as Shortcut Dimensions 1 and 2 for use on:
- Document headers
- Entry lines
Shortcut Dimensions
Shortcut dimensions are used to enter dimensions and dimension values directly on the lines in:
- Journals
- Sales and purchase documents
There are a total of eight shortcut dimensions available:
- The first two shortcut dimensions are automatically defined as global dimensions.
- The remaining six shortcut dimensions:
- Are selected from the dimensions previously set up
- Can be changed regularly, as needed
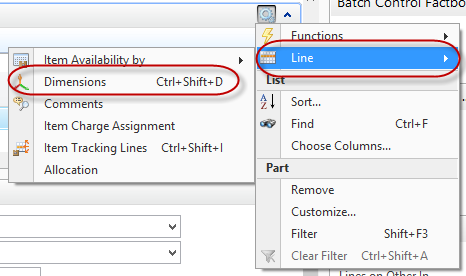
Use either of the following methods to assign dimensions to document entry lines:
- Enter dimension values for a dimension directly on the line by using the Choose Column function to add shortcut dimensions to the lines.
- On Function, Line, Dimension
Dimension Combinations
The dimension combination feature allows a business to define a set of dimension combinations together with G/L accounts. These are identified by a code and can be used in certain parts of the application to speed up processing and reduce user error. These can be used alone or in conjunction with other mechanisms to validate dimension values.
To view the Dimension Combinations page:
- In the Search field, type Dimension Combinations and select the page from the drop-down list.
The Altus Dimension Combinations page displays.
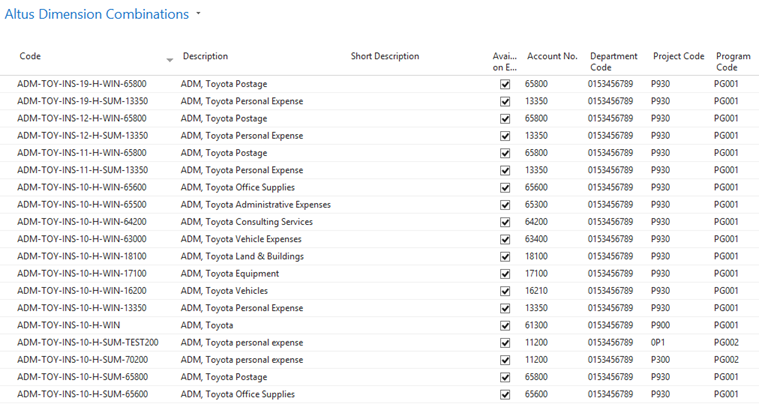
Dimension combinations provides the ability to prevent (block) particular dimensions from being combined on a journal or in a document, and under what circumstances. The blocking may be, for example, that a specific project team cannot post certain expense types or that a certain item cannot be sold in a particular area.
In addition, the use of a particular dimension combination can be restricted, depending on which dimension value combination is being used for the two dimensions.
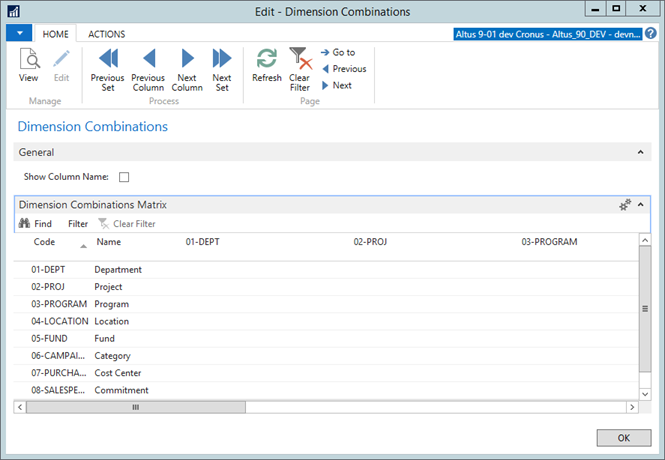
Dimension Combination Matrix
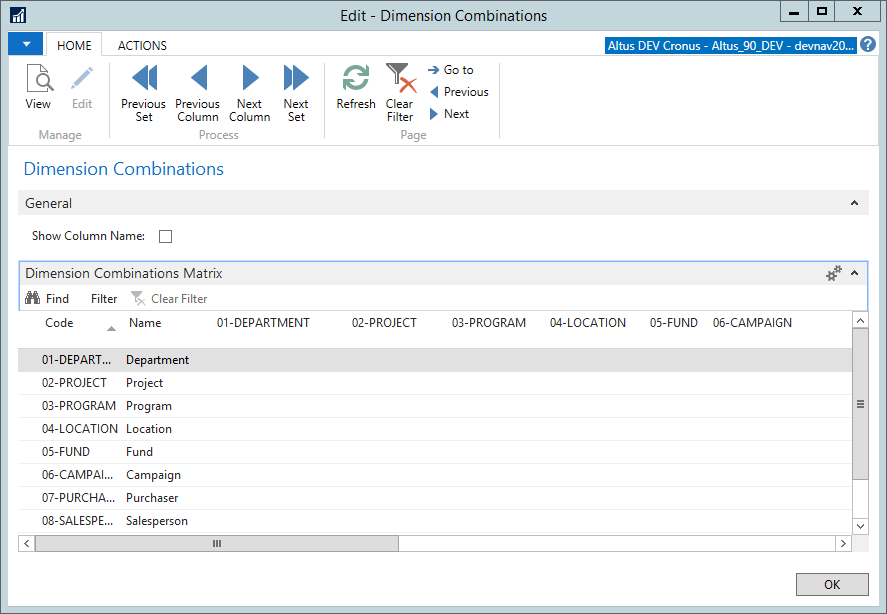
This page displays a matrix of all combinations of dimensions created in Microsoft Dynamics NAV.
-
The dimensions displayed in the rows of the matrix are also represented as dimension columns.
-
The column headings can be changed from the dimension code to the dimension name by clicking the Show Column Name check box on the Dimension Combinations page.
-
Dimension restrictions are set in the columns.
Validating Dimension Setup
Dimension combination set-up determines how and where dimension combinations can be used in the system.
To view the Dimension Validation Setup page:
- In the Search field, type Dimension Validation Setup and select the page from the drop-down list.
The Dimension Validation Setup page displays.
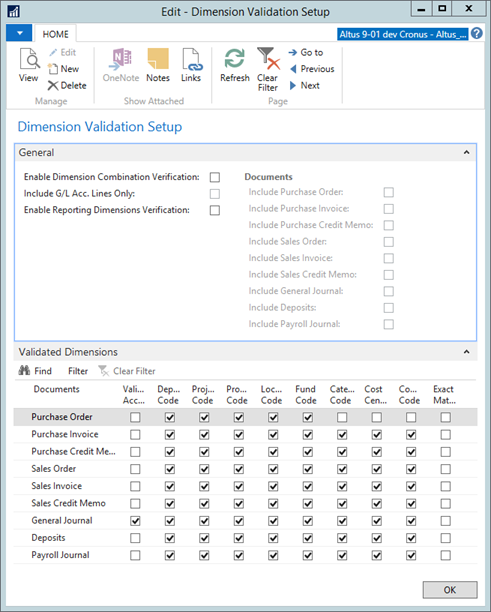
Use the table below to complete the General tab of the Dimension Validation Setup page.
| Field | Details |
| Enable Dimension Combination Verification | Add a checkmark to this field to enable the validation. You can then determine the type of documents where this validation should be done. |
| Include G/L Acc. Lines Only | Finance Administrators can now configure the system to include only lines with Account Type = G/L Account in the validation by checking Include G/L Acc. Lines Only. This is useful in General Journal where you might want to have lines with Account Types = Bank Account, Customer Vendor. |
| Enable Reporting Dimensions Verification | If the Enable Reporting Dimensions Verification field is enabled, the dimension combination validation is done on Release or Posting of the respective document. Errors can be viewed through Document Warnings from the ribbon. |
| Documents | Select all relevant documents for your purposes (see details for Enable Dimension Combination Verification). |
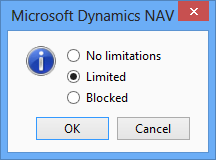
Dimension Combination Restrictions
The columns in the Dimension Combinations Matrix are called combination restriction fields. The combinations for these fields are accessed by clicking the field, and include the options shown in the following table.
| Option | Field |
| No limitations | The dimension combination is always allowed on entries. This is the default setting for dimension combinations. |
| Limited | The dimension combination is only allowed in certain circumstances, depending on which dimension values are selected when creating an entry |
| Blocked | The dimension combination is excluded from use on entries. |
NOTE: If the Limited option is selected, the restricted dimension value combinations must be specified. Dimension value combinations are only applicable to the Limited option.
Setting Dimension Combination Restrictions
Dimension value combinations are set up by drilling down in the relevant restriction field on the dimension combinations matrix to define restrictions in the Dimension Combinations Matrix page.
To access the Dimension Combinations Matrix page:
- In the Search field, type Dimension Combinations Matrix and select the page from the drop-down list.
The Dimension Combinations page displays.
- The Dimension Value Combinations Matrix page is a matrix of all combinations of dimension values for a particular dimension combination.
- The rows represent the dimension values of the dimension selected in the rows of the Dimension Combinations Matrix page.
- The columns represent the dimension values of the dimension selected in the column of the Dimension Combinations Matrix page.
- The dimension value combination restrictions are set up by clicking the relevant field and selecting Blocked. If Blocked is not selected, the combinations are allowed for these dimension values
Default Dimensions
When dimension codes and dimension values are set up, default dimensions can be defined. Default dimensions determine how particular accounts or account types use dimensions and dimension values. Default dimension values can be defined for:
- All dimensions on all accounts
- Individual accounts
- Groups of accounts
- An entire account type, for example, the customer account type
Each default can also be set up with value posting rules that determine in what way dimension information may be posted. Default dimensions can be entered at three levels:
- Dimensions - Single: Single Account
- Dimensions - Multiple: Multiple Accounts
- Account Type Default Dimensions: All Accounts
Value Posting Rules
Default dimensions contain three main areas that are used together to create the default:
- Dimension
- Dimension value
- Value posting rule
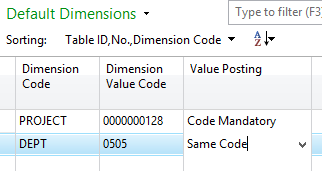
Default dimensions, at any level, use the same value posting rules, shown in the following table:
| Field | Description |
| Blank | There is no posting restriction. This default dimension for this account or account type can be posted with any dimension value or with no dimension value. |
| Code Mandatory | The default dimension for this account or account type must have a dimension value when posting, but any dimension value is acceptable. |
| Same Code | The default dimension for this account or account type must always have the same dimension value code as that selected in the Dimension Value Code field. |
| No Code | Dimension value codes must not be used with this account or account type. |
Conflicting Default Dimensions
When setting up default dimensions, consider whether the program will, in some circumstances, suggest conflicting default dimension values.
For example, a conflict will exist if:
- A customer account is set up with the value posting rule No Code.
- The Account Type default is set up so that all customer accounts use a particular default dimension value code.
In this example, Microsoft Dynamics NAV cannot disallow the use of a dimension value code while also allowing the use of a default dimension value code.
Conflicts can be identified and resolved:
- In the Default Dimensions-Multiple page
- Using the Check Value Posting function
- Using the Default Dimension Priorities feature
Users can set up default dimensions for multiple accounts in one action by using the Dimensions-Multiple function.
Additionally, users can set up default dimensions on an account card, such as Customer Card, by clicking Navigate > Dimensions.
Default Dimension Priority
In Microsoft Dynamics NAV, conflicts between default dimension values for the same dimension can be resolved using default dimension priorities. These priorities determine which default dimensions are used based on the prioritization of the source account.
For example, if G/L accounts are given a higher priority than customer accounts, a conflict between the dimension values suggested for a customer account and the dimension values suggested for a G/L account are resolved in favor of the G/L account.
Default dimension conflicts can arise between:
- Accounts or account types in documents and journals
- Headers and lines in documents
By prioritizing account types in relation to each other, the program can resolve situations where dimension values are in conflict.
Additional Conflict Resolution Rules
When a conflict between default dimensions is not resolved by a defined priority, the following rules will apply:
- If two accounts have conflicting dimension values for default dimensions and they have equal priority, or are of the same account type, the conflict is resolved in favor of the last entered account.
- Non-blank dimension values are normally prioritized higher than blank dimension values.
If there is a conflict between the default dimension values set up on an individual account and those set up in an account table, the individual account default dimension value is prioritized. This occurs because default dimension values are normally set up on the individual accounts with a specific purpose. When a more general prioritization rule is needed, a default dimension value can be assigned to the entire table.
In regards to value posting rules, posting will not occur if there is a value posting conflict between dimension values, with or without priorities. For example:
- With priorities: If one account is prioritized to override another account, but the account with lower priority has a value posting option Same Code, posting will not occur.
- Without priorities: If a single journal line is entered and the dimensions for both accounts have conflicting value posting rules, for example, one account is Same Code and the other is No Code, posting will not occur.
NOTE: In journals, resolve conflicts by not using a balancing account and entering the balancing journal line on a separate line.