

Companies use posting groups to create links between accounts in the different application areas (sub-ledgers) and the G/L accounts in the General Ledger application area.
Objectives
This topic explains how to:
- Set up specific posting groups.
- Set up general posting groups.
- Create a general posting setup.
- Create an inventory posting setup.
- Review posting setups based on the chart of accounts.
- Demonstrate how posting groups direct a sales transaction.
Companies use posting groups to create links between accounts in the different application areas (sub-ledgers) and the G/L accounts in the General Ledger application area.
When users record and post sales, purchases, and other transactions where a specific G/L account is not directly specified, posting groups provide the mapping to the correct accounts.
As a result, the chart of accounts MUST be setup before setting up posting groups.
The three types of posting groups that companies use when selling inventory and resources to customers and buying inventory from vendors are:
- Specific Posting Groups
- General Posting Groups
- VAT Posting Groups (not applicable in Canada and US)
In addition to knowing the three types of posting groups, companies must be able to set them up. This involves becoming familiar with the functions of a posting group structure using a posted sales invoice.
Specific Posting Groups
The primary purpose of specific posting groups is to identify the balance sheet account for each subsidiary, or supporting ledger.
For example, the total outstanding accounts receivable balance of all customers must correspond to the total balance of the Accounts Receivable accounts in the balance sheet.
Specific posting groups are assigned to:
- Customers
- Vendors
- Items
- Bank Accounts
- Fixed Assets
These posting groups create the direct link to the primary balance sheet account for each master item.
The following table provides further descriptions of specific posting groups:
| Specific Posting Groups | Description |
| Customer Posting Group | Maps the accounts receivable account, payment discount accounts, invoice and application rounding accounts, and interest and fee accounts relating to customers. |
| Vendor Posting Group | Maps the accounts payable account, payment discount accounts, invoice and application rounding accounts, and interest and fee accounts relating to vendors. |
| Inventory Posting Group/ Inventory Posting Setup | Inventory posting groups specify the type of inventory and are then combined with location codes in the Inventory Posting Setup page. Each combination is then mapped to the inventory accounts, WIP account, and other variance accounts relating to inventory in the chart of accounts. |
| Bank Account Posting Group | Maps a bank account to a bank G/L account. |
| Fixed Asset Posting Group | Specifies the accounts to which transactions involving fixed assets are posted. |
Set Up and Assigning Specific Posting Groups
There are two steps in creating specific posting groups:
- Set up the specific posting group.
- Assign the specific posting group to the corresponding master item:
- Customer
- Vendor
- Item
- Bank Account
- Fixed Asset
Setting Up Customer Posting Groups
To set up customer posting groups:
- In the Search field, type Customer Posting Groups and select the page from the drop-down list. Or, navigate to Departments >Financial Management > Posting Groups > Customer Posting Groups.
The Customer Posting Groups page displays.

- From the Ribbon, click New.
- In the Code field, type a unique identifier.
- In each relevant account field, enter the G/L accounts used to post transactions for each AR area where applicable and used.
- Repeat steps 4-6 to set up additional customer posting groups.
Assigning Customer Posting Groups
Follow these steps to assign a customer posting group to a customer account:
- In the Search field, type Customers and select the page from the drop-down list, or navigate to Departments >Financial Management > Receivables > Customers.
The Customers page displays.
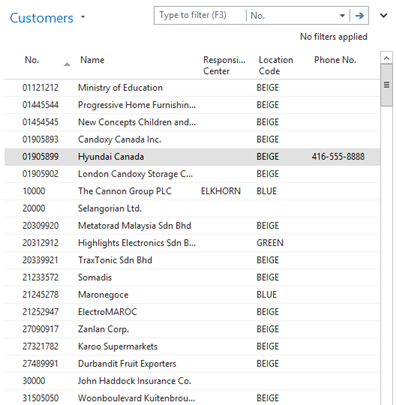
- Locate the customer and open the Customer card.
- Expand the Invoicing FastTab.
- In the Customer Posting Group field, enter the appropriate posting group.
- Click OK to close the Customer card.
When customer-related transactions, such as orders, invoices, credit memos, and payments are posted, Microsoft Dynamics NAV uses the customer posting group code to locate and post to the specified GL accounts.
Setting Up Vendor Posting Groups
Setting up vendor posting groups is the same process as setting up customer posting groups and a similar page is used.
To set up vendor posting groups:
- In the Search field, type Vendor Posting Groups and select the page from the drop-down list. Or, navigate to Departments >Financial Management > Posting Groups > Vendor Posting Groups.
The Vendor Posting Groups page displays.
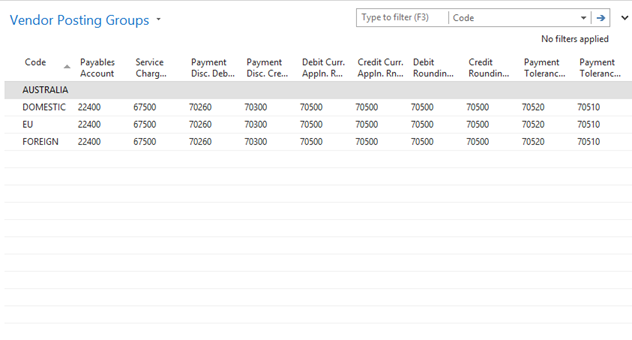
- From the Ribbon, click New.
- In the Code field, type a unique identifier.
- In each relevant account field, enter the G/L accounts used to post transactions for each AR area where applicable and used.
- Repeat steps 2-4 to set up additional vendor posting groups.
Assigning Vendor Posting Groups
Steps to assign a vendor posting group to a vendor account:
- In the Search field, type Vendors and select the page from the drop-down list, or navigate to Departments >Financial Management > Payables > Vendors.
- Locate the vendor and open its the Vendor Card.
- Expand the Invoicing FastTab.
- In the Vendor Posting Group field, enter the appropriate posting group.
- Click OK to close the Vendor Card.
When vendor-related transactions, such as orders, invoices, credit memos, and payments are posted, Microsoft Dynamics NAV uses the vendor posting group code to locate and post to the specified accounts
Inventory Posting Groups and Inventory Posting Setup
Inventory posting groups are used to group items for statistical purposes.
Reports, such as the Inventory Valuation, and batch jobs, such as the Post Inventory Cost to G/L, use inventory posting groups to list the results.
The inventory posting group setup is slightly different than the setup of customer and vendor posting groups because two pages are used:
- Inventory Posting Groups
- Inventory Posting Setup
On the Inventory Posting Groups page, inventory item groups are specified. This setup allows users to link G/L accounts to item groups rather than to specific items. The Inventory Posting Setup page holds the links between the inventory posting group, inventory locations, and G/L accounts.
Note: It is common to set up inventory posting groups without locations to allow for items not tracked in the warehouse.
Once the inventory posting group is assigned to an item, when item entries are posted, Microsoft Dynamics NAV posts to the G/L account specified for the combination of inventory posting group and location code linked to the item line entry.
Setting Up Inventory Posting Groups
Steps to set up an inventory posting group:
- In the Search field, type Inventory Posting Groups and select the page from the drop-down list, or navigate to Departments > Financial Management > Posting Groups > Inventory Posting Groups.
The Inventory Posting Groups page displays.
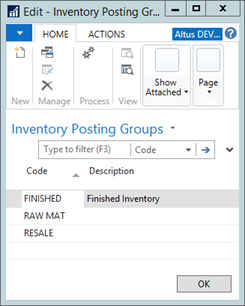
- Click New.
- In the Code field, type a unique, descriptive identifier. This code is used on reports.
- In the Description field, type a short description of the inventory posting group
Inventory Posting Set Up
- In the Search field, type Inventory Posting Setup and select the page from the drop-down list, or navigate to Departments > Financial Management > Posting Groups > Inventory Posting Groups > Setup.
The Inventory Posting Setup page displays.
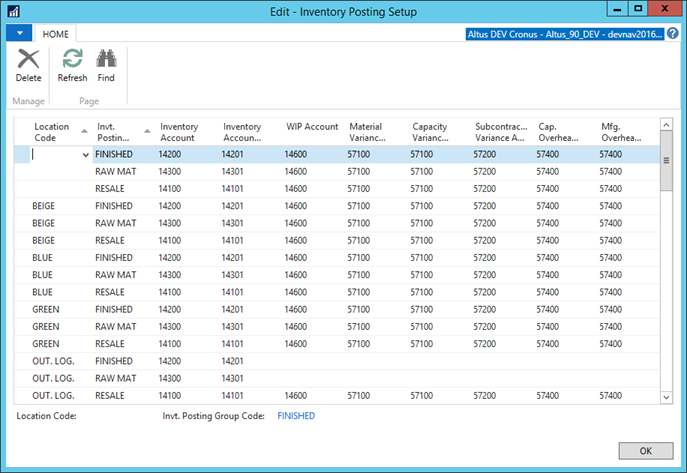
- Right-click the column heading and then select New Line.
- In the Location Code field, enter the relevant location to combine with the Inventory Posting Group.
- In the Inventory Posting Group field, enter the relevant posting group.
- In each relevant account field, enter the G/L accounts that will be used to post transactions to:
- Inventory accounts
- WIP accounts
- Manufacturing accounts
- Repeat steps 2-5 to set up additional inventory posting groups.
- Close the open pages.
- For each combination of inventory posting group and location code, use the same or different G/L account numbers.
Assigning Inventory Posting Groups
To assign inventory posting groups to items:
- In the Search field, type Items and select the page from the drop-down list, or navigate to Departments > Warehouse > Planning & Execution >Items.
The Items page displays. - Locate the item and open the Item card.
- Expand the Invoicing FastTab.
- In the Inventory Posting Group field, enter the appropriate posting group.
- Click OK to close the Item card.
Setting Up Bank Account Posting Groups
Bank account posting groups are used to link bank accounts to the general ledger.
To simplify tracing transactions and bank reconciliations, it is recommended to:
- Set up unique G/L accounts for all bank accounts.
- Create bank account posting groups for each G/L account.
- Assign each bank account with the unique posting group.
To set up a bank account posting group:
- In the Search field, type Bank Account Posting Groups and select the page from the drop-down list, or navigate to Departments > Financial Management > Posting Groups > Bank Account Posting Groups.
The Bank Account Posting Groups displays.
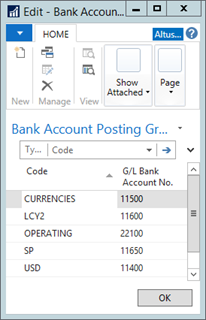
- Click New.
- In the Code field, type a unique identifier, corresponding to one of the bank accounts set up in the program.
- In the G/L Bank Account No. field, enter the account number corresponding to the bank account set up in the program.
- Click OK to close the Bank Account Posting Groups page.
Assigning Bank Account Posting Groups
To assign a bank account posting group to a bank account:
- In the Search field, type Bank Accounts and select the page from the drop-down list, or navigate to Departments > Financial Management > Cash Management > Bank Accounts.
The Bank Accounts page displays.
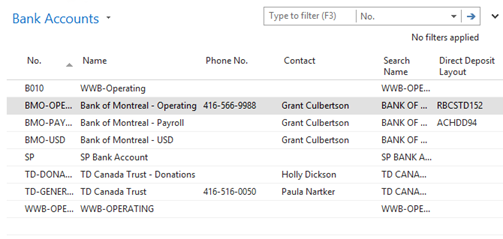
- Select a bank account and from the Ribbon click Edit.
The Bank Account card opens. - Expand the Posting FastTab.
- In the Bank Acc. Posting Group field, enter the appropriate posting group.
- Click OK.
When bank transactions are posted, Microsoft Dynamics NAV uses the bank account posting group code to locate and post to the specified account.
General Posting Groups
The primary purpose for general posting groups is to identify the Income Statement account for each subsidiary, or supporting ledger. General posting groups are added to customers, vendors, items, and resources to link the following to the general ledger:
- Item and/or resource transactions from purchases and sales documents
- Item journals and job journals
- Machine centers, work centers, and item charges
The following table shows the two types of general posting groups.
| General Posting Group | Description |
| General Business Posting Group | Specifies who is sold to (customers) and who is purchased from (vendors). |
| General Product Posting Group | Specifies what is being sold (items and resources) and what is being purchased (items). |
General Business Posting Groups
General business posting groups are assigned to:
- Customers
- Vendors
- G/L Accounts
When setting up general business posting groups, consider how many groups are needed for breaking down:
- Sales by customers
- Purchases by vendors
For example, general business posting groups can be divided by:
- Geographical area
- Type of business
- Type of industry
Setting Up General Business Posting Groups
To set up general business posting groups:
- In the Search field, type Gen. Business Posting Groups and select the page from the drop-down list, or navigate to Departments > Financial Management > Posting Groups > Gen. Business Posting Groups.
The Gen. Business Posting Groups page displays.
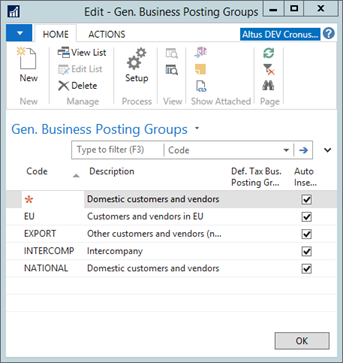
- Click New.
- In the Code field, type a unique identifier for the business group.
- In the Description field, type a short description.
- In the Def. VAT Bus. Posting Group field, enter the VAT Business Posting Group to be used as the default for transactions involving this business group.
- Select the Auto Insert Default check box to automatically insert the Def. VAT Bus. Posting Group when the corresponding general business posting group is assigned to a customer, vendor, or G/L account.
- Click OK to close the Gen. Business Posting Groups page.
General Product Posting Groups
General product posting groups are assigned to:
- Items
- Resources
- G/L Accounts
- Machine centers
- Work centers
- Item charges
When setting up general product posting groups, consider how many groups are needed for breaking down:
- Sales by products (items and resources)
- Purchases by items
General product posting groups provide the major product groups reflected in the chart of accounts. Each inventory item and resource is assigned a product posting group.
Setting Up General Posting Groups
To set up general product posting groups:
- In the Search field, type Gen. Product Posting Groups and select the page from the drop-down list, or navigate to Departments > Financial Management > Posting Groups > Gen. Product Posting Groups.
The Gen. Product Posting Groups page displays.
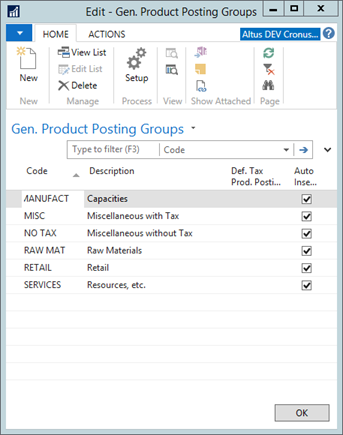
- In the Code field, type a unique identifier for the product group.
- In the Description field, type a short description.
- In the Def. VAT Prod. Posting Group field, enter the VAT Product Posting Group to be used as the default for transactions involving this product group.
- Select the Auto Insert Default check box to automatically insert the Def. VAT Prod. Posting Group when the corresponding general product posting group is assigned to an item, resource, or G/L account.
Note: Messages appear when you change the contents of the Def. VAT Prod. Posting Group field that ask you to update any G/L accounts, items, resources, and item charges affected by this change.
Assigning General Posting Groups
To assign general posting groups to G/L accounts:
- In the Search field, type Chart of Accounts and select the page from the drop-down list, or navigate to Departments> Financial Management >General >General Ledger > Chart of Accounts.
The Chart of Accounts page displays. - Open the relevant G/L Account Card.
- On the Posting Fast Tab, in the Gen. Bus. Posting Group field, enter the relevant business group.
- In the Gen. Prod. Posting Group field, enter the relevant product group.
- Click OK to close the G/L Account Card.
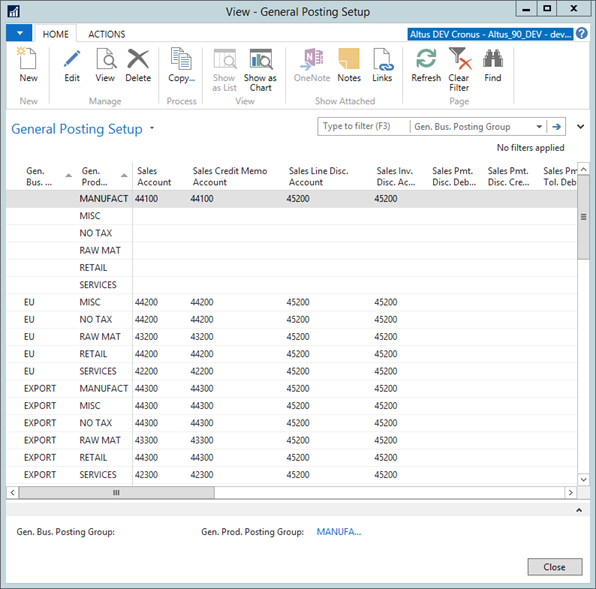
General Posting Setup
The General Posting Setup page is a matrix that combines business and product posting groups. Each combination determines the accounts that are used to post:
- Sales and purchases
- Sales and purchase credit memos
- Sales and purchase invoice discounts and payment discounts
- Cost of Goods Sold and inventory adjustments
- Direct Cost Applied and Overhead Applied
- Purchase variances
For each combination of business and product posting groups, users can assign a different set of G/L accounts. As a result, users can post the sale of the same item to different sales accounts in the general ledger since customers are assigned different general business posting groups.
Users can populate the General Posting Setup matrix in the following ways:
- On the General Posting Setup page:
- Manually
- Using a copy feature
- From the individual general posting group pages
Manually Entering General Posting Setup Lines
To manually fill in the General Posting Setup page:
- In the Search field, type General Posting Setup and select the page from the drop-down list.
The General Posting Setup page displays.
- Right-click the column heading and then select New Line.
- In the Gen. Bus. Posting Group field, enter the relevant business group.
- In the Gen. Prod. Posting Group field, enter the relevant product group to complete the combination.
- In each relevant account field, enter the G/L accounts used to post transactions for the selected general posting combination.
- Repeat steps 2-5 to set up additional combinations.
- Click OK to close the General Posting Setup page.
Note: If using inventory, in addition to entering every possible combination of general business and general product posting groups, enter a line for each general product posting group with a blank general business posting group. An instance when this combination is necessary is for posting activity from item journals when there is not a customer or vendor assigned to the transaction.
Copying General Posting Setup Lines
The more general the business and product posting groups are, the more combinations need to be set up in the General Posting Setup page. While there may be many different combinations, in many cases, the G/L account numbers are the same (or approximately the same) on several lines.
To limit the amount of manual entry, Microsoft Dynamics NAV provides a copy function that fills in G/L accounts on a line with the G/L account numbers from an already completed line.
Note: Before using the copy function, the Gen. Bus. Posting Group and Gen. Prod. Posting Group fields on the line you want to copy to must be filled in.
To run the Copy General Posting Setup batch job:
- On the Application Setup page, click Posting Groups and then click General Posting Setup.
The General Posting Setup page displays. - Right-click the column heading and then select New Line.
- Complete the the Gen. Bus. Posting Group and Gen. Prod. Posting Group fields.
- Ensure the line is selected and then click Copy.
- Specify the Gen. Bus. Posting Group and Gen. Prod. Posting Group of the line to copy from.
- In the Copy field, select either All fields or Selected fields. Click OK.
- Click Yes to copy the General Posting Setup.
- Adjust the copied account numbers as needed.
- Click OK to close the General Posting Setup page.
Creating Posting Setup Lines from General Posting Groups
Instead of setting up all general posting groups at once in the General Posting Setup page, general business and product posting groups can be set up individually from the respective pages by clicking New on Home Ribbon.
In the following example, the general business posting group is used; however, the process is the same for the general product posting group.
To review or fill in the General Posting Setup page from the Gen. Business Posting Groups page:
- On the Application Setup page, click Posting Groups and then click Gen. Business Posting Groups.
- Select the general business posting group line to review or set up.
- On the Ribbon, click Edit.
The General Posting Setup page for the selected general business posting group appears.
If combinations have been set up, the posting setup lines are filtered to only show those combinations with the selected general business posting group.
If combinations have not been set up, the Gen. Bus. Posting Group field on the first empty line is automatically populated based on the selected general business posting group. - Complete the general product posting group fields and account fields as necessary.