

Trail Codes
Audit trails in Microsoft Dynamics NAV 2016 begin with Trail Codes. There are three elements to set up in relation to Trail Codes:
- Source Codes
- Source Code Setup
- Reason Codes
When a new company is set up, the Source Code and Source Code Setup tables are automatically populated. Reason Codes must be set up manually.
Source Codes
Entries are created in the financial statements when:
- Journals, orders, invoices, or credit memos are posted.
- Various batch jobs are run.
Source codes help find the point of origin for an entry. Source codes are the basis for the audit trail in Microsoft Dynamics NAV and are assigned to transactions and journals.
The source code system defaults are provided automatically. As new journals or data entry points are added, source codes have to be added to determine where the transaction originated.
System defaults and access to the posted entries for each source code are available from the Source Code page.
To open this page and review the entries:
- In the Search field, type Trail Codes and then select the page from the drop-down list.
The Trail Codes page displays. - Select Source Codes.
The Source Codes page displays.
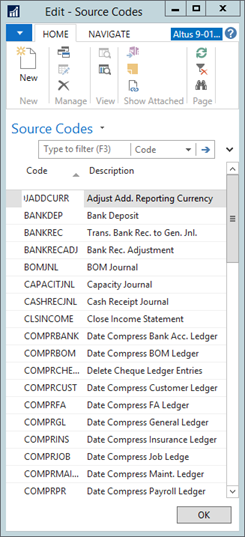
- On the Ribbon, click the Navigate tab and then select the relevant register for the current source code.
- Set up a new source code by selecting New and entering the new code and description in the line.
Source Code Setup
The Source Code Setup page is used to define or change source codes. Additionally, it contains several FastTabs, one for each application area. Each FastTab contains the source codes that are applicable for that application area.
Typically, the default source code set up is not changed. However, if a different source code identification is required, the changes can be made from the Source Code Setup page.
To change a source code, follow these steps:
- In the Search field, type Source Code Setup and select the page from the drop-down list.
The Source Code Setup page displays.
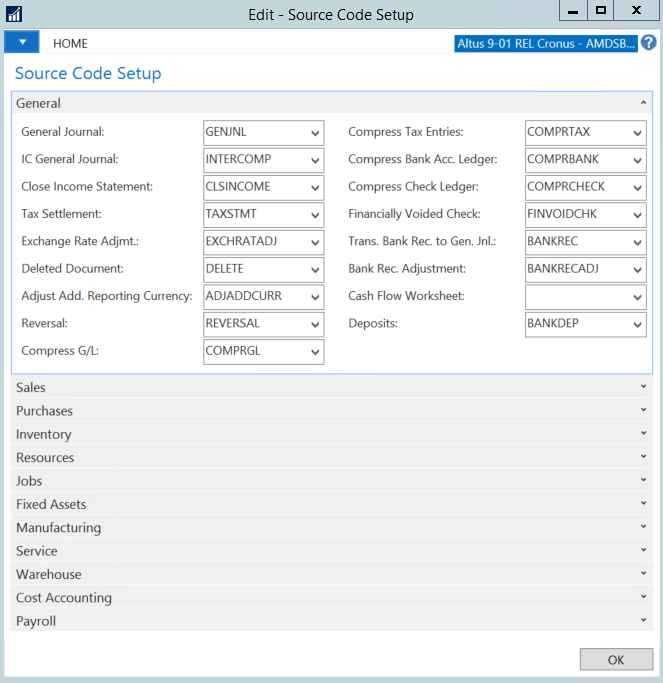
- In the appropriate field, select the new code from the drop-down list.
- Press Tab or Enter to commit the change to the field.
All subsequently posted entries will have the new source code.
Note: "NB" is not to be confused with numbering and number series.
Reason Codes
Reason codes are used to indicate why an entry was created. For example, if items from a sale must be returned, a reason code is set up to mark the reason, such as damaged, wrong color, or wrong size.
Reason codes can be assigned on transactions, such as sales and purchase invoices, or to specific journal templates and journal batches.
When the codes are linked to a journal line or a sales or purchase header, Microsoft Dynamics NAV 2016 marks all entries with the reason code during posting. This allows for the posted ledger entries to be filtered by reason code.
To create reason codes, follow these steps:
- In the Search field, type Trail Codes and select the page from the drop-down list, or navigate to Departments > Administration > Application Setup > Financial Management > Trail Codes.
The Trail Codes page displays. - Click Reason Codes.
The Reason Codes page displays.
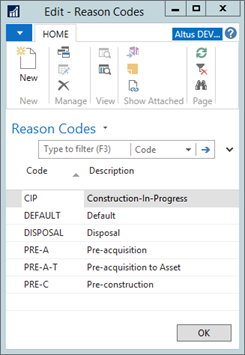
- Click New.
- In the Code field, enter a unique identifier.
- In the Description field, enter a short description of the Reason Code.
- Close the Reason Code page.
Navigate the Audit Trail
Sometimes, it may be necessary to trace information back to the entry source. Source Codes and Reason Codes are important pieces of this audit trail.
When activity is posted in Microsoft Dynamics NAV 2016, the transaction is assigned a Register Number, and each line within the transaction is assigned an Entry Number.
In addition to the Register Number, the following information is recorded for each transaction:
- Creation Date
- User ID
- Source Code
- Journal Batch Name
- If the journal was reversed
- From Entry No. and To Entry No.
- From Tax Entry No. and To Tax Entry No.
- To open the page where this information is recorded go to Departments > Financial Management > General Ledger > History > G/L Registers.
The G/L Register page is used to determine where transactions were posted in the system that is based on the assigned Source Code. - On the Ribbon, click the Action tab; the following ledger options are available; select line and click ledger to review:
- General Ledger
- Customer Ledger
- Vender Ledger
- Reverse Register
- Bank Account Ledger
- Fixed Assets Ledger
- Maintenance Ledger
- Tax Entries