

Introduction
There are many options and settings which control which features Employee Center provides and how those features work. These settings can be configured globally for your company by your Administrator. In some cases, these choices can be refined for specific groups of users. For example, by creating profiles for groups of users, you can control which pages and features these users can access when they log in to Employee Center. Additional levels of configuration are available at the individual employee level, such as security settings that control the dimensions that can be accessed on Finance pages.
Administrators define the fields and field content for Employee Center pages to provide the necessary access, assistance, and information to employees and managers.
Configuring SharePoint
As part of the post-installation configuration process, you must update SharePoint to work with the Sparkrock solution.
-
After installing the Sparkrock solution, run EWA_legacy_<version>.msi. This file is copied to the SharePoint server during installation.
-
Edit the SharePoint web.config file. The default location is \Inetpub\Wwwroot\WSS\VirtualDirectories\<web application port number>\web.config.
-
Open the SharePoint Central Administration web page.
-
Click System Settings>Configure AEP Connections.
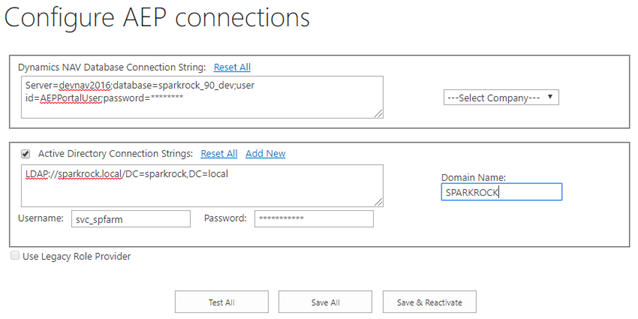
- In the Dynamics NAV Database Connection String section, type the connection string that you use to connect to the database.
- In the Active Directory Connection Strings section, type the connection string that you use to connect to Active Directories.
- Click Test All to test the connection strings, and then click Save All.
- Click Manage Farm Features.
- Locate Altus Employee Portal Membership Providers and then click Activate.
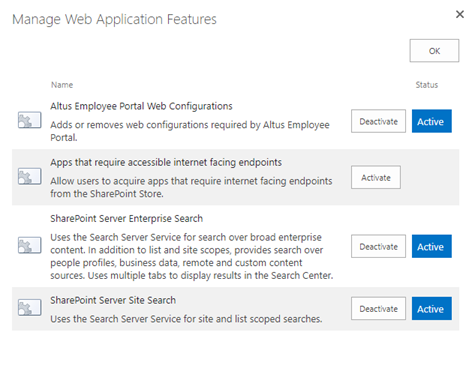
This enables the application at the SharePoint-level. - Return to the SharePoint Central Administration web page and then click Manage Web Applications.
- Highlight the line corresponding to the Sparkrock solution and then click Manage Features.
The Manage Web Application Features page displays. - Locate Altus Employee Portal Web Configurations and then click Activate.
Running Reports
There is some basic setup required before you are able to run reports. First you will load Standard Page Data Report and then you will load the Option Strings Report.
Load Standard Page Data Report
To begin the configuration process you should start by running the Load Standard Data report from Periodic Activities. This report function loads the standard EWA page groups, EWA pages, and exposes the data and function connections between Employee Center and NAV. When you run this process, you need to upload the images for the individual page group.
Run this report as an installation step before or during installation to enable you as the Administrator to test Employee Center and also provide your organization with a standard page configuration to work with initially to give you a starting point in the set up of your own.
To load standard page data:
- In the Search field, tpye EWA Load Standard Page Setup and select the page from the drop-down list.
The EWA Load Standard Page Data card opens. - Click OK.
Loading Option Strings Report
Some values on Employee Center come from the Option Strings in NAV. Before performing any action on Employee Center, a Sparkrock consultant or Administrator needs to go to the Classic client and perform the following steps.
To import option strings:
- Open Microsoft Dynamics NAV.
- In the Search field, type EWA Setup and select the page from the drop-down list.
The EWA Setup card displays. - From the Ribbon, click Load Option Captions.
The Load Option Strings card opens. - In the Language section, enter the three-letter language code for each language that you want to load. Options are:
- ENU (US English)
- ENC (Canadian English)
- FRC (Canadian French)
note: To load French option strings, you must first import the NAV language pack for FRC.
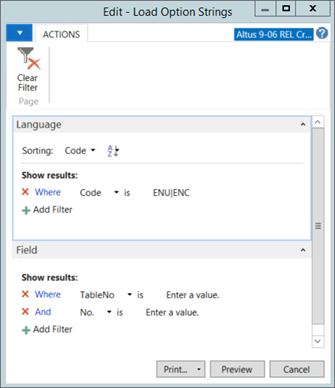
- Click Preview.
Configuring Menus and Pages
In Employee Center, access to information and workflows is provided by pages, such as expenses or timesheets.
It is possible that some of the pages and features of Employee Center will be not needed by the users in your organization. You can restrict access to each page in Employee Center globally, or you can control the access of specified employee groups to the necessary subset of pages, which simplifies their user experience and prevents unnecessary records from being generated.
Page Groups
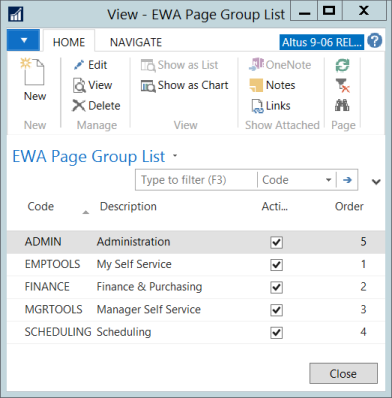
Areas of related functionality are collected together in page groups, such as Finance & Purchasing and Scheduling. Features commonly needed by employees are grouped under My Self Service, while manager capabilities are collected under Manager Self Service. Page groups can be turned on or off at the company level. This will normally be done once, when your Manage solution is first set up.
If desired, you can also define your own page groups, according to your own criteria, and assign specific Employee Center pages to those groups. This can be configured at the profile level, so that different user groups can have different experiences if desired.
Menus
Menus present the list of Employee Center pages and control the ordering of pages within the page group.
Understanding Page Group, Page, and Menu Control Relationships
Page groups are the high level grouping that represent Employee Center. My Self-Service and Finance and Purchasing are examples of page groups. EWA pages are the individual Employee Center pages. Pages belong to page groups and their access is controlled through the page group to which they belong.
Menu controls are what enable access to a page for a particular profile. For example, if you had a Managers profile the access to pages for this profile would be different from a General User profile.
The following tables provide examples of page groups, pages, and menu controls.
EWA Page Group
| Code | Description | Icon | Active (If yes, Select the Active check box to set the global access to a Page Group.) |
Order |
| EMPTOOLS | Employee Tools | <notepad> | Yes | 1 |
| REQ_PUR | Purchase Requests | <shopcart> | Yes | 2 |
EWA Page
The actual page code is not editable. The list of pages needs to be loaded by running Load Standard Data. For more information, see Running the Load Standard Page Data Report.
| Code | Standard Description | Caption | Active (If yes, Select the Active check box to set the global access to a page. The default option is that Active is selected.) |
| EMPTOOLS | My Profile | My Profile | Yes |
| EMPTOOLS | My Timesheets | Time Entry | Yes |
| REQUESTS | Purchase Requests | Purchase Requests | Yes |
| REQUESTS | Payment Requests | Payment Requests | Yes |
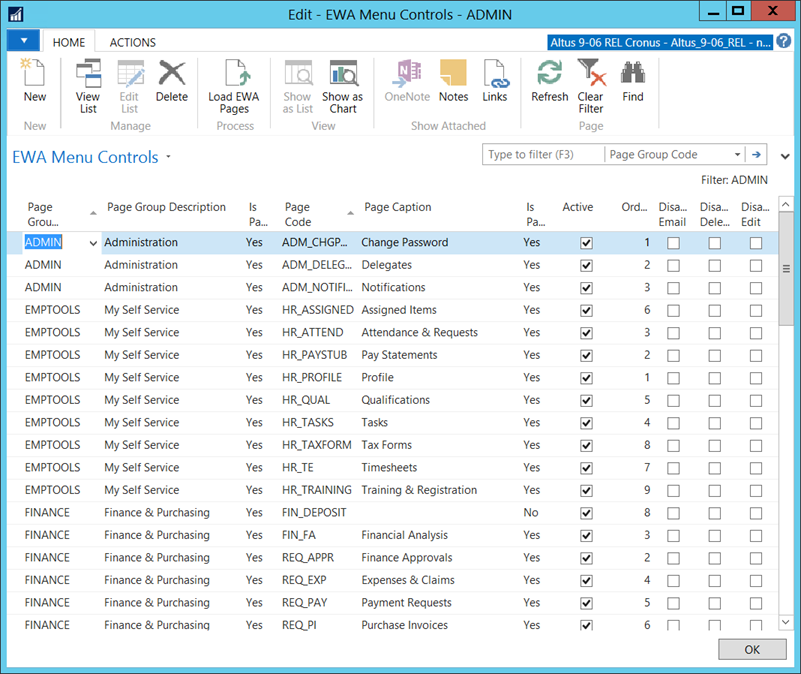
EWA Menu Control
| Profile | Page Group | Page | Active (If yes, Select the Active check box to set the access to a page for a particular profile.) |
Order |
| Secretary | Employee Tools | My Profile | No | 1 |
| Secretary | Employee Tools | My Timesheets | No | 2 |
| Secretary | Request and Purchasing | Purchase Requests | Yes | 3 |
| Secretary | Request and Purchasing | Payment Requests | Yes | 4 |
| Manager | Employee Tools | My Profile | Yes | 1 |
| Manager | Employee Tools | My Timesheets | Yes | 2 |
| Manager | Request and Purchasing | Purchase Requests | No | 3 |
| Manager | Request and Purchasing | Payment Requests | No | 4 |
| Manager | Manager Tools | My Attendance Approvals | Yes | 5 |
In the EWA Menu Control example in the table above:
Users in the Secretary profile will see the following page groups and pages:
- Page Group:<> Requests and Purchasing
- Purchase Request
- Payment Requests
Users in the Manager profile will see the following page groups and pages:
- Page Group: < >Employee Tools
- My Profile
- My Timesheets
- Page Group: < >Manager Tools
- My Attendance Approvals
notes:
- If no pages are active within a page group for a profile, then the page group is not visible. For example, the Secretary profile does not have an active page for the Manager Tools page group, so the page group does not display on the Main Menu.
- The same page group does not have to have the same pages for each profile. For example, Employee Tools for Secretary and for Manager can be two different sets of pages.
Creating Your Own or Modifying Existing Page Groups
You can have up to six page groups if you want to create custom ones.
- From the EWA Page Group card, on the Ribbon, click New to create a page group.
A new EWA Page Group card opens.
- In the Code field, enter a unique identifier for the page group.
- In the Description field, provide a description for this group.
- To display this page group on Employee Center, add the Active checkmark.
- In the Order text box, type the number corresponding to the order in which you want this group to display on the main menu.
- Click OK to close the Page Group card.
- The page group is added to the list.
- Click Close.
note: You can also make changes to the page group (the group description, image, order, or Active status for a page) from within the Page Group card.
Generating the Employee Center Page List
Once your page groups are loaded or manually defined, you need to generate the list of associated pages that are within each of the page groups.
To generate the page list:
- In the Search field, enter EWA Pages.The Edit - EWA Pages card opens.
- On the Ribbon, click Load Standard Data to generate the list of pages currently available on Employee Center.
- Modify the page caption, default page group, display order, or ‘Active’ status, if required.
Adding Menu Controls to an EWA Profile
The EWA menu control function loads your client configuration based on how you have customized the pages and groups.
You can manually add menu controls to a profile as well as upload the menu controls to be tied to the EWA profiles, enabling you to define the pages specific to the profile.
note: Before you can configure menu controls to a profile, you need to have at least one EWA Profile created. For details on creating EWA profiles, see ‘Setting up EWA Profiles’.
To add new EWA menu controls:
- In the Search field, enter EWA Profiles. The EWA Profiles list displays.
- Select the profile to which you want to add EWA menu controls.
- On the Ribbon, click EWA Menu Control.
The EWA Menu Controls card opens displaying the menu items available to the selected profile, if any.
From here you have two options:
- Start manually adding lines to the profile:
- On the Ribbon, click New.
- From the Page Group Code drop-down, select the page group to which this control belongs.
- The Page Group Description field is automatically populated based on this selection.
- Complete the remaining fields to add the menu control to the EWA profile.
OR
- Use Load EWA Pages:
- On the Ribbon, click Load EWA Pages.
The EWA Load Menu Controls card opens.
Tip: It is easier and faster to load the EWA pages and then de-select ones you do not want.
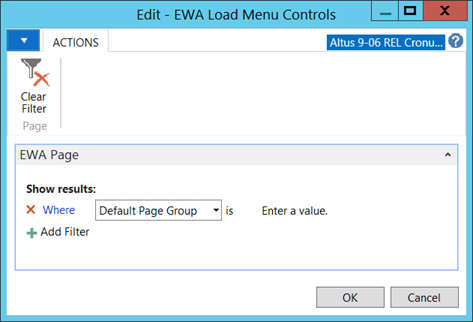
- Filter the report by Default Page Group if you want to limit the groups and pages linked to the profile.
- Click OK.
- In the confirmation message that opens, click Yes if you want to proceed.
- The EWA Group/page combinations matching the filters you defined are loaded into the EWA Menu Controls card, replacing the existing ones.
- Click OK to close the EWA Menu Controls card.
- Edit the Active status or the page order, if applicable.
- On the Ribbon, click Load EWA Pages.
Disabling Specific Features on Finance Pages
Using the check boxes on the right side of the EWA Menu Control, it is possible to disable certain Employee Center capabilities. Select the corresponding check boxes to disable Send by E-Mail, Delete, or Edit for the following pages (only):
- Purchase Requisitions
- Payment Requests
- Expenses and Claims
Note: These settings are not implemented on other Employee Center pages, and it is not possible to select the check boxes for any other page.
Configuring NAV for Multi-language Support over Employee Center
Many captions on Employee Center are retrieved from the NAV database and need to be configured.
Setting Up Employee Web Apps to use French Language and Settings
Follow these steps to set up Employee Web Apps to use the French (Canada) capability:
- Set up SharePoint.
- Configure your browser(s).
Configuring SharePoint
- Download the SharePoint Language Pack from Microsoft.
- Install the SharePoint Language Pack for each SharePoint site.
- Make French available to Employee Center. This step must be performed for each SharePoint user.
- From any Employee Center page, click Settings and then click Site Settings.
- Under Site Administration, click Language Settings. The Language Settings page displays.
- In the Alternate Language(s) section, add a checkmark to the French check box.
NOTE: If the French checkbox is not visible, this means that the SharePoint Language Pack has not been installed by the Administrator.
- Click OK. SharePoint is now configured to display in French. You can revert SharePoint to English by reversing step #3.
Configuring your Browsers
Use the following procedures to configure your browser to display French:
Google Chrome
For more information on configuring your browser's languages, refer to the Google Chrome help.
- In your Google Chrome browser, click Settings.
- Under Advanced Settings, expand the Languages section.
- Click Add Languages.
- Add a check mark to French (Canada) and then click Add.
- Reorder the languages list so that French (Canada) is at the top of the list.
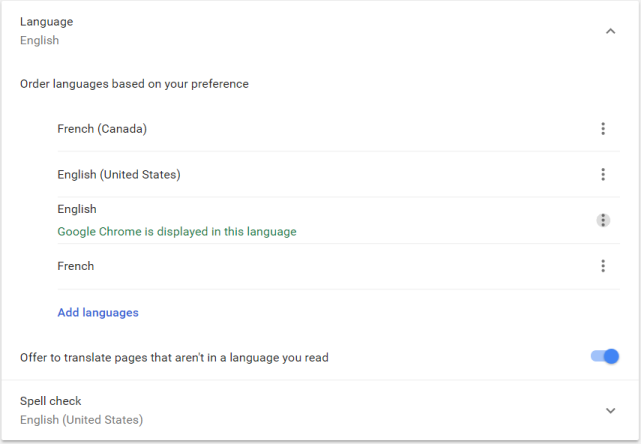
- Click the More Actions icon beside French (Canada) and add a checkmark to the Display Google Chrome in this Language check box.
Microsoft Internet Explorer and Microsoft Edge
- From Windows Settings, click Time & Language.
- Click Region & Language.
- In the Languages section, click Add a Language. An alphabetical list of languages displays.
- Click French and then click Français (Canada).
- If the Windows Display Language entry at the top includes a link called “Download and install language pack” then click that item.
Note: It may take 5 to 10 minutes for Windows to fully download and install the language pack. - Select the Français (Canada) row and click Set as Default.
Canadian French is now the default system language. If you want English to remain as Windows' default and only use French in your browsers, continue with these steps below. - Open the Control Panel, click Languages and then click Advanced Settings.
- In the Override for Windows Display Language drop-down list, select English (United States).
- In the Override for Default Input Method drop-down list, select English (United States).
- Click Save.
Translating Dimension Captions
Each client works with their own set of dimensions, which have to be translated separately in NAV.
To translate dimensions:
- In the Search field, type Dimensions and select the page from the drop-down list.
The Dimensions card opens. - Select a dimension line.
- Click the Navigate menu tab.
- On the Ribbon, click Translations.
- The Dimension Translations card for the selected dimension opens.
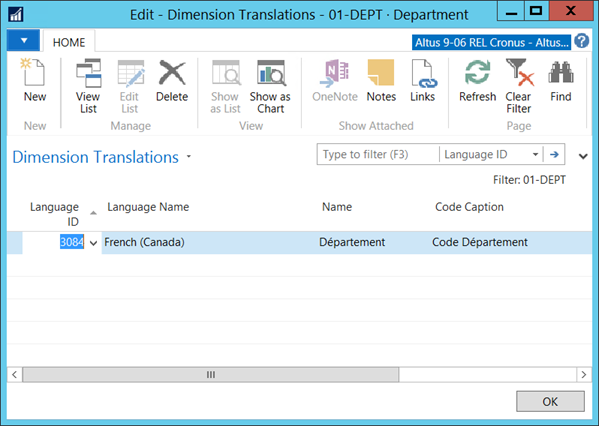
- From the Language ID drop-down, select the language ID (French (Canada) = 3084).
- Populate the Caption fields for the selected language.
- Click OK.
The dimension caption is translated to the language you selected.
Configuring Languages for Employee Center Captions
EWA captions are company-defined captions that are part of the Employee Center configuration and include:
- EWA Page Groups
- EWA Pages
- EWA Setup
- Data Sets (Financial Analysis)
To configure the language for the EWA captions:
- In the Search field, type EWA Setup and select the page from the drop-down list.
The EWA Setup page displays. - In the General FastTab, under Language Settings, select a value from the Language 1 Code drop-down.

- Click OK.
To translate EWA captions:
- In the Search field, type EWA Pages and select the page from the drop-down list.
The Edit – EWA Pages card opens. - Click the Navigate menu tab.
- On the Ribbon, click Caption Translation.
The Edit – EWA Caption Translation card opens.
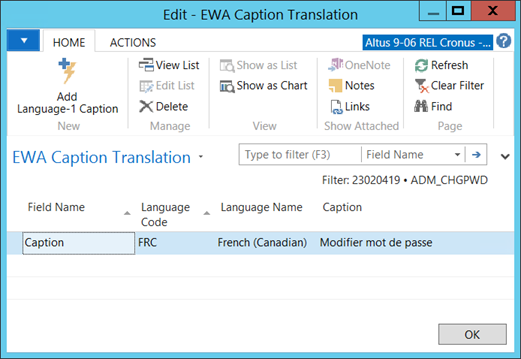
- On the Ribbon, click Add Language-1 Caption.
- A line(s) is inserted for EWA page groups, EWA pages, and data sets based on the active line. (For EWA Setup a list of the caption fields available for configuration is generated.)
- In the Caption fields, enter the appropriate value(s).
- Click OK.
The EWA caption(s) is translated to the language you selected as Language 1 Code in the EWA Setup.
Defining Employee Setup
The EWA Setup card enables you to provide content for the fields and pages in Employee Center. This content is what users see and is used to give them assistance or ‘cues’ for determining what Employee Center pages contain/capture, what information they can edit or need to define, and how to get additional information or assistance.
Providing General Account and Support Information
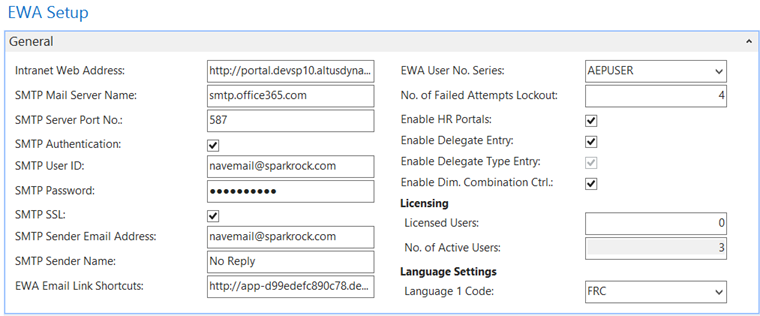
The fields in the General FastTab of the EWA Setup card define the overall settings for Employee Center.
To perform the EWA account set up:
- In the Search field, enter EWA Setup and select the page from the drop-down list.
The EWA Setup card opens displaying the General FastTab.
- The following table provides a detailed explanation to assist you in completing each of the fields:
| Field | Details | Where used |
| Intranet Web Address | Use this field to indicate the web address for Employee Center. | For information purposes only. |
| SMTP Mail Server Name | Enter the name of the SMTP server. | Used to send all Employee Center-related notifications. |
| SMTP Server Port No. | Provide the server port number. | Used to send all Employee Center-related notifications. |
| SMTP Authentication | Provide if authentication is required. If not required, leave blank. | Used to send all Employee Center-related notifications. |
| SMTP User ID | Provide the SMTP user ID. | Used to send all Employee Center-related notifications. |
| SMTP Password | Provide the user's SMTP password. | Used to send all Employee Center-related notifications. |
| SMTP SSL | Provide the SSL if required. Leave blank if not required. | Used to send all Employee Center-related notifications. |
| SMTP Sender Email Address | Provide the sender's SMTP email address. | Used to send all Employee Center-related notifications. |
| SMTP Sender Name | Provide the sender's name. | Used to send all Employee Center-related notifications. |
| EWA Email Link Shortcuts | Email link shortcuts. | Used to send all Employee Center-related notifications. |
| EWA User No. Series | Set up a number series for assigning a number system to EWA User records. | EWA User card |
| No. of Failed Attempts Lockout | Indicate the number of failed login attempts permitted before an account is locked. Note: This functionality only applies to forms authentication. |
Login page |
| Enable HR Portals | Check this box if you are Using NAV HR and Payroll. This triggers Employee Center to consider the configuration options defined in the fields requiring HR and Payroll licensing. |
Employee Center Installation |
| Enable Delegate Entry | Check this box to provide users with the ability to add or delete delegates over Employee Center. | Delegation Management |
| Enable Delegate Type Entry | Check this box to enable delegate type entry. | Delegation Management |
| Enable Dim. Combination Ctrl. |
Employee Center enables using Dimension Combinations not linked to a G/L account. To enable this feature three steps are required:
|
Purchase Requests Time Entry |
| Licensing Section | ||
| Licensed Users | Enter the number of licensed users here. | |
| No. of Active Users |
Displays the number of active EWA Users in the system. When a user opens the EWA Users list and the Licensed Users is less than the No. of Active Users a warning message is displayed. |
EWA Users List. |
| Language Section | ||
| Language 1 Code |
This language code is used when you populate captions for the Employee Center-related setup. (For details, see ‘Configuring NAV for Multi-language Support over the EWA Portal’.) |
Used when adding captions for an additional language to the following pages in NAV:
|
Setting up EWA Profiles
EWA profiles are used like templates for user security and can make managing many accounts easier. You can define several profiles and assign a single profile to many users. If a change needs to be made to the general security settings for those users, the change only needs to be made to the profile and automatically the settings are updated for all users within the profile.
The profile assigned to a user determines the menu options and security filters applied to the user on Employee Center (dictates what a user sees and the options available).
To create a new EWA profile:
- In the Search field, type EWA Profiles and select the page from the drop-down list box.
The EWA Profiles card displays. - On the Ribbon, click New.
The New – EWA Profile card opens.
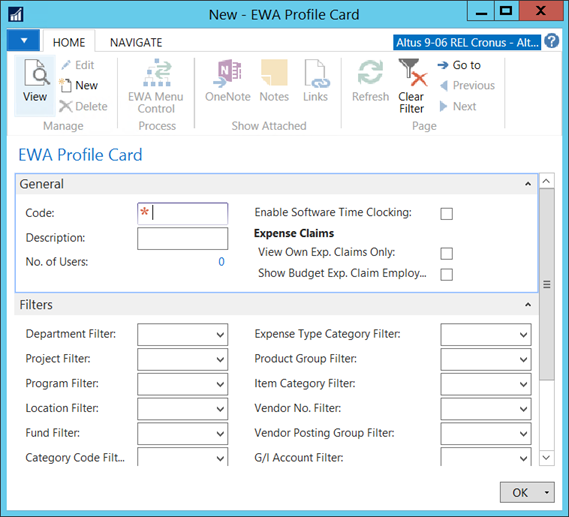
- Refer to the following sections for assistance in completing the fields in the EWA Profile card.
- When you finish defining all the required information for the EWA profile, click OK.
The newly created EWA profile is added to the EWA Profiles card. To add the required menu controls to the profile, refer to the ‘Configuring EWA Menu Controls’ section for details.
Defining the General details for the Profile
The following table provides a detailed explanation to assist you in completing each of the fields:
| Field | Details |
| Code | This code is used to link the profile to a user. In the space provided, enter a code for this profile. |
| Description | Enter text to describe this profile (user type, usage, and so on). |
| No. of Users | This field displays the number of EWA Users assigned to this profile. When creating a new profile, this number is zero (0). Once you create the profile and assign users, this field updates automatically. |
| Enable Software Time Clocking | Add a checkmark to this option to enable software time clocking. |
| Expense Claims section | |
| View Own Exp. Claims Only | Add a checkmark to configure this user to only view their own expense claims. |
| Show Budget Exp. Claim Employee | Clear this check box to hide the budget tab and insufficient budget warning from employees with the associated profile. |
Defining the Profile Security
To assign the dimension combination options available to users within this profile:
-
If not already displayed, click the Expand icon to display the Filters FastTab.
-
In the fields provided, select the filter restrictions that apply to this profile.
Supported filter format expressions are:-
“..” for a range of values (for example, 1..5 for all values from 1 to 5)
-
“|” for and expression (for example, 1|5 for 1 and 5)
-
To select values for filtering:
-
Drill up on the list of values and highlight the range of values (or use Ctrl + selected value to select specific values).
-
Click OK.
The appropriate filter format expressions are translated.
Each of the fields ending with the word Filter (Expense Type Filter, Dimension Filter, and so on) has a default field length of 100 characters to comply with table size limitations. Specific fields can be expanded to support up to 250 characters, however not all fields can be set up 250 characters at the same time. If you require more than 100 characters for a specific Filter field, contact your NAV Solution Centre to request the field size be expanded (and other field sizes decreased, if necessary).
| Field | Details | Where used |
| Dimension 1 Filter |
About Dimensions A dimension is data that you can add to an entry as a marker so that NAV can group entries with similar characteristics and easily retrieve them for analysis. Dimensions can be used throughout the program on entries in journals and documents, as well as budgets. For example, you can have dimensions that indicate the project or department from which an entry originates. You can use dimensions instead of setting up separate general ledger accounts for each department and project. You can define up to eight dimensions with an unlimited number of dimension values. For detailed information on using Dimensions, refer to the NAV online help. |
|
| Dimension 2 Filter | ||
| Dimension 3 Filter | ||
| Dimension 4 Filter | ||
| Dimension 5 Filter | ||
| Dimension 6 Filter | ||
| Dimension 7 Filter | ||
| Dimension 8 Filter | ||
| Expense Type Filter |
From the drop-down, select the filter for allowable Expense Types that users with this profile can view on Employee Center. note: Easily manage expense types through the Expense Type Category Filters. Although supported, typically only the Expense Type Category Filter OR the Expense Type Filter is used at one time; not both on the same profile. |
Add Expense Types selection page |
| Expense Type Category Filter | From the drop-down, select the filter for allowable Expense Type Categories that users with this profile can view on Employee Center. This reduces the expense types that users see via the category. | Add Expense Types selection page |
| Product Group Filter | From the drop-down, select the filter for allowable items that users with this profile can view on Employee Center. | Add Item selection page |
| Item Category Filter | From the drop-down, select the filter for allowable items that users with this profile can view on Employee Center. | Add Item selection page |
| Vendor No. Filter |
From the drop-down, select the filter for vendors that users with this profile can view on Employee Center. |
|
| Vendor Posting Group Filter | From the drop-down, select the filter for vendor posting groups that users with this profile can view on Employee Center. |
|
| G/L Account Filter | From the drop-down, select the filter for G/L Accounts users with this profile can view on Employee Center. The list is only visible if a user is changing the default G/L Account on a request line. |
|
| HR Reason Code Filter | From the drop-down, select the filter for the allowable reason codes users with this profile can select when creating HR Requests over Employee Center. |
HR Request Page |
| Bank Account Filter | From the drop-down, select the filter for the bank account users with this profile can select as an option over Employee Center. | Deposits Page |
Setting up the EWA User Card
Each employee requires an EWA User card, which defines their access to Employee Center. The EWA User card can be set up individually or as a mass using data migration. They can also be linked to the Employee record so that common data from the Employee card is copied to the EWA User card.
To set up access for a single EWA user:
- In the Search field, type EWA Users and select the page from the drop-down list.
The EWA User list displays.
note: If you want to update information for a previously existing EWA User, locate the user (use the Filter fields) and launch the EWA User card by double-clicking anywhere on the line representing the EWA user account/record. Make the necessary changes and click OK to update.
-
On the Ribbon, click New.
A blank EWA User card (new record) displays.
The No. field is automatically populated once you position the cursor on a different field. If you do not want to use the predefined number series, you can manually enter a value in this field. - If linking EWA users to employee records, from the Employee No. drop-down, select the employee.
note: To search for an employee, click Advanced to open the Employee list. Use the Filter field to define your search. Select the employee and click OK.
The following information is copied to the EWA User card from the Employee card:
- First Name
- Middle Name
- Last Name
- Full Name
- Postal/Zip Code
- Phone No.
- Birth Date
note: The Postal/Zip Code, Phone No., and Birth Date fields are not required. Populating them on this page is optional.
Use the following sections for assistance in completing the fields in the FastTabs for the EWA User card.
Providing the General User Details

note: To set up an EWA User card as a template for creating a group/type of EWA user, leave the Employee No. and Name, and Address fields blank. For more information, see ‘Copying EWA User Details to New EWA User Cards’.
| Field | Details | Where used |
|
Master EWA User No. |
Unique identifier to flag this user account to provide ability to log into more than one company. Users from different companies can be linked to the same EWA user. See the ‘Enabling EWA User Access Across Multiple Companies’ section of this document for details. |
In multi-company situations where an EWA user has access to multiple companies. |
|
No. |
Unique identifier for this EWA user. Use the number series to trigger the system to use the next number in the sequence. |
Throughout the EWA-related modules in various configuration screens and for auditing purposes (approved by, created by). |
|
Employee No. |
This field links the EWA user to an employee record. Note: This field is required for any of the HR pages. This field is not required for Purchase Request pages. |
Employee Tools/Manager Tools |
|
Preferred First Name |
Enter the first name for the employee. If the Employee No. was selected, this data is copied from the employee’s record. |
Employee Tools/Manager Tools |
|
Middle Name |
Enter the middle name for the employee. If the Employee No. was selected, this data is copied from the employee’s record. |
Employee Tools/Manager Tools |
|
Last Name (Legal) |
Enter the last name for the employee. If the Employee No. was selected, this data is copied from the employee’s record. |
Employee Tools/Manager Tools |
|
Full Name |
This field is automatically populated based on the First, Middle, and Last Name fields. Or, if the Employee No. was selected, this data is copied from the employee’s record. |
The Main Menu/Welcome page as well as title section of most pages on Employee Center. |
| City | Enter the city where the employee lives. If the Employee No. was selected, this data is copied from the employee's record. | This field is optional. |
|
Postal/Zip Code |
Enter the home postal/zip code for the employee. If the Employee No. was selected, this data is copied from the employee’s record. |
This field is optional.
|
|
Phone No. |
Enter the home phone number for the employee. If the Employee No. was selected, this data is copied from the employee’s record. |
This field is optional.
|
|
|
Enter the email address for the user. |
Used as the User ID in the login process for Email authentication. Used for all email notifications within the workflow approval process. |
|
Password |
Stores the EWA User Account password when Email authentication is used. Passwords used for Email authentication can be set either automatically using the Functions > Generate Password options on the EWA User card or they can be manually assigned. Notes:
|
Login page |
|
Windows ID |
Enter or select the user’s Windows ID from the look up. |
Used as the User ID in the login process for Windows authentication. |
|
Last Login Date/Time |
Displays the last date and time that this user logged into Employee Center. This field is not editable. |
EWA User card |
|
Blocked |
Add a checkmark to this field to block the account immediately. This field is automatically checked when the number of failed attempts (defined in the EWA Setup) is reached. |
|
|
Access Start Date |
Enter a start date for access intended for this user. |
|
|
Access End Date |
Enter an end date for access intended for this user. |
|
|
User Profile Code |
Select the profile to apply to this user to assign the appropriate Employee Center access rights/level. This field is required. You can view the details for the profile to which this employee is assigned:
|
The access to page groups and pages and general security filters. |
|
User Profile Description |
This field displays the name of the profile selected in the User Profile Code field. |
EWA User card |
|
Expense Approver EWA User |
This field displays the EWA user number (account) for the individual that acts as an expense approver for this employee. From the drop-down, select the appropriate approver. Note: Expense Approver Type should equal to Manager (EWA Setup). |
Expense Request approval workflow. |
Providing Default Values
- Click the Expand icon to display the Defaults FastTab.
The Defaults FastTab displays.
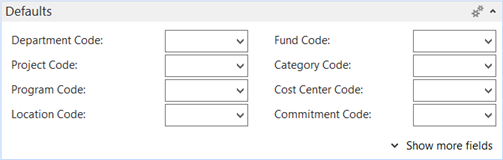
Note: The default dimension values are used for pre-populating data on Employee Center when the Dimensions >Default from EWA User option is selected.
| Field | Details | Where used |
| Department Code | Enter the default department code for the user. | EWA User card |
| Project Code | Enter the default project code for the user. | EWA User card |
| Program Code | Enter the default program code for the user. | EWA User card |
| Location Code | Enter the default location code for the user. | EWA User card |
| Fund Code | Enter the default fund code for the user. | EWA User card |
| Category Code | Enter the default category code for the user. | EWA User card |
| Cost Center Code | Enter the default cost center code for the user. | EWA User card |
| Expense Vendor No. | Enter the default vendor number for expense requests. | EWA User card |
| Location Code | Enter the default location for the user or leave blank if no default exists. | EWA User card |
Configuring EWA User Security
- Click the Expand icon to display the Security Profile FastTab.
The Security Profile FastTab displays.
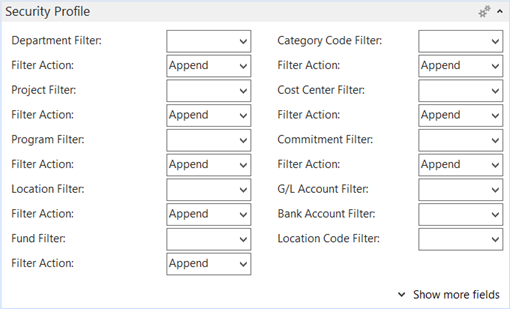
- For many of the options in the Security Profile FastTab, you need to determine the Filter Action for the option selected:
- Append: Use Append to have the values assigned to the user to be added to what the Profile already allows.
Note: If you have a filter on the Profile on 3 values on Dimension 1, but you only enter one value here, you will only be able to see this one value on Employee Center. Also, if this one value is outside the profile filter, you will not be able to see anything. - Override: Use Override to have the values in this filter override the settings of the profile.
- Append: Use Append to have the values assigned to the user to be added to what the Profile already allows.
- Use the following table for assistance in completing the fields for the Security Profile FastTab:
| Field | Details | Where used |
|
Dimension 1 Filter |
A dimension is data that you can add to an entry as a marker so that NAV can group entries with similar characteristics and easily retrieve them for analysis. Dimensions can be used throughout the program on entries in journals and documents, as well as budgets. For example, you can have dimensions that indicate the project or department from which an entry originates. You can use dimensions instead of setting up separate general ledger accounts for each department and project. You can define up to eight dimensions with an unlimited number of dimension values. For detailed information on using dimensions, refer to the NAV online help. |
|
|
Dimension 2 Filter |
||
|
Dimension 3 Filter |
||
|
Dimension 4 Filter |
||
|
Dimension 5 Filter |
||
|
Dimension 6 Filter |
||
|
Dimension 7 Filter |
||
|
Dimension 8 Filter |
||
|
Expense Type Filter |
Enter the filter for allowable expense types users with this profile can view on Employee Center. Note: Any filter specified for the user will append that of the profile. |
Add expense types selection page |
|
Expense Type Category Filter |
To reduce expense types users see in the category, enter the filter for allowable expense type categories users with this profile can view. Note: Any filter specified for the user will append that of the profile. |
Add expense types selection page |
|
Product Group Filter |
Enter the filter for allowable Items users with this profile can view on Employee Center via the range of product groups specified here. Note: Any filter specified for the user with append that of the profile. |
Add Item selection page |
|
Item Category Filter |
Enter the filter for allowable Items users with this profile can view on Employee Center via the item category range specified here. Note: Any filter specified for the user with append that of the profile. |
Add Item selection page |
|
Vendor No. Filter |
Enter the filter for vendors users with this profile can view on Employee Center. Note: Any filter specified for the user with append that of the profile. |
Select Vendors Page |
|
Vendor Posting Group Filter |
Enter the filter for Vendors users with this profile can view via the Vendor posting groups. Note: Any filter specified for the user with append that of the profile. |
Select Vendors Page |
|
G/L Account Filter |
Enter the filter for G/L Accounts that users with this profile can view on Employee Center. This list is only visible if a user is changing the default G/L Account on a request line. Note: Any filter specified for the user with append that of the profile. |
|
|
Bank Account Filter |
Enter the filter for bank accounts that users with this profile can view on Employee Center. This list is only visible if a user is changing the default bank account on a request line. Note: Any filter specified for the user with append that of the profile. |
Deposits Page |
Filtering Notes
Supported filter format expressions for Employee Center are:
-
“..” for a range of values (e.g. 1..5 for all values from 1 to 5)
-
“|” for and expression (e.g. 1|5 for 1 and 5)
To select values for filtering, drill up on the list of values, and highlight the range of values or use Ctrl + selected value to select specific values. Click OK. The appropriate filter format expressions are translated.
Each of the fields ending with the word Filter (Expense Type Filter, Dimension Filter, etc.) has a default field length of 100 characters to comply with table size limitations. Specific fields can be expanded to support up to 250 characters, however not all fields can be set up 250 characters at the same time. If you require more than 100 characters for a specific Filter field, contact your NAV Solution Centre to request the field size be expanded (and other field sizes decreased).
Attaching User Dimension Combinations
Configuring user dimension combinations provides additional security when adding lines to purchase/payment requests. By attaching dimension combinations, users will be able to see the combination of these dimensions in addition to their user security.
Note: To use this feature, your organization needs to use dimension combinations as part of your configuration.
To attach the appropriate dimension combinations to an employee:
- Open the employee’s EWA User card.
- Click the Navigate menu tab.
- On the Ribbon, click User Dimension Combination.
The EWA User Dim. Combination card opens with a new record inserted.
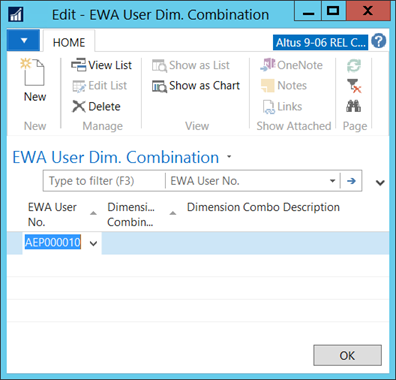
- From the Dimension Combination Code drop-down, select the applicable dimension combination for this employee.
- The Dimension Combo Description field is automatically populated based on the code selected.
- On the Ribbon, click New.
A new blank record is inserted. - Repeat steps 4 and 5 to add all the required dimension combinations.
- When you have finished adding dimension combinations, click OK.
Providing Additional User Details
The Details FastTab contains the options and fields for:
-
defining how approval emails are handled.
-
connecting a NAV User ID to the EWA User card.
-
how miscellaneous articles are assigned and collected.
-
providing a user’s corporate credit card information for managing corporate card-related expenses.
To complete fields in the Details FastTab:
- Click the Expand icon to display the Details FastTab.
The Details FastTab opens. - Use the table below for assistance in completing the fields for the Details FastTab:
| Field | Details | Where used |
|
Block Approval Response Email |
Add a checkmark to this field to disable the Approval Response Email messages sent to the user once the approvals are completed. Note: The end user can manager this setting through the Employee Center Administration page. |
Workflow approval email notifications |
|
Block Approval Request Email |
Add a checkmark to this field to disable the Approval Request Email messages sent to the user once the approvals are completed. Note: The end user can manager this setting through the Employee Center Administration page. |
Workflow approval email notifications |
|
NAV User ID |
Select the User ID linked to this Employee Center user. |
Update Request Approvers |
|
Assign/Collect Articles |
Click this check box if this user will be assigned miscellaneous articles. This enables the trigger for assigning and collecting articles. |
|
|
Misc. Article Type Filter |
From the drop-down, select the miscellaneous article category/group to which this user belongs. |
|
|
Corp. Credit Card No. |
If this user is assigned a corporate credit card, enter the card number in the space provided. |
Expense Requests (link to the bank file with the credit card details) |
Generating a Password and Notifying the User of the Account Setup
Once an employee has an EWA User card and profile set up, you need to generate a temporary password for the account and notify the employee. The employee uses the temporary password to access Employee Center. At this first log in, the employee is prompted to change the temporary password to a secure password that will be remembered by the employee.
Once you provide all the necessary details to the FastTabs in the EWA User card, you can generate the account and send the details to the user.
To generate a password for the employee and notify the individual of the account setup:
- On the Action pane, click a generate option:
- Generate – creates the EWA user account.
- Generate and Email - creates the EWA user account and launches an email session enabling you to email the details to the employee or Human Resources. The email contains the following information:
Dear <Employee First Name>,You are receiving this message because you have just been authorized to access our Employee Portal Site or you have requested a password change from administration.To access the site, please go to http://webaddress.com. Your user name is <Employee First and Last Name> and your password is: <PASSWORD>Once you have logged in you can access the Password Change section under Employee Tools on the navigator bar on the left hand side of the screen.For any additional support please contact <Intranet Support Name> at <Intranet support email> or <Intranet support phone no.>Thank you. - Generate and Print – select this option to generate a random password and print a letter containing instructions for how to connect to Employee Center. The content of the letter is identical to the email message above. The format of the letter is defined to enable it to be folded and put into a window envelope for mailing to the employee’s home address.
Note:
-
When the Intranet Password Generate, Generate and Email, or Generate and Print functions are used, the Password Reset field is set and the user is forced to change the password on first login.
-
Passwords changed or assigned on Employee Center are subject to the minimum number of characters defined.
Copying EWA User Details to New EWA User Cards
Once you set up an initial EWA User card or a template EWA User card, you can use this EWA User card to create additional EWA User cards for employees. EWA users can be set up quickly using the Copy From EWA User function. This function enables you to save time and improve accuracy within the new user set up, especially for general EWA user accounts that apply to the majority of users.
This function copies the following:
-
User Profile
-
Defaults (Dimensions and Location)
-
All Security Profile exceptions (Dimensions, Dimension Filter Action and Item, Expense Type, Vendor and G/L Account Filters)
-
EWA Groups (SharePoint Groups)
-
Financial Analysis Data Sets - all data sets and effective dates (See Financial Analysis Setup and Administration)
To copy the settings from another user or an EWA User card that was set up as a template:
Tip: Set up ‘imitation’ users as templates for the different types of users within the organization. Then, block these ‘imitation’ users so they cannot be used but are available to copy for creating user profiles/settings more quickly.
- If not already opened, open the newly created or template EWA User card.
- Next to the No. field, click the Ellipsis (…) to select from a list of possible numbering series to assign for the Employee Center user type.
- Click the Actions tab.
- On the Ribbon, click Copy from EWA User.
The Edit – Copy EWA Setup card opens. - From the EWA User No. drop-down, select the EWA user account you want to copy.
- Click OK.
- In the confirmation window that opens, click OK.
The selected EWA user settings are copied to the new EWA User card. The EWA User card refreshes with the details copied from the selected account assigned. - If linking this EWA User card to an employee record, from the Employee No. drop-down, select the employee number (or click Advanced to perform a search).
- The following are automatically populated to the EWA User record from the Employee card:
- Name fields
- Postal/Zip Code
- Phone No.
- Birth Date
- Access Start Date
- Access End Date
- User Profile Description
- From the Access Start and Access End drop-downs, select alternate access start and end dates if required.
- Click OK when you complete the required details for the EWA User card.
Providing Financial Analysis Data Set Access
To provide access to financial analysis data sets:
- In the Search field type, EWA User and select the page from the drop-down list.
The EWA User card opens. - From the EWA User list, select the user and on the Ribbon, click Edit.
- On the Ribbon, click Financial Analysis Data Sets.
The EWA User Data Sets page opens. - On the Ribbon, click New.
A new blank record is inserted.
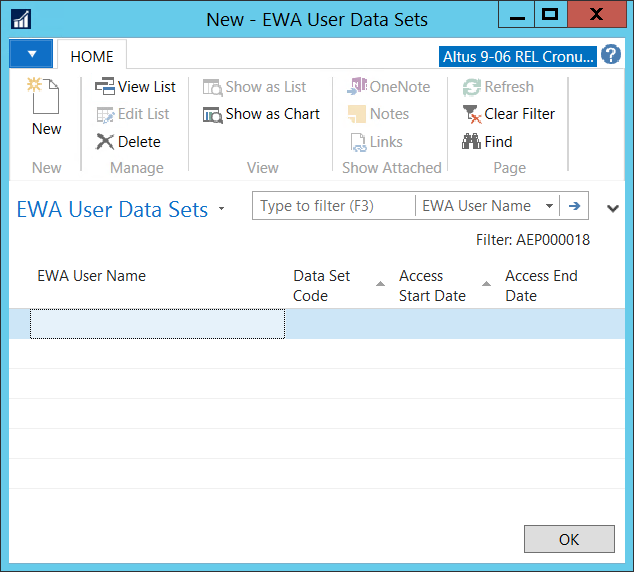
- From the Data Set Code drop-down, select the data set.
- From the Access Start Date drop-down, select the date upon which the user requires access to the data set (optional).
- From the Access End Date drop-down, select the date upon which the user no longer requires access to the data set (optional).
- The EWA User Name field is automatically populated with the user’s name.
- Repeat steps 3 – 6 to add any other required data sets.
- When you finish, click OK.
Managing Delegates
The Delegates feature gives users the ability to assign delegates for HR Requests, Time Entry, Purchase Requests, Payment Requests, Expense Requests, and Approvals. Additionally, the functionality is flexible enough to enable users to assign different delegates across their different responsibilities.
When delegate relationships are set up, you can view the details for the user that has been assigned as a delegate as well as view the details for a user that has assigned other users as delegates.
Viewing Delegate Relationships
In Microsoft Dynamics NAV, you can view the existing delegate to and from relationships for an individual.
Note: Is a Delegate For is for viewing only, while Has Delegated To is editable. (This is where you can view and/or setup delegates for the user.)
You can review the details for the delegate relationship including the specific responsibilities for which an employee is acting as delegate.
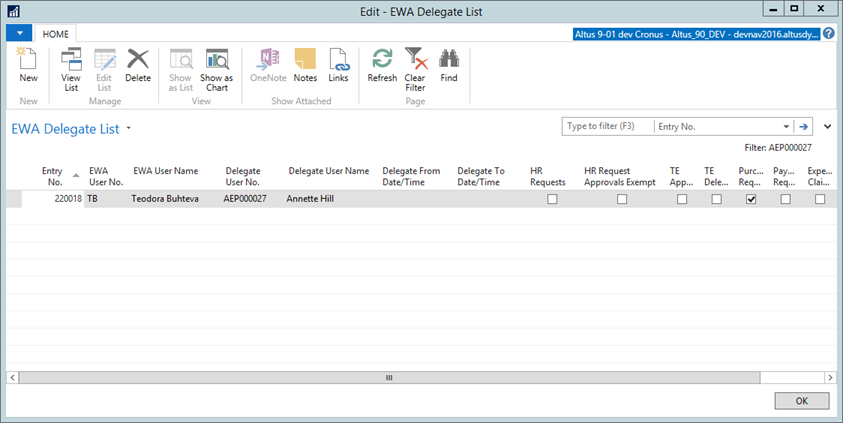
To review an employee’s delegate roles:
-
Open the EWA User card for the user for which you want to view delegate relationships.
-
Click the Navigate menu tab.
-
On the Ribbon, click Is a Delegate For.
The EWA Delegate list opens displaying the individuals for whom the employee acts as a delegate.
In the example below, Annette Hill is a delegate for the user listed in the EWA User No. column:
Viewing the Employees to which an Employee has Delegated Responsibilities
When Administrators assign delegates, the delegate functionality allows for assigning individual employees to specific responsibilities. You can view the details for who is assigned to what specific role.
To view the people to which an employee has delegated responsibilities:
- Open the EWA User card for the user for which you want to view delegate relationships.
- Click the Navigate menu item.
- Click Has Delegated To.
The EWA User card displays the individuals acting as delegates for the employee.
Note: The ability to update delegates on Employee Center is defined in EWA Setup page. Delegate Entry is enabled if Delegation Management has been made available as a page through EWA menu control.
Assigning Delegate Relationships
You can create delegate to relationships by assigning delegates to specific users.
To assign a delegate to a user:
- Open the EWA User card for the individual for whom you want to add as a delegate.
- Click the Navigate menu item.
- Click Has Delegated To.
The EWA User Delegates card opens.
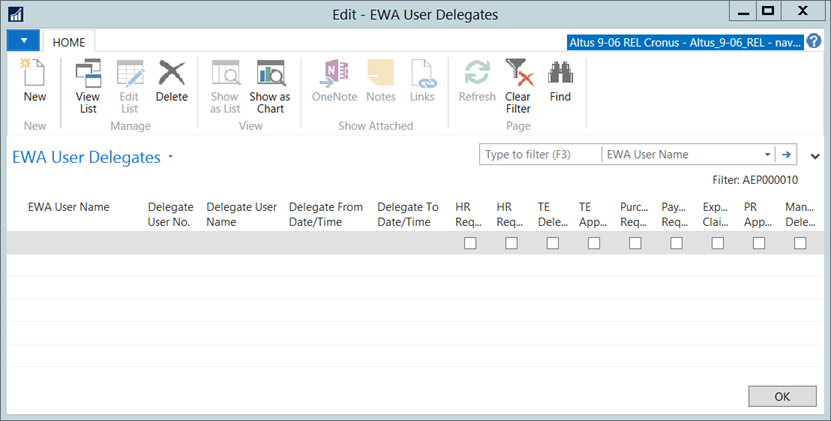
- On the Ribbon, click New.
A new blank record is inserted. - Use the following table for assistance in completing the fields for assigning a delegate to the selected user.
Notes:
- When logged into Employee Center, users assigned as a delegate can use the Requests For drop-down (available on the pages where delegation is enabled) to see a list of the delegators who assigned the user as a delegate for the particular request type. Me is the default, which represents the user’s requests.
- When selecting to be a delegate for a request, the logged-in user assumes all security filters from the delegator while the delegation is active.
| Field | Details |
|
EWA User No. |
Displays the user number for the employee to whom a delegate is being assigned. |
|
EWA User Name |
Displays the EWA user name for the individual to whom a delegate is being assigned. This field is auto-populated based on the EWA user number selected. |
|
Delegate User No. |
Displays the delegate's user number. From the drop-down, select the EWA user number for the individual you want to assign as delegate. |
|
Delegate User Name |
Displays the delegate's EWA user name. This field is not editable and is populated based on the selection made in the Delegate User No. field. |
|
Delegate From Date/Time |
In the Delegate From Date/Time field, enter the start date at which the user will begin acting as delegate (optional). |
|
Delegate To Date/Time |
In the Delegate To Date/Time field, enter the date upon which the user will no longer act as delegate (optional). |
|
HR Requests |
Click this checkbox to indicate this user is authorized to enter and submit HR Requests on behalf of this employee. |
|
HR Request Approvals Exempt |
Click this check box to indicate this user’s requests do not require approval. |
|
TE Delegate |
Click this check box to indicate the delegate is authorized to enter and submit Time Entry on behalf of this employee. |
|
TE Approver Delegate |
Click this check box to indicate the delegate can approve Time Entry submissions (from employees reporting to this employee) on behalf of this employee. |
|
Notes:
|
|
|
Pur. Req. Delegate |
Click this check box to indicate the delegate is authorized to enter and submit Purchase Requests on behalf of this employee. |
|
Pmt. Req. Delegate |
Select this check box to indicate the delegate is authorized to enter and submit Payment Requests on behalf of this employee. |
|
Exp. Req. Delegate |
Click this check box to indicate the delegate is authorized to enter and submit Expense Requests on behalf of this employee. |
|
PR Approver Delegate |
Click this check box to indicate the delegate can approve Purchase Request submissions (from employees reporting to this employee) on behalf of this employee. Note: Approval Emails will be sent to all the approvers and the delegate approvers of those approvers. |
| Manager Delegate HR | Click this check box to indicate that the delegate can approve HR submissions on behalf of this employee. |
-
Click OK.
-
Open the EWA User card for the employee you assigned as a delegate.
-
Click EWA User and then select Is a Delegate For.
The EWA Delegate list opens showing the individual for whom this employee is acting as delegate.
Performing Mass Updates for Approvers
Mass updates enable you to change the settings for approvers all at once. There are options for updating approvals to assign different approvers permanently or on a temporary basis.
Managing Global Approval Settings
Use this function to manage or update the following:
-
Change all (or only filtered) approver records
-
Reassign Open/Pending Approvals
-
Email Pending Requests list to the new approver
To perform a mass update the existing threshold approvers:
- In the Search field, type EWA Users and select the page from the drop-down list.
The EWA User list displays. - Select the EWA user for which you want to re-assign open and pending approvals to another approver.
- On the Ribbon, click Edit.
The EWA User card for the selected individual opens. - Click the Actions menu tab.
- On the Ribbon, click Mass Update Threshold Approvers.
The EWA - Mass Update Approvers page opens.
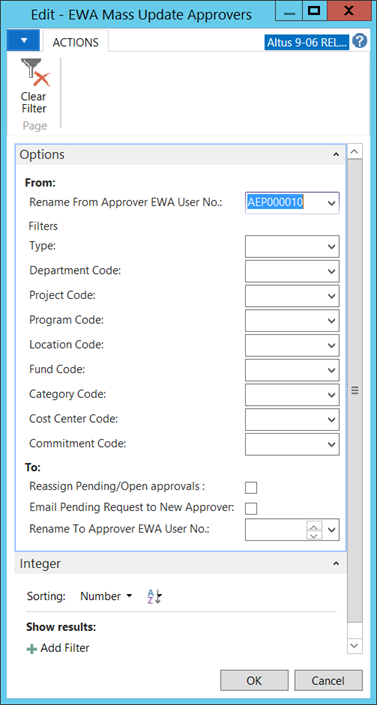
- In the Options FastTab under the From section, provide the following:
- From the Rename From Approver EWA User No. drop-down, select the current approver.
- Complete the Filters section by selecting the filters you want to apply (to which the current approver is assigned).
- In the To section, complete the following:
- Select the Reassign Pending/Open approvals checkbox to have all requests of this status reassigned to the new approver.
- Select the Email Pending Request to New Approver checkbox to forward (by email) all pending requests to the new approver.
- From the Rename To Approver EWA User No. drop-down, select the new approver.
- Click OK.
Updating EWA Request Approvers
You can use the Update Request Approvers function to assign open and pending approvals only to a temporary approver.
To update request approvers:
- Open the EWA User card for the individual to which you want to re-assign open and pending approvals to another approver. (See the previous section for steps to displaying the EWA User card.)
- Click the Actions menu tab.
- On the Ribbon, click Update Request Approvers.
The EWA Update Request Approvers card opens.
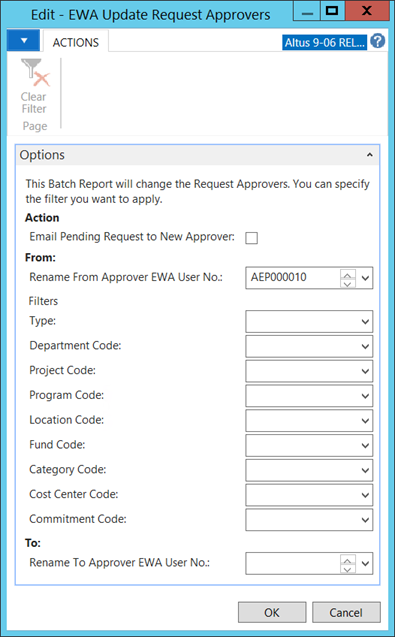
- In the Action section, click the Email Pending Request to New Approver checkbox to send email notifications to the temporary approver for all pending requests.
- In the From section, provide the following:
- From the Rename From Approver EWA User No. drop-down, select the current approver.
- Complete the Filters section by selecting the filters you want to apply (to which the current approver is assigned).
- In the To section, from the Rename To Approver EWA User No. drop-down, select the temporary approver.
- Click OK.