

The EWA Setup card enables you to provide content for the fields and pages in Employee Center. This content is what users see and is used to give them assistance or ‘cues’ for determining what Employee Center pages contain/capture, what information they can edit or need to define, and how to get additional information or assistance.
Providing General Account and Support Information
The fields in the General FastTab of the EWA Setup card define the overall settings for Employee Center.
To perform the EWA account set up:
- In the Search field, enter EWA Setup.
- Select EWA Setup.
The EWA Setup card opens displaying the General FastTab.
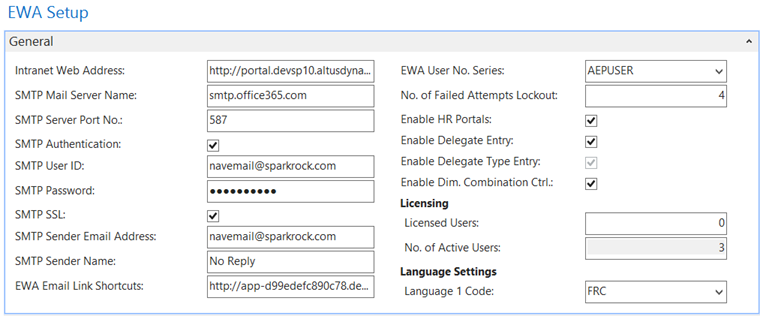
- The following table provides a detailed explanation to assist you in completing each of the fields:
Field Details Where used Intranet Web Address Use this field to indicate the web address for Employee Center. For information purposes only. SMTP Mail Server Name Enter the name of the SMTP server. Used to send all Employee Center-related notifications. SMTP Server Port No. Provide the server port number. Used to send all Employee Center-related notifications. SMTP Authentication Provide if authentication is required. If not required, leave blank. Used to send all Employee Center-related notifications. SMTP User ID Provide the SMTP user ID. Used to send all Employee Center-related notifications. SMTP Password Provide the user's SMTP password. Used to send all Employee Center-related notifications. SMTP SSL Provide the SSL if required. Leave blank if not required. Used to send all Employee Center-related notifications. SMTP Sender Email Address Provide the sender's SMTP email address. Used to send all Employee Center-related notifications. SMTP Sender Name Provide the sender's name. Used to send all Employee Center-related notifications. EWA Email Link Shortcuts Email link shortcuts. Used to send all Employee Center-related notifications. EWA User No. Series Set up a number series for assigning a number system to EWA User records. EWA User card No. of Failed Attempts Lockout Indicate the number of failed login attempts permitted before an account is locked.
Note: This functionality only applies to forms authentication.Login page Enable HR Portals Check this box if you are Using NAV HR and Payroll. This triggers Employee Center to consider the configuration options defined in the fields requiring HR and Payroll licensing. Employee Center Installation
Enable Delegate Entry Check this box to provide users with the ability to add or delete delegates over Employee Center. Delegation Management Enable Delegate Type Entry Check this box to enable delegate type entry. Delegation Management Enable Dim. Combination Ctrl. Employee Center enables using Dimension Combinations not linked to a G/L account.
To enable this feature three steps are required:
- Dimension Combinations should be configured without G/L accounts.
- The Disable Acc Valid. in Dim Code (in the Purchase-Payment Requests FastTab) option should be checked.
- The Enable Dim. Combination Ctrl. option should be checked.
Purchase Requests
Time EntryLicensing Section Licensed Users Enter the number of licensed users here. No. of Active Users Displays the number of active EWA Users in the system.
When a user opens the EWA Users list and the Licensed Users is less than the No. of Active Users a warning message is displayed.EWA Users List. Language Section Language 1 Code This language code is used when you populate captions for the Employee Center-related setup.
(For details, see ‘Configuring NAV for Multi-language Support over the EWA Portal’.)Used when adding captions for an additional language to the following pages in NAV:
- EWA Page Groups
- EWA Pages
- Financial Analysis Data Set
- EWA Setup
Setting up EWA Profiles
EWA profiles are used like templates for user security and can make managing many accounts easier. You can define several profiles and assign a single profile to many users. If a change needs to be made to the general security settings for those users, the change only needs to be made to the profile and automatically the settings are updated for all users within the profile.
The profile assigned to a user determines the menu options and security filters applied to the user on Employee Center (dictates what a user sees and the options available).
To create a new EWA profile:
- In the Search field, type EWA Profiles and select the page from the drop-down list box.
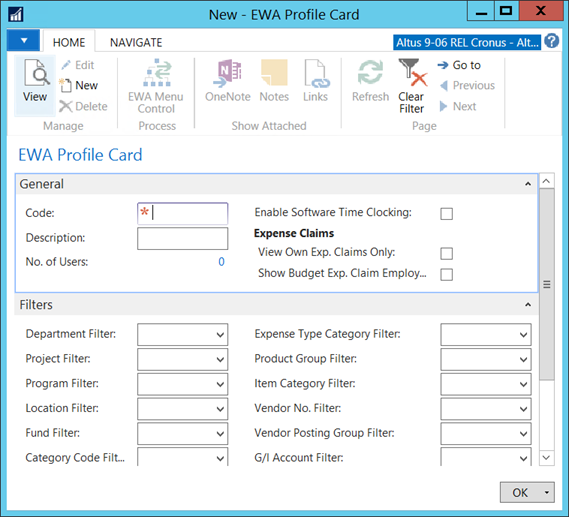
The EWA Profiles card displays. - On the Ribbon, click New.
The New – EWA Profile card opens.
- Refer to the following sections for assistance in completing the fields in the EWA Profile card.
- When you finish defining all the required information for the EWA profile, click OK.
The newly created EWA profile is added to the EWA Profiles card. To add the required menu controls to the profile, refer to the ‘Configuring EWA Menu Controls’ section for details.
| Field | Details |
| Code | This code is used to link the profile to a user. In the space provided, enter a code for this profile. |
| Description | Enter text to describe this profile (user type, usage, and so on). |
| No. of Users | This field displays the number of EWA Users assigned to this profile. When creating a new profile, this number is zero (0). Once you create the profile and assign users, this field updates automatically. |
| Enable Software Time Clocking | Add a checkmark to this option to enable software time clocking. |
| Expense Claims section | |
| View Own Exp. Claims Only | Add a checkmark to configure this user to only view their own expense claims. |
| Show Budget Exp. Claim Employee | Clear this check box to hide the budget tab and insufficient budget warning from employees with the associated profile. |
Defining the Profile Security
To assign the dimension combination options available to users within this profile:
-
If not already displayed, click the Expand icon to display the Filters FastTab.
-
In the fields provided, select the filter restrictions that apply to this profile.
Supported filter format expressions are:-
“..” for a range of values (for example, 1..5 for all values from 1 to 5)
-
“|” for and expression (for example, 1|5 for 1 and 5)
-
To select values for filtering:
-
Drill up on the list of values and highlight the range of values (or use Ctrl + selected value to select specific values).
-
Click OK.
The appropriate filter format expressions are translated.
Each of the fields ending with the word Filter (Expense Type Filter, Dimension Filter, and so on) has a default field length of 250 characters.
| Field | Details | Where used |
| Dimension 1 Filter |
About Dimensions A dimension is data that you can add to an entry as a marker so that NAV can group entries with similar characteristics and easily retrieve them for analysis. Dimensions can be used throughout the program on entries in journals and documents, as well as budgets. For example, you can have dimensions that indicate the project or department from which an entry originates. You can use dimensions instead of setting up separate general ledger accounts for each department and project. You can define up to eight dimensions with an unlimited number of dimension values. For detailed information on using Dimensions, refer to the NAV online help. |
|
| Dimension 2 Filter | ||
| Dimension 3 Filter | ||
| Dimension 4 Filter | ||
| Dimension 5 Filter | ||
| Dimension 6 Filter | ||
| Dimension 7 Filter | ||
| Dimension 8 Filter | ||
| Expense Type Filter |
From the drop-down, select the filter for allowable Expense Types that users with this profile can view on Employee Center. note: Easily manage expense types through the Expense Type Category Filters. Although supported, typically only the Expense Type Category Filter OR the Expense Type Filter is used at one time; not both on the same profile. |
Add Expense Types selection page |
| Expense Type Category Filter | From the drop-down, select the filter for allowable Expense Type Categories that users with this profile can view on Employee Center. This reduces the expense types that users see via the category. | Add Expense Types selection page |
| Product Group Filter | From the drop-down, select the filter for allowable items that users with this profile can view on Employee Center. | Add Item selection page |
| Item Category Filter | From the drop-down, select the filter for allowable items that users with this profile can view on Employee Center. | Add Item selection page |
| Vendor No. Filter |
From the drop-down, select the filter for vendors that users with this profile can view on Employee Center. |
|
| Vendor Posting Group Filter | From the drop-down, select the filter for vendor posting groups that users with this profile can view on Employee Center. |
|
| G/L Account Filter | From the drop-down, select the filter for G/L Accounts users with this profile can view on Employee Center. The list is only visible if a user is changing the default G/L Account on a request line. |
|
| HR Reason Code Filter | From the drop-down, select the filter for the allowable reason codes users with this profile can select when creating HR Requests over Employee Center. |
HR Request Page |
| Bank Account Filter | From the drop-down, select the filter for the bank account users with this profile can select as an option over Employee Center. | Deposits Page |
Providing Default Values
- Click the Expand icon to display the Defaults FastTab.
The Defaults FastTab displays.
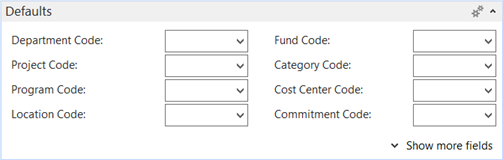
Note: The default dimension values are used for pre-populating data on Employee Center when the Dimensions >Default from EWA User option is selected. - The following table provides a detailed explanation to assist you in completing each of the fields:
| Field | Details | Where used |
| Department Code | Enter the default department code for the user. | EWA User card |
| Project Code | Enter the default project code for the user. | EWA User card |
| Program Code | Enter the default program code for the user. | EWA User card |
| Location Code | Enter the default location code for the user. | EWA User card |
| Fund Code | Enter the default fund code for the user. | EWA User card |
| Category Code | Enter the default category code for the user. | EWA User card |
| Cost Center Code | Enter the default cost center code for the user. | EWA User card |
| Expense Vendor No. | Enter the default vendor number for expense requests. | EWA User card |
| Location Code | Enter the default location for the user or leave blank if no default exists. | EWA User card |
Configuring EWA User Security
- Click the Expand icon to display the Security Profile FastTab.
The Security Profile FastTab displays.
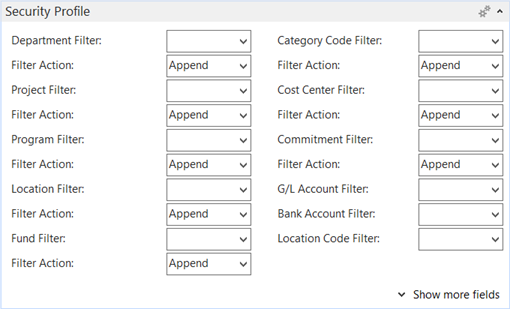
- For many of the options in the Security Profile FastTab, you need to determine the Filter Action for the option selected:
- Append: Use Append to have the values assigned to the user to be added to what the Profile already allows.
Note: If you have a filter on the Profile on 3 values on Dimension 1, but you only enter one value here, you will only be able to see this one value on Employee Center. Also, if this one value is outside the profile filter, you will not be able to see anything. - Override: Use Override to have the values in this filter override the settings of the profile.
- Append: Use Append to have the values assigned to the user to be added to what the Profile already allows.
- Use the following table for assistance in completing the fields for the Security Profile FastTab:
| Field | Details | Where used |
|
Dimension 1 Filter |
A dimension is data that you can add to an entry as a marker so that NAV can group entries with similar characteristics and easily retrieve them for analysis. Dimensions can be used throughout the program on entries in journals and documents, as well as budgets. For example, you can have dimensions that indicate the project or department from which an entry originates. You can use dimensions instead of setting up separate general ledger accounts for each department and project. You can define up to eight dimensions with an unlimited number of dimension values. For detailed information on using dimensions, refer to the NAV online help. |
|
|
Dimension 2 Filter |
||
|
Dimension 3 Filter |
||
|
Dimension 4 Filter |
||
|
Dimension 5 Filter |
||
|
Dimension 6 Filter |
||
|
Dimension 7 Filter |
||
|
Dimension 8 Filter |
||
|
Expense Type Filter |
Enter the filter for allowable expense types users with this profile can view on Employee Center. Note: Any filter specified for the user will append that of the profile. |
Add expense types selection page |
|
Expense Type Category Filter |
To reduce expense types users see in the category, enter the filter for allowable expense type categories users with this profile can view. Note: Any filter specified for the user will append that of the profile. |
Add expense types selection page |
|
Product Group Filter |
Enter the filter for allowable Items users with this profile can view on Employee Center via the range of product groups specified here. Note: Any filter specified for the user with append that of the profile. |
Add Item selection page |
|
Item Category Filter |
Enter the filter for allowable Items users with this profile can view on Employee Center via the item category range specified here. Note: Any filter specified for the user with append that of the profile. |
Add Item selection page |
|
Vendor No. Filter |
Enter the filter for vendors users with this profile can view on Employee Center. Note: Any filter specified for the user with append that of the profile. |
Select Vendors Page |
|
Vendor Posting Group Filter |
Enter the filter for Vendors users with this profile can view via the Vendor posting groups. Note: Any filter specified for the user with append that of the profile. |
Select Vendors Page |
|
G/L Account Filter |
Enter the filter for G/L Accounts that users with this profile can view on Employee Center. This list is only visible if a user is changing the default G/L Account on a request line. Note: Any filter specified for the user with append that of the profile. |
|
|
Bank Account Filter |
Enter the filter for bank accounts that users with this profile can view on Employee Center. This list is only visible if a user is changing the default bank account on a request line. Note: Any filter specified for the user with append that of the profile. |
Deposits Page |
Filtering Notes
Supported filter format expressions for Employee Center are:
-
“..” for a range of values (e.g. 1..5 for all values from 1 to 5)
-
“|” for and expression (e.g. 1|5 for 1 and 5)
To select values for filtering, drill up on the list of values, and highlight the range of values or use Ctrl + selected value to select specific values. Click OK. The appropriate filter format expressions are translated.
Each of the fields ending with the word Filter (Expense Type Filter, Dimension Filter, etc.) has a default field length of 250 characters.
Attaching User Dimension Combinations
Configuring user dimension combinations provides additional security when adding lines to purchase/payment requests. By attaching dimension combinations, users will be able to see the combination of these dimensions in addition to their user security.
NOTE: To use this feature, your organization needs to use dimension combinations as part of your configuration.
To attach the appropriate dimension combinations to an employee:
- Open the employee’s EWA User card.
- Click the Navigate menu tab.
- On the Ribbon, click User Dimension Combination.
The EWA User Dim. Combination card opens with a new record inserted.
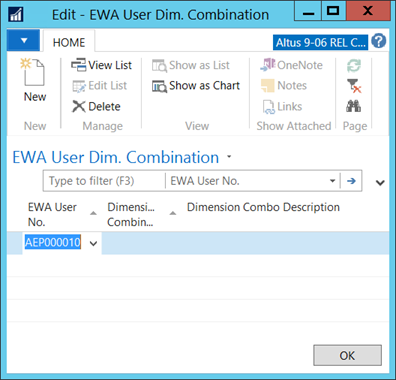
- From the Dimension Combination Code drop-down, select the applicable dimension combination for this employee.
- The Dimension Combo Description field is automatically populated based on the code selected.
- On the Ribbon, click New.
A new blank record is inserted. - Repeat steps 4 and 5 to add all the required dimension combinations.
- When you have finished adding dimension combinations, click OK.
Providing Additional User Details
The Details FastTab contains the options and fields for:
- defining how approval emails are handled.
- connecting a NAV User ID to the EWA User card.
- how miscellaneous articles are assigned and collected.
- providing a user’s corporate credit card information for managing corporate card-related expenses.
To complete fields in the Details FastTab:
- Click the Expand icon to display the Details FastTab.
The Details FastTab opens. - Use the table below for assistance in completing the fields for the Details FastTab:
| Field | Details | Where used |
|
Block Approval Response Email |
Add a checkmark to this field to disable the Approval Response Email messages sent to the user once the approvals are completed. Note: The end user can manager this setting through the Employee Center Administration page. |
Workflow approval email notifications |
|
Block Approval Request Email |
Add a checkmark to this field to disable the Approval Request Email messages sent to the user once the approvals are completed. Note: The end user can manager this setting through the Employee Center Administration page. |
Workflow approval email notifications |
|
NAV User ID |
Select the User ID linked to this Employee Center user. |
Update Request Approvers |
|
Assign/Collect Articles |
Click this check box if this user will be assigned miscellaneous articles. This enables the trigger for assigning and collecting articles. |
|
|
Misc. Article Type Filter |
From the drop-down, select the miscellaneous article category/group to which this user belongs. |
|
|
Corp. Credit Card No. |
If this user is assigned a corporate credit card, enter the card number in the space provided. |
Expense Requests (link to the bank file with the credit card details) |
Generating a Password and Notifying the User of the Account Setup
Once an employee has an EWA User card and profile set up, you need to generate a temporary password for the account and notify the employee. The employee uses the temporary password to access Employee Center. At this first log in, the employee is prompted to change the temporary password to a secure password that will be remembered by the employee.
Once you provide all the necessary details to the FastTabs in the EWA User card, you can generate the account and send the details to the user.
To generate a password for the employee and notify the individual of the account setup:
- On the Action pane, click a generate option:
- Generate – creates the EWA user account.
- Generate and Email - creates the EWA user account and launches an email session enabling you to email the details to the employee or Human Resources. The email contains the following information:
Dear <Employee First Name>,You are receiving this message because you have just been authorized to access our Employee Portal Site or you have requested a password change from administration.To access the site, please go to http://webaddress.com. Your user name is <Employee First and Last Name> and your password is: <PASSWORD>Once you have logged in you can access the Password Change section under Employee Tools on the navigator bar on the left hand side of the screen.For any additional support please contact <Intranet Support Name> at <Intranet support email> or <Intranet support phone no.>Thank you. - Generate and Print – select this option to generate a random password and print a letter containing instructions for how to connect to Employee Center. The content of the letter is identical to the email message above. The format of the letter is defined to enable it to be folded and put into a window envelope for mailing to the employee’s home address.
Note:
-
When the Intranet Password Generate, Generate and Email, or Generate and Print functions are used, the Password Reset field is set and the user is forced to change the password on first login.
-
Passwords changed or assigned on Employee Center are subject to the minimum number of characters defined.
Password Troubleshooting
Password is necessary to gain access to Employee Center. Account lockouts occur for security reason to reduce threats to company data. When user enters incorrect password multiple times the account gets blocked and the user receives the following error message:
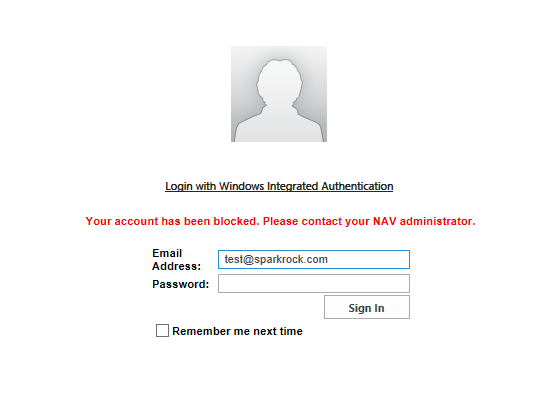
If accounts are frequently getting locked, check the value in the No.of Failed Attempts Lockout on the EWA Setup. The number in this field indicates the number of failed login attempts permitted before an account is locked. You might need to increase it if lower than 3 (three).

Copying EWA User Details to New EWA User Cards
Once you set up an initial EWA User card or a template EWA User card, you can use this EWA User card to create additional EWA User cards for employees. EWA users can be set up quickly using the Copy From EWA User function. This function enables you to save time and improve accuracy within the new user set up, especially for general EWA user accounts that apply to the majority of users.
This function copies the following:
- User Profile
- Defaults (Dimensions and Location)
- All Security Profile exceptions (Dimensions, Dimension Filter Action and Item, Expense Type, Vendor and G/L Account Filters)
- EWA Groups (SharePoint Groups)
- Financial Analysis Data Sets - all data sets and effective dates (See Financial Analysis Setup and Administration)
To copy the settings from another user or an EWA User card that was set up as a template:
Tip: Set up ‘imitation’ users as templates for the different types of users within the organization. Then, block these ‘imitation’ users so they cannot be used but are available to copy for creating user profiles/settings more quickly.
- If not already opened, open the newly created or template EWA User card.
- Next to the No. field, click the Ellipsis (…) to select from a list of possible numbering series to assign for the Employee Center user type.
- Click the Actions tab.
- On the Ribbon, click Copy from EWA User.
The Edit – Copy EWA Setup card opens. - From the EWA User No. drop-down, select the EWA user account you want to copy.
- Click OK.
- In the confirmation window that opens, click OK.
The selected EWA user settings are copied to the new EWA User card. The EWA User card refreshes with the details copied from the selected account assigned. - If linking this EWA User card to an employee record, from the Employee No. drop-down, select the employee number (or click Advanced to perform a search).
- The following are automatically populated to the EWA User record from the Employee card:
- Name fields
- Postal/Zip Code
- Phone No.
- Birth Date
- Access Start Date
- Access End Date
- User Profile Description
- From the Access Start and Access End drop-downs, select alternate access start and end dates if required.
- Click OK when you complete the required details for the EWA User card.
Providing Financial Analysis Data Set Access
To provide access to financial analysis data sets:
- In the Search field type, EWA User and select the page from the drop-down list.
The EWA User card opens. - From the EWA User list, select the user and on the Ribbon, click Edit.
- On the Ribbon, click Financial Analysis Data Sets.
The EWA User Data Sets page opens. - On the Ribbon, click New.
A new blank record is inserted.
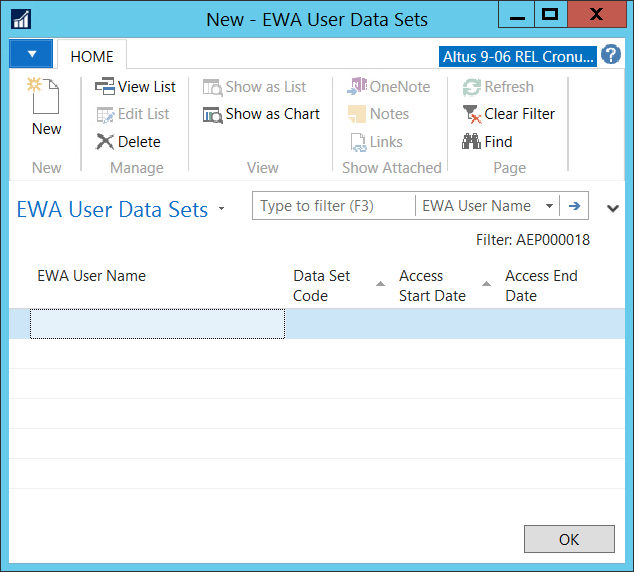
- From the Data Set Code drop-down, select the data set.
- From the Access Start Date drop-down, select the date upon which the user requires access to the data set (optional).
- From the Access End Date drop-down, select the date upon which the user no longer requires access to the data set (optional).
- The EWA User Name field is automatically populated with the user’s name.
- Repeat steps 3 – 6 to add any other required data sets.
- When you finish, click OK.