

Adding Dimensions to the General Ledger
To configure the General Ledger Setup:
- In the Search field, type General Ledger Setup and select the page from the drop-down list.
The General Ledger Setup page displays.
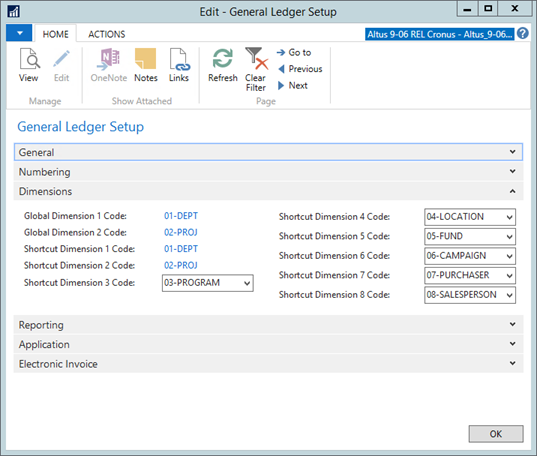
- Expand the Dimensions FastTab.
- In the Dimension fields, enter the dimensions you want to use throughout Microsoft Dynamics NAV.
Notes:
- Only the first six Shortcut Dimensions are used for budget verification.
- This configuration is generally performed as part of your initial system configuration. Use the information here primarily as a reference.
Defining Budget Categories
Budget categories are used to group accounts together for budget verification purposes. For example, if your organization uses several G/L accounts for office supplies, cleaning supplies and project supplies, but wants to group these together for budget verification, you can assign a single budget category to all the accounts. As a result, Budget, Commitment, and Actual dates for all accounts are aggregated together during the budget verification process.
Alternatively, you can define a list of budget categories that you can then assign to an Item or G/L account.
Define the different budget categories by assigning a unique code and description for each.
To set up budget categories:
- In the Search field, type Budget Categories and select the page from the drop-down list.
The Budget Categories page displays.
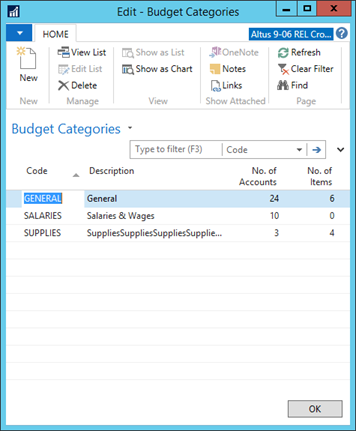
- On the Ribbon, click New.
A new record is inserted. - In the Code field, enter a unique code to represent the budget category.
- In the Description field, enter a brief description for the category and code.
Note: If you plan to use Inventory Items, you need attach an Item G/L account to that category. It is against this G/L account that the budget is checked. - Repeat steps 2 – 4to add all the budget categories you require.
- Click OK when you finish defining all the required budget categories.
Managing G/L Accounts for Budget Verification
Assigning Budget Categories to Accounts
You must specify the budget category for each G/L account that you plan to use on a purchase document within the Purchasing module.
To set up a budget category on the Chart of Accounts:
- In the Search field, enter Chart of Accounts.
The Chart of Accounts window displays.

NOTE: By default, the Budget Category column is not visible. To display the Budget Category column, complete the following steps:
- Right-click the Column Header and select Choose Columns.
- The Choose Columns window opens.
- From the Available columns list, select Category and click Add.
- Click OK.
- The Budget Category column is added to the Chart of Accounts window.
- Select the account.
- On the Ribbon, click Edit.
The G/L Account Card for the selected account opens. - Click the Expand icon next to the Posting FastTab.
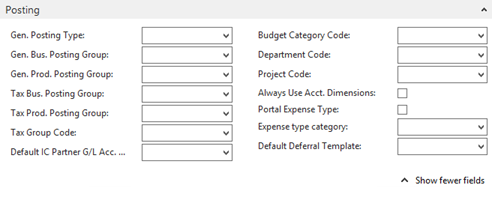
-
Assign each individual budget category to each G/L account.
-
From the Budget Category Code drop-down, select the applicable budget category. If the Category field is not visible, click the Show more fields icon.
Assigning Budget Categories to Items
For items to be verified or checked against the defined budget categories, budget categories need to be assigned to items.
To assign budget categories to items:
- In the Search field, enter Items.
- Select Items List.
The Items List displays. - Locate and select the item to which you want to assign a budget category.
- On the Ribbon, click Edit.
The Item card for the selected item opens displaying the General FastTab.
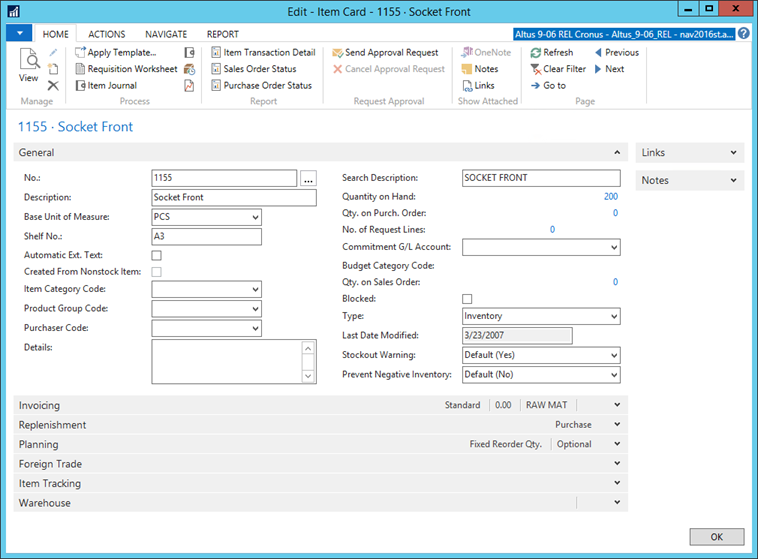
- From the Commitment G/L Account drop-down, select the G/L Account. (This G/L account needs to be linked to a Budget Category Code. For details, see the previous section, Assigning Budget Categories to Accounts).
NOTE: Typically the Commitment G/L Account and the Budget Category are set to match the purchase account on the Product Posting Setup. If this is not the case, budget verification may not be done on the correct accounts and an over budget situation may occur. - Repeat steps 3 – 5 for each item to which you want to assign a budget category.
- When finished, click OK.
Disabling Budget Verification for Dimension Values
You can exempt certain values from the budget verification process.
To disable budget verification for dimension values:
- In the Search field, enter Dimensions.
- Select Dimensions.
The Dimensions window displays.

- Select the dimension for which you want to disable budget verification.
- Click the Navigate menu tab.
- On the Ribbon, click Dimension Values.
The Dimension Values window displays.
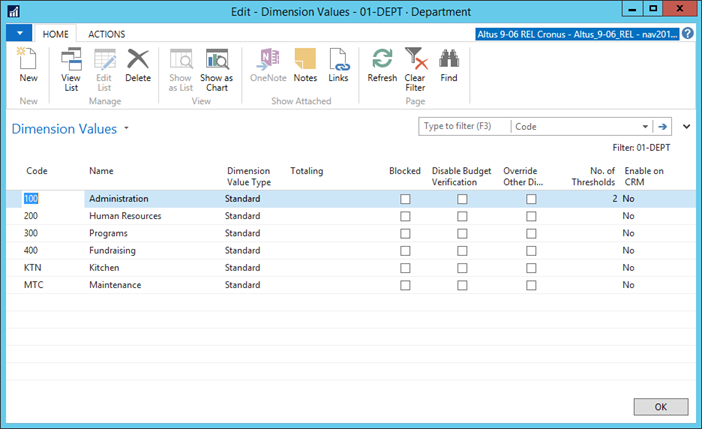
- To disable budget verification, do one of the following:
- Disable budget verification for an individual value: Locate the required dimension value and select the Disable Budget Verification check box.
- Disable (or enable) budget verification for all dimension values within a dimension:
- Click the Actions menu tab.
- On the Ribbon, click Disable All Budget Verification. The Disable Budget Verification check box is simultaneously selected for every value within the dimension.
Notes:
- Click Enable All Budget Verification to turn budget verification back on.
- Only the first six Shortcut Dimensions are used for budget verification.
Setting up Purchase Request G/L Budgets
To set up purchase request G/L budgets:
- In the Search field, enter Purchase Requisition G/L Budgets.
- Select Purchase Requisition G/L Budgets.
The Purchase Requisition G/L Budgets window opens.
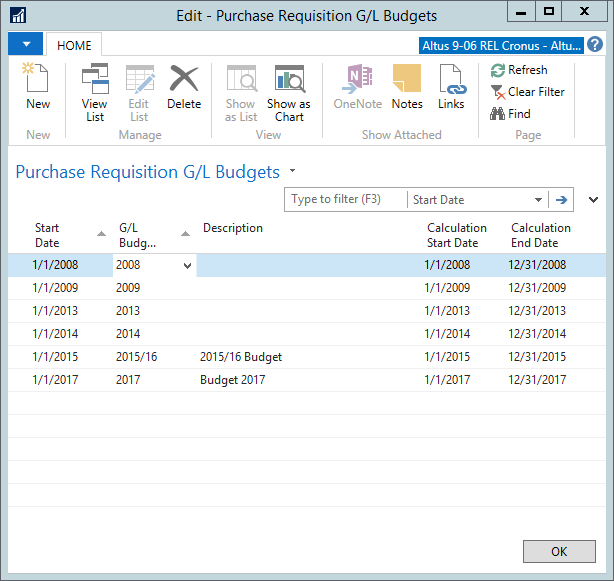
- On the Ribbon, click New.
A new record is inserted. - From the Start Date drop-down, select the date upon which the portal will display the budget for users to start using.
NOTE: The Start Date controls which budget name the system refers to during budget verification. It does so by checking the transaction posting date (for example, a purchase order made on 08/01/08 falls under G/L Budget Name 2008, which has a start date of 01/01/08). - From the G/L Budget Name drop-down, select the appropriate budget.
- From the Calculation Start Date drop-down, select the date to be used by the calculations as the starting date.
- In the Calculation End Date drop-down, select the date to be used by the calculations as the ending date.
About Budget Verification
Depending on your budget verification requirements, the following applies:
- If you are performing budget verification against an annual budget then you will have one line per budget and the Calculation Start and End Dates will correspond to your fiscal year start and end dates.
- If you are performing budget verification on monthly basis then you will have 12 lines for the same budget and the Calculation Start and End Dates will correspond to the month start and end dates. The Start Date will be the month start date.
- If you are planning monthly and you require budget verification on year to day basis, you will have 12 lines per budget with Start reflecting the beginning of each month, Calculation Start Date reflecting the beginning of the fiscal year and the Calculation Month Date reflecting the respective month end date.
Understanding How Budget Verification Works with Purchase Requests
The following section provides the details for how the budget verification configuration you defined behaves over Employee Center.
The G/L Budget Name is based upon the posting date that is entered by the user on Employee Center. The default posting date is the creation date of the request. The user can select an alternate posting date if the Posting Date Non-Editable option is turned off (if the request should be included in a different budget). The G/L Budget Name displays the budget name being used for budget checking on Employee Center.
The Budget tab displays the following fields and information:
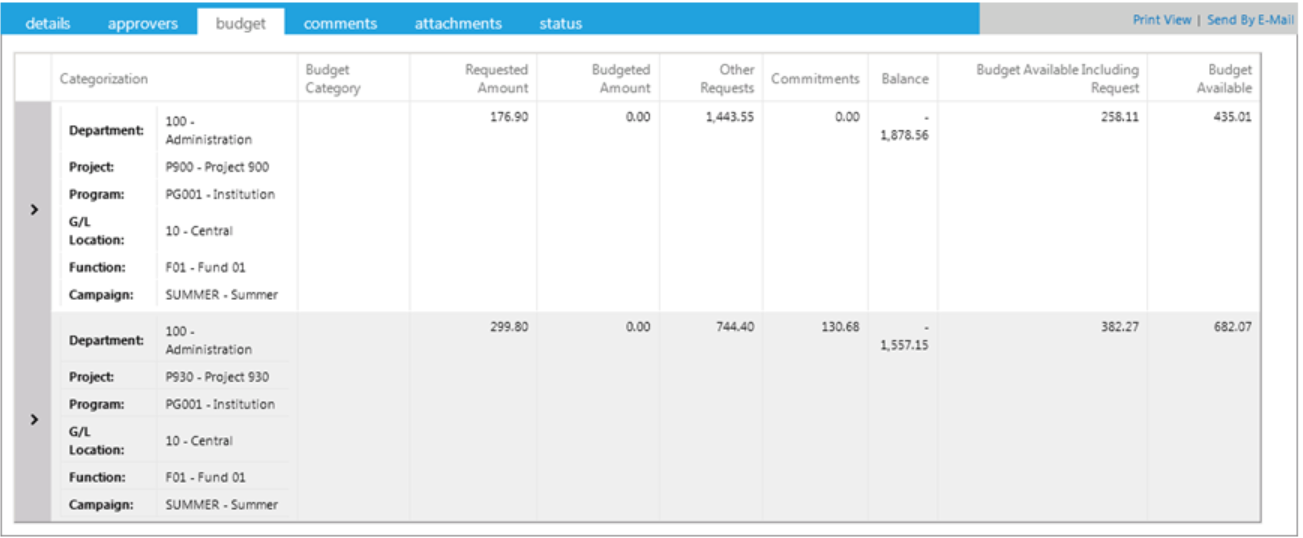
The following table provides a detailed explanation of the columns in the Budget tab:
| Column | Description |
|
This information is common to the calculations within the Budgeted Amount, Other Requests, Commitments, and Balance fields. These values sum the Amount including taxes to be expensed in the lines by the following:
|
|
| Categorization |
This section displays each of the dimension codes and dimension values assigned to the lines. NOTE: This screen summarizes and groups like lines together. If you have multiple lines assigned to the same |
| Budget Category | This section displays the budget category (grouping of accounts) associated with the line(s). |
| Requested Amount |
This section displays the total amount of the request lines with this categorization. NOTE: This amount includes the portions of the Taxes that are to be expensed, such as PST and a portion of the GST. |
| Budgeted Amount | This section displays the total available budget for this categorization. |
| Other Request | This section displays the amount of any other existing (not yet approved) requests. |
| Commitments | This section displays the total amount of other commitments (approved requests) currently recorded. |
| Balance | This section displays the total amount spent against this categorization. |
| Budget Available Including Request |
This section displays the budget left available if this Request is approved. If the insufficient funds message displays, you can still submit the request. This value equals the Budgeted Amount - Other Requests - Commitments - Balance - Requested Amount. NOTE: Each organization has different policies/rules regarding budget checking. Contact your Purchasing and AP |
| Budget Available | This section displays the budget available (Budget Available = Balance – Commitments – Other Requests - Requested Amount). |