

The Asset Management granule contains numerous reporting options for collecting and analyzing fixed asset and depreciation data. Additionally, the available reports each contain further options for customizing the content of the report.
The following sections provide a description for each report along with the details for determining the report content and printing/exporting the report.
Accessing the Reports List
To access the report list:
- From the Asset Management menu, navigate to Reports > Fixed Assets.
The list of available reports displays.- Posting Group – Net Change – shows the net change posted in the fixed asset ledger entries per FA Posting Group.
- FA Document Nos. – displays a list of fixed asset ledger entries, sorted by document type and number.
- FA Journal – Test – shows the journal lines in an FA journal.
- FA Register – shows posted FA ledger entries sorted and divided by register number.
- FA Acquisition List – prints all the information about a fixed asset that has an acquisition date within a certain period.
- FA Analysis – shows an analysis of your fixed assets with various types of data for both individual assets and groups of assets.
- FA Book Value 01 – shows detailed information about acquisition cost, depreciation and book value for both individual assets and groups of assets. For each of these three amount types, amounts are calculated at the beginning and at the end of a specified period as well as for the period itself.
- FA Book Value 02 – shows detailed information about acquisition cost, depreciation, appreciation, write-down and book value for both individual assets and groups of assets.
- FA Details – shows detailed information about the FA ledger entries that have been posted to a specified depreciation book for each fixed asset.
- FA G/L Analysis – shows an analysis of your fixed assets with various types of data for individual assets and/or groups of assets.
- FA List – shows basic information about each fixed asset.
- FA Projected Value – shows calculated future depreciation and book value.
- Click a report option to open the Report page and customize the details to suit your requirements.
Creating the Report to Send to the Ontario Ministry of Education (Pipe Delimited Format)
Before you generate the Ministry report, you need to select the reporting period for the data you want to generate. You can set up more than one reporting period and then select the option you want for the specific reports you want to run at one time.
To specify the reporting period and the export format:
- From the Asset Management menu, select Setup > Asset Management > Administration > Asset Management Extraction.
The Asset Management Extraction page displays.

- Either select the reporting period you want or if the reporting period you want does not exist, you can define a new one by completing the following steps:
- Click New to create a new record.
- In the Code field, provide a code for the new reporting period.
- In the Description field, enter a brief explanatory description for the time period, if required.
- In the Start Date field, enter the date upon which the reporting period starts.
- In the End Date field, enter the date upon which the reporting period ends.
- In the Document Set field, enter the document set name/number, if required.
- In the G/L Budget Name field, enter the G/L budget or click the drop-down list to open the list of budget names.
- Select the appropriate option and click OK.
- Click OK to close the Asset Management Extraction page.
Printing the Posting Group - Net Change Report
This report represents the net change posted in the fixed asset ledger entries per FA Posting Group. If G/L integration is activated for a depreciation book, the amounts in the report should be the same as the net change in the G/L accounts assigned to the FA Posting Groups. Consequently, this report is very useful when reconciling the Fixed Asset Ledger and General Ledger.
The report contains two sections.
- First section: shows the net change for each G/L account for each FA posting group.
- Second section: shows the total change in each G/L account for all FA posting groups.
To generate a Posting Group – Net Change report:
- From the Fixed Assets folder, select Posting Group – Net Change.
The FA Posting Group – Net Change page displays.
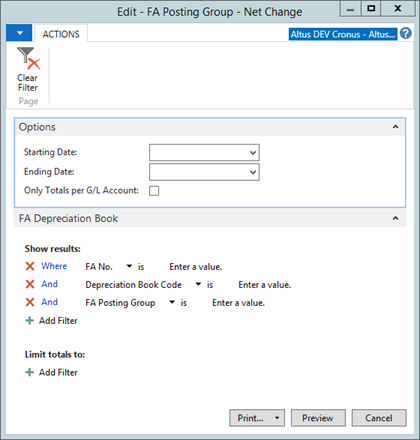
- In the Options FastTab, enter information or select the options you want to tailor the report to meet your specific needs:
- In the Starting Date field, define a start date.
- In the Ending Date field, define a an end date.
- Click the Only Totals pr. G/L Account check box if you want the report to only show the total change in each G/L account for all FA posting groups.
- In the FA Depreciation Book FastTab, set the filters you want the report to include (if you only want certain depreciation books, fixed assets or FA Posting Groups):
- In the FA No. filter field, enter the numbers of the fixed assets to be included in the report.
- In the Depreciation Book Code filter field, click the drop-down button to select the code for the depreciation book to include in the report.
- In the FA Posting Group filter field, enter the codes for the FA posting groups to include in the report.
- Click Print to print the report. If you want to see the report on the screen before printing, click Preview.
Generating a Report Containing Fixed Asset Ledger Entries (Document Nos. Report)
This report contains a list of fixed asset ledger entries, which are sorted by document type and number. The report includes the document type, document number, posting date, and source code of the entry, the description and number of the fixed asset, and so on.
To generate a Document Nos. report:
- From the Fixed Assets folder, select FA Document Nos.
The Fixed Asset Document Nos. page displays.
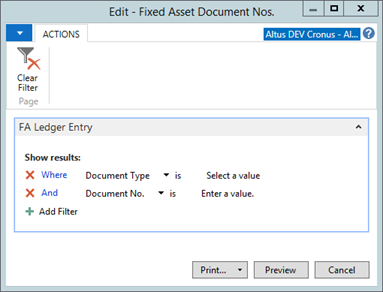
- In the FA Ledger Entry FastTab, set the filters you want the report to include:
- In the Document Type filter field, enter the document type of the entries that you want to include.
- In the Document No. filter field, enter the document numbers of the entries that you want to include.
- Click Print to print the report. If you want to see the report on the screen before printing, click Preview.
Creating a Report to Show all FA Journal Lines (FA Journal - Test)
This report shows the journal lines in an FA journal. You can use the report to have the program check the lines before you post the journal. You can define what is to be included in the report by setting filters.
Note: If you run the report by clicking Posting in a journal page, the report is automatically filtered by the current journal template and journal batch names. In this case, you do not have to enter filters, and so on in the FastTabs.
To generate a FA Journal - Test report:
- From the Fixed Assets folder, under Reports and Analysis select FA Journal - Test.
The Fixed Asset Journal - Test page opens.
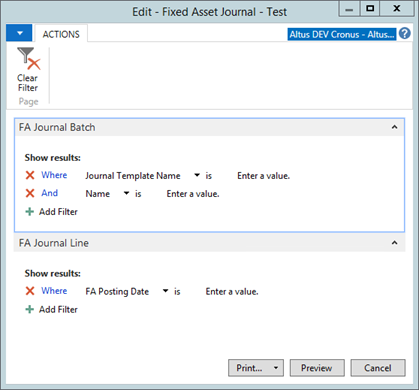
- In the FA Journal Batch FastTab, set the filters you want the report to include (if you only want certain depreciation books, fixed assets or FA Posting Groups):
- In the Journal Template Name filter field, enter the name of the FA journal template to use.
- In the Name filter field, the name of the FA journal batch to include in the report.
- Expand the FA Journal Line FastTab.
- In the FA Posting Date field, enter an FA posting date (if you want the report to include only journal lines with that date).
- Click Print to print the report. If you want to see the report on the screen before printing, click Preview.
Generating a Report of the FA Ledger Entries by Register Number
This report shows posted FA ledger entries sorted and divided by register number. You can determine which entries are contained in the report by defining filters.
To generate a Register report:
- From the Fixed Assets folder, under Reports and Analysis, select FA Register.
The Fixed Asset Register page opens.
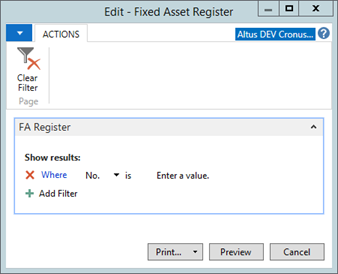
- In the No. filter field, enter the numbers of the registers that you want to include.
- Click Print to print the report. If you want to see the report on the screen before printing, click Preview.
Creating a Report Showing your Acquisitions
With the Fixed Asset - Acquisition List report, you can print all the information about a fixed asset that has an acquisition date within a certain period. The report shows the fixed asset number, description, responsible employee, FA location code, serial number and acquisition date.
If you want to include more information, you can select additional fields that you want to include in the report.
To generate an Acquisition List report:
- From the Fixed Assets folder, under Reports and Analysis, select FA Acquisition List.
The Fixed Asset Acquisition List page opens.
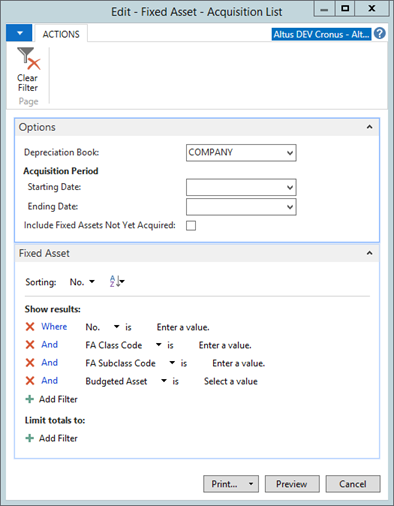
- Click the Drop Down button and then select the relevant field(s).
- In the the Options FastTab, enter the following information:
- In the Depreciation Book field, click the drop-down button to select the appropriate depreciation book to use in the report.
- In the Acquisition Period section, define a starting and end date for the acquisition period in the fields provided.
- Click the Include Fixed Assets Not Yet Acquired check box if you want to include a fixed asset for which the first acquisition cost has not yet been posted.
- In the Fixed Asset FastTab, set the filters you want the report to include (if you only want certain depreciation books, fixed assets or FA Posting Groups):
- In the No. filter field, enter the numbers of the fixed assets to include in the report. Or, to see the existing numbers, click the drop-down button.
- In the FA Class Code filter field, enter the codes for the FA classes to include in the report. Or, to see the existing codes, click the drop-down button.
- In the Subclass Code filter field, enter the codes for the FA subclasses to include in the report. Or, to see the existing codes, click the drop-down button.
- In the Budget Asset filter field, enter Yes in the filter field if you only want to copy budgeted assets. If you want to exclude budgeted assets from the report, enter No in this field. Leave the field blank if you want to include budgeted assets in the report.
- In the Location Code filter field, click the drop-down button to select the location code for the location to include in the report.
- Click the Arrow button in the lower left-hand corner of the page to see the table with the results of the filters you set for the report.
Note: If you do not set any filters, the report will include all your records.
- Click Print to print the report. If you want to see the report on the screen before printing, click Preview.
- To sort your records in descending or ascending order (for example, numerically or alphabetically) on one of the fields in your report, click Sort.
- In the Sort window, under Key, select the relevant field and under Order select Ascending or Descending and then click OK.
Creating an Analysis of your Fixed Assets
This report shows an analysis of your fixed assets with various types of data for both individual assets and groups of assets.
Note: All dates in relation to this report are FA posting dates. (The Fixed Asset - G/L Analysis, which is similar, uses posting dates.) The amounts in the report are calculated from FA ledger entries.
To generate a Fixed Asset Analysis report:
- From the Fixed Assets folder, under Reports and Analysis, select FA Analysis.
The Fixed Asset - Analysis page opens.
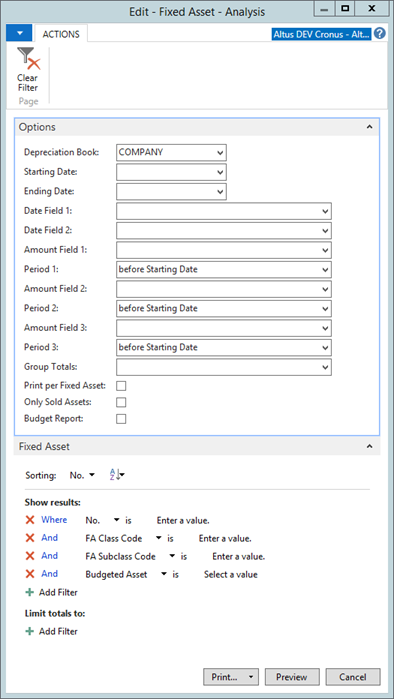
- In the Options FastTab, enter information or select the options you want to tailor the report to meet your specific needs:
- In the Depreciation Book field, click the drop-down button to select the code for the depreciation book to use in the report.
- In the Starting Date field, define a start date for the report.
- In the Ending Date field, define an end date for the report.
- In the Date 1 and 2 fields, click the drop-down button to select the FA date types to include in the report.
- In the Amount 1, 2, and 3 fields (report has three columns enabling the display of three types of amounts), click the drop-down button to select the FA posting types. Then, from the corresponding drop-down fields, select how the amounts will be calculated. The options refer to the starting date and ending dates defined above. Net Change refers to the period between the start and end dates.)
- From the Group Totals drop-down, select a group type if you want the report to group the fixed assets and print group totals. For example, if you have set up six FA classes, then select the FA Class option to have group totals printed for each of the six class codes. If you do not want group totals printed, leave this field empty.
- Add a checkmark to the Print Per Fixed Asset check box if you want the report to print a line for each fixed asset.
- Click the Only Sold Assets check box if you want the report to show information only for sold fixed assets.
- Click the Budget check box if you want the report to calculate future depreciation and book value. This is valid only if you selected Depreciation and Book Value for Amount fields 1, 2 or 3.
- In the Fixed Asset FastTab, set the filters you want the report to include:
- In the No. filter field, click the drop-down button to select the numbers of the fixed assets to include in the report.
- In the FA Class Code filter field, click the drop-down button to select the code for the FA classes to include in the report.
- In the Subclass Code filter field, click the drop-down button to select the code for the FA class subclasses to include in the report.
- In the Budget Asset filter field, enter Yes in the filter field if you want the report to include only budgeted assets. If you do not want budgeted assets to be included in the batch job, enter No.
- In the Location Code filter field, click the drop-down button to select the location code for the location to include in the report.
- Click Print to print the report. If you want to see the report on the screen before printing, click Preview.
Generating a Book Value 01 Report for Individual and Group Assets
This report shows detailed information about acquisition cost, depreciation, and book value for both individual assets and groups of assets. For each of these three amount types, amounts are calculated at the beginning and at the end of a specified period as well as for the period itself.
To generate an Amortization Schedule report:
- From the Fixed Assets folder, under Reports and Analysis, select FA Book Value 01.
The Fixed Asset – Book Value 01 page opens.
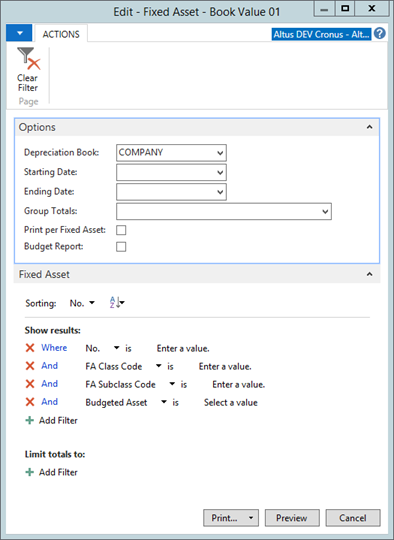
- In the Options FastTab, enter information or select the options you want to tailor the report to meet your specific needs:
- In the Depreciation Book field, click the drop-down button to select the code for the depreciation book to use in the report.
- In the Starting Date field, define a start date for the report.
- In the Ending Date field, define an end date for the report.
- From the Group Totals drop-down, select a group type if you want the report to group the fixed assets and print group totals. For example, if you have set up six FA classes, then select the FA Class option to have group totals printed for each of the six class codes. If you do not want group totals printed, leave this field empty.
- Add a checkmark to the Print Per Fixed Asset check box if you want the report to print a line for each fixed asset.
- Add a checkmark to the Budget Report check box if you want the report to calculate future depreciation (and a calculated future book value). If you enter a check mark, the Depreciation in Period column will contain both posted depreciation and depreciation calculated until the specified ending date for the report. If you leave blank, the column will only contain posted depreciation. In both cases, "posted depreciation" means depreciation posted in the period defined by the starting date and the ending date.
Note: Set your printer to print in Landscape format before running this report. Click File, Print Setup, then change the orientation setting.
- In the Fixed Asset FastTab, set the filters you want the report to include:
- In the No. filter field, click the drop-down button to select the numbers of the fixed assets to include in the report.
- In the FA Class Code filter field, click the drop-down button to select the code for the FA classes to include in the report.
- In the Subclass Code filter field, click the drop-down button to select the code for the FA class subclasses to include in the report.
- In the Budget Asset filter field, enter Yes in the filter field if you want the report to include only budgeted assets. If you do not want budgeted assets to be included in the batch job, enter No in this field.
- In the Location Code filter field, click the drop-down button to select the location code for the location to include in the report.
- Click Print to print the report. If you want to see the report on the screen before printing, click Preview.
Generating Book Value 02 Report for Individual and Group Assets
This report shows detailed information about acquisition cost, depreciation, appreciation, write-down and book value for both individual assets and groups of assets. For each of these categories, amounts are calculated at the beginning and at the end of a specified period, as well as for the period itself.
To generate a Book Value 02 report:
- From the Fixed Assets folder, under Reports and Analysis, select Book Value 02.
The Fixed Asset – Book Value 02 page opens.
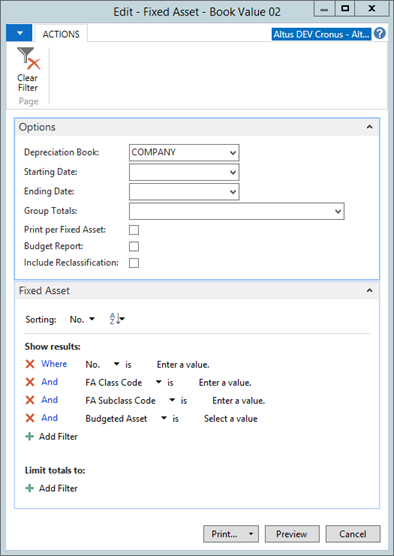
- In the Options FastTab, enter the following information:
- In the Depreciation Book field, click the drop-down button to select the code for the depreciation book to use in the report.
- In the Starting Date field, define a start date for the report.
- In the Ending Date field, define an end date for the report.
- From the Group Totals drop-down, select a group type if you want the report to group the fixed assets and print group totals. For example, if you have set up six FA classes, then select the FA Class option to have group totals printed for each of the six class codes. If you do not want group totals printed, leave this field empty.
- Add a checkmark to the Print per Fixed Asset check box if you want the report to print a line for each fixed asset.
- Add a checkmark to the Budget Report check box if you want the report to calculate future depreciation (and a calculated future book value). If you enter a check mark, the Depreciation in Period column will contain both posted depreciation and depreciation calculated until the specified ending date for the report. If you leave blank, the column will only contain posted depreciation. In both cases, "posted depreciation" means depreciation posted in the period defined by the starting date and the ending date.
- In the Fixed Asset FastTab, set the filters you want the report to include:
- In the No. filter field, click the drop-down button to select the numbers of the fixed assets to include in the report.
- In the FA Class Code filter field, click the drop-down button to select the code for the FA classes to include in the report.
- In the Subclass Code filter field, click the drop-down button to select the code for the FA class subclasses to include in the report.
- In the Budget Asset filter field, enter Yes in the filter field if you want the report to include only budgeted assets. If you do not want budgeted assets to be included in the batch job, enter No in this field.
- Click Print to print the report. If you want to see the report on the screen before printing, click Preview.
Generating a Fixed Asset Details Report
This report shows detailed information about the FA ledger entries that have been posted to a specified depreciation book for each fixed asset.
To generate a Details report:
- From the Fixed Assets folder, under Reports and Analysis, select FA Details.
The Fixed Asset – Details page opens.
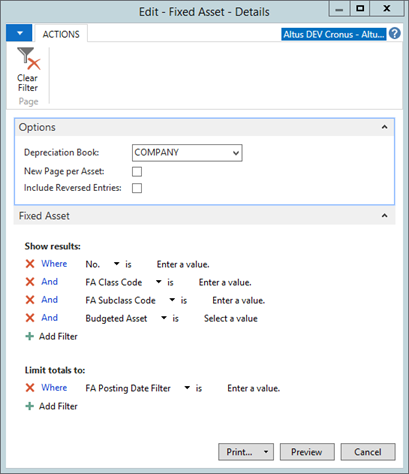
- In the Options FastTab, enter the following information:
- Click the Include Reversed Entries check box if you want the report to also contain ledger entries that were reversed.
- Click the New Page per Asset check box if you want the report to print a separate page for each fixed asset.
- In the Depreciation Book field, click the drop-down button to select the code for the depreciation book to be included in the report.
- In the Fixed Asset FastTab, set the filters you want the report to include:
- In the No. filter field, enter the numbers of the fixed assets to include in the report. Or, to see the existing numbers, click the drop-down button.
- In the FA Class Code filter field, enter the codes for the FA classes to include in the report. Or, to see the existing codes, click the drop-down button.
- In the Subclass Code filter field, enter the codes for the FA subclasses to include in the report. Or, to see the existing codes, click the drop-down button.
- In the Budget Asset filter field, enter Yes in the filter field if you only want to copy budgeted assets. If you want to exclude budgeted assets from the report, enter No in this field. Leave the field blank if you want to include budgeted assets in the report.
- In the FA Posting Date filter field, enter a date or a date interval to determine (by FA posting date) which ledger entries will be included in the report.
- Click the Arrow button in the lower left-hand corner of the page to see the table with the results of the filters you set for the report.
Note: If you do not set any filters, the report will include all your records.
- Click Print to print the report. If you want to see the report on the screen before printing, click Preview.
Creating an FA G/L Analysis Report
This report shows an analysis of your fixed assets with various types of data for individual assets and/or groups of assets. On the Fixed Assets FastTab, you can set filters if you want the report to include only certain fixed assets. On the Options FastTab, you can choose among a number of options to tailor the report to meet your specific needs.
All dates related to this report are posting dates. The Fixed Asset - Analysis, which is similar, uses FA posting dates. The amounts in the report are calculated from FA ledger entries. If you set up integration to G/L for the current depreciation book, the amounts in the report also represent G/L entries.
To generate a FA G/L Analysis report:
- From the Fixed Assets folder, under Reports and Analysis, select G/L Analysis.
The Fixed Asset – G/L Analysis page displays.
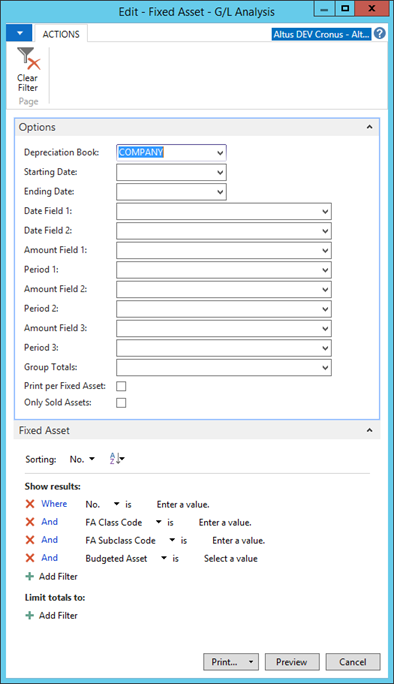
- In the Fixed Asset FastTab, set the filters you want the report to include:
- In the No. filter field, click the drop-down button to select the numbers of the fixed assets to include in the report.
- In the FA Class Code filter field, click the drop-down button to select the code for the FA classes to include in the report.
- In the Subclass Code filter field, click the drop-down button to select the code for the FA class subclasses to include in the report.
- In the Budget Asset filter field, enter Yes in the filter field if you want the report to include only budgeted assets. If you do not want budgeted assets to be included in the batch job, enter No.
- In the Options FastTab, enter the following information:
- In the Depreciation Book field, click the drop-down button to select the code for the depreciation book to use in the report.
- In the Starting Date field, define a start date for the report.
- In the Ending Date field, define an end date for the report.
- In the Date 1 and 2 fields, click the drop-down button to select the FA date types to include in the report.
- In the Amount 1, 2, and 3 fields (the report has three columns enabling the display of three types of amounts), click the drop-down button to select the FA posting types.
- (Blank) - the amounts consist of FA ledger entries with the posting type that corresponds to the option in the amount field.
- Disposal - the amounts consist of FA ledger entries with the posting type that corresponds to the option in the amount field if these entries have been posted to disposal accounts (an amount will only appear for sold assets).
- Bal. Disposal - the amounts consist of FA ledger entries with the posting type that corresponds to the option in the amount field if these entries have been posted to balancing disposal accounts. You can only select this option if you have selected Write-Down, Appreciation, Custom 1 or Custom 2 in the corresponding amount field. Amounts will only appear if you have specified (in the FA Posting Type Setup) that amounts posted with the posting type in the amount field are not to be included in the calculation of gain/loss.
- From the Group Totals drop-down, select a group type if you want the report to group the fixed assets and print group totals. For example, if you have set up six FA classes, then select the FA class option to have group totals printed for each of the six class codes. If you do not want group totals printed, leave this field empty.
- Click the Print per Fixed Asset check box if you want the report to print a line for each fixed asset.
- Click the Only Sold Assets check box if you want the report to only show information for sold assets.
- Click Print to print the report. If you want to see the report on the screen before printing, click Preview.
Creating a List with Descriptions for Each Fixed Asset
This report shows basic information about each fixed asset.
To generate a FA List report:
- From the Fixed Assets folder, under Reports and Analysis, select FA List.
The Fixed Asset – List page displays.
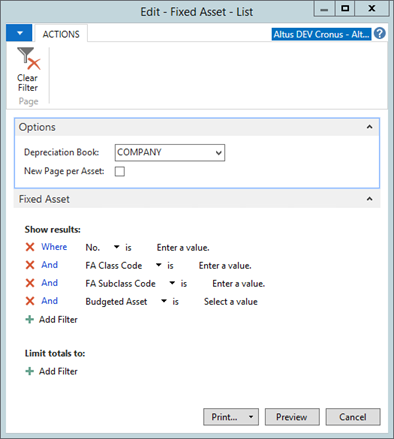
- In the Options FastTab, enter the following information:
- In the Depreciation Book field, click the Assist button to select the code for the depreciation book to use in the report.
- Click the New Page per Asset check box if you want the report to print a separate page for each fixed asset.
- In the Fixed Asset FastTab, set the filters you want the report to include:
- In the No. filter field, click the drop-down button to select the numbers of the fixed assets to include in the report.
- In the FA Class Code filter field, click the drop-down button to select the code for the FA classes to include in the report.
- In the Subclass Code filter field, click the drop-down button to select the code for the FA class subclasses to include in the report.
- In the Budget Asset filter field, enter Yes in the filter field if you want the report to include only budgeted assets. If you do not want budgeted assets to be included in the batch job, enter No in this field.
- Click Print to print the report. If you want to see the report on the screen before printing, click Preview.
Generated a Projected Value Report of Your Fixed Assets
With the Fixed Asset - Projected Value report, you see calculated future depreciation and book value. You can print the report for one depreciation book at a time. Additionally, you can calculate the projected depreciation for two periods:
- For the first period, the dates in the Posted Entries From field and the First Depreciation Date field are used. If you enter a date before the last posted depreciation entry, no depreciation is calculated as of the first depreciation date.
- For the second period, the dates in the First Depreciation Date field and the Last Depreciation Date field are used. The depreciation amount calculated for the second period can either be shown as a single amount or as several amounts broken down by the time interval specified in the No. of Days field.
To generate a Projected Value report:
- From the Fixed Assets folder, under Reports and Analysis, select FA Projected Value.
The Fixed Asset – Projected Value page opens.
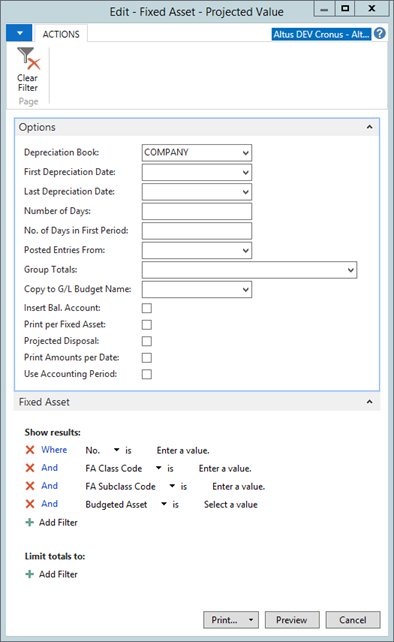
- In the Fixed Asset FastTab, set the filters you want the report to include:
- In the No. filter field, click the drop-down button to select the numbers of the fixed assets to include in the report.
- In the FA Class Code filter field, click the drop-down button to select the code for the FA classes to include in the report.
- In the Subclass Code filter field, click the drop-down button to select the code for the FA class subclasses to include in the report.
- In the Budget Asset filter field, enter Yes in the filter field if you want the report to include only budgeted assets. If you do not want budgeted assets to be included in the batch job, enter No in this field.
- In the Location Code filter field, click the drop-down button to select the location code for the location to include in the report.
- In the Options FastTab, enter the following information:
- In the Depreciation Book field, click the drop-down button to select the code for the depreciation book to use in the report.
- In the First Depreciation Date field, enter the date to be used as the first date in the period for which you want to calculate projected depreciation.
- In the Last Depreciation Date field, enter the date to be used as the last date in the period for which you want to calculate projected depreciation.
- In the Number of Days field, enter the length of the periods between the first depreciation date and the last depreciation date. Depreciation is calculated for each period. If you leave this field blank, this field is populated to equal the number of days in a fiscal year, normally 360.
- In the No. of Days in First Period field, enter the number of days that must be used for calculating the depreciation as of the first depreciation date, regardless of the actual number of days from the last depreciation entry. The number you enter in this field does affect the total number of days from the starting date to the ending date.
- In the Posted Entries From field, enter a date if you want the report to include posted entries. The report includes all types of posted entries posted from that FA posting date.
- From the Group Totals drop-down, select a group type if you want the report to group the fixed assets and print group totals. For example, if you have set up six FA classes, then select the FA Class option to have group totals printed for each of the six class codes. If you do not want group totals printed, leave this field empty.
- In the Copy to G/L Budget Name field, click the drop-down button and select the name of the budget to which you want to copy projected values.
- Click the Insert Bal. Account check box if you want the program to automatically insert budget entries with balancing accounts.
- Click the New Page per Asset check box if you want the report to print a separate page for each fixed asset.
- Click the Projected Disposal check box if you want the report to include projected disposals (the contents of the Projected Proceeds on Disposal field and the Projected Disposal Date field on the FA depreciation book).
- Click the Print Amounts per Date check box if you want the program to include on the last page of the report a summary of the calculated depreciation for all assets.
- Click the Use Accounting Period check box if you want the periods between the starting date and click the table. When you click this field, the Number of Days field is cleared.
- Click Print to print the report. If you want to see the report on the screen before printing, click Preview.
Running a Change Log Report
Before being able to run Change Log reports for updates on the Fixed Asset card you first need to configure Change Log Setup for Table ID 5600 Fixed Assets.
To view the change log:
- From the Administration menu, select IT Administration> General> Tasks> Change Log Setup.
The Change Log Setup page opens.
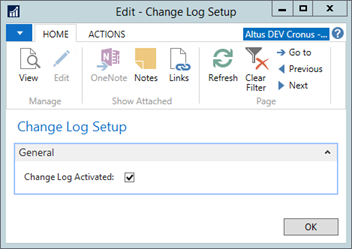
- Add a checkmark to the Change Log Activated check box (if not already checked).
- From the Ribbon, click the Actions tab and then click Tables.
- The Change Log Setup (Table) List displays.
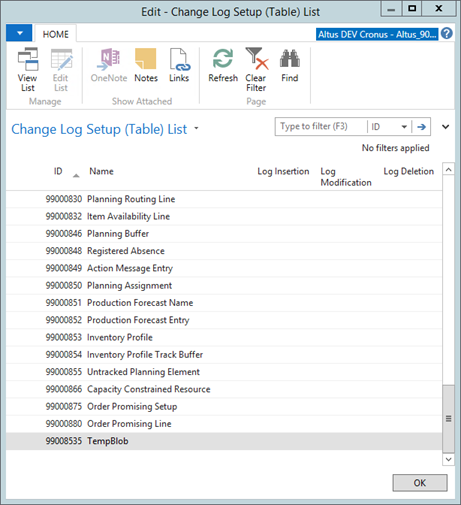
- In the Table List, filter by ID column for Table No. = 5600.
- Set parameters for Log Insertion, Log Modification, and Log Deletion. (The recommended setting is to select the Some Fields option.
- Use the multi-dot button (…) next to Some Fields to drill down to the list of fields.
- Update the columns Log Insertion, Log Modification, and Log Deletion for the fields and actions you want to track.
- Close the page.
- From the Administration menu, select Application Setup> General> Change Log.
- The Change Log shows a log of the updates made on the fixed asset card.