

Recording Acquisition Costs
For every asset purchased, you need to record the expense/cost to maintain a record of the asset. Additionally, recording the acquisition cost also enables you to track depreciation and salvage value.
The following process applies when Employee portal is implemented. Before starting the process:
- Create a Fixed Asset Card for the asset(s) to be purchased.
- Check TCA Expense Posting for each asset.
- Create an Expense Type that corresponds to each asset.
Recording an Expense using the Employee Portal
To record a capital tangible asset expense when Employee Center is used:
Note: Before you begin, make sure that the asset is created as a Fixed Asset Card and an Expense Type.
- Launch and log in to Employee Center.
- From the Finance & Purchasing menu, select Purchase Requisitions.
The Purchase Requisitions page displays. - Create a new purchase requisition by clicking New.
A new purchase requisition window opens with a number automatically assigned: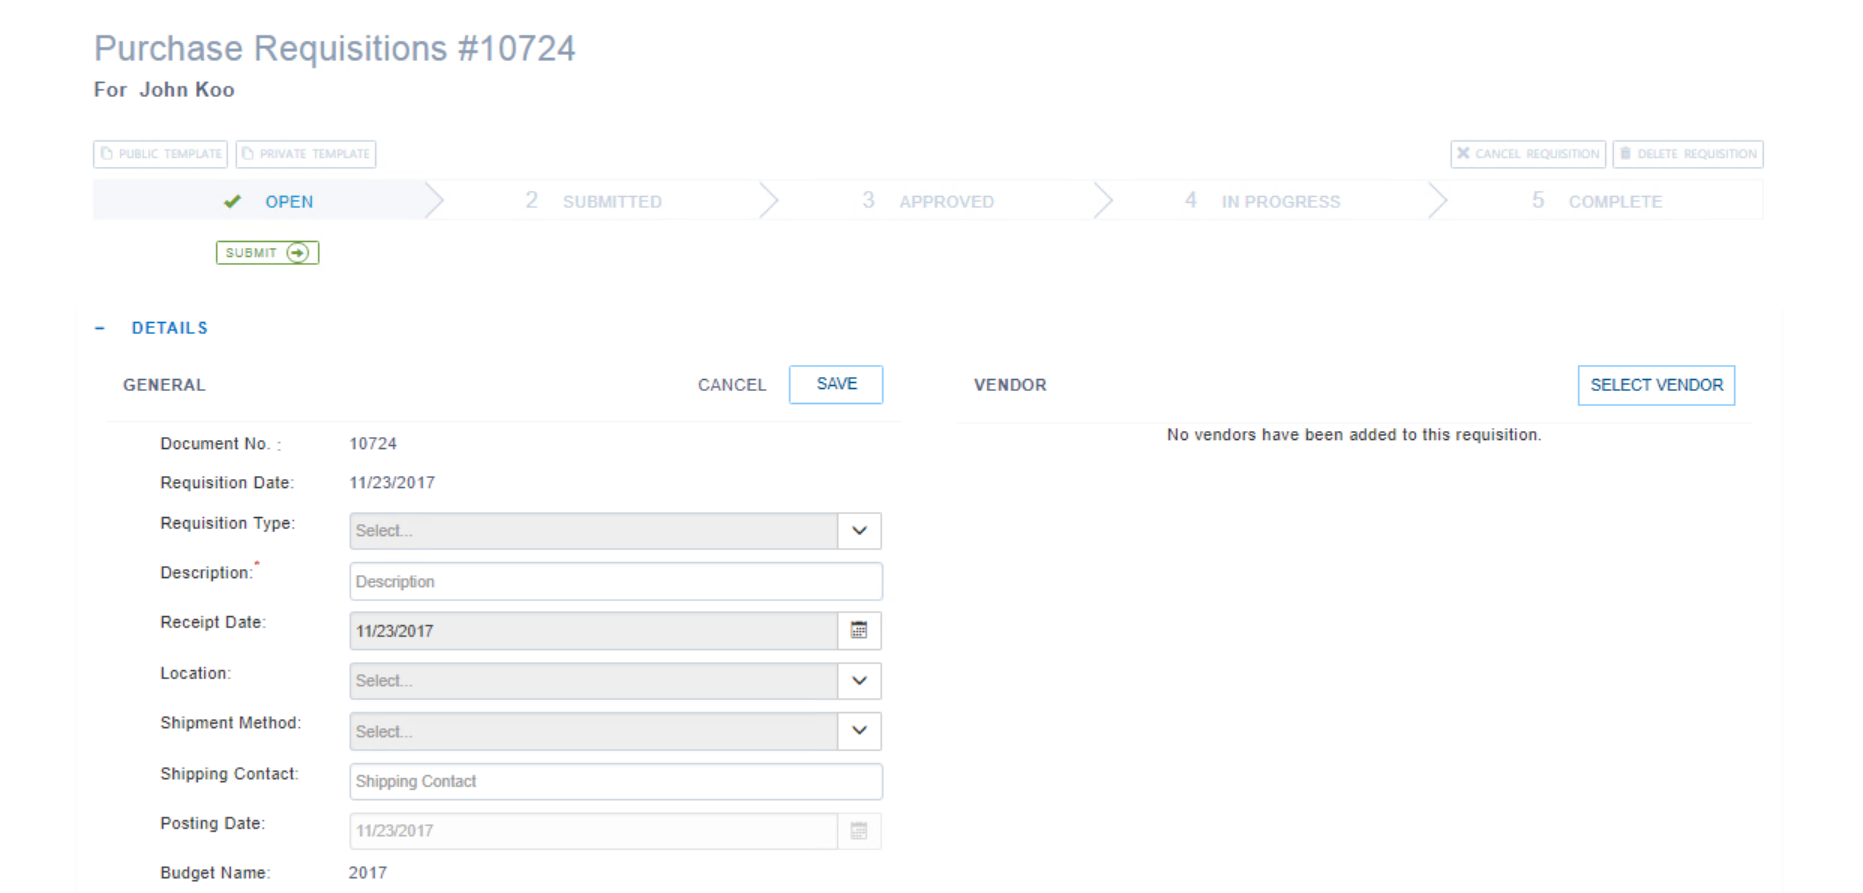
- In the Description field, enter a brief description for the Purchase Requisition.
- In the Receipt Date field enter the date upon which the item is required.
- From the Location drop-down list, select the appropriate location.
- In the GENERAL section, click SAVE.
- Add a vendor by clicking SELECT VENDOR at the top right corner, if applicable.
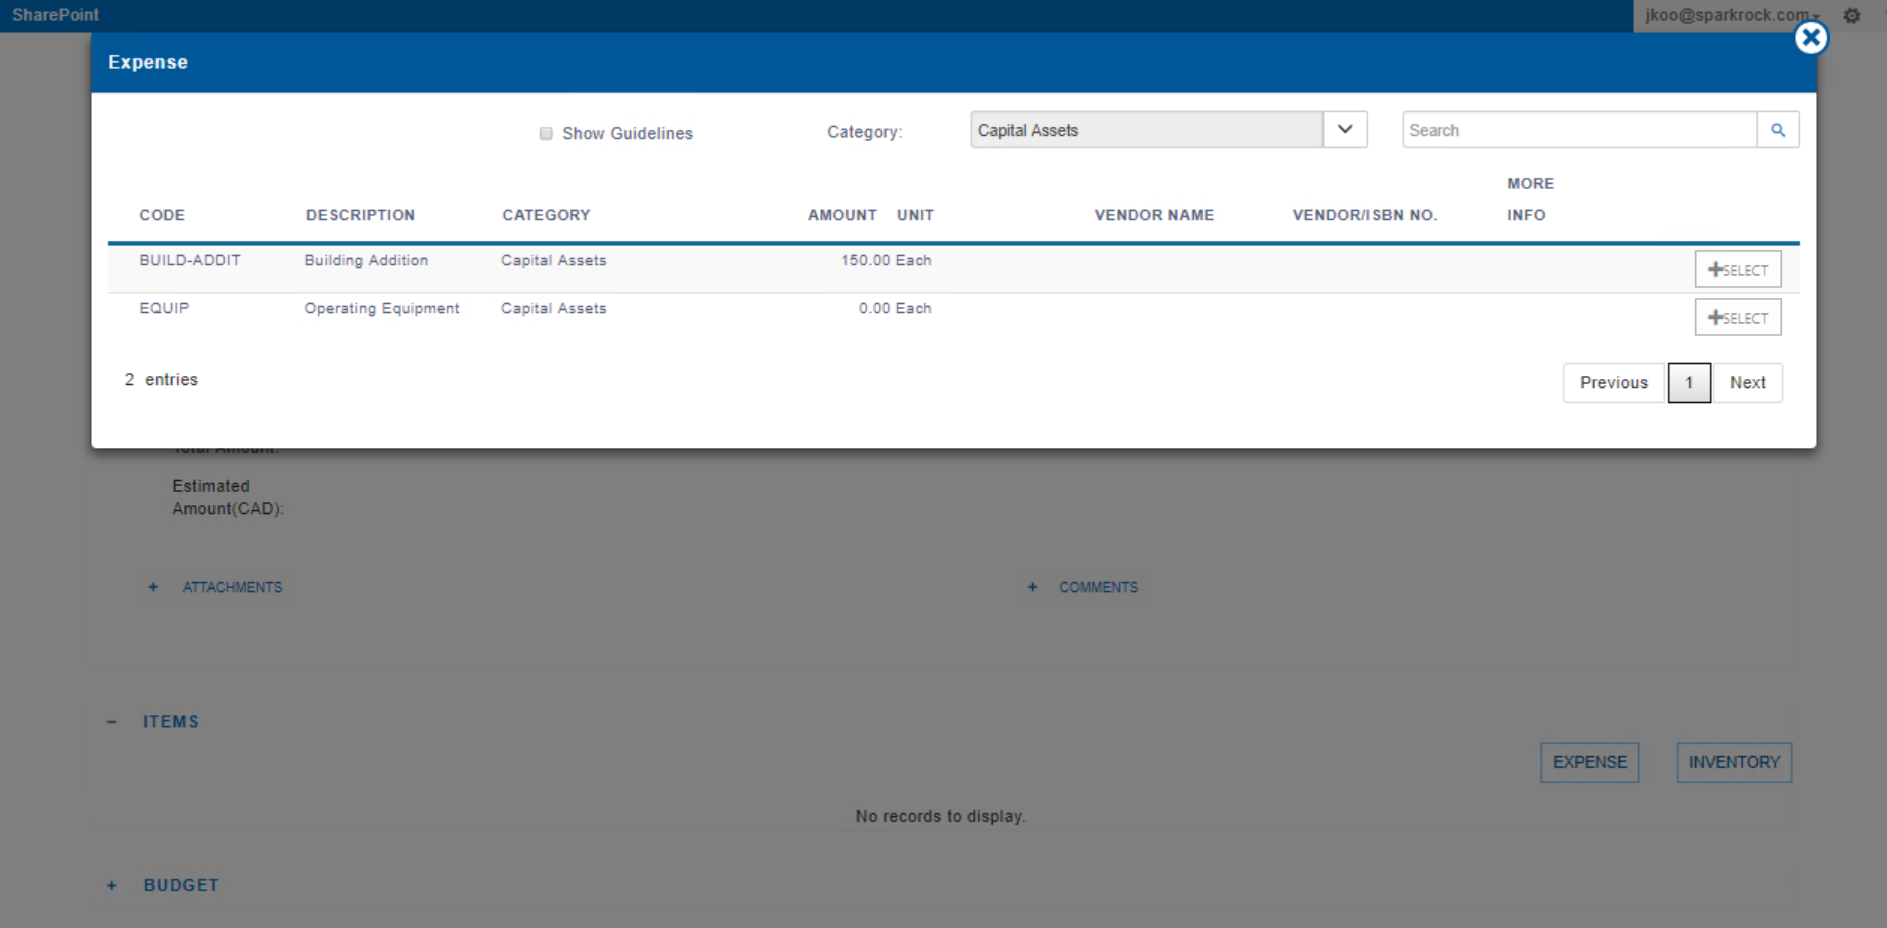
- In ITEMS section, Click EXPENSE to add the asset to the Purchase Requisition.
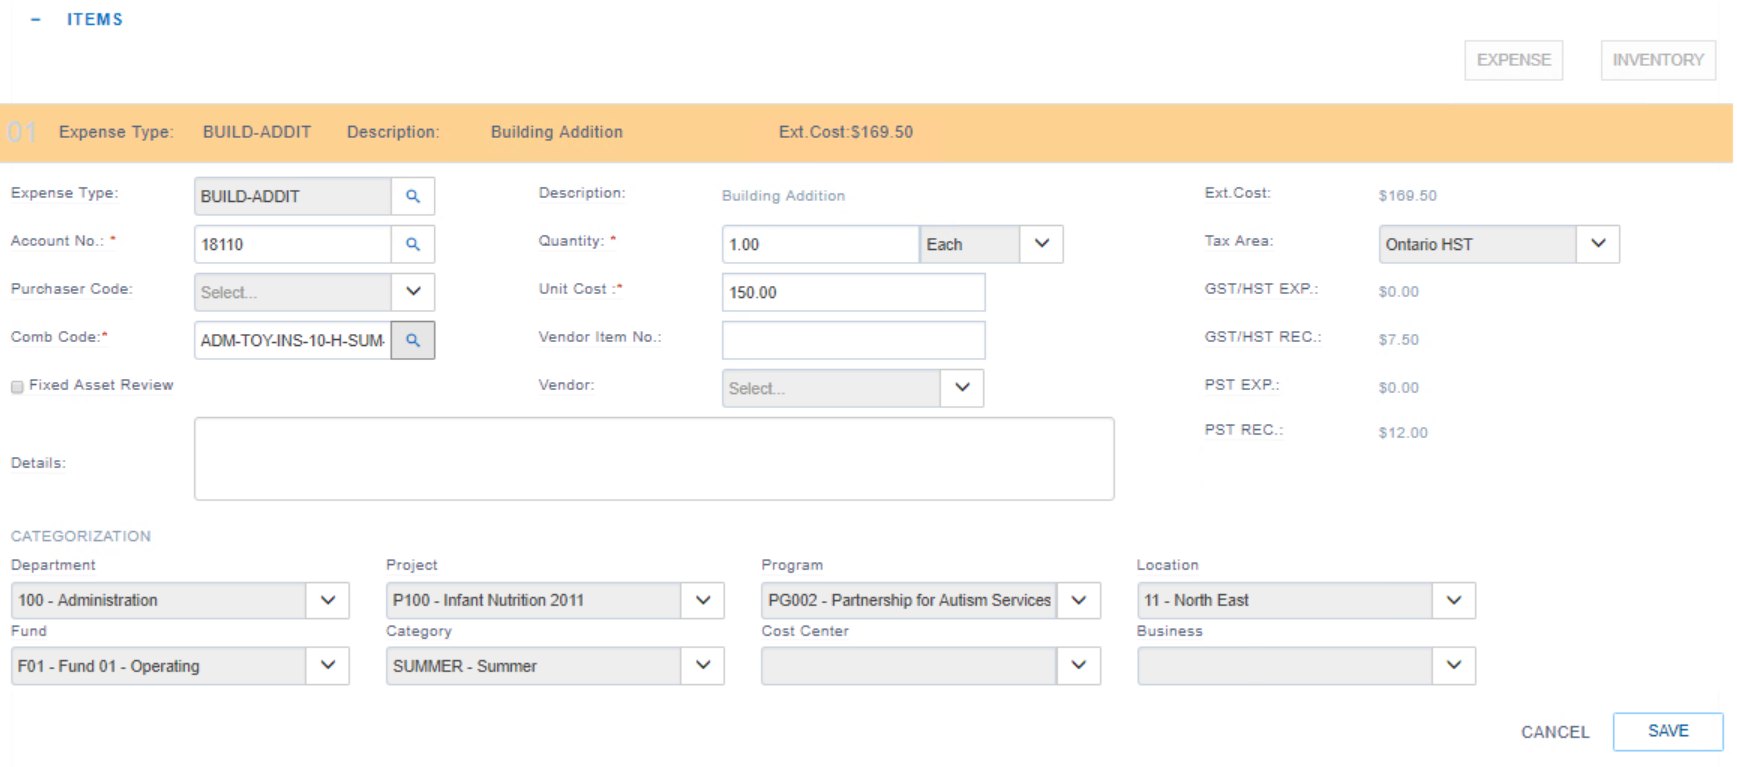
- Select dimension values where applicable.
- Enter Unit Cost before taxes.
- Check to update the line and click Save.
- Repeat steps 10-12 as required.
- Once the purchase requisition is completed, go to the Status tab.
- Click Submit to submit the purchase requisition for approval.

Converting a Purchase Requisition into a Purchase Order
Once a purchase requisition is created, you can use the original request document to create a purchase order, which saves time and reduces the possibility for error.
To convert a Purchase Request to a Purchase Order:
- From the Departments menu, select Purchase > Order Processing > Tasks > Request Inbox.
The Request Inbox page displays.
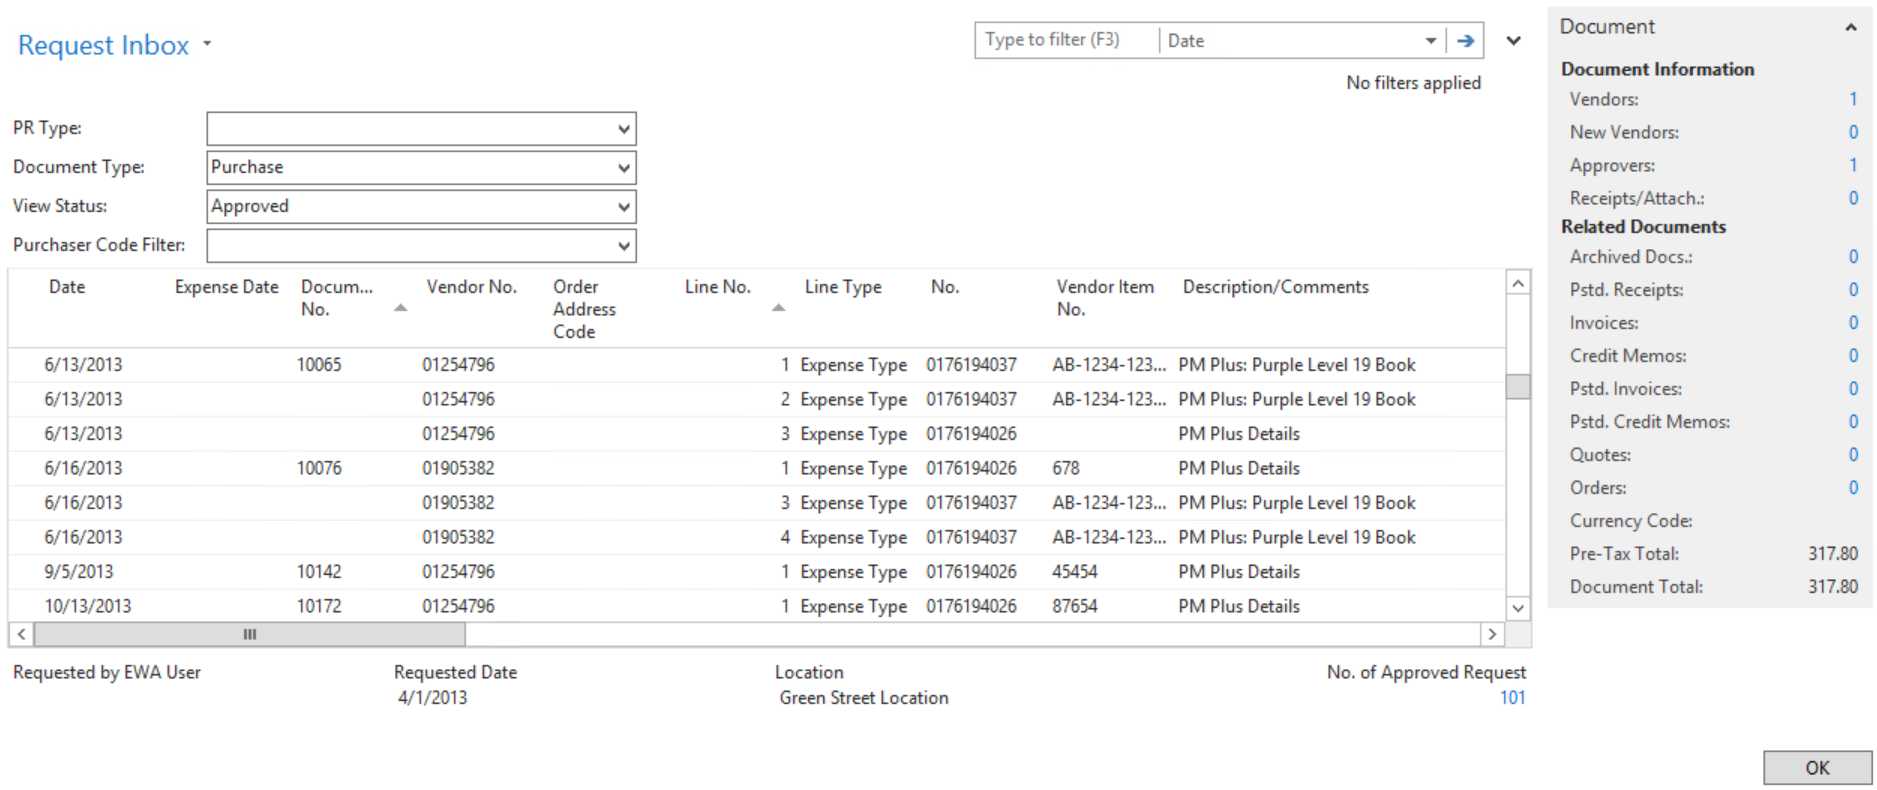
- Locate the TCA Purchase Requisition and verify it has been approved.
Document No. is the Purchase Requisition No. and View Status = Approved. - Highlight the one of requisition lines and from the Ribbon click Navigate and then click Card.
- Review the Purchase Requisition and make changes, if necessary.
- Click the Action tab and click Create Purchase Order for the lines you want to convert into a Purchase Order.
Viewing the Newly Created Purchase Order
Once you clicked Create Purchase Order button from previous step, it will bring you the Purchase Order. Another way to open the Purchase Order created from the Purchase Requisition:
- In the Search field, type Purchase Orders and select the page from the drop-down list.
The Purchase Orders page displays.
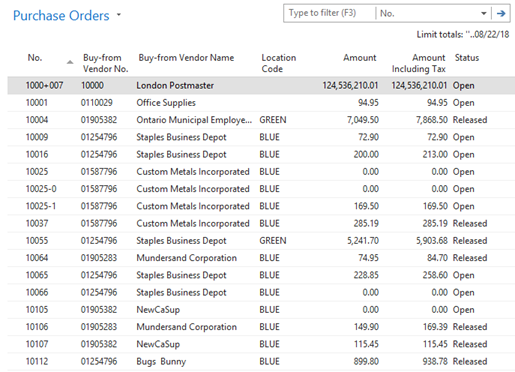
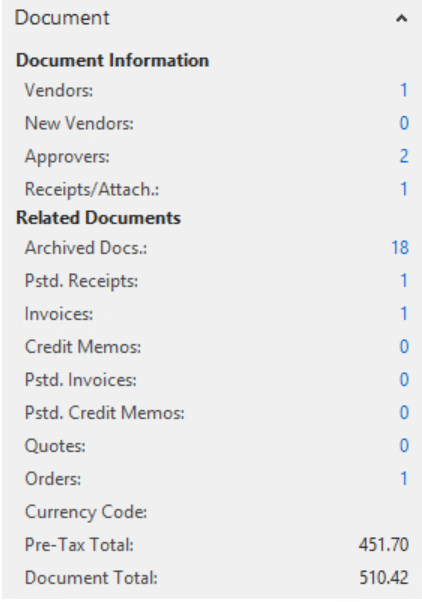
- Locate the purchase order you created. Or, under the Factbox section (the right pane of the screen on the Purchase Requisition Card), click the drill-down arrow on the Orders field to see the purchase orders generated from the request.
- On the purchase lines, complete the following:
- Confirm that Type equals to G/L account.
- From the the No. drop-down list select a GL Expense account if the account is not populated or needs to be changed.
- From the Fixed Asset No. drop-down list, tag this line with the Fixed Asset No. that corresponds to the expense type.
- In the Ribbon, click Release to create a commitment.
Posting a Vendor Invoice
Please follow the Purchase Process applicable to your organization.
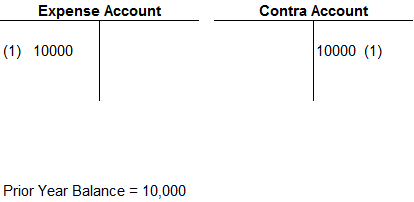
The entries generated once the vendor invoice has been posted are illustrated through these T Accounts:

NOTES:
- The Contra Account (Expense Capital Bal. Acc) and the Acquisition Value account are set up in the FA Posting Group.
- The goal of the entry is to allow tracking of actuals vs. budget on the expense account. For Income Statement presentation purposes the Expense Account and the Contra account offset each other.
Recording an Expense outside Employee Center
The process below applies when Employee Center is not implemented. Before starting the process:
- Create a Fixed Asset Card for the asset(s) that was purchased.
- Check TCA Expense Posting for each CIP asset
NOTE: Follow the Purchase Process applicable to your organization.
The first step in recording the CIP asset is to create a purchase order or vendor invoice. To create either a Purchase Order or a Vendor Invoice:
- Confirm that Type is equal to G/L account.
- Click the Drop Down button in the No. column to select a GL Expense account.
- Click the Drop Down button in the Fixed Asset No. column to tag this line with the new CIP Fixed Asset number. This list is restricted to show only assets that have TCA expense posting checked.
- Repeat steps 1 to 3 to enter as many expenses as you need. You can also tag the expenses against different dimension combination, if applicable.
The entries generated once the vendor invoice is posted are illustrated through the T Accounts shown below:

NOTE: The Contra Account (Expense Capital Bal. Acc) and the Acquisition Value account are setup in the FA Posting Group.
The goal of the entry is to allow tracking of actuals vs. budget on the expense account. For Income Statement presentation purposes the Expense Account and the Contra account offset each other.
Recording an Asset Outside Employee Center
The salvage value is the residual value of a fixed asset when it can no longer be used. You can post the salvage to an FA journal.
Posting the Salvage Value from an FA Journal
NOTE: The salvage value can only be posted after the acquisition cost of an asset has been posted.
To post salvage:
- In the Search field, type FA Journals and select the page from the drop-down list.
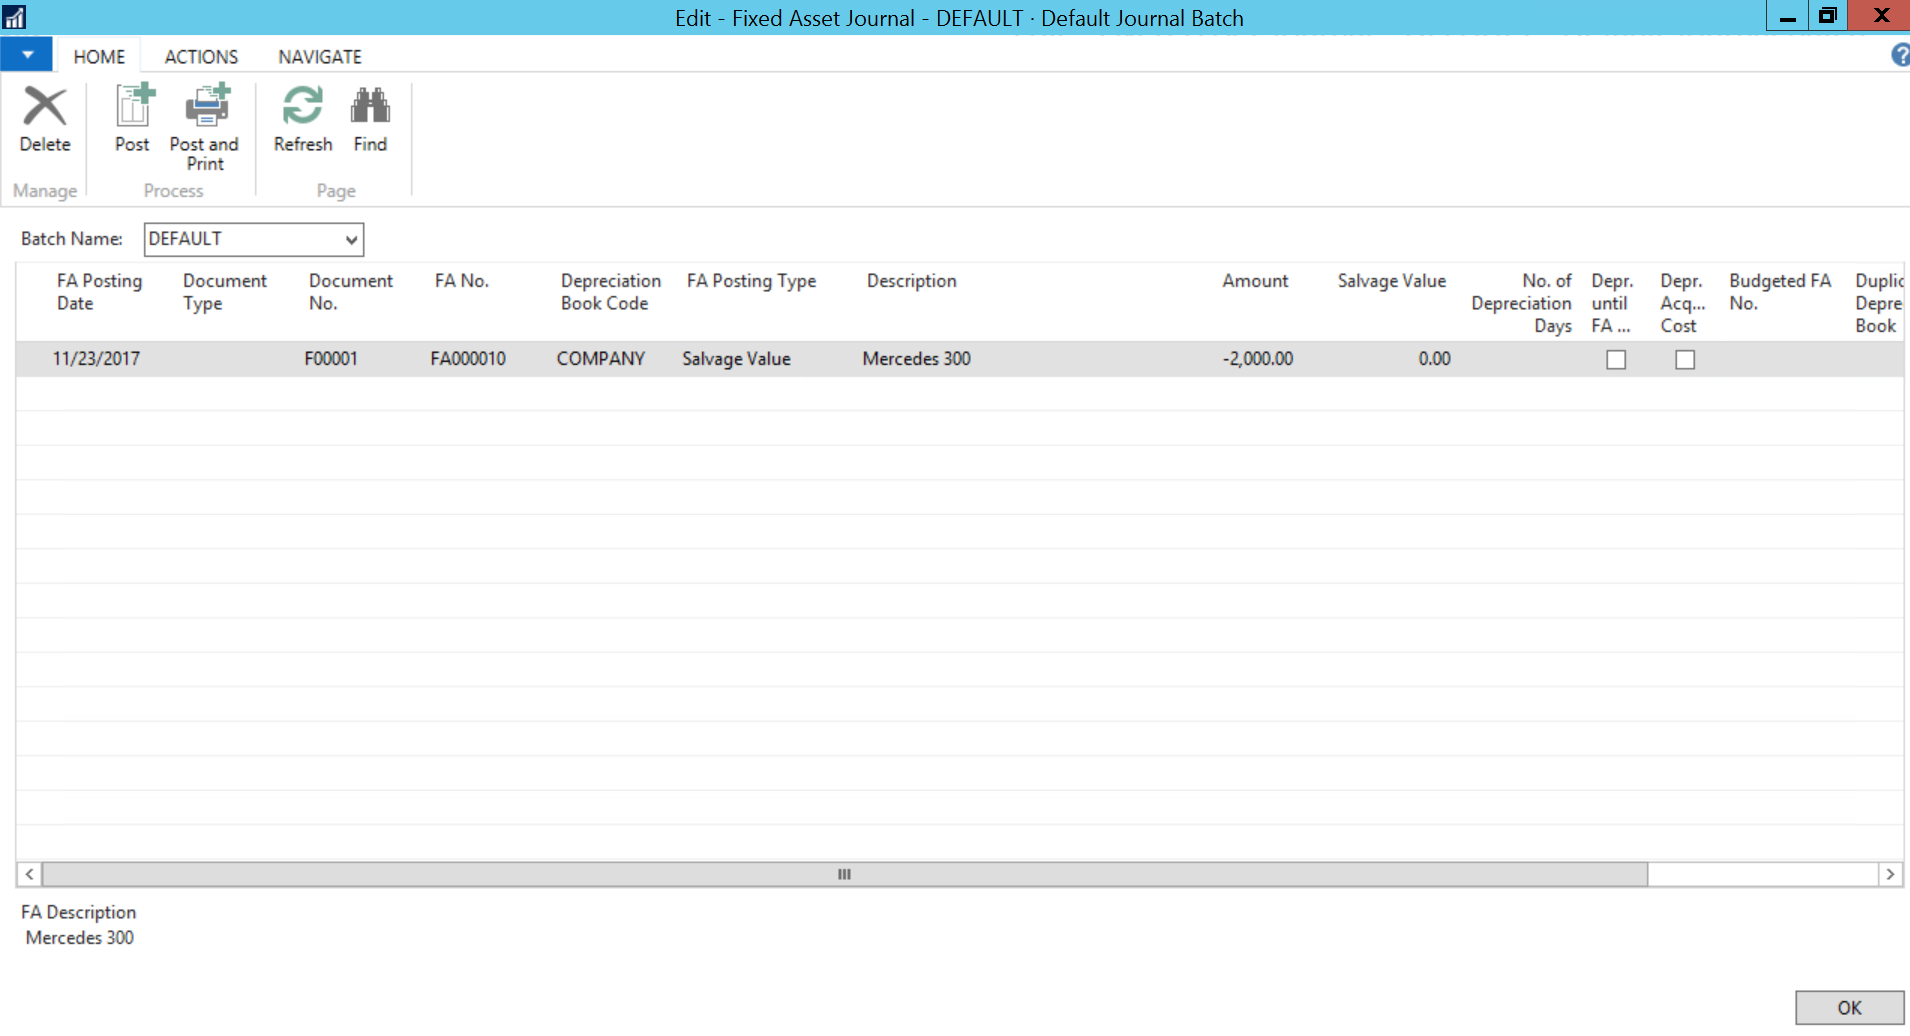
The Fixed Asset Journal displays.

2. In the Fixed Asset Journal, enter the salvage values in the Salvage Value field.
NOTE: The posting type Salvage Value is an option only in the FA journal (not in the FA G/L journal). This is because salvage value is never posted to the general ledger.
Viewing the Salvage Value
To see the salvage value of a fixed asset:
- In the Search field, type Fixed Assets and select the page from the drop-down list.
The Fixed Assets page displays.

- Select the asset for which want view the salvage value.
- From the Home Ribbon, click Edit.
The Edit - Fixed Asset card displays.
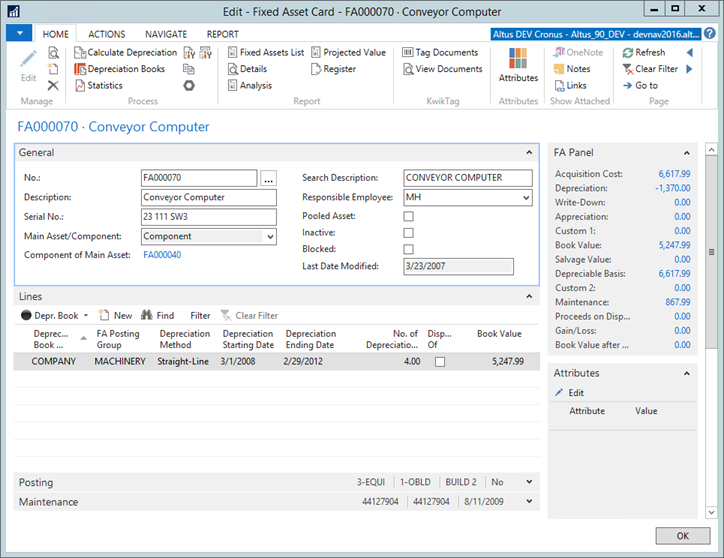
- From the Home Ribbon, click Depreciation Books.
The Edit - FA Depreciation Books page displays.
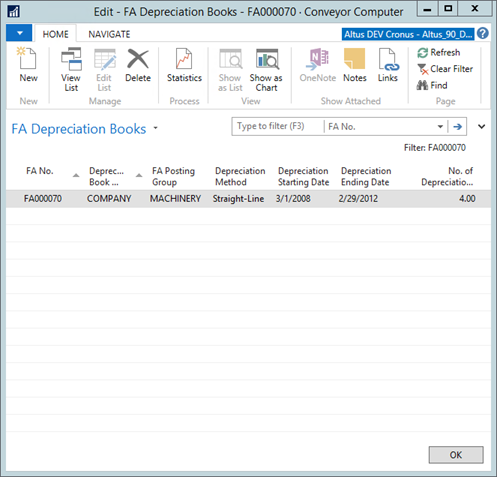
- From the Home Ribbon, click Statistics.
The Fixed Asset Statistics page displays. Here you can see the salvage value and the last fixed asset posting date on which a salvage-value transaction was posted.
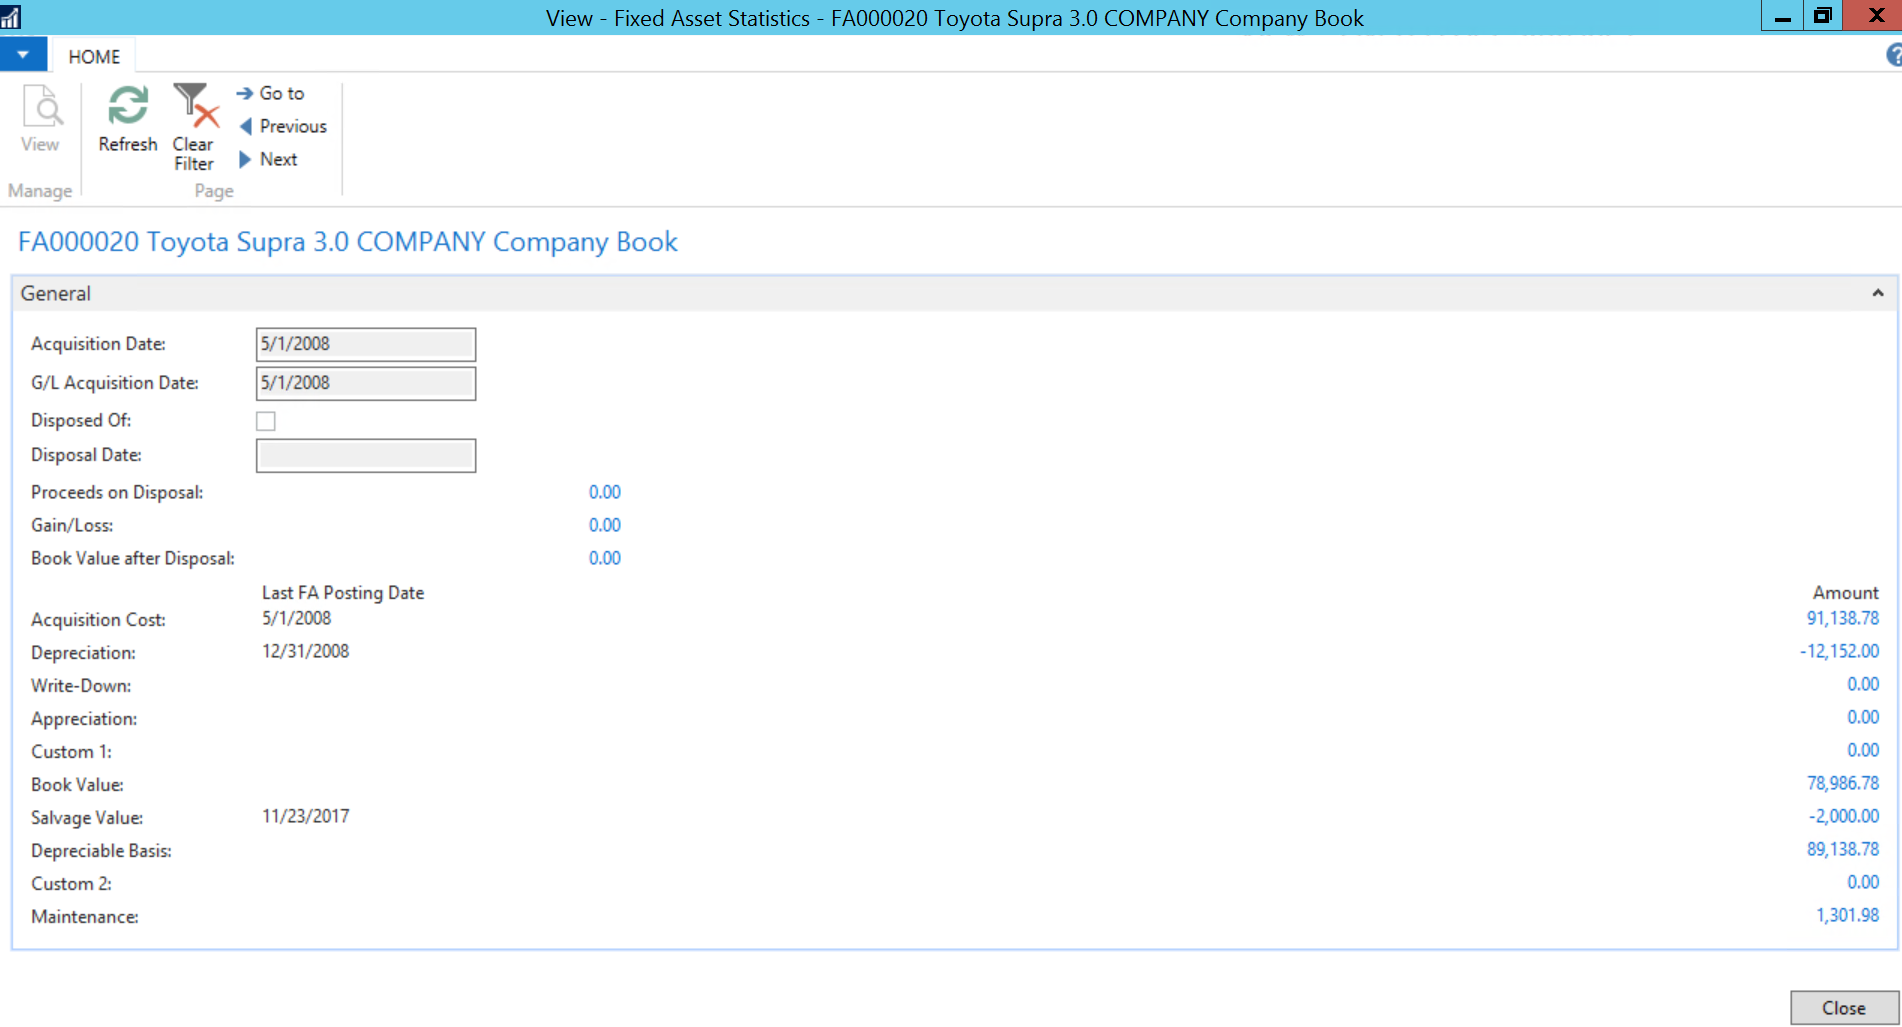
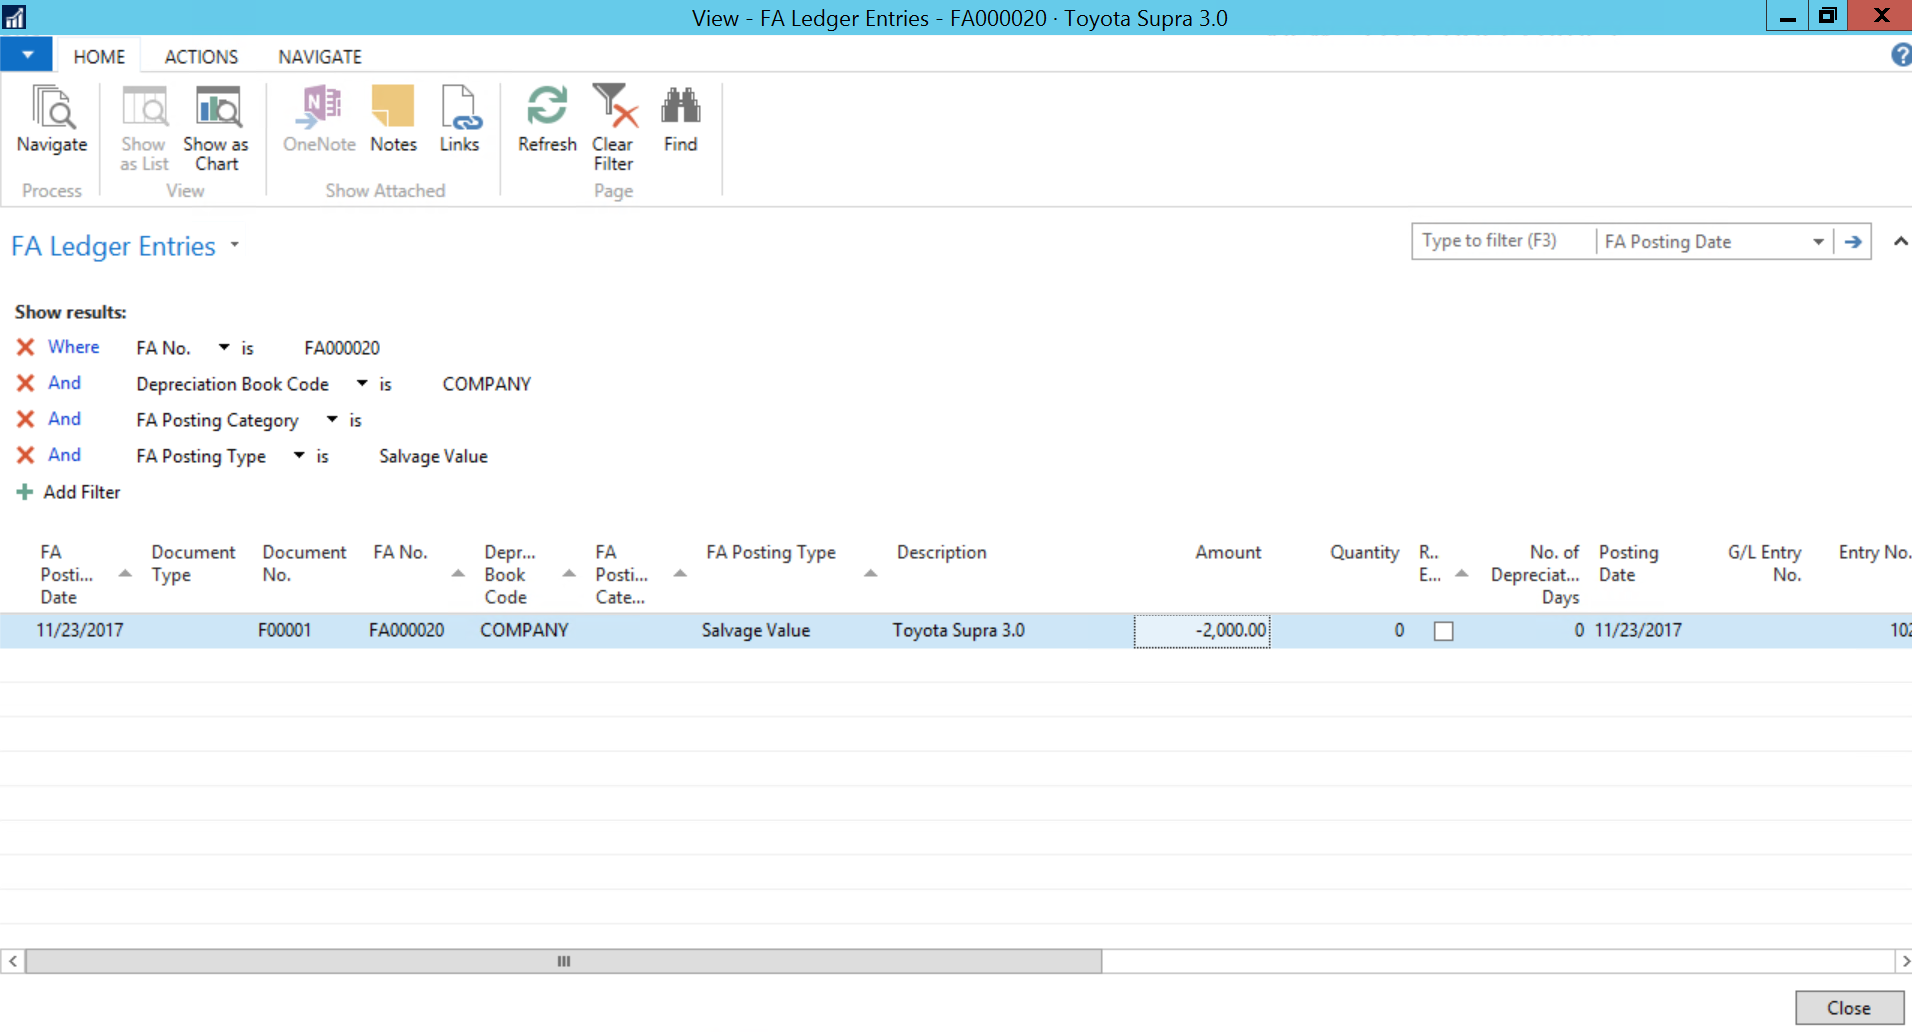
- In the Salvage Value field, drill down the number to see the FA ledger entries that add up to the amount.
Calculating and Posting Depreciation
Calculating and Posting Through a Journal Entry
Depreciation is used to allocate the cost of fixed assets such as machinery and equipment over their depreciable life. For each fixed asset, by choosing a depreciation method you must define how it will be depreciated.
There are two ways to post depreciation:
- Manually using the FA G/L journal or the FA journal
- Automatically by running the Calculate Depreciation batch job
Once a month, or whenever you choose (such as March 31st and August 31st), you can run the Calculate Depreciation batch job. Assets that have been sold, assets that are blocked or inactive on the fixed asset card and assets set to use the manual depreciation method are ignored.
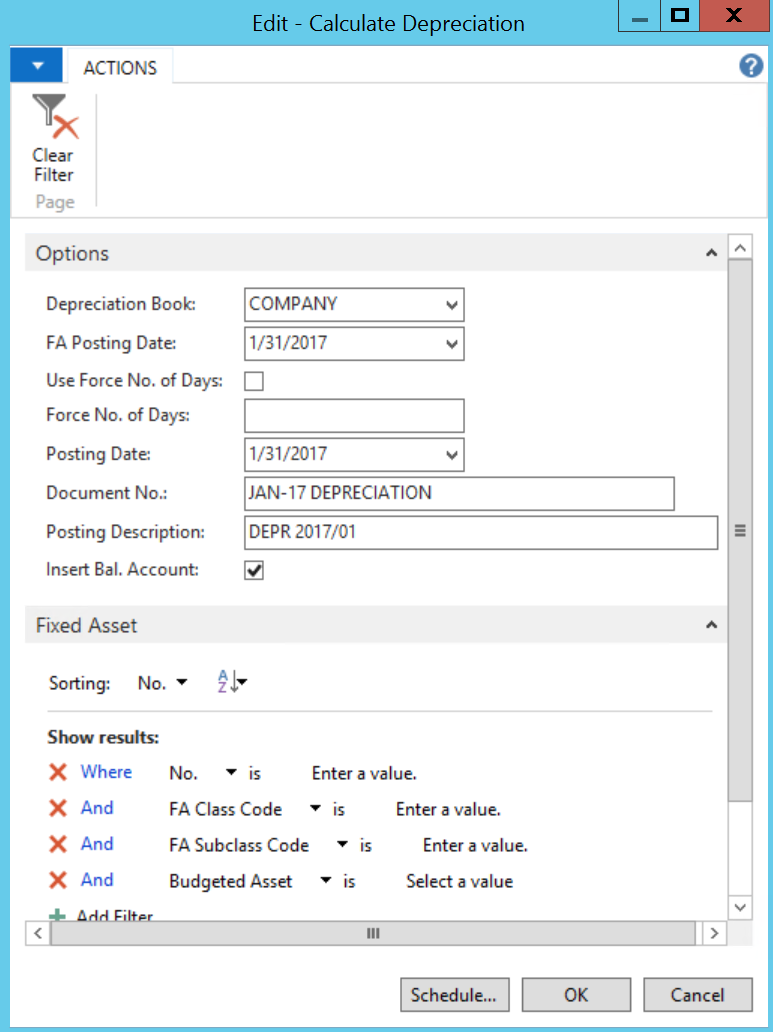
The following example explains how to run batch depreciation job. The depreciation is calculated for fixed asset FA000080 only to make it easier to see how the program works. The last depreciation took place on 12/31/16. For this depreciation calculation the date is January 31, 2017.
To run a batch depreciation job:
- In the Search field, type Calculate Depreciation and select the page from the drop-down list.
The Calculate Depreciation page displays.
- Set a filter to select the assets you want to depreciate.
- In Options tab, select a Depreciation Book.
- Enter a FA Posting Date and Posting Description in the fields provided.
- Click to add a check mark in the Insert Bal. Account check box.
- Click OK to calculate the depreciation as of the posting date.
The batch job has calculated depreciation for the selected fixed asset number and created lines in the FA G/L journal. - In the Search field, type FA G/L Journals and select the page from the drop-down list.
The Fixed Asset G/L Journal page displays.
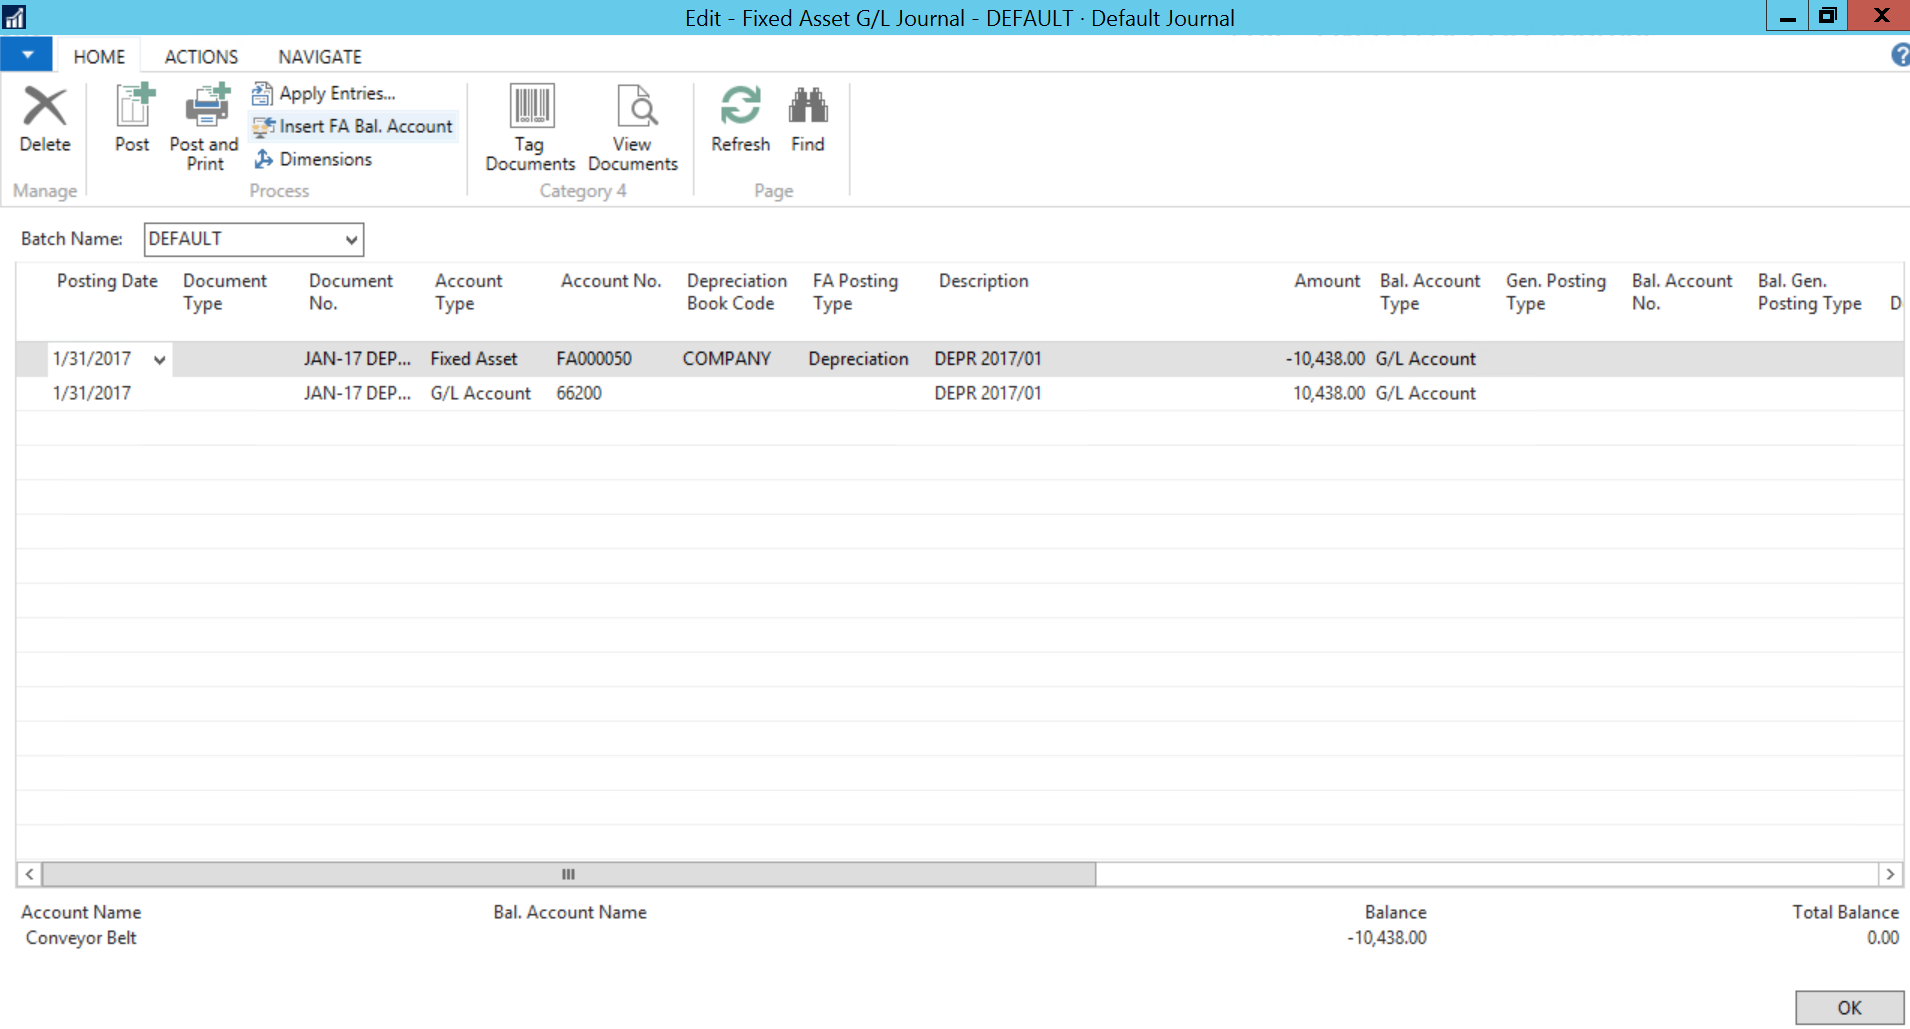
- The balancing line has been created because there is a check mark in the Insert Bal. Account field check box on the Options tab for the Calculate Depreciation batch job.
- Click Posting and select Post to post the journal.
Viewing the Depreciation Ledger Entries
To view ledger entries for a depreciation:
- Open the Fixed Assets card. In the Search field, type Fixed Assets and select the page from the drop-down list.
The Fixed Assets card displays.
- Search for the asset that has been depreciated.
- From the Ribbon, click the Navigate tab and then click Depreciation Books.
The FA Depreciation Books page displays.
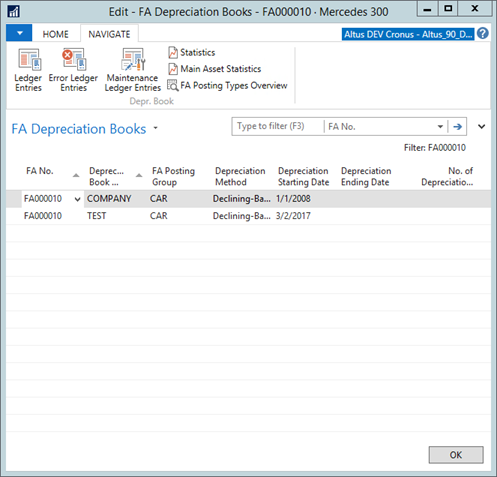
- On the Ribbon, click the Navigate tab and then click Ledger Entries.
The FA Ledger Entries page displays.
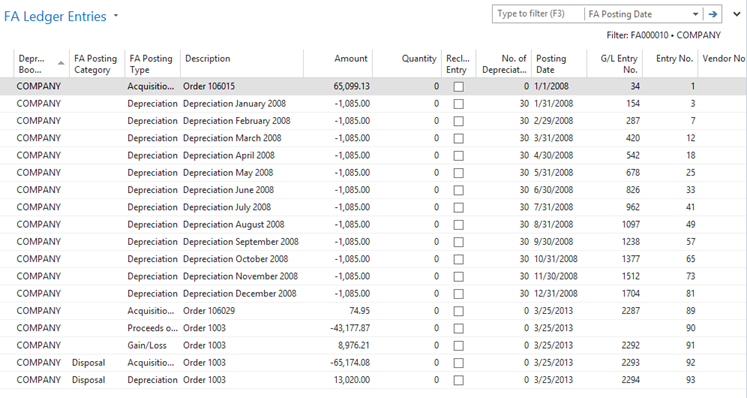
- Select the line with Depreciation in the FA Posting Category field.
- Click Navigate.
The Navigate page displays.
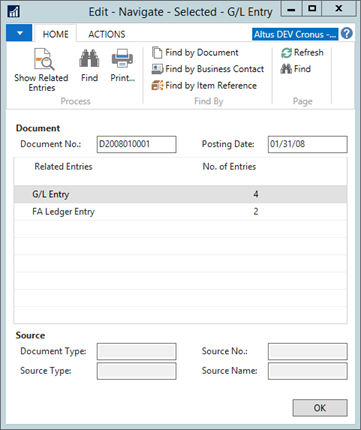
- Click the G/L Entry, and then click Show Related Entries.
The General Ledger Entries page displays.
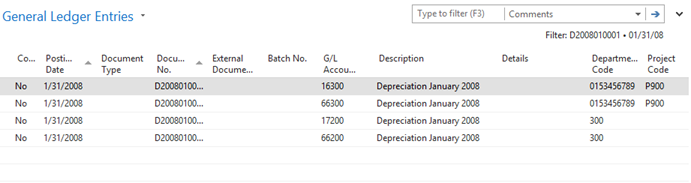
The write-down transaction has resulted in these entries:
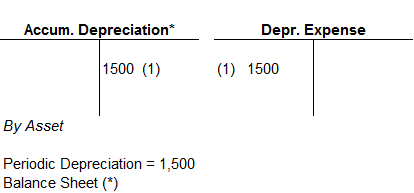
NOTE: Account numbers related to depreciation are specified in the FA Posting Groups window in the Accum. Depreciation Account and Depreciation Expense Acc. fields respectively. Use Show Columns to display the account references if they are not currently visible on the screen.
Using the Journals for "Write Downs"
Entering a Journal Entry
You can use this feature to write down an asset when its value has decreased.
- From the Financial Management menu, select Fixed Assets > Tasks > FA G/L Journals.
- Complete a line entry by entering the following information:
- Account Type – Fixed Assets
- Account No. – Asset Number
- FA Posting Type – Write-Down
- Amount – enter the sale value with negative sign
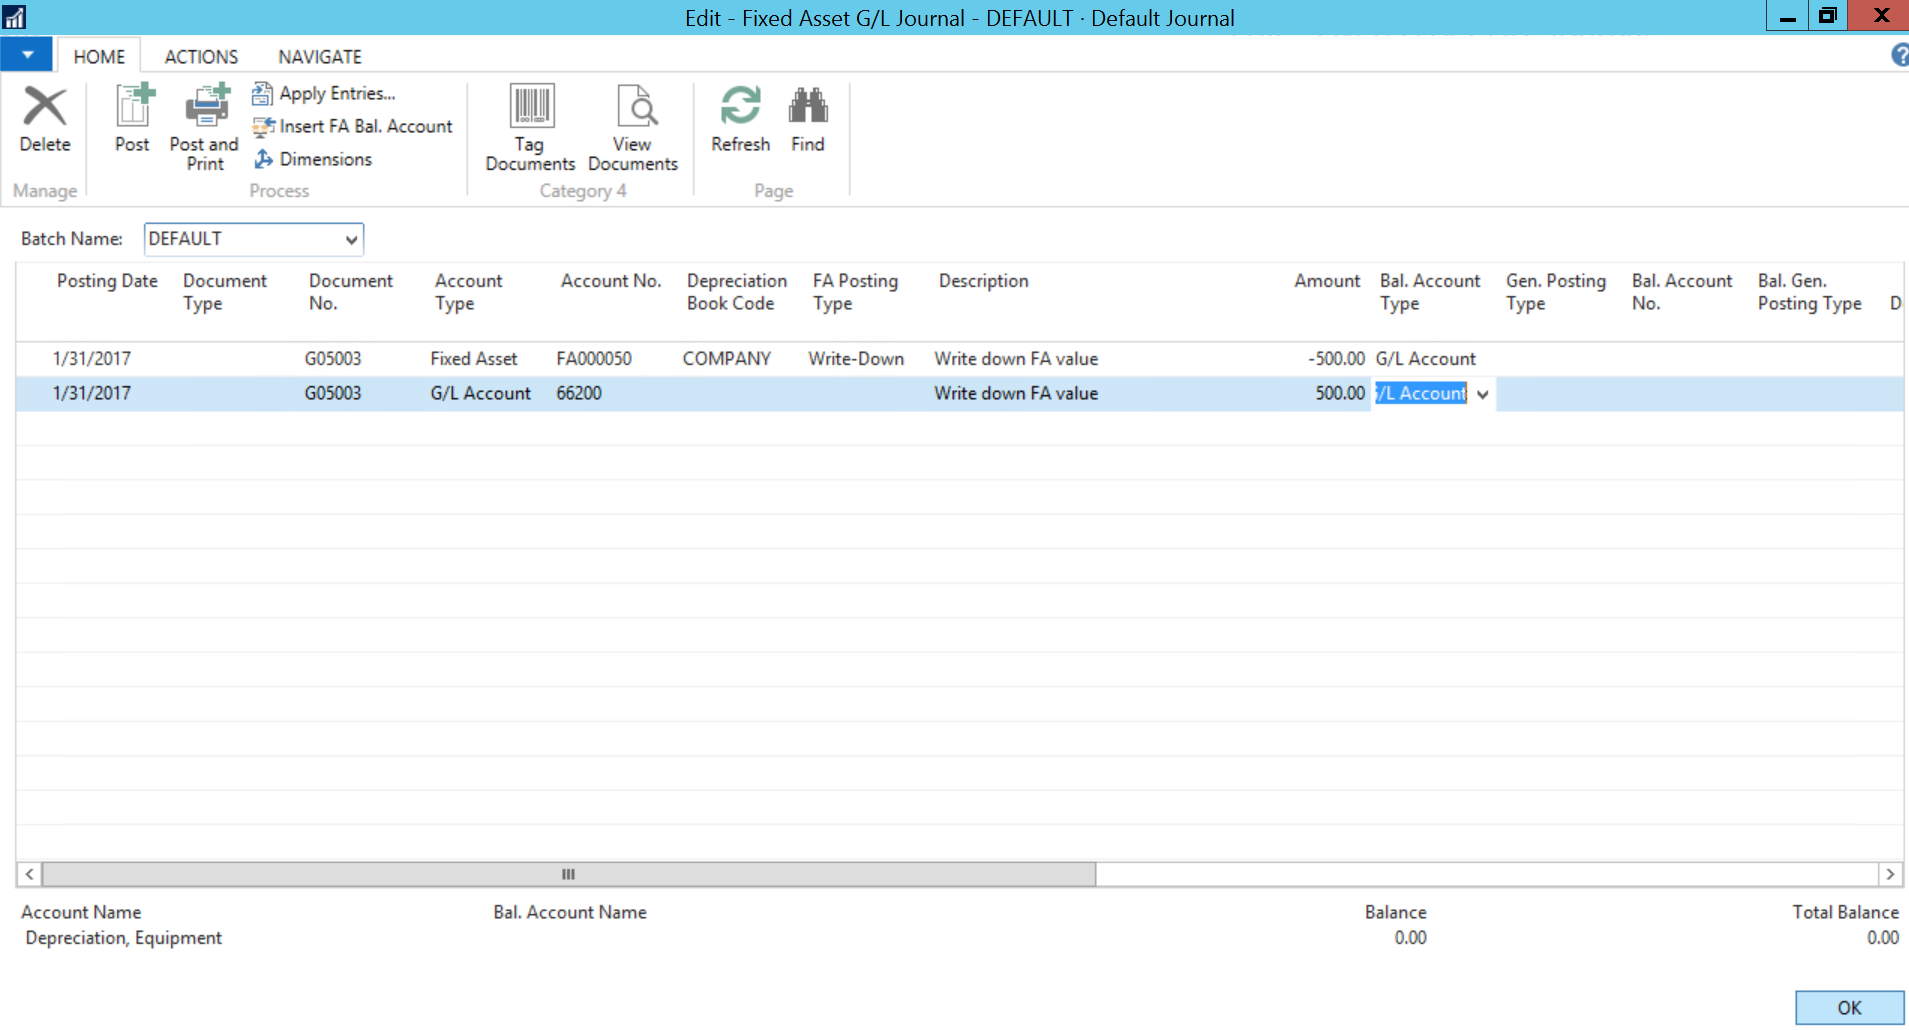
- In the Ribbon, click Insert FA Bal. Account.
A second line is entered with the balance entry (displayed in the image on the previous page). - From the Home Ribbon, click Post.
The entry is posted to the journal.
Viewing the Write Downs Ledger Entries
To view the ledger entries for a write down:
- From the Financial Management menu, select Fixed Assets > Lists > Fixed Assets.
The Fixed Assets list opens. - Select the asset that has been written-down.
- From the Ribbon, click the Navigate tab and then click Depreciation Books.
The FA Depreciation Books page displays. - From the Ribbon, click the Navigate tab and then click Ledger Entries.
The FA Ledger Entries page displays. - Select the line with Write-Down in the FA Posting Category field, and from the Home Ribbon click Navigate.
- In the Navigation page, click the G/L Entry, and then click Show Related Entries.
The General Ledger Entries page opens.
The write-down transaction created the following entries:
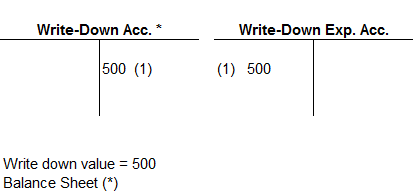
NOTE: Account numbers related to write-down are specified in the FA Posting Groups page in the Write-Down Account and Write-Down Expense Acc. fields respectively. Use Show Columns to display the account references if they are not currently visible on the screen.
Recording Disposals
Posting the Disposal Value for a Capital Asset to the Journal
When you sell or otherwise dispose of a capital asset, the disposal value must be posted. The program automatically calculates the gain or loss as the difference between the net book value of the asset and its disposable value.
To post the disposal value to the journal:
- From the Financial Management menu, select Fixed Assets > Tasks > FA G/L Journals.
The FA G/L Journals displays.
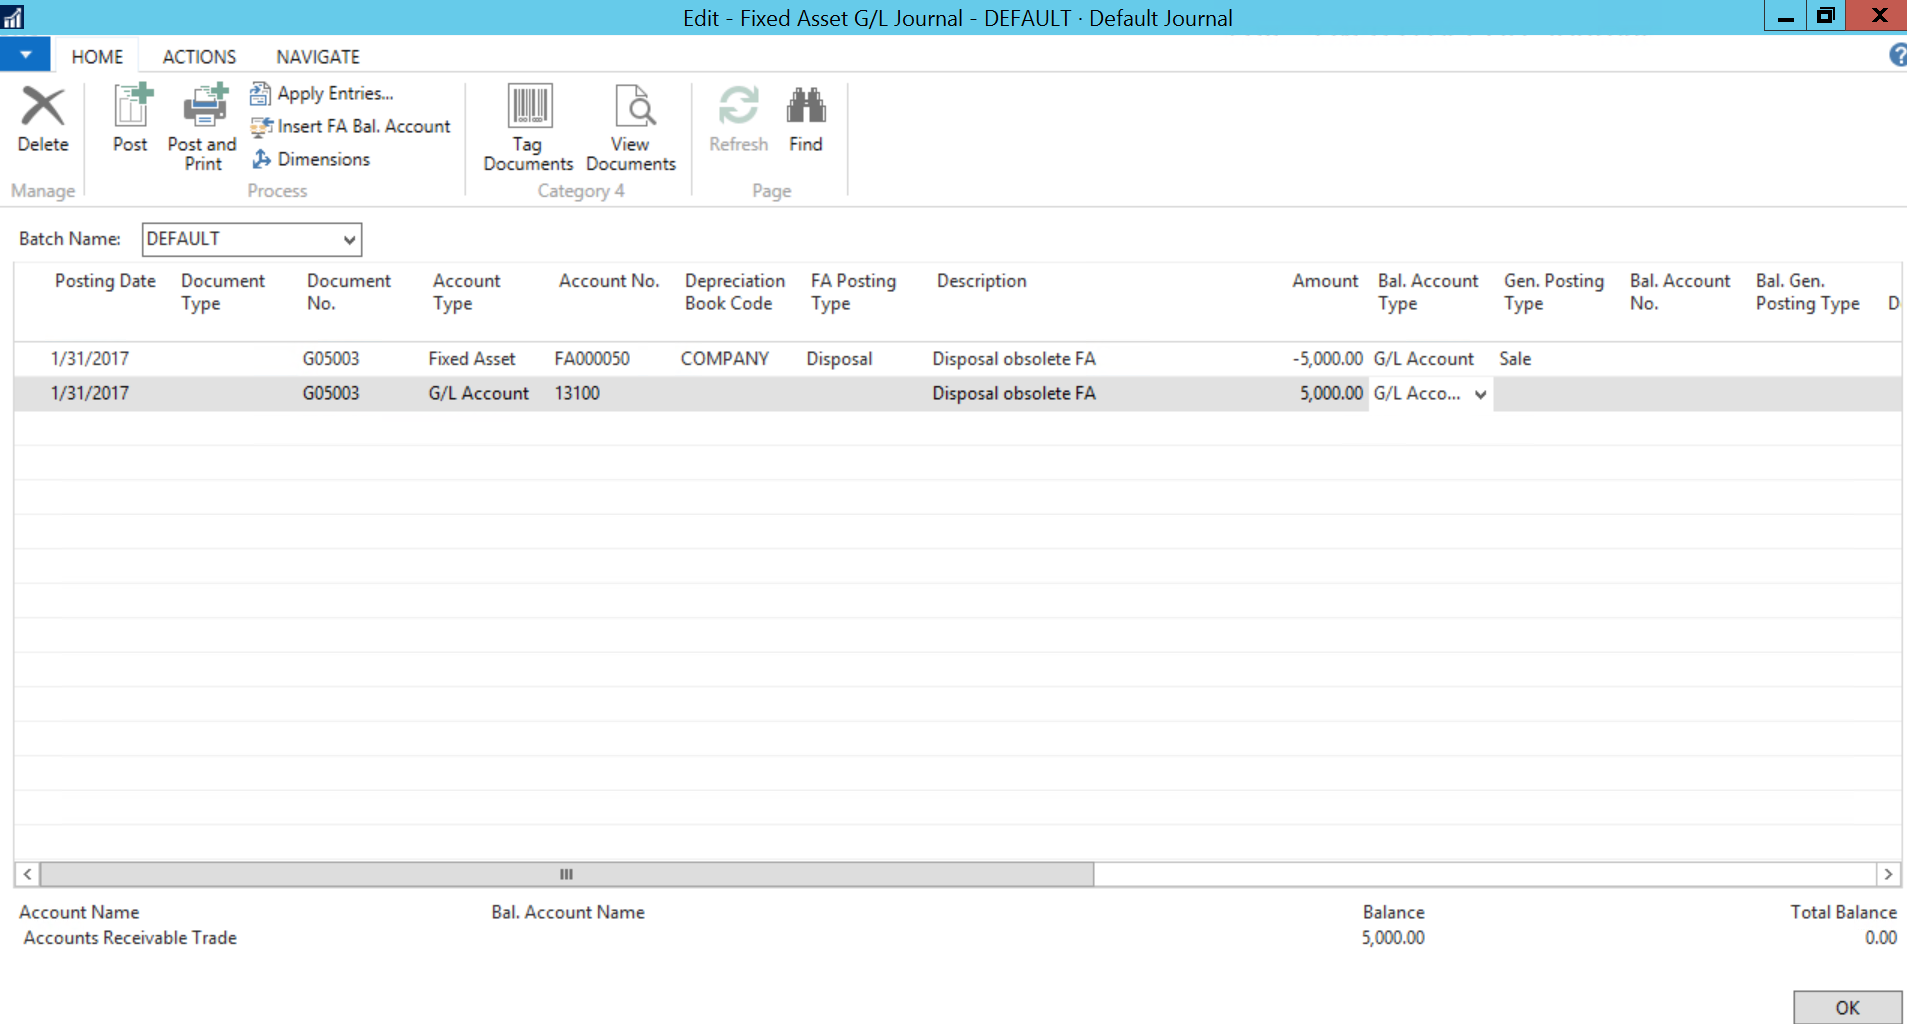
- Complete a line using the following information:
- Account Type – Fixed Assets
- Account No. – Asset Number
- FA Posting Type – Disposal
- Amount – enter the sale value with negative sign (sale value should be greater than 0)
- Bal. Account No. – balance the entry
- From the Ribbon, click Post.
The journal entry is posted.
Viewing the Ledger Entries
To view the ledger entries posted for a disposal:
- From the Financial Management menu, select Fixed Assets > Lists > Fixed Assets.
The Fixed Assets list displays. - Select the asset that has been disposed of.
- From the Ribbon, click the Navigate tab and then click Depreciation Books.
The FA Depreciation Books page displays. - From the Ribbon, click the Navigate tab and then click Ledger Entries.
The FA Ledger Entries page displays. - Select the line with Disposal in the FA Posting Category field, and from the Home Ribbon click Navigate.
The Navigate page displays. - In the Navigate page, click the G/L Entry, and then click Show Related Entries.
The General Ledger Entries page displays.
The disposal transaction has resulted in these entries:
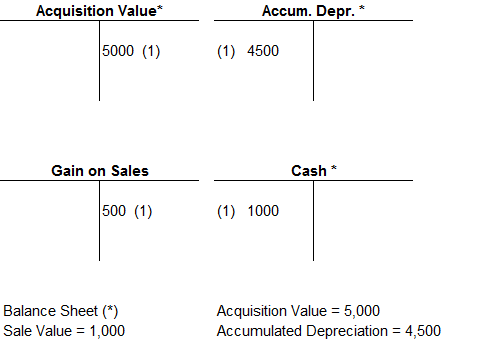
The gain or loss is calculated as follows:
Sales Price – Acquisition Cost + Depreciation
A positive amount is a gain, a negative one is a loss.
NOTE: Account numbers related to disposals are specified on the FA Posting Groups page in the Gains Acc. on Disposal, Acq. Cost Acc.on Disposal and Accum. Depr. Acc. on Disposal fields respectively.
Performing an Asset Write-off
To write-off assets with net book value greater than 0 enter -0.1 in the Amount column and select as a balancing account the account for Loss on Sales of Assets.
- Partial Disposal - If you sell or otherwise dispose of part of a fixed asset, you must split up the asset into two capital assets before you can record the disposal transaction one of them.
- Pooled Assets - Tangible capital assets recorded using the pooled cost approach will have a deemed disposal at the end of their useful life; individual disposals are not generally recorded. If an asset is sold or disposed of before the asset has reached the end of its useful life, the proceeds (if any) are to be recorded as revenue.
Cancelling a Disposal
Before reversing a disposal transaction verify that the action has been allowed:
To cancel a disposal:
- From the Financial Management menu, select Fixed Assets > Setup> Depreciation Books.
The Depreciation Book List displays.
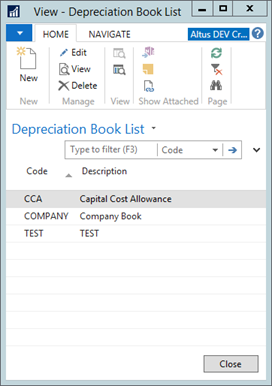
- Select the Depreciation Book with a disposal that you want to cancel and from the Ribbon click Edit.
The Depreciation Book Card displays. - Verify that the Allow Correction at Disposal check box is checked.
- Open the respective Asset Card.
- From the Ribbon, click the Navigate tab and then click Depreciation Books.
The FA Depreciation Books page displays. - From the Ribbon, click the Navigate tab and then click Ledger Entries.
The FA Ledger Entries page displays. - In the FA Posting Category field select the line with Disposal, and then click Navigate.
The Navigate page displays. - On the Navigate page, click the FA Ledger Entry line, and then click Show Related Entries.
The FA Ledger Entries page displays. - From the Ribbon, click the Actions tab and then click Cancel Entries.
The Cancel FA Entries page displays. - Click OK.
- Go to the Financial Management menu, select Fixed Assets > Tasks > FA G/L Journals.
- In the Balance Acc. No. field, enter the account number.
- Click Post to post the journal.
Viewing the Ledger Entries for a Disposal
To view the ledger entries for a disposal:
- Go to the Fixed Assets List.
- Select the asset that has been corrected.
- In the Navigate Ribbon, click Depreciation Books.
The FA Depreciation Books page displays. - From the Navigate Ribbon, click Error Ledger Entries to view the canceled entry.
The cancelation reverses the G/L entries made at the time of the original transaction.
Using the FA Reclassification Journal to Split Fixed Assets
FA reclassification journal is used when one fixed asset needs be split up into several fixed assets, several assets need be combined into one or one asset should be transferred to another asset.
Reclassifying a CIP Asset
The acquisition cost of an asset under construction is to be transferred out to an asset assigned to the appropriate asset class (for example, building) when the construction is substantially complete and the asset is ready for use. The Reclassification % must be 100%.
To create an FA Reclass journal:
- From the Financial Management menu, select Fixed Assets > Tasks > FA Reclass. Journals.
The FA Reclass. Jnl. Template List displays.
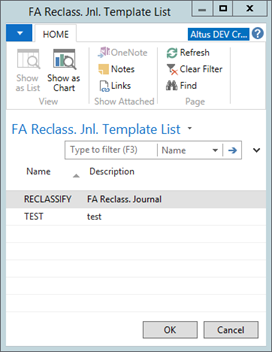
- Select a Journal Template that indicates the current status of the CIP asset (the only exception is disposal).
| Name | Description |
| CIP | CIP to Asset |
| DISPOSAL | Disposal |
| PREA | Pre Acquisition to CIP |
| PREATOASS | Pre Acquisition to Asset |
| PREC | Pre-Construction to CIP |
| PREATOASS | Pre Acquisition to Asset |
| RECLASSIFY | FA Reclass. Journal (used for non CIP Assets) |
- Enter a date in FA Posting Date.
- Click the Drop Down button to select an FA No from which to reclassify. This should be an asset under construction.
- Click the Drop Down button to select a New FA No to which to reclassify. This should be a new asset (a main asset or a component).
- In the Reclassify Acq. Cost % field, enter 100.
- Click to select the Reclassify Acquisition Cost check box.
- If the balancing accounts have been setup in the FA Posting Group Card window, click to select the Insert Bal. Account check box and the balancing account lines will be created automatically.
- From the Ribbon, click Reclassify.
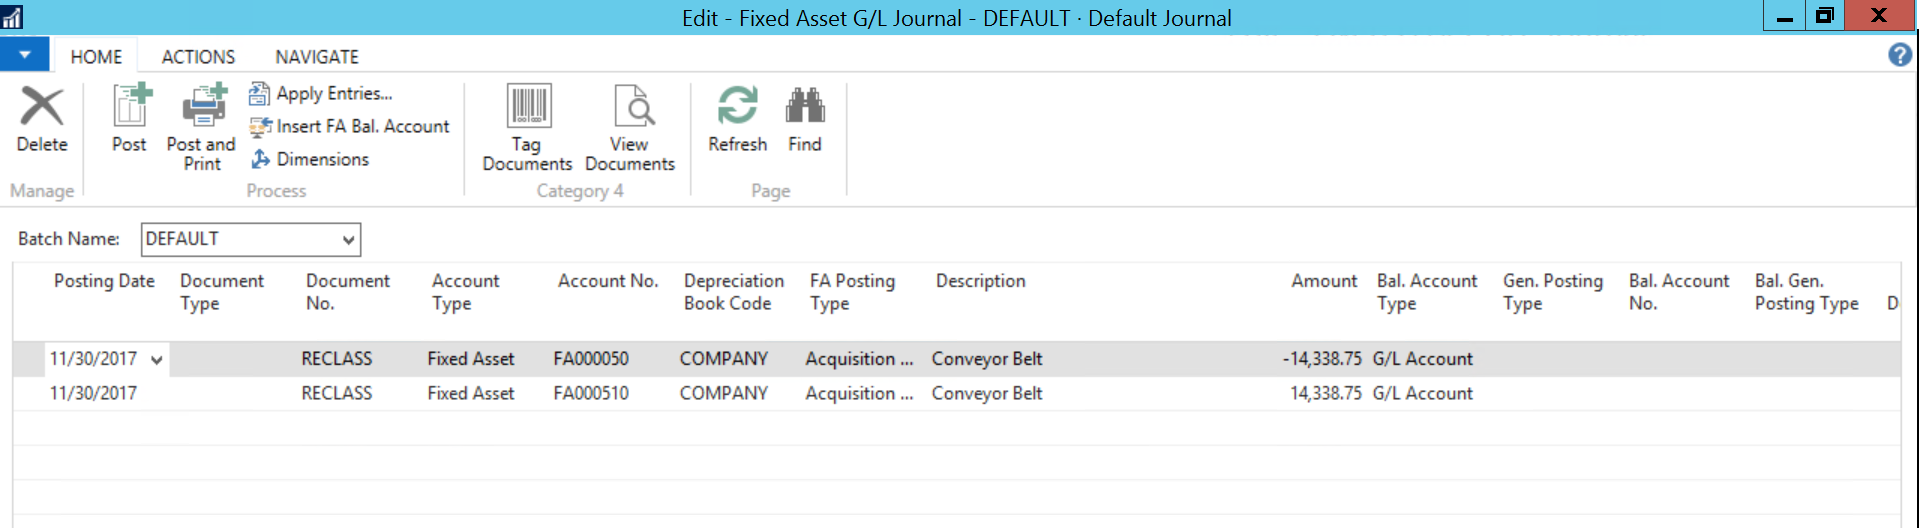
The FA G/L Journal is created. - Go to the Financial Management menu, select Fixed Assets > Tasks > FA G/L Journals to view the entry.
- If the balancing accounts are not set up, enter the balancing accounts before you post the lines.
- Post the journal to transfer the CIP acquisition cost to the new completed asset.
The following T Accounts summarize the entries done by the batch:
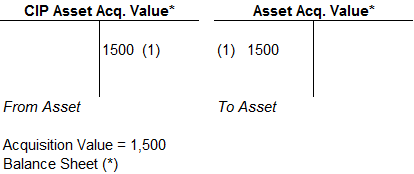
Once the reclassification is completed the new asset can be depreciated as part of the periodic depreciation process.
Transferring Asset Depreciation to Another Asset
The acquisition cost and/or the depreciation of an asset is to be transferred out to another asset.
To create a FA Reclass journal:
- From the Financial Management menu, select Fixed Assets > Tasks > FA Reclass. Journals.
- Select a journal template and click OK.
The template you selected displays. - In FA Posting Date field, enter a date.
- In the FA No. field, click the Drop Down button to select a number from which to reclassify.
- In the New FA No. field, click the Drop Down button to select a the FA number to reclassify. This should be a new asset (a main asset or a component).
- In Reclassify Acq. Cost % field, enter the percentage of the asset to be reclassified.
- Check the Reclassify Acquisition Cost and/or Reclassify Depreciation check boxes.
- If the balancing accounts have been setup in the FA Posting Group Card page, insert a check box in the Insert Bal. Account field to automatically create the balancing account lines.
- Click Reclassify.
The FA G/L Journal is created. - Go to the Financial Management menu, select Fixed Assets > Tasks > FA G/L Journals to view the entry.

- If the balancing accounts are not set up, enter the balancing accounts before you post the lines.
- Post the journal to transfer the CIP acquisition cost to the new completed asset.
The following T Accounts summarize the entries done by the batch for the transfer of the acquisition cost:

Performing the Year End Closing Process
This process applies for assets for which the TCA Expense Posting and Multi-Year TCA Expense options have been selected. Usually these are construction-in-progress assets.
Running the Close Income Statement Batch
Run the Close Income Statement Batch as part of year end closing procedure to close the income statement against the Retained Earnings.
You must run a close income statement batch before you can do a fixed asset budget transfer described next.
To run a close income statement batch:
- From the Financial Management Menu, select Periodic Activities > Fiscal Year > Tasks > Close Income Statement.
The Close Income Statement page displays.
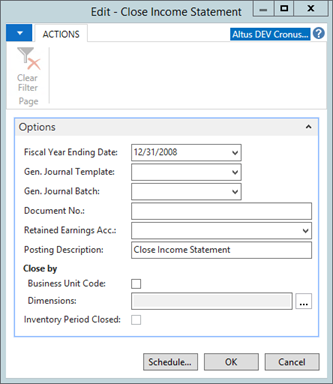
- Fill in the required fields as per your Year End Closing Procedure.
- Click OK.
A list of ‘Close Income Statement’ entries is generated in General Journal (Financial Management > General Ledger > Tasks > General Journals). - Review and change the data as required.
- Post the journal once you are satisfied with the entries.
Using a Fixed Asset Budget Transfer to Create Opening Balances
Fixed Asset Budget Transfer batch is used to create the opening balances for the multi-year budget.
NOTE: This batch should only be executed after the Close Income Statement Batch.
To create the opening balances using the Fixed Asset Budget Transfer batch:
- From the Asset Management menu, select Periodic Activities> Fixed Asset Budget Transfer.
The Fixed Asset Budget Transfer page displays.
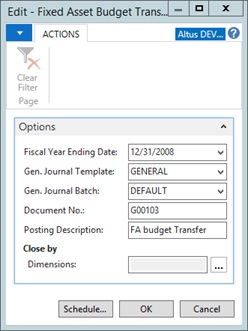
- Fill in the required fields.
- Select the dimensions that you want to close.
- Click OK.
A list of ‘FA Budget Transfer’ entries is generated in General Journal (Financial Management > General Ledger > Tasks > General Journals). - Review and/or change the data as required.
- Post the journal once you are satisfied with the entries.
The entries have a posting date the beginning of the next fiscal year and are broken down by asset and dimension combination.
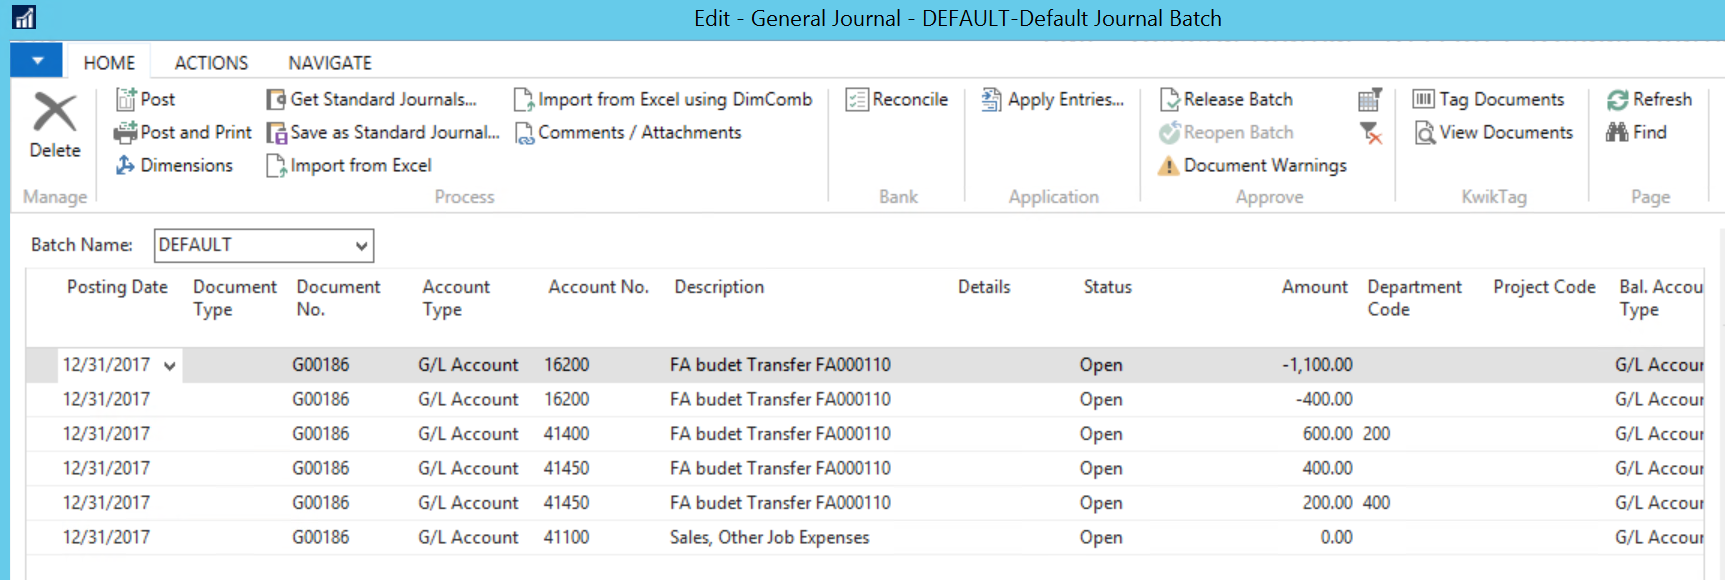
The following T Accounts summarize the entries done by the batch:
NOTE: The system generates an entry that takes the balances of the Expense Account and the Contra account and books them with the same sign as an entry at the beginning of the next fiscal year, thus allowing multi-annual tracking of actuals vs. budget.