

Sparkrock solutions now support a standard check Stub check format for vendor payments. You can select if the check is either preprinted or printed on blank check paper (MICR). There is a specific MICR font required for the printed checks.
The Sparkrock solution does not cover the following check functionality:
- Bilingual text,
- Single, or no signature lines,
- Special characters (in MICR line or elsewhere, for example for USD checks),
- Multi-page checks that use a single check No.
MICR Checks
The supported MICR font for the printed checks is MICR E13B. If you want to use MICR checks you need this font as well as blank check stock.
Pre-printed Checks
The supported vendor for ordering checks is Print & checks Now.
Note: The Vendor address is 4319 54 Ave SE Calgary Alberta T2C 2A2; the vendor website is: www.chequesnow.ca; the vendor email for ordering checks is: orders@printnow.ca.
If you want to use your own print service for generating checks, Sparkrock has samples of pre-printed and blank stock format.
Understanding the MICR Font
All checks used in the U.S. and Canada must be printed using a MICR font (Magnetic Ink Character Recognition). The bottom line on a check must always be printed in the MICR typeface using a special magnetic ink. The MICR encoding line on a check allows check information to be automatically read and easily processed.
This guide contains information for setting up Accounts Payable so organization can produce checks that banking institutions accept. However, each organization printing their own checks is responsible for ensuring it has the approved printer and toner as well and the correct font installed on the work station that will produce the checks.
To Print with the MICR Font:
- Ensure you have selected Regular for the Check Style (for details see Step 6 Posting FastTab this is part of the Bank Account Card Configuration section below),
- Ensure you have font MICR E13B installed on your workstation.
- Ensure you have a laser printer that prints Magnetic fonts.
Note: Printing MICR is relatively difficult. The MICR line needs to be printed accurately to better than 1 part in 1,000. Your magnetic toner must stay on the paper under adverse conditions and have a specific signal strength. The Canadian CPA 006 standard specifies the Canadian requirements. These are details that each organization is responsible for ensuring their printer and toner adheres to. - Ensure you have the magnetic toner for printing magnetic fronts. The image below provides a summary of all the symbols used by MICR. This will help users understand why they are selecting numbers and letters in Step 13 of the Bank Account Card Configuration section below.
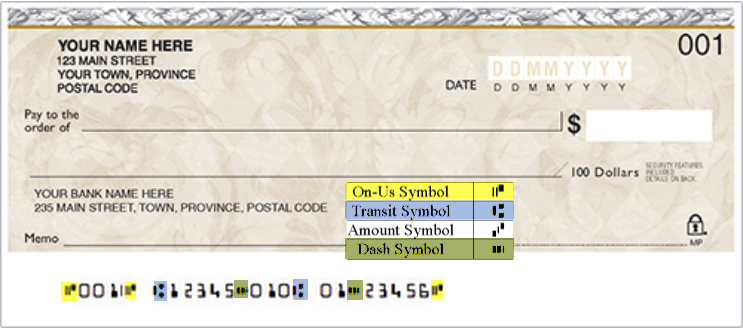
Note: Transit Symbol is mapped to letter A; Amount symbol is mapped to letter B; On-us symbol is mapped to letter C; Dash symbol is mapped to letter D; all number symbols are mapped to their respective number.
Bank Account Card Configuration
Make the majority of the configuration updates for standard check stub / check format on the respective Bank Account Card.
To Update the Bank Account Card for the standard check Stub and check format:
- Navigate to the respective Bank Accounts Card.
- From the General FastTab, select the appropriate county code from the County/Region Code drop-down list.
- From the Posting FastTab, specify the number of the last check used in the Last Check No. field.
- Select your preferred date format from the Check Date Format drop-down list.
Note: This information is no longer retrieved from the Vendor Card. - You can select a Check Date Separator from the drop-down or leave the Check Date Separator field blank.
- Select Regular or Preprinted from the Check Style field.
Note: When Regular is selected, you must also:- Complete the MICR configuration on the Transfer fast-tab.
- Add a checkmark to the Print Company Logo checkbox.
- (Optionally) In the Signature 1 field, import the signature of the first signing authority by right-clicking the image space and selecting Choose Picture.
- (If applicable) In the Signature 1 Max Amount field, enter the maximum amount for the first signing authority.
- (Optionally) In the Signature 2 field, import the signature of the second signing authority.
- (If applicable), enter maximum amount for the second signing authority in the Signature 2 Max Amount field.
- Expand the Transfer FastTab.
- If you have selected Regular for the Check Style in the Posting FastTab (step 6 above), Add a check mark in the Print MICR Encoding field.
Note: When testing and the MICR font is not installed, the value from field MICR Sample will print on the check. - In the MICR Printing Control group, fill in the 16 fields in the as per the requirements of your bank / check. The MICR Printing Control group refers to the fields starting with MICR Sample and ending at Divider 8.
Note:The following are sample instructions. Users will need to look at their check and see how the info should be ordered, then order it in the same way through the configuration. Certain symbols on the check correspond to specific letters.- The MICR sample field is read only. Value will be displayed as you populate the remaining MICR fields.
- Divider 1: before check number select code C.
- Format 1: From the drop-down select Check No., The system continue from last check number you imputed in posting tab.
- Divider 2: After the end of check number enter code C.
- Spacing 1: Between the check number and transit number, value 1.
- Divider 3: Before transit number, select code A.
- Format 2: Select Transit No. from the drop-down. This is a combination of institution & branch numbers from Transfer Tab, these two separate fields are concatenated and separated by the dash symbol ('-' = D)(Nav Transit field=branch).
- Divider 4: at the end of transit number, enter code D.
- Spacing 2: Enter a value between transit number and account number (blank in the screen shot example).
- Divider 5: before Bank Institution number, (blank in example).
- Format 3: Select Bank Insitution No., from the drop-down (from the Transfer FastTab).
- Divider 6: following Bank Institution number, code A.
- Spacing 3: Between Bank Institution number and Bank Account number, enter value 4.
- Divider 7: Before Bank Account number, (blank in example).
- Format 4: Select Bank Account No., from the drop-down (from Transfer FastTab).
- Divider 8: After Bank Account number enter code C.
- If you selected Regular for the Check Style in step 6:
- Provide a value for the Transit No. field.
- Provide a value for the Bank Institution No. field.
- Provide a value for the Bank Account No. field.
- Populate the Bank Account No. (MICR) field. When this field is populated it is displayed on the check in the bank account section on the MICR line.
Note: The third decimal number has been removed from the amount. - Add a checkmark to the Print MICR Encoding check box.
Company Information
You can import a separate logo to Check Logo on Company Information that can be used on the printed checks to display the logo and the company information. If the check is preprinted the company address, bank address and check no. should be part of the check stock.
To set up a different logo that will appear on the company checks:
- Navigate to Company Information.
- From the General FastTab, import the logo for the check in the check Logo field. To import the logo, right click in the check Logo field and then click on Select Picture.
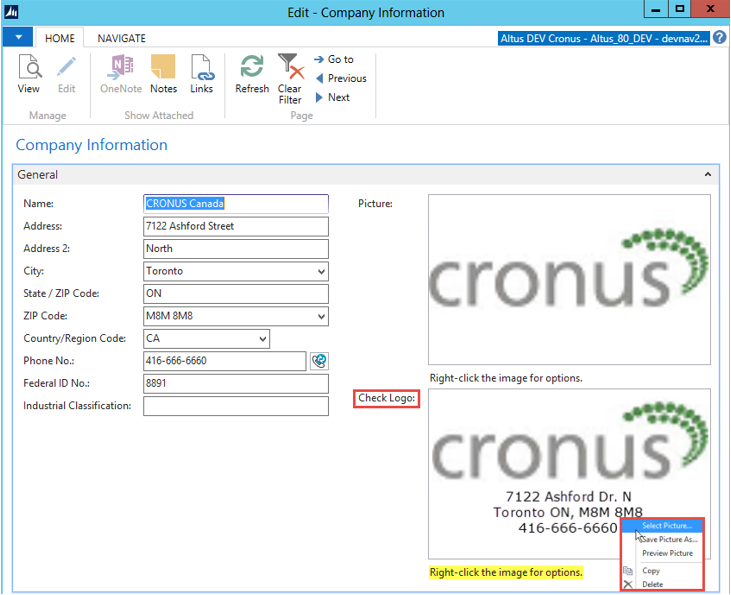
- In the Payments FastTab, select the appropriate Canada Country/Region Code from the adjacent drop-down.
Specifying a Currency Symbol
Users must ensure the currency symbol is specified on the currencies table so the correct currency symbol will be used for printing checks.
To specify the currency symbol:
- In the Search field, type Currencies and select the Currencies table from the drop-down list.
- Select the currency that you want to add a symbol to, and from the Ribbon click Edit.
The Currency Card displays. - Expand the Reporting FastTab.
- In the Symbol field, enter the appropriate currency symbol.
- Click OK.
Report Selection - Bank Account
You must specify the default check report to be used by the system. To make the standard check report the default:
- In the Search field, type Report Selection - Bank Acc. and then select the object from the drop-down list.
The Report Selection - Bank Acc. page displays.
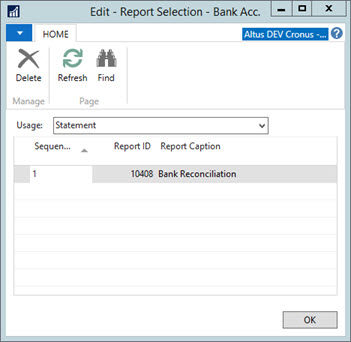
- From the Usage drop-down list, select Check.
- From the table, choose 2320139 Altus Standard Check (Stub/Check/Stub).
- Click OK.